E4568 Eee PC User Manual Windows® XP Edition Eee PC 1008HA 15G06Q132000
Table of Contents About This User’s Manual ......................................................................................................iv Notes for This Manual .............................................................................................................iv Safety Precautions.....................................................................................................................v Chapter 1: Knowing the Parts Top Side ....................................................
Super Hybrid Engine Modes...............................................................................3-6 Eee Docking ............................................................................................................................3-7 Eee Arena...................................................................................................................3-7 Eee Sharing ...............................................................................................................
About This User’s Manual You are reading the Eee PC User’s Manual. This User’s Manual provides information regarding the various components in the Eee PC and how to use them. The following are major sections of this User’s Manual: 1. Knowing the Parts Provides information on the Eee PC’s components. 2. Getting Started Provides information on getting started with the Eee PC. 3. Using the Eee PC Provides information on using the Eee PC’s utilities. 4.
Safety Precautions The following safety precautions will increase the life of the Eee PC. Follow all precautions and instructions. Except as described in this manual, refer all servicing to qualified personnel. Do not use damaged power cords, accessories, or other peripherals. Do not use strong solvents such as thinners, benzene, or other chemicals on or near the surface. Disconnect the AC power before cleaning.
SAFE TEMP: This Eee PC should only be used in environments with ambient temperatures between 5°C (41°F) and 35°C (95°F) INPUT RATING: Refer to the rating label on the bottom of the Eee PC and be sure that your power adapter complies with the rating. DO NOT throw the Eee PC in municipal waste. This product has been designed to enable proper reuse of parts and recycling.
Charging Your Batteries If you intend to use battery power, be sure to fully charge your battery pack before going on long trips. Remember that the power adapter charges the battery pack as long as it is plugged into the computer and an AC power source. Be aware that it takes much longer to charge the battery pack when the Eee PC is in use. Remember to fully charge the battery (8 hours or more) before first use and whenever it is depleted to prolong battery life.
viii Table of Contents
Top Side Bottom Side Right Side Left Side Rear Side Keyboard Usage Touchpad Usage 1 Knowing the Parts
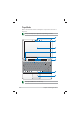
Top Side Refer to the illustration below to identify the components on this side of the Eee PC. The top side may vary in appearance depending on model. 1 2 3 4 5 6 ESC ~ F1 F2 F3 F4 F5 F6 ! @ # $ % 1 2 3 4 5 Q Tab W E F7 F8 F9 F10 & 6 R T ( 7 8 7 Y U S Z Shift D X F C G V H B N F12 Pause Break Prt Sc SysRq ) 9 8 Num LK Delete Scr LK = O 5 Insert Backspace 0 9 I 4 A Caps Lock F11 P { [ 6 J K L : 1 2 3 ; M < > 0 , . Enter ? .
1 Built-in Camera 2 Array Microphone (Built-in) The built-in array microphone is more clear and echo-free compared with traditional single microphones. 3 Display Panel 4 Instant keys Wireless key Wireless Models Only: Toggles the internal wireless LAN ON or OFF. Toggles the touchpad ON/OFF. 5 Status Indicators Power Indicator The power indicator lights when the Notebook PC is turned ON and blinks slowly when the Notebook PC is in the Suspend-to-RAM (Sleep) mode.
Powered OFF With Adapter High battery power Green ON (95%–100%) Medium battery power Orange ON (11%–94%) Low battery power Orange Blinking (0%–10%) Without Adapter Off Off Off Hard Disk Drive (HDD) Indicator The hard disk drive indicator blinks when data is written to or read from the disk drive. Wireless/Bluetooth Indicator This is only applicable on models with built-in wireless LAN/Bluetooth. When the built-in wireless LAN/Bluetooth is enabled, this indicator lights.
Bottom Side Refer to the illustration below to identify the components on this side of the Eee PC. The bottom side may vary in appearance depending on model. 1 2 3 The bottom of the Eee PC can get very hot. Be careful when handling the Eee PC while it is in operation or recently been in operation. High temperatures are normal during charging or operation. DO NOT use on soft surfaces such as beds or sofas, which may block the vents.
3 Audio Speaker System The built-in stereo speaker system allows you to hear audio without additional attachments. The multimedia sound system features an integrated digital audio controller that produces rich, vibrant sound (results improved with external stereo headphones or speakers). Audio features are software controlled. Right Side Refer to the illustration below to identify the components on this side of the Eee PC. 1 2 3 4 5 1 Memory Card Slot 2 USB Port (2.0/1.
Left Side Refer to the illustration below to identify the components on this side of the Eee PC. 1 1 2 3 4 Power (DC) Input The supplied power adapter converts AC power to DC power for use with this jack. Power supplied through this jack supplies power to the Eee PC and charges the internal battery pack. To prevent damage to the Eee PC and battery pack, always use the supplied power adapter. CAUTION: MAY BECOME WARM TO HOT WHEN IN USE. BE SURE NOT TO COVER THE ADAPTER AND KEEP IT AWAY FROM YOUR BODY.
Rear Side Refer to the illustration below to identify the components on this side of the Eee PC. 1 2 3 1 Battery Charge Indicator The battery charge indicator (LED) shows the status of the battery’s power. Refer to the LED status table on pages 1-3 to 1-4. 2 Power Indicator The power indicator lights when the Eee PC is turned ON and blinks slowly when the Eee PC is in the Save-to-RAM (Suspend) mode. This indicator is OFF when the Eee PC is turned OFF.
Keyboard Usage Special Function Keys The following defines the colored hot keys on the Eee PC’s keyboard. The colored commands can only be accessed by first pressing and holding the function key while pressing a key with a colored command. Some function icons appear in the Notification area after activation. The Hot Key locations on the function keys may vary depending on model but the functions should remain the same. Follow the icons whenever your hot key locations do not match the manual.
Task Manager Icon (F9): Initiates the Task Manager to view the application process or terminates applications. Crossed Speaker Icon (F10): Mutes the speaker. Volume Down Icon (F11): Decreases speaker volume. Volume Up Icon (F12): Increases the speaker volume. Super (Fn+Space Bar): Toggles among various power saving modes. The selected mode is shown on the display. Num Lk (Insert): Toggles the numeric keypad (number lock) ON and OFF. Allows use of a larger portion of the keyboard for number entering.
Touchpad Usage Multi-finger gesture input Finger gesture Two-finger zooming in/out Applications Impress, Adobe reader, Photomanager Two-finger zooming in/out - Moving two fingertips apart or together on the touchpad to zoom in or zoom out. This is convenient when viewing photos or reading documents.
1-12 Chapter 1: Knowing the Parts
Powering on your Eee PC First-time Startup Desktop ASUS Eee PC Tray Utility Network Connection 2 Getting Started
Powering on your Eee PC These are only quick instructions for using your Eee PC. 1. 2. Connect the AC power adapter Turn ON the Eee PC 2 3 110 V-220V 1 Damage may occur if you use a different adapter to power the Eee PC. You may damage both your battery pack and the Eee PC with a faulty AC-DC adapter.
First-time Startup For the first time you start your Eee PC, the Windows wizard will launch automatically and lead you through setting up your preferences and some basic information. Follow the wizard instructions to finish the initialization: 1. The Welcome message 2. Select you system settings by appears. Click Next to specifying the region you are continue. in, the language you use and the keyboard type you use. Click Next to continue. 3. Select the time zone you are in and click Next to continue.
5. Click Help protect my PC by turning on Automatic Updates now to get the latest important updates and click Next to continue. 6. Type your computer’s name in the Computer name box and click Next to continue. 7. Follow the onscreen instructions to register with Microsoft and finish the initialization. Desktop The are several shortcuts on the desktop. Double-click them to launch the corresponding applications and enter the specified folders.
ASUS EeePC Tray Utility The preloaded ASUS EeePC Tray utility allows you to turn off some devices to minimize the power consumption and helps you adjust the display resolution easily. Enabling and Disabling Devices To disable or enable devices in the Notification 1. Right-click the ASUS EeePC Tray Utility icon area and the utility shows the available options: Disable WLAN: Turns on and off the wireless LAN connection. Disable Blue Tooth: Turns on and off the Bluetooth connection.
Adjusting the display resolution Click the ASUS EeePC Tray Utility icon in the Notification area to adjust the display resolution. Select the resolution based on your needs. The CRT-related options are unavailable when there is no connected external monitors. When you select LCD 1024 x 768, move the pointer to scroll up and down the screen. You need not scroll up and down the screen when you select LCD Compress Mode.
Network Connection Configuring a wireless network connection 1. Double-click the crossed wireless network icon Notification area. in the If the wireless connection icon does not show in the Notification area. Activate the wireless LAN function by pressing + ( + ) before configuring a wireless network connection. 2. Select the wireless access point you want to connect to from the list and click Connect to build the connection.
Local Area Network To establish a wired network, follow the instructions below: Using a dynamic IP: 2-8 1. Right-click the network icon with a yellow warning triangle on the Windows® taskbar and select Open Network Connections. 2. Right-click Local Area Connection and select Properties. 3. Click Internet Protocol (TCP/IP) and click Properties. 4. Click Obtain an IP address automatically and click OK.
5. Click Create a new connection to start the New Connection Wizard. 6. Click Next. 7. Select Connect to the Internet and click Next. 8. Select Set up my connection manually. 9. Select your connection type and click Next. 10. Enter your ISP Name and click Next.
2-10 11. Enter your User name and Password. Click Next. 13. Enter your user name and password. Click Connect to connect to the Internet. 12 Click Finish to finish the configuration.
Using a static IP: 1. 2 3. 4. 5. Repeat the step 1–3 of Using a dynamic IP to start the static IP network configuration. Click Use the following IP address. Enter the IP address, Subnet mask and Gateway from your service provider. If needed, enter the preferred DNS Server address and alternative address. After entering all the related values, click OK to build the network connection. Contact your Internet Service Provider (ISP) if you have problems connecting to the network.
2-12 Chapter 2: Getting Started
ASUS Update Bluetooth Connection Super Hybrid Engine Eee Docking Microsoft® Office Trial 3 Using the Eee PC
ASUS Update The ASUS Update is a utility that allows you to manage, save, and update the Eee PC BIOS in Windows® environment. The ASUS Update utility allows you to: • Save the current BIOS file • Download the latest BIOS file from the Internet • Update the BIOS from an updated BIOS file • Update the BIOS directly from the Internet, and • View the BIOS version information. This utility is pre-loaded in your Eee PC and is also available in the support DVD that comes with the Eee PC package.
3. 4. 5. Select the ASUS FTP site nearest you to avoid network traffic, or click Auto Select. Click Next. From the FTP site, select the desired BIOS version and click Next. Follow the screen instructions to complete the update process. The ASUS Update utility is capable of updating itself through the Internet. Always update the utility to avail all its features. Updating the BIOS through a BIOS file To update the BIOS through a BIOS file: 1. 2. 3. 4.
Bluetooth Connection This device contains FCC ID: TLZ-BT253 and IC ID:6100A-AWBT253. Bluetooth technology eliminates the need for cables for connecting Bluetooth-enabled devices. Examples of Bluetooth-enabled devices may be Notebook PCs, Desktop PCs, mobile phones, and PDAs. To connect to a Bluetooth-enabled device: 1. Press + repeatedly until Bluetooth ON or WLAN & Bluetooth ON is shown. 2. Click My Bluetooth Places on the desktop and follow the onscreen instructions to finish initialization.
7. Select a Bluetooth-enabled device from the list and click Next. 8. Enter the Bluetooth security code and start pairing. 9. After the paired relationship is built, select the service you are interested in from the list and click Next to continue. 10. A message appears to show that the selected shortcuts have been created on the My Bluetooth Places screen of Windows Explorer. Click Ok to continue. 11. Click Skip to set up connection 11. later and continue.
Super Hybrid Engine Super Hybrid Engine offers different power modes. The assigned instant key toggles power savings between various power saving modes. The power saving modes control many aspects of your Eee PC to maximize performance versus battery time. The selected mode is shown on the display. To change the power mode • Click Start > All Programs > ASUS > SuperHybridEngine > SuperHybridEngine. • Press Instant Key 3 repeatedly to switch power modes.
Eee Docking Eee Docking contain multiple useful funcitons. The Eee Docking tool bar is at the top of the desktop. Eee Arena Eee Sharing Eee Xperience Eee Tools Click here to open the Eee Docking Eee Arena Eee Arena Eee Arena allows you to enjoy online entertainment contents including Radio, Live TV and Games, etc. The Eee Arena service contents differ for each territory. Game Park Game Park includes multiple interesting games.
Eee Sharing Data Sync Data Sync allows you to easily synchronize the data on your Eee PC with another PC (station PC) at home or in the office under the same network segment. EzMessenger EzMessenger allows you to chat and share files with another Eee PC user under the same network segment. Eee Storage Eee PC users can enjoy free online space. With Internet connection, you can access and share any files whenever you want and wherever you are.
Eee Tools Live Update Keeps your Eee PC up-to-date by checking the online updates. Parental Control Allows you to restrict access to important resources for privacy protection. Font Resizer Font Resizer allows you to adjust the font/text size on your Eee PC screen. Easy Mode Easy Mode categorizes multiple commonly used functions into Favorite, Internet, Work, Learn, Play, and Setting, helping you find the functions easier and quicker.
Microsoft® Office Trial Eee PC users can enjoy Microsoft Office Suite free trial for 60 days. Do the following instructions to start the free trial. 1. 2. Ensure that your Eee PC is connected to the Internet and doubleclick Microsoft Office 60 Day Trial - Online on the desktop. Click TRY NOW. 3. Enter your E-mail address and click SUBMIT. 4. Copy your product key and click the link. 5.
Support DVD information System Recovery Boot Booster 4 Support DVD & System Recovery
Support DVD information The support DVD that comes with the Eee PC package contains the drivers, software applications, and utilities that you can install to avail all the features. Running the support DVD Insert the support DVD in the external optical drive. The DVD automatically displays the Drivers menu if Autorun is enabled in your computer.
Drivers menu The Drivers menu shows available device drivers when the system detects installed devices. Install the necessary drivers to activate the devices. Utilities menu The Utilities menu shows the applications that the Eee PC supports. Contact Click the Contact tab to display the ASUS contact information. Other information The icons on the top right corner of the screen provide additional information on the Eee PC and the contents of the support DVD.
System Recovery Using the Support DVD The Support DVD includes an image of the operating system, installed on your system at the factory. The Support DVD provides a comprehensive recovery solution that quickly restores your system to its original working state, provided that your system drive is in good working order. Before using the Support DVD, copy your data files to a USB storage device or to a network drive and make note of any customized configuration settings (such as network settings). 1. 2.
You will lose all your data during the system recovery. Ensure to back up your important data before recovering your system. 6. After the system recovery is completed, eject the the Support DVD from the optical drive and click OK to restart the Eee PC. Using Recovery Partition About the Recovery Partition The Recovery Partition is a space reserved on your hard disk drive used to restore the operating system, drivers, and utilities installed on your Eee PC at the factory. Using the Recovery Partition: 1.
Boot Booster The Boot Booster item in BIOS setup helps shorten your Eee PC bootup time. However, you MUST disable this BIOS item before you change any Eee PC components or perform system recovery (from USB flash disk, external optical drive or hidden partition). Follow the instructions below to disable Boot Booster: 1. 2. Start the system and press on bootup to show the POST screen. Press again to enter the BIOS setup.
Declarations and Safety Statements Copyright Information Limitation of Liability Service and Support A Appendix
Declarations and Safety Statements Federal Communications Commission Statement This device complies with FCC Rules Part 15. Operation is subject to the following two conditions: • This device may not cause harmful interference, and • This device must accept any interference received, including interference that may cause undesired operation.
(Reprinted from the Code of Federal Regulations #47, part 15.193, 1993. Washington DC: Office of the Federal Register, National Archives and Records Administration, U.S. Government Printing Office.) FCC Radio Frequency (RF) Exposure Caution Statement Any changes or modifications not expressly approved by the party responsible for compliance could void the user’s authority to operate this equipment. “The manufacture declares that this device is limited to Channels 1 through 11 in the 2.
CE Mark Warning This is a Class B product, in a domestic environment, this product may cause radio interference, in which case the user may be required to take adequate measures. IC Radiation Exposure Statement for Canada This equipment complies with IC radiation exposure limits set forth for an uncontrolled environment. To maintain compliance with IC RF exposure compliance requirements, please avoid direct contact to the transmitting antenna during transmitting.
Wireless Operation Channel for Different Domains N. America 2.412-2.462 GHz Ch01 through CH11 Japan 2.412-2.484 GHz Ch01 through Ch14 Europe ETSI 2.412-2.472 GHz Ch01 through Ch13 France Restricted Wireless Frequency Bands Some areas of France have a restricted frequency band. The worst case maximum authorized power indoors are: • 10mW for the entire 2.4 GHz band (2400 MHz–2483.5 MHz) • 100mW for frequencies between 2446.5 MHz and 2483.
68 Haut Rhin 70 Haute Saône 71 Saône et Loire 75 Paris 82 Tarn et Garonne 84 Vaucluse 88 Vosges 89 Yonne 90 Territoire de Belfort 94 Val de Marne This requirement is likely to change over time, allowing you to use your wireless LAN card in more areas within France. Please check with ART for the latest information (www.art-telecom.fr) Your WLAN Card transmits less than 100mW, but more than 10mW.
Required for UL 1642 covering primary (nonrechargeable) and secondary (rechargeable) lithium batteries for use as power sources in products. These batteries contain metallic lithium, or a lithium alloy, or a lithium ion, and may consist of a single electrochemical cell or two or more cells connected in series, parallel, or both, that convert chemical energy into electrical energy by an irreversible or reversible chemical reaction. • Do not dispose the Eee PC battery pack in a fire, as they may explode.
Nordic Lithium Cautions (for lithium-ion batteries) CAUTION! Danger of explosion if battery is incorrectly replaced. Replace only with the same or equivalent type recommended by the manufacturer. Dispose of used batteries according to the manufacturer’s instructions. (English) ATTENZIONE! Rischio di esplosione della batteria se sostituita in modo errato. Sostituire la batteria con un una di tipo uguale o equivalente consigliata dalla fabbrica. Non disperdere le batterie nell’ambiente.
ATTENTION! Il y a danger d’explosion s’il y a remplacement incorrect de la batterie. Remplacer uniquement avec une batterie du mêre type ou d’un type équivalent recommandé par le constructeur. Mettre au rebut les batteries usagées conformément aux instructions du fabricant. (French) ADVARSEL! Eksplosjonsfare ved feilaktig skifte av batteri. Benytt samme batteritype eller en tilsvarende type anbefalt av apparatfabrikanten. Brukte batterier kasseres i henhold til fabrikantens instruksjoner.
Copyright Information No part of this manual, including the products and software described in it, may be reproduced, transmitted, transcribed, stored in a retrieval system, or translated into any language in any form or by any means, except documentation kept by the purchaser for backup purposes, without the express written permission of ASUSTeK COMPUTER INC. (“ASUS”).
Limitation of Liability Circumstances may arise where because of a default on ASUS’ part or other liability, you are entitled to recover damages from ASUS.
A-12 Appendix