Eee PC Hardware Manual Eee PC 901 Series May 2008
Table of Contents Chapter 1: Introducing the Eee PC About This User’s Manual ............................................................................ 1-2 Notes for This Manual ................................................................................... 1-2 Safety Precautions ......................................................................................... 1-3 Transportation Precautions ...................................................................... 1-4 Charging Your Batteries....
Appendix Trademark Statements .................................................................................A-2 Qualified Vendor List .....................................................................................A-3 Declarations and Safety Statements .................................................... A-10 Federal Communications Commission Statement........................ A-10 FCC Radio Frequency (RF) Exposure Caution Statement ............
iv Table of Contents
About This User’s Manual Notes for This Manual Safety Precautions Preparing Your Eee PC 1 Introducing the Eee PC
About This User’s Manual You are reading the Eee PC User’s Manual. This User’s Manual provides information regarding the various components in the Eee PC and how to use them. The following are major sections of this User’s Manual: 1. Introducing the Eee PC Introduces the Eee PC and this User’s Manual. 2. Knowing the Parts Provides information on the Eee PC’s components. 3. Getting Started Provides information on getting started with the Eee PC. 4.
Safety Precautions The following safety precautions will increase the life of the Eee PC. Follow all precautions and instructions. Except as described in this manual, refer all servicing to qualified personnel. Do not use damaged power cords, accessories, or other peripherals. Do not use strong solvents such as thinners, benzene, or other chemicals on or near the surface. Disconnect the AC power and remove the battery pack(s) before cleaning.
Transportation Precautions To prepare the Eee PC for transport, you should close the display panel to protect the keyboard and display panel. The Eee PC’s surface is easily dulled if not properly cared for. Be careful not to rub or scrape surfaces when transporting your Eee PC. You can put your Eee PC in a carrying case for protection from dirt, water, shock, and scratches.
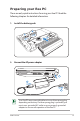
Preparing your Eee PC These are only quick instructions for using your Eee PC. Read the following chapters for detailed information. 1. Install the battery pack 3 1 2 2. Connect the AC power adapter Your Eee PC may come with either a two or three-prong plug depending on territory. If a three-prong plug is provided, you must use a grounded AC outlet or use a properly grounded adapter to ensure safe operation of the Eee PC.
3. Open the display panel 4. Turn ON the Eee PC 1.
Top Side Bottom Side Right Side Left Side Rear Side 2 Knowing the Parts
Top Side Refer to the illustration below to identify the components on this side of the Eee PC. 1 2 3 4 5 6 7 8 The keyboard differs for each territory.
1 Built-in Camera The built-in camera allows picture taking or video recording. 2 Display Panel The display panel functions the same as a desktop monitor. The Eee PC uses an active matrix TFT LCD, which provides excellent viewing like that of desktop monitors. Unlike desktop monitors, the LCD panel does not produce any radiation or flickering, so it is easier on the eyes. Use a soft cloth without chemical liquids (use plain water if necessary) to clean the display panel.
User-defined Key This key is reserved for customized definition. The default definition is for launching Skype. Only models with built-in wireless LAN and Bluetooth supoort the user-defined key for Skype. 5 Power Switch The power switch allows powering ON and OFF the Eee PC and recovering from STR. Press the switch once to turn ON and hold it to turn OFF the Eee PC. The power switch only works when the display panel is opened.
8 Status Indicators (front) Power Indicator The power indicator lights when the Eee PC is turned ON and blinks slowly when the Eee PC is in the Save-toRAM (Suspend) mode. This indicator is OFF when the Eee PC is turned OFF. Battery Charge Indicator The battery charge indicator (LED) shows the status of the battery’s power as follows: ON: The Eee PC’s battery is charging when AC power is connected. OFF: The Eee PC’s battery is charged or completely drained.
Bottom Side Refer to the illustration below to identify the components on this side of the Eee PC. The bottom side may vary in appearance depending on model. 1 2 2 3 1 4 5 5 The bottom of the Eee PC can get very hot. Be careful when handling the Eee PC while it is in operation or recently been in operation. High temperatures are normal during charging or operation. DO NOT use on soft surfaces such as beds or sofas ,which may block the vents.
2 Battery Pack The battery pack is automatically charged when connected to an AC power source and maintains power to the Eee PC when AC power is not connected. This allows use when moving temporarily between locations. Battery time varies by usage and by the specifications for this Eee PC. The battery pack cannot be disassembled and must be purchased as a single unit. 3 Battery Lock - Manual The manual battery lock is used to keep the battery pack secured.
Right Side Refer to the illustration below to identify the components on this side of the Eee PC. 1 1 2 3 4 Memory Card Slot The built-in memory card reader can read MMC/SD cards from devices such as digital cameras, MP3 players, mobile phones, and PDAs. 2 2.0 USB Port (2.0/1.1) The USB (Universal Serial Bus) port is compatible with USB 2.0 or USB 1.1 devices such as keyboards, pointing devices, cameras, and storage devices, connected in a series up to 12Mbits/sec (USB 1.1) and 480Mbits/sec (USB 2.
4 Power (DC) Input The supplied power adapter converts AC power to DC power for use with this jack. Power supplied through this jack supplies power to the Eee PC and charges the internal battery pack. To prevent damage to the Eee PC and battery pack, always use the supplied power adapter. CAUTION: MAY BECOME WARM TO HOT WHEN IN USE. BE SURE NOT TO COVER THE ADAPTER AND KEEP IT AWAY FROM YOUR BODY.
Left Side Refer to the illustration below to identify the components on this side of the Eee PC. 1 1 2 3 4 5 Kensington® Lock Port The Kensington® lock port allows the Eee PC to be secured using Kensington® compatible security products. These security products usually include a metal cable and lock that prevent the Eee PC to be removed from a fixed object. 2 3 LAN Port The eight-pin RJ-45 LAN port (10/100M bit) supports a standard Ethernet cable for connection to a local network.
5 Headphone Output Jack The 1/8” stereo headphone jack (3.55mm) connects the Eee PC’s audio out signal to amplified speakers or headphones. Using this jack automatically disables the built-in speakers. Rear Side Refer to the illustration below to identify the components on this side of the Eee PC. 1 1 Battery Pack The battery pack is automatically charged when connected to an AC power source and maintains power to the Eee PC when AC power is not connected.
2-12 Chapter 2: Knowing the Parts
Power System Touchpad Usage Keyboard Usage First Run Wizard Operating Mode Shutdown 3 Getting Started
Power System Using AC Power The Eee PC power comprises two parts, the power adapter and the battery power system. The power adapter converts AC power from a wall outlet to the DC power required by the Eee PC. Your Eee PC comes with a universal AC-DC adapter for connection to any 100V-120V as well as 220V-240V outlets without setting switches or using power converters. Different countries may require an adapter to connect the provided USstandard AC power cord to a different standard.
Damage may occur if you use a different adapter to power the Eee PC or use the Eee PC’s adapter to power other electrical devices. If there is smoke, burning scent, or extreme heat coming from the AC-DC adapter, seek servicing. Seek servicing if you suspect a faulty AC-DC adapter. You may damage both your battery pack(s) and the Eee PC with a faulty AC-DC adapter. Using Battery Power The Eee PC is designed to work with a removable battery pack.
Battery Care The Eee PC’s battery pack, like all rechargeable batteries, has a limit on the number times it can be recharged. The battery pack’s useful life will depend on your environment temperature, humidity, and how your Eee PC is used. It is ideal that the battery be used in a temperature range between 5˚C and 35˚C (41˚F and 95˚F). You must also take into account that the Eee PC’s internal temperature is higher than the outside temperature.
Super Hybrid Engine Super Hybrid Engine offers different power modes. The assigned instant key toggles power savings between various power saving modes. The power saving modes control many aspects of your Eee PC to maximize performance versus battery time. The selected mode is shown on the display. Applying or removing the power adapter will automatically add Auto High Performance and Auto Power-Saving mode.
Touchpad Usage Single-finger gesture input Clicking/Tapping - With the pointer over an item, press the left button or use your fingertip to touch the touchpad lightly, keeping your finger on the touchpad until the item is selected. The selected item will change color. The following 2 illustrations produce the same results. Double-clicking/Double-tapping - This is a common skill for launching a program directly from the corresponding icon you select.
Dragging - Dragging means to pick up an item and place it anywhere on the screen you wish. You can move the pointer over the item you select, and while keeping the left button depressed, moving the pointer to the desired location, then release the button. Or, you can simply double-tap on the item and hold while dragging the item with your fingertip. The following illustrations produce the same results.
Keyboard Usage Special Function Keys The following defines the colored hot keys on the Eee PC’s keyboard. The colored commands can only be accessed by first pressing and holding the function key while pressing a key with a colored command. Some function icons appear in the Notification area after activation. The Hot Key locations on the function keys may vary depending on model but the functions should remain the same. Follow the icons whenever your hot key locations do not match the manual.
Task Manager Icon (F6): Initiates the Task Manager to view the application process or terminates applications. Crossed Speaker Icon (F7): Mutes the speaker. Speaker Down Icon (F8): Decreases speaker volume. Speaker Up Icon (F9): Increases the speaker volume. Num Lk (F11): Toggles the numeric keypad (number lock) ON and OFF. Allows use of a larger portion of the keyboard for number entering. Scr Lk (F12): Toggles the “Scroll Lock” ON and OFF.
House icon: Returns to the main menu. Menu with pointer icon : Activates the properties menu and is equivalent to right-clicking the touchpad/mouse on an object.
First Run Wizard For the first time you start your Eee PC, the First Run Wizard will launch automatically and lead you through setting up your preferences and some basic information. Follow the wizard instructions to finish the initiation. 1. Toggle I agree with this license and click Next to continue. 2. Select your keyboard type and click Next to continue. 3. Enter your User Name. Click Next to continue.
4. Enter your Password and enter again to confirm the password. Click Next to continue. Click the box before Log me in automatically when system starts up if you want to log in without entering your password. Doing so will allow people to access your computer without permission. Keep your password in mind! You have to pass the password check every time you start up your Eee PC if you select not to login automatically.
Operating Mode The system is designed with an operating mode that is functionoriented and clearly divides functions into six categories, Internet, Work, Learn, Play, Settings, Favorites. The lucid desktop categorization is convenient for first-time users to operate this Eee PC and enables sophisticated users to more easily locate and initiate applications.
3-14 Chapter 3: Getting Started
Trademark Statements Qualified Vendor List Declarations and Safety Statements GNU General Public License Copyright Information Limitation of Liability Service and Support A Appendix
Trademark Statements Google Talk service and its logos are trademarks of Google Inc.. GroupWise service and its logos are trademarks of Novell Inc.. MSN service and its logos are trademarks of Microsoft Corporation. QQ service and its logos are trademarks of Tencent Inc.. Yahoo! service and its logos are trademarks of Yahoo! Inc.. All other services and logos are either trademarks or registered trademarks of their respective owners.
Qualified Vendor List The Linux-based Eee PC may not support all PC peripherals. Visit our ASUS website for the latest qualified vendor list before you purchase peripherals for your Eee PC. Analog TV Tuner Cards Type Model USB2.0 Leadtek WinFast PalmTop TV Upmost Mobile TV 3 Bluetooth Adapter Devices Type Model USB 1.1 Billionton GUBTCR41A-BT Easy RU5AWBC5U Dial-Up Modem Devices Type Model USB 1.1 Galileo DU-560M Digital Home Devices Type Model USB 1.
Display Devices Type Model D-Sub EIZO HD2441W Hannsg GF191 Hannsg HG281D Hannsg HW216 LG L245WP LG L1930B Philips 150P2 Philips 170B5 Philips 190B6 Philips 32PF7320 Samsung 740NW Samsung 225MS Samsung 940B Sony KDL-26S2020 Tatung V22ECBF ViewSonic P227F ViewSonic VA1716W ViewSonic VX2235WM ViewSonic VX2435WM ViewSonic VX2835WM ViewSonic VX912 ViewSonic N3206W Projector Hitachi CP-X253 Jector PT-XA2 Premier LX-2200 Premier PD-X730 Toshiba TDP-T90 Earphone Devices Type Model Earphone AKG K601 Audio-techia ATH
Flash Memory Card Reader/Writer Type Model USB 2.0 Apacer Card Reader AR020 Apacer Card Reader AP450 Digimaster USB-25IN1 I Rock-All In One Kingston Card Reader FCR-MLFE Philips Powersync CR220W Sanwa ADR-MLT17 TRANSCEND Multi Card Reader M2 Floppy Devices Type Model USB 1.1 Mitsumi D353FUE Sony MPF82E HandWriter Devices Type Model USB 1.1 PenPower Touch Pad PD8UE Joystick & Game Pad Devices Type Model USB 1.
Mouse Devices Type Model USB 1.1 Acrox MT5 Genius GM-03003 INX IM7301 INX IM7501 INX IM7701 Logitech G9 Laser Logitech LX-7 Cordless Logitech MX1000Laser Logitech M-RBH113 Logitech M-UAE96 Logitech VAG96B Logitech V200 Cordless Logitech M-BZ96C RaZer Copperhead RZ01 Microsoft Comfort Optical Mouse 3000 Microsoft Wireless Optical Desktop Microsoft Comfort Optical Mouse ODD CD/DVD-ROM / CD-RW / Combo / DVD+-RW Devices Type Model USB 2.
Smart Card Type SD Smart Card Type SD MMC SDHC Model SanDisk UltraII 2GB Transcend TS512MUSD Transcend TS2GSDC Transcend TS4GSD150 Kingston SD 512M Model Kingston Mini SD/2GB Kingston SD/2GB Apacer SD/60x/1G Apacer SD/60x/2G Kingston Mini SD 4GB Kingmax 64MB MMC Transcend TS128MRMMC Transcend TS1GRMMC4 Transcend TS512MMCM Transcend TS2GMMC4 Transcend TS4GMMC4 PQI mobile/1GB Kingston SD/1GBFE A-DATA SDHC 4GB A-DATA SDHC 8GB Kingston SDHC 4GB PNY SDHC 4GB PQI SDHC 4GB SanDisk SDHC 4GB SanDisk ultraII SDHC
USB Flash Disk Type Model USB 2.0 Adata MyFlash Adata PD10 Apacer HA202 2G Flash Apacer AH221 Apacer AH320 ASUS Ai-FLASH V Kingston DTR PQI U172P PQI U230 Sandisk SDCZ6 TRANSCEND JetFlash V10 Transcend JetFlash V20 Transcend JF168 USB HUB Devices Type Model USB 2.
Wireless Ethernet Adapters Type Model USB 2.0 ASUS WL-167G PCi GW-US300MiniW 3G WLAN Adapter Type Model USB ASUS T500 Amoi H01 HUAWEI E220 PAH A91 100 BaseTx Ethernet Adapters Type Model USB 2.
Declarations and Safety Statements Federal Communications Commission Statement This device complies with FCC Rules Part 15. Operation is subject to the following two conditions: • • This device may not cause harmful interference, and This device must accept any interference received, including interference that may cause undesired operation.
(Reprinted from the Code of Federal Regulations #47, part 15.193, 1993. Washington DC: Office of the Federal Register, National Archives and Records Administration, U.S. Government Printing Office.) FCC Radio Frequency (RF) Exposure Caution Statement Any changes or modifications not expressly approved by the party responsible for compliance could void the user’s authority to operate this equipment. “The manufacture declares that this device is limited to Channels 1 through 11 in the 2.
Declaration of Conformity (R&TTE directive 1999/5/EC) The following items were completed and are considered relevant and sufficient: • • • • • • • • Essential requirements as in [Article 3] Protection requirements for health and safety as in [Article 3.1a] Testing for electric safety according to [EN 60950] Protection requirements for electromagnetic compatibility in [Article 3.
Wireless Operation Channel for Different Domains N. America 2.412-2.462 GHz Ch01 through CH11 Japan 2.412-2.484 GHz Ch01 through Ch14 Europe ETSI 2.412-2.472 GHz Ch01 through Ch13 France Restricted Wireless Frequency Bands Some areas of France have a restricted frequency band. The worst case maximum authorized power indoors are: • • 10mW for the entire 2.4 GHz band (2400 MHz–2483.5 MHz) 100mW for frequencies between 2446.5 MHz and 2483.
60 64 68 71 82 89 94 Oise 61 Orne Pyrénées Atlantique 66 Haut Rhin 70 Saône et Loire 75 Tarn et Garonne 84 Yonne 90 Val de Marne 63 Puy du Dôme Pyrénées 67 Bas Rhin Haute Saône Paris Vaucluse 88 Vosges Territoire de Belfort This requirement is likely to change over time, allowing you to use your wireless LAN card in more areas within France. Please check with ART for the latest information (www.art-telecom.fr) Your WLAN Card transmits less than 100mW, but more than 10mW.
UL Safety Notices Required for UL 1459 covering telecommunications (telephone) equipment intended to be electrically connected to a telecommunication network that has an operating voltage to ground that does not exceed 200V peak, 300V peak-to-peak, and 105V rms, and installed or used in accordance with the National Electrical Code (NFPA 70).
Power Safety Requirement Products with electrical current ratings up to 6A and weighing more than 3Kg must use approved power cords greater than or equal to: H05VV-F, 3G, 0.75mm2 or H05VV-F, 2G, 0.75mm2. This symbol of the crossed out wheeled bin indicates that the product (electrical, electronic equipment, and mercurycontaining button cell battery) should not be placed in municipal waste. Check local regulations for disposal of electronic products.
Nordic Lithium Cautions (for lithium-ion batteries) CAUTION! Danger of explosion if battery is incorrectly replaced. Replace only with the same or equivalent type recommended by the manufacturer. Dispose of used batteries according to the manufacturer’s instructions. (English) ATTENZIONE! Rischio di esplosione della batteria se sostituita in modo errato. Sostituire la batteria con un una di tipo uguale o equivalente consigliata dalla fabbrica. Non disperdere le batterie nell’ambiente.
GNU General Public License Licensing Information This product includes copyrighted third-party software licensed under the terms of the GNU General Public License. See The GNU General Public License for the exact terms and conditions of this license.
GNU GENERAL PUBLIC LICENSE Version 2, June 1991 Copyright (C) 1989, 1991 Free Software Foundation, Inc., 51 Franklin Street, Fifth Floor, Boston, MA 02110-1301 USA Everyone is permitted to copy and distribute verbatim copies of this license document, but changing it is not allowed. Preamble The licenses for most software are designed to take away your freedom to share and change it.
We protect your rights with two steps: (1) copyright the software, and (2) offer you this license which gives you legal permission to copy, distribute and/or modify the software. Also, for each author's protection and ours, we want to make certain that everyone understands that there is no warranty for this free software.
1. You may copy and distribute verbatim copies of the Program's source code as you receive it, in any medium, provided that you conspicuously and appropriately publish on each copy an appropriate copyright notice and disclaimer of warranty; keep intact all the notices that refer to this License and to the absence of any warranty; and give any other recipients of the Program a copy of this License along with the Program.
These requirements apply to the modified work as a whole. If identifiable sections of that work are not derived from the Program, and can be reasonably considered independent and separate works in themselves, then this License, and its terms, do not apply to those sections when you distribute them as separate works.
c) Accompany it with the information you received as to the offer to distribute corresponding source code. (This alternative is allowed only for noncommercial distribution and only if you received the program in object code or executable form with such an offer, in accord with Subsection b above.) The source code for a work means the preferred form of the work for making modifications to it.
6. Each time you redistribute the Program (or any work based on the Program), the recipient automatically receives a license from the original licensor to copy, distribute or modify the Program subject to these terms and conditions. You may not impose any further restrictions on the recipients' exercise of the rights granted herein. You are not responsible for enforcing compliance by third parties to this License. 7.
This section is intended to make thoroughly clear what is believed to be a consequence of the rest of this License. 8. If the distribution and/or use of the Program is restricted in certain countries either by patents or by copyrighted interfaces, the original copyright holder who places the Program under this License may add an explicit geographical distribution limitation excluding those countries, so that distribution is permitted only in or among countries not thus excluded.
NO WARRANTY 11. BECAUSE THE PROGRAM IS LICENSED FREE OF CHARGE, THERE IS NO WARRANTY FOR THE PROGRAM, TO THE EXTENT PERMITTED BY APPLICABLE LAW. EXCEPT WHEN OTHERWISE STATED IN WRITING THE COPYRIGHT HOLDERS AND/OR OTHER PARTIES PROVIDE THE PROGRAM "AS IS" WITHOUT WARRANTY OF ANY KIND, EITHER EXPRESSED OR IMPLIED, INCLUDING, BUT NOT LIMITED TO, THE IMPLIED WARRANTIES OF MERCHANTABILITY AND FITNESS FOR A PARTICULAR PURPOSE. THE ENTIRE RISK AS TO THE QUALITY AND PERFORMANCE OF THE PROGRAM IS WITH YOU.
END OF TERMS AND CONDITIONS How to Apply These Terms to Your New Programs If you develop a new program, and you want it to be of the greatest possible use to the public, the best way to achieve this is to make it free software which everyone can redistribute and change under these terms. To do so, attach the following notices to the program.
The hypothetical commands `show w' and `show c' should show the appropriate parts of the General Public License. Of course, the commands you use may be called something other than `show w' and `show c'; they could even be mouse-clicks or menu items-whatever suits your program. You should also get your employer (if you work as a programmer) or your school, if any, to sign a "copyright disclaimer" for the program, if necessary. Here is a sample; alter the names: Yoyodyne, Inc.
Copyright Information No part of this manual, including the products and software described in it, may be reproduced, transmitted, transcribed, stored in a retrieval system, or translated into any language in any form or by any means, except documentation kept by the purchaser for backup purposes, without the express written permission of ASUSTeK COMPUTER INC. (“ASUS”).
Limitation of Liability Circumstances may arise where because of a default on ASUS’ part or other liability, you are entitled to recover damages from ASUS.
A-32 Appendix