Introduction 第 1 頁,共 224 頁 Introduction Thank you very much for selecting the Bluetooth Utility. This Help facility will show you how to use the Bluetooth Utility for configuring Bluetooth devices and how it can be used in other convenient ways. We hope that the Help facility will enable you to be able to make full use of the Bluetooth Utility.
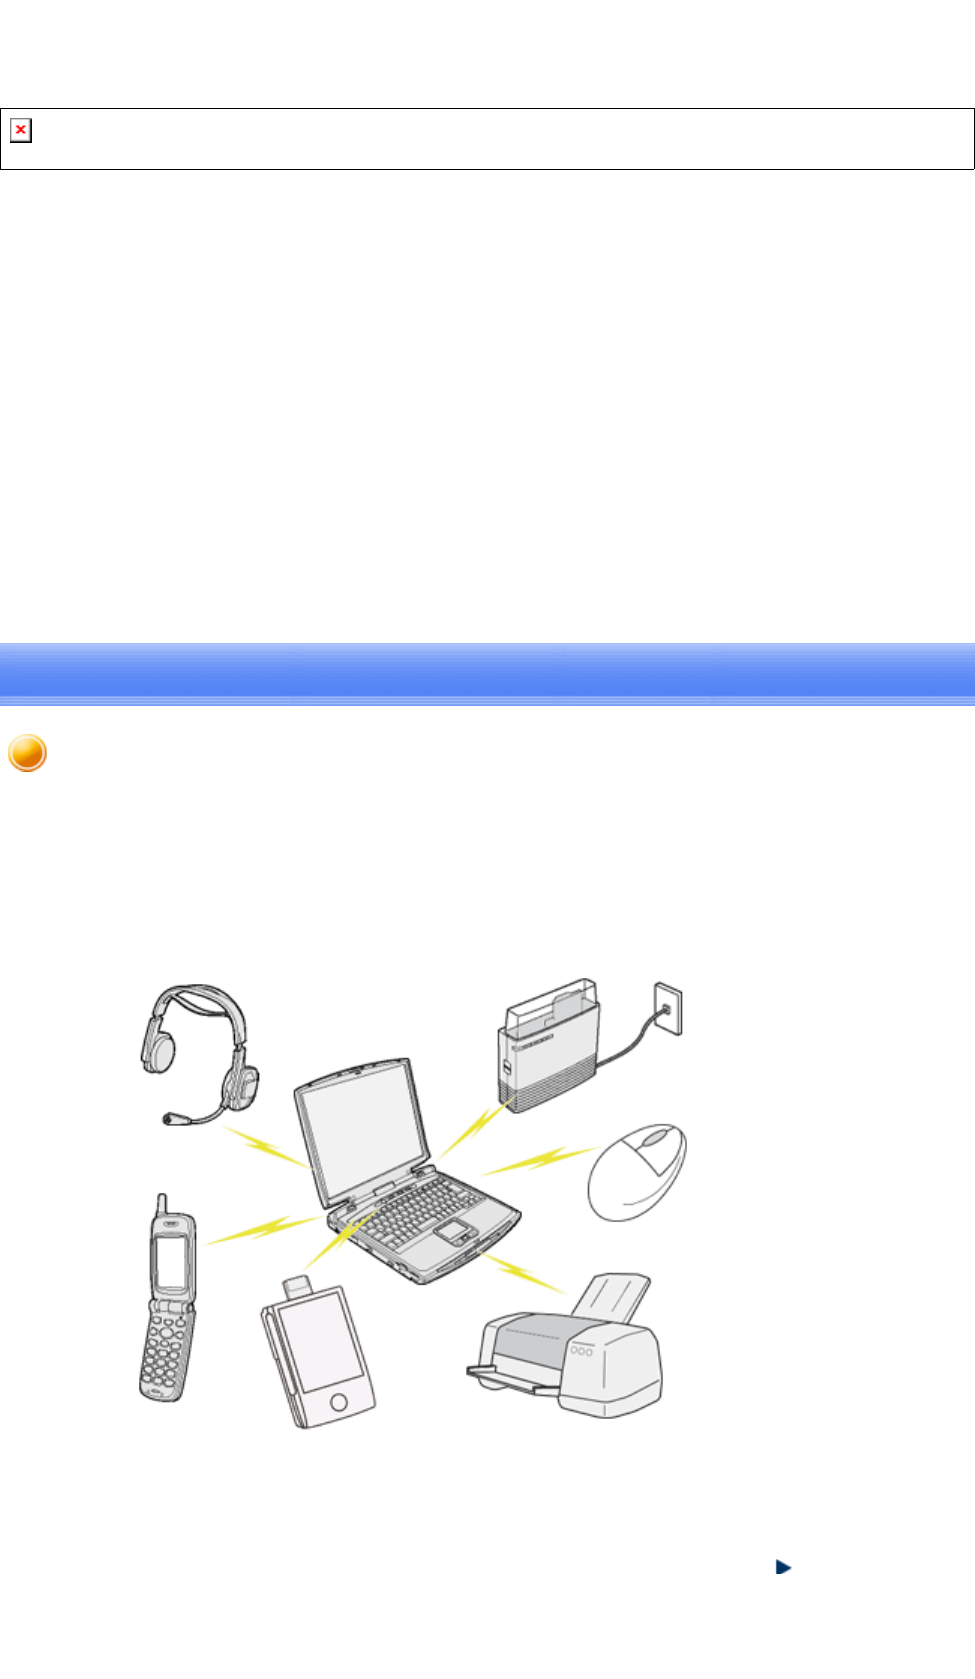
Introduction 第 2 頁,共 224 頁 Next What you need to know about using Bluetooth Bluetooth exchanges data using radio waves. The following points are critical in order to configure and use Bluetooth devices correctly.
NOTE: THE MANUFACTURER IS NOT RESPONSIBLE FOR ANY RADIO OR TV INTERERENCE CAUSED BY UNAUTHORIZED MODIEICATIONS TO THIS EQUIP-MENT.SUCH MODIFICATIONS COULD VOID THE USER AUTHORITY TO OPERATE THE EQUIPMENT.
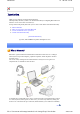
Introduction 第 3 頁,共 224 頁 The devices must be in a connectable state The Bluetooth devices must recognize each other in order to be connectable for use. In certain devices, simply turning on the power will not produce a connectable state. Moreover, the energy-saving feature may come into effect after a certain amount of time, which will prevent the devices from being detected. Please refer to the specific product instruction manual for further details.
Introduction 第 4 頁,共 224 頁 However, no dialogue will occur if they do not share a common language. In the above example, the traveller and his/her counterpart correspond to the devices, the languages to the profiles, and the dialogues between the two people to the services.
Introduction 第 5 頁,共 224 頁 Allows connections to wireless mice, keyboards and other input devices. HCRP Hardcopy Cable Replacement Profile Enables printing with a printer driver. FTP File Transfer Profile Enables you to browse folders on a wireless device and transfer files to and from the local device. OPP Object Push Profile Allows business card data to be exchanged with a wireless device.
Introduction 第 6 頁,共 224 頁 This program enables you to easily configure settings when you connect to a Bluetooth device for the first time. The function of a configured and registered device is displayed on the main window as a connection icon. As a rule, the Bluetooth device will be connected automatically after having been set up; however, a shortcut can be created for a manual connection, if so required.
Introduction 第 7 頁,共 224 頁 Related topics →"Exchanging files with PCs and PDAs" →"Sending images to mobile telephones" →"Sending images to PCs or PDAs" →"Exchanging business card data with PCs and PDAs" Remote Camera Connecting to a Bluetooth-compatible digital camera allows the device to be operated from the PC side, and captured images to be sent to the PC.
Introduction 第 8 頁,共 224 頁 ↓ Related topics →"Manually creating a virtual Bluetooth COM port" Wireless File Transfer You can send a file wirelessly to another device by right-clicking on the intended file and using the "Sending to Bluetooth Device" menu that appears. file://C:\Documents and Settings\anitachou\Local Settings\Temp\~hh114B.
Introduction 第 9 頁,共 224 頁 Related topics →"Exchanging files with PCs and PDAs" Using the Bluetooth Utility Actual examples of how to establish a connection to a Bluetooth device using the Bluetooth Utility are described in this section. Descriptions of more convenient methods and detailed information on the Bluetooth Utility functions are also provided.
Introduction 第 10 頁,共 224 頁 Flow of operation The procedure below is used to set up Bluetooth devices using the Bluetooth Utility. Note z It is assumed that the set-up is performed from the [Bluetooth Settings] window. : Enter Bluetooth passkey (PIN code), if required by the device. : During these stages of the set-up process, the Bluetooth device must be set to Connectability mode. * Simply turning the power on will activate Connectability mode in certain devices.
Introduction 第 11 頁,共 224 頁 Basic settings Methods for registering new devices using the Bluetooth Utility shall now be described. A Bluetooth mouse shall be connected and set up using [Bluetooth Settings] as an example. [Bluetooth Settings] provides two set-up methods: "Express Mode" and "Custom Mode." z Express Mode [Bluetooth Settings] will automatically detect and register services.
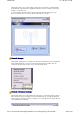
Introduction 第 12 頁,共 224 頁 The [Bluetooth Settings] window below will appear when other devices have already been registered. Please click the [New Connection] button to open the [Add New Connection Wizard] window. If no devices have been registered yet, please proceed directly to "Detecting Bluetooth Devices." (continued in "Detecting Bluetooth Devices"...) Next Detecting Bluetooth devices Procedure (...continued from previous step) file://C:\Documents and Settings\anitachou\Local Settings\Temp\~hh
Introduction 第 13 頁,共 224 頁 ( p p) The [Add New Connection Wizard (Welcome to the Add New Connection Wizard)] window will appear. 1. Switch the mouse power ON to make it connectable via Bluetooth. Please refer to the mouse instruction manual for details on this procedure. 2. Confirm that [Express Mode] has been selected in the [Add New Connection Wizard (Welcome to the Add New Connection Wizard)] window, and click on the [Next] button. Searching for Bluetooth devices will start.
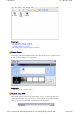
Introduction 第 14 頁,共 224 頁 Note { If no device is found, please confirm that the device has been made connectable via Bluetooth, and click on the [Update] button. A further device search will be performed. (→ continued in [Detecting Services]...) Next Detecting services Procedure (...continued from previous step) When the mouse has been detected, the name and address of the device will appear in the [Add New Connection Wizard (Select Device)] window. 1.
Introduction 第 15 頁,共 224 頁 Bluetooth device detection will commence. Note { If several services (profiles) are supported by the device, the service that has been set to the highest priority shall be automatically selected and set up in Express Mode. Please use Custom Mode if you wish to select desired services manually. When a service has been detected, a window prompting you to enter the Bluetooth passkey (PIN code) may appear. Please enter the passkey and click on the [OK] button.
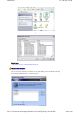
Introduction 第 16 頁,共 224 頁 passed, the connection process will be cancelled for security reasons. Please perform the passkey entry process again. A message will appear prompting you to prepare the device for connection. 2. Click on the [OK] button Note { When the settings information has been registered, a window prompting you to enter your Bluetooth passkey (PIN code) may appear. Please enter your passkey and click on the [OK] button.
Introduction 第 17 頁,共 224 頁 Note { If you wish to change the icon, please click on the [Change Icon] button and select your preferred icon from the list that appears. (→ continued in [Registering Settings Information]...) Next Registering settings information Procedure (...continued from previous step) The [Add New Connection Wizard (Completing the Add New Connection Wizard)] window will appear. 1. Click on the [Finish] button file://C:\Documents and Settings\anitachou\Local Settings\Temp\~hh114B.
Introduction 第 18 頁,共 224 頁 The [Bluetooth Settings] window will appear. The icons of the registered devices will appear, and the devices will be ready to use. Note z The connection icons and icon names can be changed. Changing a connection icon name Changing a connection icon Custom Mode Set up file://C:\Documents and Settings\anitachou\Local Settings\Temp\~hh114B.
Introduction 第 19 頁,共 224 頁 Custom Mode Set-up The procedure for setting up the device using Custom Mode shall now be described. Starting Bluetooth Settings Procedure 1. Click [Start]→[All Programs]→[Bluetooth]→[Bluetooth Settings]. (Under Windows 2000, click [Start]→[Programs]→[Bluetooth]→[Bluetooth Settings].) Note { The same result can be achieved by right-clicking on the Bluetooth icon in the task tray and selecting [Bluetooth Settings] from the menu that appears.
Introduction 第 20 頁,共 224 頁 window. If no devices have been registered yet, please proceed directly to Detecting Bluetooth Devices". (continued in "Detecting Bluetooth Devices"...) Next Detecting Bluetooth devices Procedure (...continued from previous step) The [Add New Connection Wizard (Welcome to the Add New Connection Wizard)] window will appear. 1. Switch the mouse power ON to make it connectable via Bluetooth. Please refer to the mouse instruction manual for details on this procedure. 2.
Introduction 第 21 頁,共 224 頁 When the mouse has been detected, the name and address of the device will appear in the [Add New Connection Wizard (Select Device)] window. Note { If no device is found, please confirm that the device has been made connectable via Bluetooth, and click on the [Update] button. A further device search will be performed. (→ continued in [Detecting Services]...) Next file://C:\Documents and Settings\anitachou\Local Settings\Temp\~hh114B.
Introduction 第 22 頁,共 224 頁 Detecting services Procedure (...continued from previous step) When the mouse has been detected, the name and address of the device will appear in the [Add New Connection Wizard (Select Device)] window. 1. Select the mouse device name from [Device List] and click on the [Next] button Bluetooth device detection will commence. file://C:\Documents and Settings\anitachou\Local Settings\Temp\~hh114B.
Introduction 第 23 頁,共 224 頁 Note { When a service has been detected, a window prompting you to enter the Bluetooth passkey (PIN code) may appear. Please enter the passkey and click on the [OK] button. Please refer to your device instruction manual for information on which passkey to use. { If you have not entered your Bluetooth passkey after a certain amount of time has passed, the connection process will be cancelled for security reasons. Please perform the passkey entry process again.
Introduction 第 24 頁,共 224 頁 Note { When a device supports several services If the device supports several services, you can use Custom Mode to manually select the services (profiles) you wish to use from the list that appears under [Select Services]. Example: List of wireless modem station services If Express Mode is used to perform the set-up, the highest-priority service in the device will be automatically selected and configured. 3. Click on the [OK] button.
Introduction 第 25 頁,共 224 頁 4. Select the type and name of the icon to be displayed once the device has been registered, and click on the [Next] button. Note { If you wish to change the icon, please click on the [Change Icon] button and select your preferred icon from the list that appears. (→ continued in [Registering Settings Information]...) Next file://C:\Documents and Settings\anitachou\Local Settings\Temp\~hh114B.
Introduction 第 26 頁,共 224 頁 Registering settings information Procedure (...continued from previous step) The [Add New Connection Wizard (Completing the Add New Connection Wizard)] window will appear. 1. Click on the [Finish] button The [Bluetooth Settings] window will appear. The icons of the registered devices will appear, and the devices will be ready to use. file://C:\Documents and Settings\anitachou\Local Settings\Temp\~hh114B.
Introduction 第 27 頁,共 224 頁 Note { The connection icons and icon names can be changed. Changing a connection icon name Changing a connection icon Connecting to the Internet using a modem station [DUN] You can use a Bluetooth wireless modem to connect to the Internet via a telephone line. →Setting up the modem station →Connecting to the Internet Important z z z In order to connect to the Internet, you must have already signed up with a provider and obtained a connection ID and password.
Introduction 第 28 頁,共 224 頁 Note { Alternatively, click [Start]→[All Programs]→[Bluetooth]→[Bluetooth Settings], and then click on [New Connection] from the active [Bluetooth Settings] window. The [Add New Connection Wizard (Welcome to the Add New Connection Wizard)] window will appear. 3. Confirm that [Express Mode] has been selected, and then click on the [Next] button The [Add New Connection Wizard (Searching for Bluetooth devices)] window will appear. file://C:\Documents and Settings\anitachou\Loc
Introduction 第 29 頁,共 224 頁 4. Select the device name of the wireless modem station from [Device List], and then click on the [Next] button The [Add New Connection Wizard (Searching for Services)] window will appear. Once a service has been detected successfully, connection to the device and COM port creation will be performed automatically, after which the [Add New Connection Wizard (Modem Settings)] window will appear. 5.
Introduction 第 30 頁,共 224 頁 Once the program has finished searching for the devices, the [Add New Connection Wizard (Device Selection)] window will appear. 6. Click on the [Next] button Certain modems require you to configure initialization commands separately. Please click on the [Additional initialization Command Settings] button, enter the initialization commands in the following window, and then click on the [OK] button.
Introduction 第 31 頁,共 224 頁 7. Enter the connection name (optional), telephone number (of your provider's access point), user name and password (as issued by your provider), and then click on the [Finish] button. Important { The sample entries shown in the window are provided solely for purpose of explanation. Please use your own telephone number, ID and password according to the arrangement with your provider. The settings will be registered, and an icon will appear in the [Bluetooth Settings] window.
Introduction 第 32 頁,共 224 頁 Important { A connection will be automatically established with the modem station if COM Auto Connect is available. If COM Auto Connect is not available, please manually connect to the modem station. The following message will appear once you have connected to the Internet. 4. End the connection The window below will appear if you double-click on the icon in the task bar. Please click on the [Disconnect] button when you want to disconnect from the Internet.
Introduction 第 33 頁,共 224 頁 Note z You can start an application to make an automatic connection to the Internet, but you can also make a manual connection using the connection destination icon. The procedure is described below. 1. From the [Bluetooth Settings] window, right -click on the connection destination icon, and then click on [Connect] from the menu that appears A window indicating that the connection is being established will appear.
Introduction 第 34 頁,共 224 頁 You will be able to browse Web pages using your browser and send and receive email. Important { Please enter the e-mail settings separately if you are going to use e-mail (the setup method will vary with the application). 2. End the connection Right-click on the icon, and then click [Disconnect] to end the connection. The following message will appear. Click on the [Yes] button. When the icon appears as shown below, the connection will have ended.
Introduction 第 35 頁,共 224 頁 Connecting to the Internet using a mobile telephone [DUN] This section describes how to connect to the Internet via a telephone line, using a mobile telephone. →Configuring a mobile telephone for use as a modem →Connecting to the Internet Important z In order to connect to the Internet, you must have already signed up with a provider and obtained a connection ID and password.
Introduction 第 36 頁,共 224 頁 Note { Alternatively, click [Start]→[All Programs]→[Bluetooth]→[Bluetooth Settings], and then click on [New Connection] from the active [Bluetooth Settings] window. The [Add New Connection Wizard (Welcome to the Add New Connection Wizard)] window will appear. 3. Confirm that [Express Mode] has been selected, and then click on the [Next] button The [Add New Connection Wizard (Searching for Bluetooth devices)] window will appear. 4.
Introduction 第 37 頁,共 224 頁 The [Add New Connection Wizard (Searching for Services)] window will appear. Once a service has been detected successfully, connection to the device and COM port creation will be performed automatically, after which the [Add New Connection Wizard (Modem Settings)] window will appear. 5.
Introduction 第 38 頁,共 224 頁 Once the program has finished searching for the devices, the [Add New Connection Wizard (Device Selection)] window will appear. 6. Click on the [Next] button Certain modems require you to configure initialization commands separately. Please click on the [Additional Initialization Command Settings] button, enter the initialization commands in the following window, and then click on the [OK] button.
Introduction 第 39 頁,共 224 頁 Important { The sample entries shown in the window are provided solely for purpose of explanation. Please use your own telephone number, ID and password according to the arrangement with your provider. The settings will be registered, and an icon will appear in the [Bluetooth Settings] window.
Introduction 第 40 頁,共 224 頁 Important { A connection will be automatically established with the mobile telephone if COM Auto Connect is available. If COM Auto Connect is not available, please manually connect to the mobile telephone. The following message will appear once you have connected to the Internet. 4. End the connection The window below will appear if you double-click on the icon in the task bar. Please click on the [Disconnect] button when you want to disconnect from the Internet.
Introduction 第 41 頁,共 224 頁 Note z You can start an application to make an automatic connection to the Internet, but you can also make a manual connection using the connection destination icon. The procedure is described below. 1. From the [Bluetooth Settings] window, right -click on the connection destination icon, and then click on [Connect] from the menu that appears A window indicating that the connection is being established will appear.
Introduction 第 42 頁,共 224 頁 p g gy Important { Please enter the e-mail settings separately if you are going to use e-mail (the setup method will vary with the application). 2. End the connection Right-click on the icon, and then click [Disconnect] to end a connection. The following message will appear. Click on the [Yes] button. When the icon appears as shown below, the connection will have been ended.
Introduction 第 43 頁,共 224 頁 →Setting up the access point →Connecting to a LAN (LAP) Important z z The access point must have been started and a normal connection already established to the network before the access point is set up. Please refer to the access point instruction manual for information on how to set up the access point. A Bluetooth passkey (PIN code) is required for you to connect to the access point. Please make a note of your Bluetooth passkey before you start the set-up process.
Introduction 第 44 頁,共 224 頁 The [Add New Connection Wizard (Searching for Bluetooth devices)] window will appear. Once the program has finished searching for the devices, the [Add New Connection Wizard (Device Selection)] window will appear. 4. Select the device name of the access point from [Device List], and then click on the [Next] button file://C:\Documents and Settings\anitachou\Local Settings\Temp\~hh114B.
Introduction 第 45 頁,共 224 頁 The [Add New Connection Wizard (Searching for Services)] window will appear. You will be asked for the Bluetooth passkey in the window that appears. 5. Enter the passkey under [Bluetooth Passkey (PIN code)], and then click on the [OK] button Service detection and COM port creation will be performed automatically. The [Add New Connection Wizard (Create Connection Destination)] window will appear. 6.
Introduction 第 46 頁,共 224 頁 Note { The user name and password are entered here to allow you to connect to the access point. The [Add New Connection Wizard (Confirm Dial-up Settings)] window will appear. 7. Click on the [Confirm Settings] button The [Internet Options] window will appear. 8.
Introduction 第 47 頁,共 224 頁 9. Click on the [Next] button The [Add New Connection Wizard (Connection Name Settings)] window will appear. 10. Enter the type and name of the icon displayed after registration, and then click on the [Next] button Please click on the [Next] button if you are satisfied with the settings. file://C:\Documents and Settings\anitachou\Local Settings\Temp\~hh114B.
Introduction 第 48 頁,共 224 頁 The [Add New Connection Wizard (Completing the Add New Connection Wizard)] window will appear. 11. Click on the [Finish] button The access point icon will be registered in the [Bluetooth Settings] window. This will complete the access point set-up process. →"Connecting to a LAN (LAP) " Connecting to a LAN (LAP) Procedure 1.
Introduction 第 49 頁,共 224 頁 The [Dial-up Connection] window will appear. 2. Confirm that "Direct connection" has been selected under [Connection Destination], and then click on the [Connect] button A connection will be initiated. Note { { { This is an example of what happens when you use "Direct connection" as a connection name under "Connect to access point." If a name different from the connection name is used, that name will appear under [Connection Destination].
Introduction 第 50 頁,共 224 頁 3 Enter the IP address and port number of the proxy server under [Proxy Server], and then click on the [OK] button 3. End the connection Right-click either on the connection icon under the [Bluetooth Settings] window or on the icon in the task tray, and then click on [Disconnect]. Click on the "Yes" button in the disconnection confirmation dialog box that appears. file://C:\Documents and Settings\anitachou\Local Settings\Temp\~hh114B.
Introduction 第 51 頁,共 224 頁 Connecting to a LAN using an access point (PAN) [PAN] This section describes how to connect to a network (for example, a company LAN or a personal home network) using a PAN profile-compatible access point. Please refer to "Using an access point (LAP) to connect to a LAN" if you are using a LAP profilecompatible access point.
Introduction 第 52 頁,共 224 頁 Note { Alternatively, click [Start]→[All Programs]→[Bluetooth]→[Bluetooth Settings], and then click on [New Connection] from the active [Bluetooth Settings] window. The [Add New Connection Wizard (Welcome to the Add New Connection Wizard)] window will appear. 3. Confirm that [Express Mode] has been selected, and then click on the [Next] button The [Add New Connection Wizard (Searching for Bluetooth devices)] window will appear.
Introduction 第 53 頁,共 224 頁 [Next] button The [Add New Connection Wizard (Searching for Services)] window will appear. You will be asked for the Bluetooth passkey in the window that appears. 5. Enter the passkey under [Bluetooth Passkey (PIN code)], and then click on the [OK] button file://C:\Documents and Settings\anitachou\Local Settings\Temp\~hh114B.
Introduction 第 54 頁,共 224 頁 Service detection and COM port creation will be performed automatically. The [Add New Connection Wizard (Connection Name Settings)] window will appear. 6. Enter the type and name of the icon displayed after registration, and then click on the [Next] button Please click on the [Next] button if you are satisfied with the settings. The [Add New Connection Wizard (Completing the Add New Connection Wizard)] window will appear. 7.
Introduction 第 55 頁,共 224 頁 Procedure 1. Right-click on the connection icon in the [Bluetooth Settings] window, and then click on [Connect] You will be asked for the Bluetooth passkey in the window that appears. 2. Enter the passkey under [Bluetooth Passkey (PIN code)], and then click on the [OK] button A connection will be initiated. Once you have connected to the network, Internet Explorer will start automatically, and you will be able to exchange data with other computers on the network.
Introduction 第 56 頁,共 224 頁 3 Enter the IP address and port number of the proxy server under [Proxy Server], and then click on the [OK] button 3. End the connection Right-click either on the connection icon under the [Bluetooth Settings] window or on the icon in the task tray, and then click on [Disconnect]. Click on the "Yes" button in the disconnection confirmation dialog box that appears. file://C:\Documents and Settings\anitachou\Local Settings\Temp\~hh114B.
Introduction 第 57 頁,共 224 頁 Building a personal area network [PAN] You can use the PAN profile to build a network of Bluetooth -enabled devices. →Operating as a server →Operating as a client A personal area network comprises a client -server architecture. The device to which other devices connect is called the "server", and a device that connects to the server is called a "client." The client-server relationship is not necessarily a fixed one.
Introduction 第 58 頁,共 224 頁 g , g g In addition, you will be able to configure folder and file sharing, which will allow data to be browsed by other servers or clients on the network. Important z Please refer to Windows Help for further information on TCP/IP, DHCP and configurations for sharing. Operating as a server The following icon will appear in the tasktray when the PAN server function has been activated.
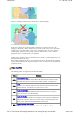
Introduction 第 59 頁,共 224 頁 [ ] The PAN server will be activated, and an icon will accordingly appear in the tasktray. Other devices that use the PAN profile will now be able to connect over the network. Important z When using the device as the server, make sure that all user accounts have a password set for the security reasons. By clicking on the icon, the [Bluetooth PAN Server] window will appear. In the graphic below, one client has established a connection.
Introduction 第 60 頁,共 224 頁 { Alternatively, click on [Start] →[All Programs]→[Bluetooth]→[Bluetooth Settings], and then on [New Connection] from the [Bluetooth Settings] window. 2. Confirm that [Express Mode] has been selected, and then click on the [Next] button 3. Click on the [Next] button in the advisory dialog box The [Add New Connection Wizard (Searching for Bluetooth devices)] window will appear.
Introduction 第 61 頁,共 224 頁 The [Add New Connection Wizard (Searching for Services)] window will appear. The [Add New Connection Wizard (Confirm Connection Name)] window will appear. 5. Click on the [Next] button file://C:\Documents and Settings\anitachou\Local Settings\Temp\~hh114B.
Introduction 第 62 頁,共 224 頁 The registered icon will appear in the [Bluetooth Settings] window. ■Connecting to a server Procedure 1. Right-click on the icon in the [Bluetooth Settings] window, and then click on [Connect] Once you have connected, the icon will change to indicate that the device is connected. ■Ending a connection to a server Procedure 1. Right-click on the icon in the [Bluetooth Settings] window, and then click on [Disconnect] file://C:\Documents and Settings\anitachou\Local Settings\
Introduction 第 63 頁,共 224 頁 A message confirming whether you wish to disconnect will appear. Click on the [Yes] button. Once you have disconnected, the icon will change to indicate that the device is not connected. Using a modem station for fax transmissions [FAX] This section describes how to send a fax using a Bluetooth wireless modem station. →Setting up the modem station →Installing a modem →Setting fax information →Sending a fax file://C:\Documents and Settings\anitachou\Local Settings\Temp\~hh
Introduction 第 64 頁,共 224 頁 g →Receiving a fax Important z z z z Please refer to the modem station instruction manual for information on how to connect the station to a telephone line. Please ensure that any drivers used to connect the PC to the modem have been installed. A Bluetooth passkey (PIN code) is required for you to connect to the modem station. Please make a note of your Bluetooth passkey before you start the set -up process.
Introduction 第 65 頁,共 224 頁 The [Add New Connection Wizard (Searching for Bluetooth devices)] window will appear. Once the program has finished searching for the devices, the [Add New Connection Wizard (Select Device)] window will appear. 4. Select the device name of the wireless modem station from [Device List], and then click on the [Next] button file://C:\Documents and Settings\anitachou\Local Settings\Temp\~hh114B.
Introduction 第 66 頁,共 224 頁 The [Add New Connection Wizard (Searching for Services)] window will appear. 5. If you are connecting to the wireless modem station for the first time, enter the passkey for the device from the [Bluetooth Passkey (PIN Code)] window, and then click on the [OK] button Once the program has finished searching for the services, the [Add New Connection Wizard (Select Service)] window will appear. 6.
Introduction 第 67 頁,共 224 頁 The [Add New Connection Wizard (Connecting to Remote Device)] screen will appear. The COM port and modem registration process will then be automatically performed. Once the COM port and modem (standard 33600 bps type) registration is complete, the [Add New Connection Wizard (Setting Connection Name)] screen will appear. 7. Configure the type and name of the icon to appear after registration, and click on the [Next] button.
Introduction 第 68 頁,共 224 頁 8. Click on the [Finish] button The settings will be registered, and the icon will appear on the [Bluetooth Settings] screen. Setting FAX information Configure send/receive settings and register fax information. Procedure 1. Select [Start]→[Control Panel], and then double -click on the [Printers and Other Hardware] icon Note { If the control panel is displayed in "Classic view", and you use Windows 2000, please start from Step (2). 2.
Introduction 第 69 頁,共 224 頁 created in the [Printers and Faxes] screen. 4. Click on "Send a fax" under "Printer Tasks" on the left side of the window If you have not yet configured a fax device, the [Fax Configuration Wizard] window will appear. In the window you can enter settings pertaining to the sender (yourself).
Introduction 第 70 頁,共 224 頁 Note { The sender information that you configure here will be automatically appended as header information when you send a fax. The [Fax Configuration Wizard (Select Device for Sending or Receiving Faxes)] window will appear. 6.
Introduction 第 71 頁,共 224 頁 The [Fax Configuration Wizard (Completing the Fax Configuration Wizard)] window will appear. 8. Click on the [Finish] button The fax information will be have been registered, and the [Fax Console] window will appear. This will complete the fax set -up process. Related topics: " Sending a fax" and "Receiving a fax " Sending a fax This section describes how to send a fax from the Fax Console. Important file://C:\Documents and Settings\anitachou\Local Settings\Temp\~hh114B.
Introduction 第 72 頁,共 224 頁 Important z The Fax service must be enabled for sending in order for you to send a fax. Please refer to " Using a wireless modem station " under "Troubleshooting" for how to change the send and receive settings once the service has been configured. Procedure 1. Double-click on the [Fax] icon in the Control Panel The [Fax Console] window will appear. 2.
Introduction 第 73 頁,共 224 頁 The [Send Fax Wizard (Recipient Information)] window will appear. 4. Enter the name and fax number of the destination party, and then click on the [Next] button The [Send Fax Wizard (Preparing the Cover Page)] window will appear. 5. Specify the cover page template, subject line, and note (body text), and then click on the [Next] button The [Send Fax Wizard (Schedule)] window will appear. 6.
Introduction 第 74 頁,共 224 頁 The [Send Fax Wizard (Completing the Send Fax Wizard)] window will appear. 7. Confirm the destination information and transmission details, and then click on the [Finish] button The software will automatically dial the number and send the fax. Once the fax has been sent, Fax Monitor will revert to standby mode. file://C:\Documents and Settings\anitachou\Local Settings\Temp\~hh114B.
Introduction 第 75 頁,共 224 頁 , y Related topic: " Receiving a fax" Receiving a fax This section describes what to do when a fax arrives after you have established a connection to a modem station. Important z z The Fax service must be enabled for receiving in order for you to receive a fax. Please refer to " Using a wireless modem station " under "Troubleshooting" for information on how to change the send and receive settings once the fax service has been configured.
Introduction 第 76 頁,共 224 頁 Click on the message with your mouse to receive the fax. 2. Double-click on the [Fax] icon in the Control Panel The [Fax Console] window will appear. 3. In the [Fax Console] window, double -click on the fax that has arrived An image of the received fax will be displayed. Related topic: " Sending a fax" file://C:\Documents and Settings\anitachou\Local Settings\Temp\~hh114B.