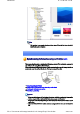
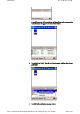
Introduction 第 154 頁,共 224 頁 Note z This window is an example showing pictures when [Filmstrip] has been selected fr the [View] menu in Explorer. Synchronising information using ActiveSync [SPP] This section describes how to synchronize information on your PDA (calendars, contacts, inb etc) with your PC using Microsoft ActiveSync. When you connect via Bluetooth instead of with a standard cable, you will always be able to synchronise your data without the hassle of having to connect the cable.
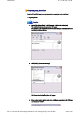
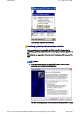
Introduction 第 155 頁,共 224 頁 Connecting using ActiveSync Both the PC and PDA must be set up in order for a connection to be established. ■Preparing the PC Procedure 1. On the PC, click on [Start] →[All Programs]→[Microsoft ActiveSync] The initial ActiveSync set -up window will appear. It is assumed in the explanation below that no ActiveSync connections have been established with other devices. 2. Click [File]→[Connection Settings] The [Connection Settings] window will appear. 3.
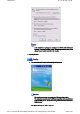
Introduction 第 156 頁,共 224 頁 Note { In the standard set -up, the port is configured to "COM7" (refer to Steps (3) (4) under "Preparing the PDA" below). When using a different port, please change the port number selected in this window. ■Preparing the PDA Procedure 1. Tap on the Bluetooth icon in the bottom right of the screen Important { The graphic above shows an example of a PDA operating window. The connection procedure may be different depending on the manufacturer model of PDA you use.
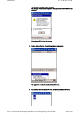
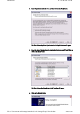
Introduction 第 157 頁,共 224 頁 The [Bluetooth Settings] window will open. The message "Connection not registered" will appear if no Bluetooth device has registered. Please tap on [OK] to close the message. 2. Double click on [Tools] →[Search for peripheral components] The application searches for nearby Bluetooth devices. 3. Tap and hold on the destination PC icon, and then select [Update Services] file://C:\Documents and Settings\anitachou\Local Settings\Temp\~hh114B.
Introduction 第 158 頁,共 224 頁 A search for services will be carried out, and then a list of service names and the connection status will appear as list in the lower window. 4. Tap and hold on "COM7" from the list of service names, and then select "Registe ActiveSync". 5. Tap [OK] in the confirmation message window file://C:\Documents and Settings\anitachou\Local Settings\Temp\~hh114B.
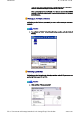
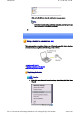
Introduction 第 159 頁,共 224 頁 An ActiveSync connection will be initiated. Establishing a partnership between ActiveSync and a PDA Once a connection has been successfully established with a PDA, the procedure for establishing a partnership with the PDA will be started by the ActiveSync application on PC. Performing this set -up procedure will enable data to be synchronised between your PC a PDA. Procedure 1.
Introduction 第 160 頁,共 224 頁 2. Select "Synchronise with this PC", and then click on the [Next] button The [New Partnership (Select Synchronisation Settings)] window will appear. 3. Select the type of information to be synchronised between your PC and PDA, and click on the [Next] button The [New Partnership (Completing Setup)] window will appear. 4. Click on the [Finish] button file://C:\Documents and Settings\anitachou\Local Settings\Temp\~hh114B.
Introduction 第 161 頁,共 224 頁 When you click on the [Finish] button, ActiveSync will begin to synchronise you information. [Confirming changes] ↓ (Synchronisation process) ↓ [Synchronisation complete] While the ActiveSync connection is active, synchronisation will be performed file://C:\Documents and Settings\anitachou\Local Settings\Temp\~hh114B.
Introduction 第 162 頁,共 224 頁 While the ActiveSync connection is active, synchronisation will be performed whenever information is changed on either the PC or the PDA. Once a partnership has been established, every time you start your PC (and PDA thereafter, a Bluetooth connection will be opened and ActiveSync will synchroni your information. Finishing an ActiveSync connection Follow the procedure below on your PDA if you want to end an ActiveSync connection manually. Procedure 1.
Introduction 第 163 頁,共 224 頁 Click on the [Yes] button when the confirmation message appears. Note { If you wish to create another ActiveSync connection, you will have to repe above procedure to re -establish a partnership. Using a headset to communicate [HSP] This section provides a description of how to use a Bluetooth -compatible wireless headset to communicate (chat) using Microsoft NetMeeting or other software.
Introduction 第 164 頁,共 224 頁 Note { Alternatively, you can click on [Start]>[All Programs]>[Bluetooth]>[Blueto Settings], then click on [New Connection] in the [Bluetooth Settings] scree has opened. The [Add New Connection Wizard (Welcome to the Add New Connection Wizar screen will appear. 2. Turn the headset power on Once you have turned on the headset, set the mode to enable a Bluetooth connect Important { The procedure for operating the headset may differ depending on the manufacturer and model.
Introduction 第 165 頁,共 224 頁 Once the device search has been completed, the [Add New Connection Wizard (S a Device)] screen will appear. 4. Select the name of the headset device from the list, then click on the [Next] butto 5. Answering with the headset If the service has been properly detected, a screen will appear indicating that the headset is being called, and a tone will accordingly sound in the headset. Please press the headset switch.
Introduction 第 166 頁,共 224 頁 pp , g p Note { If you are connecting to the headset for the first time, or if another Bluetoo audio device has not yet been registered, the following [Found New Hardw Wizard] screen will appear, from which you can proceed to install the drive If another audio device has already been registered (i.e., the driver has been installed), you can proceed to Step 9 without having to install the driver. 6. Click on the [Next] button The [Install Hardware] screen will appear.
Introduction 第 167 頁,共 224 頁 8. Click on the [Finish] button Once driver installation is complete, the [Add New Connection Wizard (Enter Connection Name)] will appear. 9. Confirm the information you have entered, and click on the [Next] button The [Add New Connection Wizard (Completing the Add New Connection Wizar screen will appear. 10. Click on the [Finish] button The configuration information will be registered, and an icon will be displayed in [Bluetooth Settings] screen. file://C:\Documents and
Introduction 第 168 頁,共 224 頁 Making a connection to the headset You can make a connection to the headset from an icon that has been registered in [Blue Settings]. Important z Before making a connection to the headset, please check that you have turned on th headset's power, and that it has been enabled for a Bluetooth connection. Please ensure that the following audio -related applications have been closed before connect the headset to your PC.
Introduction 第 169 頁,共 224 頁 If the connection has been properly established, the icon's appearance will change indicate a connected state. You may now launch conferencing and voice -recognition software and use the headset. Disconnecting from the headset Please follow the steps below to disconnect from the headset. Procedure 1. Right-click on the headset icon in the [Bluetooth Settings] screen, then click on [Disconnect]. A message will appear, requesting confirmation that you wish to disconnect.
Introduction 第 170 頁,共 224 頁 p p g p Procedure 1. Right-click on the Bluetooth icon in the task tray, and click on [Device Propertie Security] The [Device Properties] window will appear. 2. Select [Non-discoverable mode] in [Discoverability mode] under the [Security] t and then click on the [OK] button Your device will now be undetectable by other users, even when they search for devices.
Introduction 第 171 頁,共 224 頁 Encrypting the content of your transmissions Since Bluetooth communication is conducted wirelessly, there is always the possibility that a party may be able to intercept your transmissions. You can use encryption to render the content indecipherable to anyone who manages to inter it. Important z Encrypting your transmissions will still not guarantee complete security.
Introduction 第 172 頁,共 224 頁 Note z Once you have configured the security mode, a window will appear when you first a connection to another device, prompting you to enter a Bluetooth passkey (PIN c Please click on the [OK] button after you have entered the passkey. z The window in which you enter the passkey will not appear once you have connect more than two times to the device.
Introduction 第 173 頁,共 224 頁 The [Internet Options] window will appear. 3. Click on the [Connections] tab In this window, "Direct Connection" is set as the default, and "Never dial a connection" has been selected. Change the settings so that "London A" will always be dialled when you connect the Internet. 4. Select "Always dial my default connection" file://C:\Documents and Settings\anitachou\Local Settings\Temp\~hh114B.
Introduction 第 174 頁,共 224 頁 5. Click on "London A", and then click on the [Set Default] button "London A" has been changed to the default connection. Note z z Alternatively, if you wish to connect to the Internet from a LAN in a company or o environment where a LAN can be accessed, select "Never dial a connection" if you a dial-up configuration, but do not want dial -up to occur automatically. When connecting to the Internet via a LAN, you must enter the appropriate LAN settings under [LAN Settings..
Introduction 第 175 頁,共 224 頁 Sending business card data from Outlook This section describes how to send business card data wirelessly using Microsoft Outlook Note z The explanation below relates to an example in which Microsoft Outlook 2002 has bee used to perform the procedure. Subtle differences may arise when using other versions software. Sending business card data You can send business card data directly from the "Contacts" window in Outlook. Procedure 1.
Introduction 第 176 頁,共 224 頁 3. Click on the [to Bluetooth] from the toolbar The [Device List] window will appear. Note { If the [to Bluetooth] button does not appear on the toolbar, please refer to Installing business card -sending functionality in Outlook as an Add -in" be and change the settings accordingly. 4. Select the destination for the business card data, and then click on the [Send] but Note file://C:\Documents and Settings\anitachou\Local Settings\Temp\~hh114B.
Introduction 第 177 頁,共 224 頁 Note { If you cannot find the destination device in the list, please click on the [Searching for devices] button to discover it. The business card will be sent. If the business card has been sent successfully, the message below will appear. Note { If the transmission was unsuccessful, please attempt to send the data once m after having confirmed the operating conditions (power status, security sett etc) of the destination device.
Introduction 第 178 頁,共 224 頁 The [Options] dialog box will appear. 2. Select the [Other] tab, and then click on the [Advanced Options...] button in the "General" field The [Advanced Options] dialog box will appear 3. Click on the [COM Add -Ins...] button The [COM Add-Ins] dialog box will appear. 4. Click on the [Add...] button file://C:\Documents and Settings\anitachou\Local Settings\Temp\~hh114B.
Introduction 第 179 頁,共 224 頁 The [Add Add-In] dialog box will appear. 5. Select "TosBTAddin.dll", and then click on the [OK] button Note { "TosBTAddin.dll" can be found on the hard drive at the address below. C:\Program Files\Toshiba\Bluetooth Toshiba Stack 6. Confirm that "Send to Bluetooth" has been added to the list and that a check appe next to it, and then click on the [OK] button This will complete the Add in process file://C:\Documents and Settings\anitachou\Local Settings\Temp\~hh114B.
Introduction 第 180 頁,共 224 頁 This will complete the Add -in process. Manually creating a virtual Bluetooth COM port In order for a PC to connect to and communicate with a Bluetooth device, the Bluetooth Util will create a gateway for data to be exchanged between the respective devices. This gateway known as a "port" (or "virtual COM port"). Since one virtual COM port will be allocated to each device, trouble -free communication w be possible even if several devices are being used.
Introduction 第 181 頁,共 224 頁 The [Printers and Other Hardware] window appears. 2. Double-click on the [Bluetooth Local COM] icon The main Bluetooth Local COM window will appear. Note { Even when the Control Panel appears in Classic view, please simply click o [Bluetooth Local COM] icon. file://C:\Documents and Settings\anitachou\Local Settings\Temp\~hh114B.
Introduction 第 182 頁,共 224 頁 { No such distinction between viewing formats exists in Windows 2000. 3. Click on the [Add...] button The [Bluetooth Local COM Wizard] window, from where you can create a virtua COM port, will appear. Start from this window when creating Bluetooth virtual COM ports for either ser or clients.
Introduction 第 183 頁,共 224 頁 Note z You can only delete virtual COM ports created by the Bluetooth Local COM utility 1. Select the port you wish to delete from the [Bluetooth Local COM] window, and click on the [Delete] button A message will appear asking you to confirm that you wish to delete the port. 2. Click on the [Yes] button The port will be deleted. 3. Click on the [OK] button file://C:\Documents and Settings\anitachou\Local Settings\Temp\~hh114B.
Introduction 第 184 頁,共 224 頁 Bluetooth Settings This section provides detailed information on the [Bluetooth Settings] window. Main window Menu ■[Bluetooth] menu Category Description Add New Connection Opens the [Add New Connection Wizard] window, and then search new devices. Connect Connects to selected device. Disconnect Disconnects from selected device. Details Displays detailed information about selected device. file://C:\Documents and Settings\anitachou\Local Settings\Temp\~hh114B.
Introduction 第 185 頁,共 224 頁 Delete Deletes selected device. Create shortcut on Desktop Creates a shortcut icon for the selected device on the Desktop. Rename Changes the name of the device you have selected. Change Icon Changes the icon of the device you have selected. COM Auto Connect Settings Opens the [COM Auto Connect Settings] window, and allows you t enable/disable Auto Connect. Displays the device connection name and port used.
Introduction 第 186 頁,共 224 頁 ■[View] menu Category Large icons Description Changes the way icons are displayed on a device. Small icons List Details ■[Help] menu Category Description Help Opens the Bluetooth Utility User Guide. Version Displays the version information for Bluetooth Settings. Device List Displays a list of devices that have been registered in [Bluetooth Settings]. Function buttons Category Description New Connection Opens [Add New Connection Wizard] window. Details...
Introduction 第 187 頁,共 224 頁 Procedure 1. Right-click on Bluetooth icon in task tray and click on [Bluetooth Settings] Note { Alternatively, you can click [Start] →[All Programs]→[Bluetooth] →[Bluetoot Settings]. The [Bluetooth Settings] screen will appear, from where you can create a Shortcut en "Bluetooth Mouse." 2. Right-click on the [BT-Mouse-01] icon, and then click on [Create Shortcut on Deskt A shortcut icon entitled "BT -Mouse-01" will appear on the Desktop.
Introduction 第 188 頁,共 224 頁 2. Turn on the mouse, set it to Bluetooth -connectable mode, and then click on the [OK button in the [Bluetooth Settings] window. The mouse will be connected. Manually connecting to a Bluetooth device After a keyboard or mouse (HID profile), printer (HCRP or SPP profiles), or other device ha been set up for the first time, subsequent connections will be automatically restored wheneve operate the device, print out a document from the PC, or perform another similar activity.
Introduction 第 189 頁,共 224 頁 g [ ] , [ ] The [Bluetooth Settings] window will open. 3. Turn on the mouse, enable Bluetooth -connection mode, and click on the [OK] button the [Bluetooth Settings] window. The mouse will be connected. Note { If you wish to manually disconnect a device, right -click on its icon and click [Disconnect]. file://C:\Documents and Settings\anitachou\Local Settings\Temp\~hh114B.
Introduction 第 190 頁,共 224 頁 When the following message appears, click on the [Yes] button. Changing a connection icon You can change a device icon that has been registered on the Bluetooth Settings screen. Procedure 1. Right-click on the Bluetooth icon in the task tray, and then click on [Bluetooth Settin Note { Alternatively, click [Start] →[All Programs]→[Bluetooth]→[Bluetooth Setting The [Bluetooth Settings] window will appear. Now try to change the icon for "My Mobile." 2.
Introduction 第 191 頁,共 224 頁 A list of available icons will appear. 3. Select the icon, and then click on the [OK] button The new icon will appear. file://C:\Documents and Settings\anitachou\Local Settings\Temp\~hh114B.
Introduction 第 192 頁,共 224 頁 Changing a connection icon name You can change a the name of a device icon that has been registered on the Bluetooth Setting screen. Procedure 1. Right-click on the Bluetooth icon in the task tray, and then click on [Bluetooth Settin Note { Alternatively, click [Start] →[All Programs]→[Bluetooth]→[Bluetooth Setting The [Bluetooth Settings] window will appear. Now try to change the connection nam "My Mobile" to "Pocket PC." 2.
Introduction 第 193 頁,共 224 頁 3. Enter "Pocket PC", and then hit the [Enter] key The new name will appear. Bluetooth Manager This section provides detailed information on the settings categories in Bluetooth Manager. Main menu Category Description Bluetooth Settings Opens [Bluetooth Settings] window. Wireless File Transfer Open the [Wireless File Transfer] window. file://C:\Documents and Settings\anitachou\Local Settings\Temp\~hh114B.
Introduction 第 194 頁,共 224 頁 Remote Camera Open the [Remote Camera] window. Add New Connection Opens the [Add New Connection Wizard] window. Device Displays Bluetooth device information on your PC. Properties&Security [General] tab Allows you to confirm the name, address and other settings displ other devices. Note z z [Device Name] is the only category able to be changed. If y wish to change the name of a device, enter the new name, a click on the [OK] or [Apply] button.
Introduction 第 195 頁,共 224 頁 Note z Click on the [Default] button to restore the initial settings. Category Nondiscoverable Discoverability mode mode Discoverable mode Connectability mode Description Other devices will not be able to detect yours. Other devices will be able to detect yours. Nonconnectable mode Other devices will not be able to connect to yours.1) Connectable mode Other devices will be able to connect to yours.
Introduction 第 196 頁,共 224 頁 Important z Communication using Bluetooth will be impossible once it been turned off. When you next wish to use Bluetooth, plea right-click on the Bluetooth icon in the task tray, and then c [Power ON]. → (Turned on) Service Properties Ensures security against various kinds of access from remote dev Here you can enable or disable the following four typical service are accessed remotely.
Introduction 第 197 頁,共 224 頁 PAN Networking Service Ticking the box enables a (server function that allows networking to performed from a remote device u PAN Networking Service. Bluetooth COM Port Service Ticking the box enables a (server function that allows COM Service performed from a remote location the Serial Port Service. AV Remote Control Service Ticking the box enables a (server function that allows remote contro performed from a remote device u AV Remote Control Service.
Introduction 第 198 頁,共 224 頁 Bluetooth menu Category Description Device Discovery Detects Bluetooth devices. Configuration Allows detailed setting of categories related to Bluetooth Informati Exchanger. -[General] tab -[Mode] tab -[Inbox/Business Card] tab -[Shared folder] tab -[Image box] tab -[Associate] tab -[Transfer mode] tab -[Service security] tab -[Service class] tab -[Information] tab -[Version] tab Help Displays Bluetooth Utility User Guide.
Introduction 第 199 頁,共 224 頁 Category Description Click on the icon to display a list of devices. "Image box" is a folder on transferring images. Click on the icon to display a list of devices. "Shared folder" is a share transferring files. Click on the icon to display a list of devices. "Inbox" is a folder on you business cards. file://C:\Documents and Settings\anitachou\Local Settings\Temp\~hh114B.
Introduction 第 200 頁,共 224 頁 Remote Camera This section provides detailed information on the settings categories in Remote Camera. Main window Menu ■[Bluetooth] menu Category Description Device Search Searches for remote cameras. Properties [Filter for Search Devices] file://C:\Documents and Settings\anitachou\Local Settings\Temp\~hh114B.
Introduction 第 201 頁,共 224 頁 The program may discover devices other than digital cameras, depe on which profiles are supported by those devices. Adjusting the setting to "Loose filtering" will increase the likelihoo devices other than those intended will be detected. The further you slide the setting towards "Tight filtering", the strict will be the criteria determining device detection, and the lower the likelihood will be that irrelevant devices will be included.
Introduction 第 202 頁,共 224 頁 [Inbox settings] Opens the "Browse folders..." dialog box and allows you to select t folder where you would like your captured images to be saved. Exit Exits Remote Camera. ■[Help] menu Category Image monitor version information Description Displays version information for the image monitor. List of cameras A list of cameras that have been registered as remote cameras will be displayed. [Camera Search...
Introduction 第 203 頁,共 224 頁 Note z A folder for saving your images will be created automatically. Camera operation window Camera images Images as seen through the lens of your remote camera will be displayed. Display magnification The size of the operating window display can be adjusted from 100% (1x) to 300% (3x). Important file://C:\Documents and Settings\anitachou\Local Settings\Temp\~hh114B.
Introduction 第 204 頁,共 224 頁 z Increasing the size of the operating window will impede its ability to display image and will have an adverse effect on other processes being performed by your PC. Pl adjust the magnification as appropriate for your intended use. [Explorer...] button Clicking on this button will display the folders on the hard drive where images that have transferred to the PC have been stored.
Introduction 第 205 頁,共 224 頁 This section provides detailed information on the settings categories in Bluetooth Local COM Main window Port Displays a list of configured ports. Description Displays the function of each port. Ports displayed as "Toshiba BT Port (COMxx)" are TOSHIBA Bluetooth virtual COM p Owner Displays the application used to create those COM ports. The following information will appear for ports created by Bluetooth Local COM.
Introduction 第 206 頁,共 224 頁 Note z OK You can only delete COM ports created by Bluetooth Local COM. Click on this button to confirm settings information, and close the Bluetooth Local COM window. Wireless File Transfer This section provides detailed information on the settings categories in Wireless File Transfe Main window Files/folders Displays a list of files/folders to be sent. Devices to which data can be sent Displays other devices to which you are able to send files.
Introduction 第 207 頁,共 224 頁 Connection method Displays method used to connect to other devices. Note z If a device to which you would like to send data is not listed, you can click on the [Search] button to search for other devices. Function buttons Category Description Add Displays the window below, from where you can add files and/or folders yo would like to send. Delete By selecting a file from the list and clicking on the "Delete" button, you can remove that file (i.e.
Introduction 第 208 頁,共 224 頁 to application.
Introduction 第 209 頁,共 224 頁 Bluetooth Settings Clicking on the [New Connection] button brings up the message "Unable to prepare Bluetooth." z The wireless communication switch is turned off. Please switch it on. Remote device(s) cannot be detected z The other device(s) may have been set to Non -discoverable mode. Please check the mode settings on the device.
Introduction 第 210 頁,共 224 頁 z A maximum of 64 virtual COM ports can be added. You will be unable to add ano port if 64 ports have already been configured. Using a wireless modem station Important z Please refer to " What you need to know about using Bluetooth " for an understandi the basic concepts to be aware of when using Bluetooth.
Introduction 第 211 頁,共 224 頁 Cannot connect to the Internet z The telephone number of the connection (i.e., the telephone number for the access of your Internet service provider) may not be correct. Please check the telephone number. z The user ID and/or password for the provider with whom you have signed up may been entered incorrectly. Please check the user ID and password. The default connection may have been configured with different settings.
Introduction 第 212 頁,共 224 頁 3. Select the [Send] tab, and then confirm that "Enable device to send" has be checked. 4. Select the [Receive] tab, and then confirm that "Enable device to receive" h been checked (when you wish to receive faxes) file://C:\Documents and Settings\anitachou\Local Settings\Temp\~hh114B.
Introduction 第 213 頁,共 224 頁 5. Click on the [OK] button Using an access point Important z Please refer to " What you need to know about using Bluetooth " for an understandi the basic concepts to be aware of when using Bluetooth. Access point cannot be detected z If the access point is connected to and is being used by another device, the access p will be undetectable even if you search for it.
Introduction 第 214 頁,共 224 頁 broken. Please replace the cable with another one. z The access point may not have been configured correctly, and may not be able to maintain the connection to the LAN. Please refer to the product instruction manual for information on how to configure access point.
Introduction 第 215 頁,共 224 頁 Using a Bluetooth Headset Important z Please refer to " What you need to know about using Bluetooth " for an understandi the basic concepts to be aware of when using Bluetooth. Bluetooth Headset cannot be detected z If the Bluetooth Headset is connected to and is being used by another device, the Bluetooth Headset will be undetectable even if you search for it.
Introduction 第 216 頁,共 224 頁 the basic concepts to be aware of when using Bluetooth. Keyboard or mouse cannot be detected z If the keyboard or mouse is connected to and is being used by another device, the keyboard or mouse will be undetectable even if you search for it. Cannot connect to keyboard or mouse z If the keyboard or mouse is connected to and is being used by another device, no o device will be able to connect to the keyboard or mouse.
Introduction 第 217 頁,共 224 頁 Using a PDA Important z Please refer to " What you need to know about using Bluetooth " for an understandi the basic concepts to be aware of when using Bluetooth. Cannot make an ActiveSync connection z Please confirm that you have installed ActiveSync v3.7 or higher on your PC. z ActiveSync is installed to COM7 as a default. Please refer to " Synchronising information using ActiveSync " and re-configure your ActiveSync connection.
Introduction 第 218 頁,共 224 頁 If the mobile telephone is connected to and is being used by another device, the mo telephone will be undetectable even if you search for it. Cannot connect to mobile telephone z If the mobile telephone is connected to and is being used by another device, no oth device will be able to connect to the mobile telephone. Cannot send images to mobile telephone z Please use the appropriate transfer method, according to the profiles supported by y mobile telephone.
Introduction 第 219 頁,共 224 頁 The [Fax properties] window will appear. 2. Select the [Device] tab, right -click on the modem you wish to use, and the on [Properties] 3. Select the [Send] tab, and then confirm that "Enable device to send" has be checked. file://C:\Documents and Settings\anitachou\Local Settings\Temp\~hh114B.
Introduction 第 220 頁,共 224 頁 4. Select the [Receive] tab, and then confirm that "Enable device to receive" h been checked when you wish to receive faxes) 5. Click on the [OK] button Glossary This glossary provides definitions for Bluetooth -related terminology. You will be able to look up the meanings of any uncertain terms here. A2DP Profile Abbreviation of Advanced Audio Distribution. A Bluetooth profile allowing you to adjust the sound quality of wireless headsets and ot audio devices.
Introduction 第 221 頁,共 224 頁 control functions to be sent and received. Remote control commands can be received by Bluetooth Utility. Bluetooth Profile A specification that guarantees the connection to the service function of a remote Blueto device. For a Bluetooth device to send and receive information to and from another device, both devices must support shared profiles designated for each function, such as dial -up networking, faxing, printing and human interface devices.
Introduction 第 222 頁,共 224 頁 GAVDP Profile Abbreviation of Generic Audio -Video Distribution Profile. This is a Bluetooth profile. HCRP Abbreviation of Hardcopy Cable Replacement Profile. A Bluetooth profile that establish connection to a device only when you print, unlike SPP (Serial Port Profile). HID Profile Abbreviation of Human Interface Device Profile. A Bluetooth profile that enables you to connect to a wireless mouse, keyboard or other i device. LAP Abbreviation of LAN Access Profile.
Introduction 第 223 頁,共 224 頁 Passkey Also known as a PIN code This is a password consisting of up to 16 alphanumeric characters that enables a connec to be established to a wireless device. You need to know the passkey in order to connec device that requires authentication. Even when the authentication setting has been disabled in the User Mode Properties of t Bluetooth Utility, the passkey entry dialog box will appear automatically if authenticatio required, enabling you to authenticate a device.
Introduction 第 224 頁,共 224 頁 Names, (e)mail addresses, telephone numbers and other information are exchanged in th form of electronic business cards (in *.vcf format), allowing all parties to easily register other's data in their address books. The standard is extensively compatible with Microsoft Outlook, Lotus Organizer and oth mail/schedule management software. file://C:\Documents and Settings\anitachou\Local Settings\Temp\~hh114B.
Quick Start Guide - Introduction 第 1 頁,共 160 頁 Introduction The Quick Start Guide is intended to those who wish to get started right away using Bluetooth, and describes basic concepts to be aware of as well as ways to connect to Bluetooth devices. The Quick Start Guide comprises the following items. What you need to know about using Bluetooth Describes the basic concepts you need to be aware of when using Bluetooth devices. It is recommended that you read this section before starting the set-up process.
Quick Start Guide - Introduction z z 第 2 頁,共 160 頁 and telephone number of your provider s access point before you begin the set up process. Please refer to your instruction manual for information on connecting the modem station to a telephone line. A Bluetooth passkey (PIN code) is required for you to connect to the modem station. Please make a note of your Bluetooth passkey before you start the set-up process. Setting up the modem station Procedure 1. Turn on the wireless modem station 2.
Quick Start Guide - Introduction 第 3 頁,共 160 頁 The [Add New Connection Wizard (Searching for Bluetooth devices)] window will appear. 4. Select the device name of the wireless modem station from [Device List], and then click on the [Next] button The [Add New Connection Wizard (Searching for Services)] window will appear. file://C:\Documents and Settings\anitachou\Local Settings\Temp\~hh3F24.
Quick Start Guide - Introduction 第 4 頁,共 160 頁 Once a service has been detected successfully, connection to the device and COM port creation will be performed automatically, after which the [Add New Connection Wizard (Modem Settings)] window will appear. 5.
Quick Start Guide - Introduction 第 5 頁,共 160 頁 Note { Please refer to the modem or mobile phone instruction manual for further details on the initialization commands. 7. Enter the connection name (optional), telephone number (of your provider's access point), user name and password (as issued by your provider), and then click on the [Finish] button. Important { The sample entries shown in the window are provided solely for purpose of explanation.
Quick Start Guide - Introduction 第 6 頁,共 160 頁 Connecting to the Internet You can connect to the Internet by following the procedure below if the connection destination registered when you configured the wireless modem has been set as the default connection destination. 1. Start your browser, e -mail application or other application Important { Please enter the e-mail settings separately if you are going to use e-mail (the setup method will vary with the application). 2.