Meet your tablet. Para la versión en español, visite verizonwireless.
E11266 February 2016 First Edition COPYRIGHT INFORMATION No part of this manual, including the products and software described in it, may be reproduced, transmitted, transcribed, stored in a retrieval system, or translated into any language in any form or by any means, except documentation kept by the purchaser for backup purposes, without the express written permission of ASUSTeK COMPUTER INC. (“ASUS”).
Contents Conventions used ................................................................................................................................. 6 Care and safety ....................................................................................................................................... 6 1 Get your Zen ready! Parts and features ......................................................................................................... 9 Installing a memory card ........................
Your precious moments Capture moments .......................................................................................................53 Launching the Camera app .............................................................................................................53 Using Camera for the first time.......................................................................................................54 Advanced camera features ..................................................................
6 Staying connected Wi-Fi .............................................................................................................................75 Enabling Wi-Fi .......................................................................................................................................75 Connecting to a Wi-Fi network .......................................................................................................75 Disabling Wi-Fi ....................................................
Conventions used To highlight key information in this manual, some text are presented as follows: IMPORTANT! This message contains vital information that must be followed to complete a task. NOTE: This message contains additional information and tips that can help complete tasks. CAUTION! This message contains important information that must be followed to keep you safe while performing tasks and prevent damage to your ASUS Tablet data and components. Care and safety Guidelines Road safety comes first.
Proper disposal Risk of explosion if battery is replaced by an incorrect type. Dispose of used batteries according to the instructions. Do not throw your device in municipal waste. This product has been designed to enable proper reuse of parts and recycling. The symbol of the crossed out wheeled bin indicates that the product (electrical, electronic equipment and mercurycontaining button cell battery) should not be placed in municipal waste. Check local regulations for disposal of electronic products.
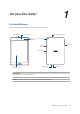
1 Get your Zen ready! 1 Get your Zen ready! Parts and features Take a hold of your device and have it up and running in a jiffy. Audio speaker Front camera Ambient light sensor Speaker/Headset port Rear camera Groove Volume button Power button Touch screen panel Microphone Type-C port IMPORTANT! Keep the device, particularly the touch screen, dry all the time. Water or other liquids can cause the touch screen to malfunction. NOTE: The bottom side may vary in appearance depending on model.
Installing a memory card Your ASUS Tablet supports a microSD™, microSDHC™, and microSDXC™ memory card with up to 64 GB of capacity. NOTE: Some memory cards may not be compatible with your ASUS Tablet. Ensure that you use only compatible memory cards to prevent loss of data, damage to your device, or memory card, or both. CAUTION! Be extra careful when handling a memory card. ASUS is not responsible for any data loss or damage incurred to your memory card. To install a memory card: 1.
2. Align and insert a memory card into the memory card slot. 3. Push the memory card all the way into the slot until it is seated firmly in place. 4. Put back the card slot cover. NOTE: After installing a formatted memory card, you can access its contents from ASUS > File Manager > Internal storage > sdcard.
Removing a memory card CAUTION! t #F FYUSB DBSFGVM XIFO IBOEMJOH B NFNPSZ DBSE "464 JT OPU SFTQPOTJCMF GPS BOZ EBUB MPTT PS EBNBHF incurred to your memory card. t &KFDU UIF NFNPSZ DBSE QSPQFSMZ UP TBGFMZ SFNPWF JU GSPN EFWJDF 5P FKFDU UIF NFNPSZ DBSE HP UP Home > All Apps > Settings > Storage > . To remove a memory card: 1. Orient your device as shown, then locate the groove and open the card slot.
2. Press the memory card to eject, then pull it out. 3. Put back the card slot cover.
Installing a micro SIM card Your micro SIM card slot supports LTE, WCDMA and EDGE/GSM bands. NOTE: To prevent connector damage, ensure to use a standard micro SIM card without a SIM adapter or the use of a cutter. CAUTION! Be extra careful when handling a micro SIM card. ASUS is not responsible for any data loss or damage incurred to your micro SIM card. To install a micro SIM card: 1. Orient your device as shown, then locate the groove and open the card slot.
2. Align and insert a micro SIM card into the micro SIM card slot. 3. Push the micro SIM card all the way into the slot until it is seated firmly in place. 4. Put back the card slot cover.
Removing a micro SIM card CAUTION! Be extra careful when handling a micro SIM card. ASUS is not responsible for any data loss or damage incurred to your micro SIM card. To remove a micro SIM card: 1. Orient your device as shown, then locate the groove and open the card slot. CAUTION! t #F DBSFGVM OPU UP EBNBHF UIF CBDL DPWFS PS JOKVSF ZPVS öOHFSOBJMT XIFO ZPV SFNPWF UIF DPWFS t %P OPU GPSDJCMZ SFNPWF TIFBS PS EJTUPSU UIF CBDL DPWFS 2. 16 Press the micro SIM card to eject, then pull it out.
3. Put back the card slot cover. Charging your ASUS Tablet Your ASUS Tablet comes partially charged but you must charge it fully before using it for the first time. Read the following important notices and cautions before charging your device. IMPORTANT! t 6TF POMZ UIF CVOEMFE "$ QPXFS BEBQUFS BOE NJDSP 64# DBCMF UP DIBSHF ZPVS "464 5BCMFU 6TJOH B different AC power adapter and cable may damage your device.
To charge your ASUS Tablet: 1. Connect the USB Type-C cable to the power adapter. 2. Plug the power adapter into a grounded power outlet. 3. Plug the USB Type-C connector into your ASUS Tablet. IMPORTANT! t $IBSHF ZPVS "464 5BCMFU GPS FJHIU IPVST CFGPSF VTJOH JU JO CBUUFSZ NPEF GPS UIF öSTU UJNF t 5IF TUBUVT PG CBUUFSZ DIBSHF JT JOEJDBUFE CZ UIF GPMMPXJOH JDPOT Low 4.
Turning your ASUS Tablet on or off Turning your device on To turn your device on, press and hold the power button until your device vibrates and starts up. Turning your device off To turn your device off: 1. If your screen is turned off, press the power button to turn it on. If your screen is locked, unlock the device screen. 2. Press and hold the power button, then when prompted, tap Power off then tap OK. Sleep mode To put your device in sleep mode: a.
Basics Explore the intuitive simplicity of ASUS Zen UI! ASUS Zen UI is a charming and intuitive interface exclusively for ASUS Tablets. It provides you with special apps, which are integrated in or with other apps, to fit your unique individual needs and make your life easier while letting you have fun with your ASUS Tablet. Camera With PixelMaster technology, capture those precious moments in vivid and high-quality photos and videos.
Starting for the first time When you turn your ASUS Tablet on for the first time, Setup Wizard will guide you through the setup process. Follow the onscreen instructions to select your language, select input methods, set up your mobile network, Wi-Fi, sync accounts, and configure your location services. Use your Google or ASUS account to set up your device, if you do not have a Google or ASUS account yet, go ahead and create one.
Battery power conservation tips The battery charge is the lifeline of your ASUS Tablet. Here are some battery power conservation tips that helps preserve the power of your ASUS Tablet’s battery. – Close all running apps that are not in use. – When not in use, press the power button to put the device in sleep mode. – Activate Smart Saving in Power Saver app. – Set audio to Smart Mode. – Decrease brightness of display. – Keep the speaker volume to a low level. – Disable Wi-Fi feature.
Using the touchscreen Use these gestures on the touchscreen to launch apps, access some settings, and navigate your ASUS Tablet. Launching apps or selecting items Do any of the following: t 5P MBVODI BO BQQ TJNQMZ UBQ PO JU t 5P TFMFDU BO JUFN TVDI BT JO 'JMF .
Moving through pages or screens Do any of the following: t 4XJQF ZPVS öOHFS UP UIF MFGU PS UP UIF SJHIU UP TXJUDI CFUXFFO TDSFFOT PS UP øJQ UISPVHI B Gallery of images. t 4DSPMM ZPVS öOHFS VQ PS EPXO UP HP UISPVHI XFC QBHFT PS MJTU PG JUFNT Zooming in Spread apart your two fingers on the touch panel to zoom in an image in Gallery or Maps, or zoom in a web page.
Zooming out Bring together your two fingers on the touch panel to zoom out an image in Gallery or Maps, or zoom out of a web page. ZenMotion When your touch screen panel is off, with these easy and intuitive gestures, you can launch apps on your ASUS Tablet in a snap by simply writing down an alphabet.
Chapter 1: Get your Zen ready!
2 There’s no place like Home 2 There’s no place like Home NOTE: Screenshots are for reference only. Actual apps shown on-screen may vary per model. Zen Home features Home screen Get reminders of important events, app and system updates, weather forecasts, and text messages from people who really matter to you, right from your Home screen.
Understanding notification icons These icons are shown on the status bar and will guide you of the current status of your ASUS Tablet. Messages Shows that you have an unread message. Wi-Fi Shows the signal strength of your Wi-Fi connection. Battery life Shows the battery status of your ASUS Tablet. MicroSD card Shows that a microSD card is inserted in your ASUS Tablet. Screenshot Shows that you took screenshots of your ASUS Tablet. Airplane mode Shows that your ASUS Tablet is on Airplane mode.
Personalizing your Home screen Stamp your own personality on your Home screen. Select an attractive design as your wallpaper, add shortcuts for quick access to your favorite apps, and add widgets for a quick review of important info. You can also add more pages so you can add and quickly access or view more apps or widgets on your Home screen. App shortcuts and widgets App shortcuts and widgets make it easier to quickly access your favorite items from your Home screen.
Grouping your app shortcuts in a folder Create folders to organize your app shortcuts on your Home screen. 1. On your Home screen, tap and drag an app onto another app and a folder will appear. 2. Open the new folder and tap the folder name to rename this folder if desired. Wallpapers Let your apps, icons, and other Zen elements sit on an attractively designed wallpaper. You may add a translucent background tint to your wallpaper for readability and clarity.
Applying wallpaper and background tint To apply wallpaper and background tint: 1. Tap and hold an empty area on your Home screen and select Wallpapers. 2. Tick Background tint, then adjust the transparency level. If you do not want to add a background tint to your wallpaper, skip to step 4. 3. Tap 4. Select a wallpaper, then tap Apply. then select a color. NOTE: You can also set up your wallpaper settings from > Settings > Display.
Setting up the date and time By default, the date and time displayed on your Home screen automatically syncs when you are connected to the Internet. To change the date and time settings: 1. Launch the Settings screen by doing any of the following: t Launch Quick settings then tap t Tap . > Settings. 2. Select Date & time. 3. Uncheck Automatic date & time. 4. Select the time zone and manually set the date and time. 5. You can opt to use the 24-hour format if desired. 6.
Quick settings The Quick settings panel provides a one-tap access to some of the wireless features and settings of your ASUS Tablet. Each of these features are represented by a button. To launch the Quick settings panel, swipe down with two fingers from the top of your ASUS Tablet. NOTE: A blue button indicates that the feature is currently enabled while a gray button indicates a disabled feature.
Adding or removing buttons To add or remove existing buttons from the ASUS Quick settings notification panel: . 1. Launch Quick settings then tap 2. Tap the box beside the feature to add or remove it from the ASUS Quick settings notification panel. NOTE: A checked box indicates that the feature's button is accessible via the ASUS Quick settings notification panel while an unchecked box means the opposite. 3. Tap to go back and view the current ASUS Quick settings notification panel.
Lock Screen By default, the lock screen appears after turning on your device and while waking it up from sleep mode. From the lock screen, you can proceed to your device’s Android system by swiping on your touch screen panel. Your device’s lock screen can also be customized to regulate access to your mobile data and apps. Customizing your lock screen If you want to change your lock screen settings from the default Swipe option, refer to the following steps: 1. Launch Quick settings then tap 2.
Customizing the quick access buttons By default, your lock screen includes quick access buttons for these apps: Messaging, and Camera. Change this default settings and customize these buttons to launch other apps on the lock screen using the following steps: . 1. Launch Quick settings then tap 2. Select Lock screen. 3. Tap Quick access. 4. Under the Quick access screen, select which button you would like to customize. 5.
Voice Search Make voice commands to your ASUS Tablet then watch it listen and take action using the Voice Search app. Using Voice Search, you can make voice commands to accomplish the following: t 4FBSDI GPS EBUB BOE JOGPSNBUJPO POMJOF PS PO ZPVS "464 5BCMFU t -BVODI BQQT JOTJEF ZPVS "464 5BCMFU t (FU EJSFDUJPOT HPJOH UP B MPDBUJPO IMPORTANT! Your ASUS Tablet must be connected to the Internet to be able to use this feature. Launching Voice Search 1. 2.
Customizing voice search results from the Tablet search group If you want to set parameters for the voice search results gathered from your Google account and your ASUS Tablet’s data, you may do so using the following steps: 1. On your ASUS Tablet’s home screen, tap 2. Once your voice search results are shown, tap 38 Chapter 2: There’s no place like Home > Voice Search. > Settings.
3. Tap Tablet search. 4. Tick the box of the search groups you would like to include as source when using Voice Search.
Chapter 3: Keeping in touch
3 Keeping in touch 3 Keeping in touch Managing contacts Organize your contacts and easily stay in touch with them emails, or social networks. Group your contacts as Favorites to quickly get in touch with them, or group them as VIPs to get notified about any upcoming events, or unread messages. You can also sync your contacts with your email or social network accounts, link contacts’ info for easy access in one place, or filter the contacts you want to keep in touch with.
Adding contacts Add contacts to your device, corporate, Google, or other email accounts and fill in more important contact information such as contact numbers, email addresses, special events for VIPs, and more. 1. Launch the Contacts app then tap 2. Select Device. . NOTE: t :PV DBO BMTP TBWF UIF DPOUBDU UP ZPVS 4*. DBSE PS ZPVS FNBJM BDDPVOU t *G ZPV EPOhU IBWF BO FNBJM BDDPVOU UBQ Add account then create one. 3.
Adding an extension number to a contact number You can add an extension number to a contact’s number. 1. From the Add contact screen, fill in the necessary fields. 2. On the Phone field, key in the main line then tap or , and add the extension number. NOTE: t 6TF , as a separator of the main line and the extension number when you want to skip the voice prompt.
Customizing your contact’s profile Edit your contact’s info, add a photo, set a ringtone, or take a photo as a cover for your contact’s profile. 1. Launch the Contacts app then select the contact whose info or profile you want to edit or customize. 2. Make the changes from the contact’s profile page.
Set up your VIP from the Groups screen To set up your VIP from the Groups screen: 1. Launch the Contacts app. 2. Tap 3. In the VIP screen, tap 4. Select the contact or contacts you want to group as VIPs, then tap Add. The contact or contacts are added to your VIP list. > VIP. .
Set up your VIP from the VIP screen To set up your VIP from the VIP screen: 1. Launch the Contacts app. 2. Tap 3. In the VIP screen, tap 4. Select the contact or contacts you want to group as VIPs, then tap Add. The contact or contacts are added to your VIP list. . . Adding an event to a VIP contact You can add an event to a VIP contact such as anniversary, birthday, and other important events. . 1. Launch the Contacts app, tap the contact you want to add an event detail to, then tap 2.
Marking your favorite contacts Set your frequently-accessed contacts as your favorites to be able to locate them quickly from the Contacts app. 1. Launch the Contacts app by doing any of the following: a. From the Home screen, tap > Contacts app. b. From the All Apps screen, tap Contacts app. then tap . 2. From the Contacts app screen, tap 3. Tick the boxes of the contacts that you wish to add to Favorites. 4. When done, tap Add. All contacts that you added appears on Favorites screen.
Importing contacts Import your contacts and their respective data from one contact source to your ASUS Tablet, or email account, or a micro SIM card. 1. Tap 2. Tap Import/export then select from the following importing options: > Contacts then tap > Manage contacts. a. Import from SIM card b. Import from storage 3. Select from the following accounts to save the contact: a. Email account/s b. Device c. SIM1/SIM2 4. Tick to select the contacts that you wish to import and when done, tap Import.
Social networking with your contacts Integrating the social network accounts of your contacts makes it easier for you to view their profiles, news, and social feeds. Stay updated with the activities of your contacts in real time. IMPORTANT! Before you can integrate social network accounts of your contacts, you need to log in to your social network account and sync its settings.
Send messages and more Messaging Messaging lets you send, promptly reply, or reply at a later time to important messages from your contacts in any of your SIM cards installed on your ASUS Tablet. You can also email your message threads or conversations to others to keep them in the loop. Launching the Messaging app From your Home screen, do any of the following to launch the Messaging app: t 5BQ t 5BQ . > Messaging. Sending messages 1. Launch the Messaging app then tap . 2.
Forwarding a message thread You can forward a message thread or conversation to others, and set an alert so you can reply to an important message at a convenient time. . 1. From the Home screen, tap 2. Tap the message thread then tap 3. Tap Select All or any of the messages from the thread, then tap Forward. 4. In the To field, tap 5. When you’re done, select the SIM account where you’re going to send your message from.
Linking your contacts’ info When you add social network or email accounts, data from these accounts automatically sync with the Contacts app. In some instances, some contact info may appear in several places or under different name variations or nicknames in the Contacts app. You can manually link and unify all these info and put them under one place or profile. 1. From the Contacts app, tap and hold the contact whose info you want to link, then select Link contact. 2.
4 Your precious moments Your precious moments 4 NOTE: Screenshots are for reference only. Actual apps shown on-screen may vary per model. Capture moments Launching the Camera app Capture images and record videos using your ASUS Tablet’s Camera app. Refer to any of the steps below to open the Camera app. From the lock screen Drag down until the camera app is launched. From the home screen Tap .
Using Camera for the first time After launching the Camera for the first time, two consecutive features appear to help you get started: Tutorial and Image locations. Tutorial If it is your first time to use your ASUS Tablet’s camera, you will encounter the following tutorial screen after launching the Camera app. Refer to the following steps to proceed from this screen. 1. On the Tutorial screen, tap Skip if you want to skip viewing or Start to view the basic tutorial about using Camera. 2.
Camera home screen Your ASUS Tablet’s camera is equipped with auto-scene detection and auto-image stabilizer features. It also features a video stabilization function that helps prevent shakiness while video recording. Tap the icons to start using your camera and explore the image and video features of your ASUS Tablet.
Camera settings Adjust the appearance of your captured images by configuring your camera’s settings using the steps below. IMPORTANT! Apply the settings first before taking images. 1. On the camera’s home screen, tap 2. Scroll down and configure the available options. 56 Chapter 4: Your precious moments > .
Video settings Adjust the appearance of your recorded videos by configuring your camera’s settings using the steps below. IMPORTANT! Apply the settings first before taking images. 1. On the camera’s home screen, tap > . 2. Scroll down and configure the available options. Others settings Adjust advanced settings to customize your camera. IMPORTANT! Apply the settings first before taking images. 1. On the camera’s home screen, tap > . 2. Scroll down and configure the available options.
Advanced camera features Explore new ways of capturing images or videos and make captured moments extra special using the advanced camera features of your ASUS Tablet. IMPORTANT! Apply the settings first before taking images. Available features may vary per model. HDR The High-dynamic-range (HDR) feature allows you to take more detailed images for low-light and highly contrasting scenes.
Low light Using PixelMaster, your camera’s light sensitivity is increased by up to 400% to enhance noise reduction and boost color contrast by up to 200%. Use this mode to transform any subject into a great photo or video—with or without ample natural lighting. Capturing Low light photos 1. From the Camera app’s home screen, tap 2. Tap > Low light. to start capturing photos. Capturing Low light videos 1. From the Camera app’s home screen, tap 2. Tap > Low light. to start recording a video.
Effect Take photos using different effects such as Pixelize, Cartoon, Vintage, LOMO or other effects. NOTE: Effect should be selected before taking the photo. Capturing Effect photos 1. From the Camera app screen, tap 2. Tap 3. Tap > Effect and select an effect to apply to the photo. to start capturing photos. Applying effects to photos 1. Tap the thumbnail to select the photo. 2. Tap the photo and tap to select your preferred Effect, then tap to save the photo.
GIF animation Create GIF (Graphics Interchange Format) images straight from your ASUS Tablet’s camera using the GIF animation feature. Capturing GIF animation photos 1. From the Camera app’s home screen, tap > GIF Animation. 2. Long press 3. Make your preferred adjustments to the GIF animation settings. 4. Tap to start capturing burst photo for GIF animation. when finished. Panorama Capture images from various angles using Panorama.
Time rewind After selecting Time Rewind, your shutter starts taking burst shots two seconds before you actually press the shutter button. As a result, you get a timeline of images where you can choose the best image to save on your Gallery. NOTE: The Time Rewind feature can only be used on the rear camera. Capturing Time Rewind photos 1. From the Camera app’s home screen, tap > Time Rewind. 2. Tap 3. Adjust the time (in seconds) that you want your captured photo to play in reverse or rewind mode. 4.
All smiles Capture the perfect smile or the wackiest facial expression from a range of photos using the All Smiles feature. This feature lets you take five consecutive photos after pressing the shutter button, automatically detecting faces on the image for comparison. Capturing All smiles photos 1. From the Camera app’s home screen, tap > All smiles. 2. Tap 3. Touch the subject’s face, then select the subject’s best facial expression. 4.
Using the Gallery View images and play videos on your ASUS Tablet using the Gallery app. This app also allows you to edit, share, or delete image and video files stored in your ASUS Tablet. From Gallery, you can display images in a slideshow or tap to view the selected image or video file. To launch Gallery, tap > Gallery. Viewing files from your social network or cloud storage By default, your Gallery displays all the media files on your ASUS Tablet according to their album folders.
Viewing the photo location Enable the location access on your ASUS Tablet, and get the location details on your photos. Your photos’ location details include the area where the photos are taken, as well a map of the location via Google Map or Baidu (in China only). To view the details of a photo: 1. Turn on the location access from 2. Ensure that you have shared your location to Google Map or Baidu. 3. On the camera’s home screen, tap > Settings > Location.
Sharing files from the Gallery 1. From the Gallery screen, tap the folder where the files you want to share are located. 2. After opening the folder, tap 3. Tap the files you want to share. A check mark appears on top of the image you select. 4. Tap to activate file selection. then select from the list where you want to share the images. Deleting files from the Gallery 1. From the Gallery screen, tap the folder where the files you want to delete are located. 2. After opening the folder, tap 3.
5 Work hard, play harder 5 Work hard, play harder Browser Your browser’s state-of-the-art Chromium-based engine lets you surf the Internet at a fast loading speed. IMPORTANT! Before doing any Internet surfing or Internet-related activities, ensure that your ASUS Tablet is connected to a Wi-Fi network. For more details, see the Staying connected section. Launching the Chrome app From your Home screen, tap > Chrome.
Clearing the browser cache Clear the browser cache to delete temporary Internet files, websites, and cookies that are temporarily stored in your ASUS Tablet. This helps improve the loading performance of your browser. 1. Launch the browser. 2. Tap 3. Click OK on the confirmation message. > Settings > Privacy & security > Clear cache. Email Add Exchange, Gmail, Yahoo! Mail, Outlook.com, POP3/IMAP accounts so you can receive, create, and browse emails right from your device.
Adding email accounts If you don’t have an existing email account, you can create one so you can receive, read, and send emails right from your ASUS Tablet. 1. From the Home screen, tap Email to launch the Email app. 2. Tap 3. Tap the mail provider that you want to add. 4. Follow the succeeding instructions to complete setting up your new email account. > Settings, then add an email account.
Calendar The Calendar app enables you to keep track of important events using your ASUS Tablet. Along with creating events you may also set reminders, or create a countdown notice to ensure you don’t forget these important occasions. It also stores the events, such as birthdays and anniversaries, that you’ve set up for your VIP contacts. Creating events To create an event: 1. Tap > Calendar. 2. Tap to start creating a new event. 3.
Creating an event from your account After adding online accounts that you would like to sync with Calendar, you may now use your ASUS Tablet to create notifications for those online accounts by following these steps: > Calendar. 1. Tap 2. Tap New Event to start creating a new event. 3. In the New event screen, tap My Calendar to view all the accounts currently synced with the Calendar. 4. Tap the account where you would like to create a new event. 5.
Do It Later Get hold of even the most trivial things in your busy life. Even when you’re too busy, reply to your emails, SMS messages, read news online, or add other important to-do tasks at your convenience. Mark your unread messages or emails and interesting web pages as Reply Later or Read Later items. These marked items will be added to your Do It Later tasks, and you can act on these tasks at a convenient time. NOTE: t 1PQVMBS UIJSE QBSUZ BQQT UIBU TVQQPSU %P *U -BUFS JODMVEF (PPHMF .
Catching up on my online reading now You can retrieve pages that you’ve previously marked as read later tasks and catch up on your online reading at your convenience from the Do It Later app. > Do It Later. 1. From the Home screen, tap 2. Select the page or pages that you want to read now, then tap Read now. NOTE: For details on setting pages as read later tasks, see the Reading the pages later section.
File Manager Using File Manager allows you to easily locate and manage your data on the internal storage of your ASUS Tablet and its connected external storage devices. Accessing the internal storage To access the internal storage: 1. Tap 2. Tap > File Manager. > Internal storage to view the contents of your ASUS Tablet then tap an item to select. Accessing the external storage device To access the external storage device: 1. Insert the microSD card into your ASUS Tablet. 2. Tap 3.
6 Staying connected Wi-Fi The Wi-Fi technology of your ASUS Tablet gets you connected to the wireless world. Update your social media accounts, browse the Internet, or exchange data and messages wirelessly from your ASUS Tablet. Enabling Wi-Fi 1. 2. Launch the Settings screen by doing any of the following: t Launch Quick settings then tap t Tap . > Settings. Slide the Wi-Fi switch to the right to turn on the Wi-Fi. NOTE: You can also enable the Wi-Fi from Quick Settings screen.
Disabling Wi-Fi To disable Wi-Fi: 1. 2. Launch the Settings screen by doing any of the following: t Launch Quick settings then tap t Tap . > Settings. Slide the Wi-Fi switch to the left to turn off the Wi-Fi. NOTE: You can also disable the Wi-Fi from Quick Settings screen. See the Quick settings section on how to launch Quick Settings screen. Bluetooth® Use the Bluetooth feature of your ASUS Tablet to send or receive files and stream multimedia files with other smart devices over short distances.
Pairing your ASUS Tablet to a Bluetooth® device Before using the Bluetooth feature of your ASUS Tablet in full scale, you have to pair it first with the Bluetooth device. The ASUS Tablet automatically stores the pairing connection of the Bluetooth device. 1. On the Settings screen, tap Bluetooth to display all available devices. IMPORTANT! t *G UIF EFWJDF UIBU ZPV XBOU UP QBJS JT OPU JO UIF MJTU FOTVSF UP FOBCMF JUT #MVFUPPUI GFBUVSF BOE JT discoverable.
Tethering When Wi-Fi service is not available, you can use your ASUS Tablet as a modem or turn it into a Wi-Fi hotspot to get Internet access on your laptop, tablet, and other mobile devices. IMPORTANT! Most mobile service providers may require a data plan for you to be able to use the tethering function. Contact your mobile service provider about availing of this data plan.
4. From the Tethering screen, tap Wi-Fi hotspot to turn on the Wi-Fi hotspot on your ASUS Tablet. 5. Connect other devices to your ASUS Tablet’s hotspot connection the same way you connect to a Wi-Fi network. Bluetooth Tethering Enable Bluetooth on your ASUS Tablet and use it to link with other devices, or link to a printer. 1. Enable Bluetooth on your ASUS Tablet and the other device. 2. Pair both devices. NOTE: For details, see the Pairing your ASUS Tablet to a Bluetooth® device section. 3.
PlayTo PlayTo app lets you screencast your ASUS Tablet to a streaming-supported display. Doing this allows an external display to become a dual monitor or second screen to your ASUS Tablet. IMPORTANT! Your external display must have Miracast™ or DLNA® technology to support PlayTo app. Launching PlayTo There are two ways you can use to start using PlayTo from your ASUS Tablet. From Quick settings 1. Setup the streaming-supported display you want to use with your ASUS Tablet. 2.
7 Travel and Maps Weather Get real-time weather updates straight from your ASUS Tablet using the weather app. Using Weather, you can also check other weather details from around the world. Launching the Weather app From your Home screen, launch the Weather app using either of the following options: t Tap t From your ASUS Tablet’s home screen, tap the weather icon. > Weather.
Weather home screen Set up and get your current location’s weather updates as well as other parts of the world. Tap to search for a city’s weather info Tap to get the area’s current weather info, refresh the weather info, edit the location list, or configure the weather settings Swipe up to see other weather information.
Getting the weather updates Get real-time AccuWeather® updates, every hour or up to 12 hours, for your current location or for other parts of the world. You can make plans for up to seven (7) days with the 7-day weather forecast or dress appropriately based on AccuWeather RealFeel® temperature. You can also get the real-time UV index or air pollution index, letting you take the necessary protective measures against harmful ultra-violet rays or air pollutants. 1. 2.
Clock Customize the time zone settings of your ASUS Tablet, set alarms, and use your ASUS Tablet as a stop watch using the Clock app. Launching Clock Launch the Clock app using either of the following options: t Tap t From your ASUS Tablet’s home screen, tap the digital clock display. > Clock. World Clock Tap to access the world clock settings of your ASUS Tablet. Tap this to add a new city to mark on your world clock’s map. Tap this to set your clock on night mode.
Alarm clock Tap to access the world clock settings of your ASUS Tablet. Tap this to delete any of the previously set alarms. Tap this to set a new alarm time. Tap this to access the settings of the alarm clock feature. Stopwatch Tap to use your ASUS Tablet as a stopwatch. Tap this button to start running the stopwatch feature.
Timer You may set multiple timer options for your ASUS Tablet. To do this, follow the steps below. Setting the timer 1. Tap to access the timer feature of your ASUS Tablet. Numeric keypad 2. 86 Use the numeric keypad to input your target time then tap start to start the timer.
8 Zen Everywhere Special Zen Tools Calculator One-swipe and a tap is all it takes to launch your Calculator. When you open the Quick settings panel, the Calculator icon is there visibly on top of the list. Tap it to get started with your computations.
Quick Memo Quick Memo is a note-taking tool that gives you the freedom to either scribble or type down important notes you need to remember. After creating notes, you can turn them into a task inside Do It Later. Creating a sticky note You can turn Quick Memo notes into a sticky note so you can view them anywhere on your ASUS Tablet. To create a sticky note, just tap on the pin icon on the upper right corner of Quick Memo after creating your note.
Power Saver Fully maximize or extend the power of your ASUS Tablet even when it is idle or while it stays connected to your network. Smartly customize the power settings for your frequent activities such as reading emails or watching videos. Setting up Power Saver Optimize the power of your ASUS Tablet according to your needs with some smart power saving options. > Settings > Power management > Power Saver. 1. Tap 2. Select any of these battery modes: t t t t t 3.
Chapter 8: Zen Everywhere
9 Maintain your Zen Keeping your device up-to-date Keep your ASUS Tablet in the loop of Android system updates and upgraded apps and features. Updating your system 1. Tap then tap Settings. 2. On the Settings screen, slide down to display other items then tap About. 3. Tap System update then tap Check Update. NOTE: You can preview the last time your ASUS Tablet’s system was updated in the Last check for update section.
Securing your ASUS Tablet Use the security features of your ASUS Tablet to prevent unauthorized access of information. Unlocking your screen When the screen is locked, you can open it with the security unlocking options that the ASUS Tablet offers you. then tap Settings > Lock Screen. 1. Tap 2. Tap Screen lock then select an option to unlock your ASUS Tablet. NOTE: t 3FGFS UP TFDUJPO Unlock screen options for more information.
PIN Key in at least four numbers to set a PIN. IMPORTANT! Ensure to remember the PIN that you created to unlock your device Pattern Slide your finger on the dots and create a pattern. IMPORTANT! You can create a pattern with a minimum of four dots. Ensure to remember the pattern that you created to unlock your device.
Password Key in at least four characters to create a password. IMPORTANT! Ensure to remember the password that you created to unlock your device. Configuring the other lock screen features Aside from the mode of screen lock, you can also do the following from the Lock screen settings: t Quick Access: Tap this to edit quick access on the lock screen.
Setting your ASUS Tablet identity Know your ASUS Tablet’s identity such as serial number, IMEI (International Mobile Equipment Identity) number, or model number. This is important, as when you lose your ASUS Tablet, you can contact your mobile carrier and provide the information to blacklist the unauthorized use of your ASUS Tablet. To display your ASUS Tablet’s identity: 1. Tap All Apps then tap Settings. 2. On the Settings screen, slide down to display other items then tap About.
Model name: XXXX Manufacturer: ASUSTeK Computer Inc. Address: 4F, No.150, LI-TE RD., PEITOU, TAIPEI 112, TAIWAN Authorised representative ASUS Computer GmbH in Europe: Address: 96 HARKORT STR.