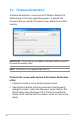
5.2 Firmware Restoration Firmware Restoration is used on an ASUS Wireless Router that failed during its firmware upgrading process. It uploads the firmware that you specify. The process takes about three to four minutes. IMPORTANT: Launch the rescue mode on the router before using the Firmware Restoration utility. NOTE: This feature is not supported on MAC OS. To launch the rescue mode and use the Firmware Restoration utility: 1. Unplug the wireless router from the power source. 2.
3. Set a static IP on your computer and use the following to set up your TCP/IP settings: IP address: 192.168.1.x Subnet mask: 255.255.255.0 4. From your computer’s desktop, click Start > All Programs > ASUS Utility RT-AC56U Wireless Router > Firmware Restoration. 5. Specify a firmware file, then click Upload. NOTE: This is not a firmware upgrade utility and cannot be used on a working ASUS Wireless Router. Normal firmware upgrades must be done through the web interface.
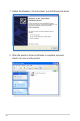
NOTE: The print server function is supported on Windows® XP, Windows® Vista, and Windows® 7. To set up the EZ Printer sharing mode: 1. From the navigation panel, go to General > USB Application > Network Printer Server. 2. Click Download Now! to download the network printer utility. NOTE: Network printer utility is supported on Windows® XP, Windows® Vista, and Windows® 7 only. To install the utility on Mac OS, select Use LPR protocol for sharing printer. 3.
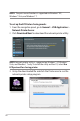
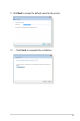
. Follow the onscreen instructions to set up your hardware, then click Next. 5. Wait a few minutes for the initial setup to finish. Click Next. 6. Click Finish to complete the installation.
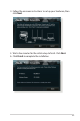
7. Follow the Windows® OS instructions to install the printer driver. 8. After the printer’s driver installation is complete, network clients can now use the printer.
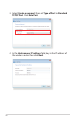
5.3.2 Using LPR to Share Printer You can share your printer with computers running on Windows® and MAC operating system using LPR/LPD (Line Printer Remote/ Line Printer Daemon). Sharing your LPR printer To share your LPR printer: 1. From the Windows® desktop, click Start > Devices and Printers > Add a printer to run the Add Printer Wizard. 2. Select Add a local printer and then click Next.
3. Select Create a new port then set Type of Port to Standard TCP/IP Port. Click New Port. 4. In the Hostname or IP address field, key in the IP address of the wireless router then click Next.
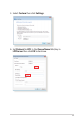
5. Select Custom then click Settings. 6. Set Protocol to LPR. In the Queue Name field, key in LPRServer then click OK to continue.
7. Click Next to finish setting up the standard TCP/IP port. 8. Install the printer driver from the vendor-model list. If your printer is not in the list, click Have Disk to manually install the printer drivers from a CD-ROM or file.
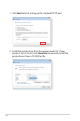
9. Click Next to accept the default name for the printer. 10. Click Finish to complete the installation.
5.4 Download Master Download Master is a utility that helps you download files even while your laptops or other devices are switched off. NOTE: You need a USB device connected to the wireless router to use Download Master. To use Download Master: 1. Click General > USB application > Download Master to download and install the utility automatically. NOTE: If you have more than one USB drive, select the USB device you want to download the files to. 2.
5. Use the navigation panel to configure the advanced settings. 5.4.1 Configuring Bit Torrent download settings To configure BitTorrent download settings: 1. From Download Master’s navigation panel, click Bit Torrent to launch the Bit Torrent Setting page. 2. Select a specific port for your download task. 3. To prevent network congestion, you can limit the maximum upload and download speeds under Speed Limits. 4.
5.4.2 NZB settings You can set up a USENET server to download NZB files. After entering USENET settings, Apply.
6 Troubleshooting This chapter provides solutions for issues you may encounter with your router. If you encounter problems that are not mentioned in this chapter, visit the ASUS support site at: http://support.asus.com/ for more product information and contact details of ASUS Technical Support. 6.1 Basic Troubleshooting If you are having problems with your router, try these basic steps in this section before looking for further solutions. Upgrade Firmware to the latest version. 1. Launch the Web GUI.
Restart your network in the following sequence: 1. Turn off the modem. 2. Unplug the modem. 3. Turn off the router and computers. 4. Plug in the modem. 5. Turn on the modem and then wait for 2 minutes. 6. Turn on the router and then wait for 2 minutes. 7. Turn on computers. Check if your Ethernet cables are plugged properly. • When the Ethernet cable connecting the router with the modem is plugged in properly, the WAN LED will be on.
• Some cable modem service providers require you to use the MAC address of the computer initially registered on the account. You can view the MAC address in the web GUI, Network Map > Clients page, and hover the mouse pointer over your device in Client Status.
6.2 Frequently Asked Questions (FAQs) I cannot access the router GUI using a web browser • If your computer is wired, check the Ethernet cable connection and LED status as described in the previous section. • Ensure that you are using the correct login information. The default factory login name and password is “admin/admin”. Ensure that the Caps Lock key is disabled when you enter the login information. • Delete the cookies and files in your web browser. For Internet Explorer 8, follow these steps: 1.
The client cannot establish a wireless connection with the router. NOTE: If you are having issues connecting to 5Ghz network, make sure that your wireless device supports 5Ghz or features dual band capabilities. • Out of Range: • Move the router closer to the wireless client. • Try to adjust antennas of the router to the best direction as described in section 1.4 Positioning your router. • DHCP server has been disabled: 1. Launch the web GUI.
• SSID has been hidden. If your device can find SSIDs from other routers but cannot find your router’s SSID, go to Advanced Settings > Wireless > General, select No on Hide SSID, and select Auto on Control Channel. • If you are using a wireless LAN adapter, check if the wireless channel in use conforms to the channels available in your country/area. If not, adjust the channel, channel bandwidth, and wireless mode.
Internet is not accessible. • Check if your router can connect to your ISP’s WAN IP address. To do this, launch the web GUI and go to General> Network Map, and check the Internet Status. • If your router cannot connect to your ISP’s WAN IP address, try restarting your network as described in the section Restart your network in following sequence under Basic Troubleshooting. • The device has been blocked via the Parental Control function.
• If there is still no Internet access, try to reboot your computer and verify the network’s IP address and gateway address. • Check the status indicators on the ADSL modem and the wireless router. If the WAN LED on the wireless router is not ON, check if all cables are plugged properly. You forgot the SSID (network name) or network password • Setup a new SSID and encryption key via a wired connection (Ethernet cable).
Firmware upgrade failed. Launch the rescue mode and run the Firmware Restoration utility. Refer to section 5.2 Firmware Restoration on how to use the Firmware Restoration utility.
Cannot access Web GUI Before configuring your wireless router, do the steps described in this section for your host computer and network clients. A. Disable the proxy server, if enabled. Windows® 7 1. Click Start > Internet Explorer to launch the browser. 2. Click Tools > Internet options > Connections tab > LAN settings. 3. From the Local Area Network (LAN) Settings screen, untick Use a proxy server for your LAN. 4. Click OK when done.
MAC OS 1. From your Safari browser, click Safari > Preferences > Advanced > Change Settings... 2. From the Network screen, deselect FTP Proxy and Web Proxy (HTTP). 3. Cllick Apply Now when done. NOTE: Refer to your browser's help feature for details on disabling the proxy server. B. Set the TCP/IP settings to automatically obtain an IP address. Windows® 7 1. Click Start > Control Panel > Network and Internet > Network and Sharing Center > Manage network connections. 2.
3. To obtain the IPv4 IP settings automatically, tick Obtain an IP address automatically. To obtain the IPv6 IP settings automatically, tick Obtain an IPv6 address automatically. 4. Click OK when done. MAC OS 1. Click the Apple icon located on the top left of your screen. 2. Click System Preferences > Network > Configure... 3. From the TCP/IP tab, select Using DHCP in the Configure IPv4 dropdown list. 4. Cllick Apply Now when done.
C. Disable the dial-up connection, if enabled. Windows® 7 1. Click Start > Internet Explorer to launch the browser. 2. Click Tools > Internet options > Connections tab. 3. Tick Never dial a connection. 4. Click OK when done. NOTE: Refer to your browser's help feature for details on disabling the dial-up connection.
Appendices Notices ASUS Recycling/Takeback Services ASUS recycling and takeback programs come from our commitment to the highest standards for protecting our environment. We believe in providing solutions for you to be able to responsibly recycle our products, batteries, other components, as well as the packaging materials. Please go to http://csr.asus. com/english/Takeback.htm for the detailed recycling information in different regions.
against harmful interference in a residential installation. This equipment generates, uses and can radiate radio frequency energy and, if not installed and used in accordance with the instructions, may cause harmful interference to radio communications. However, there is no guarantee that interference will not occur in a particular installation.
Safety Information To maintain compliance with FCC’s RF exposure guidelines, this equipment should be installed and operated with minimum distance 20cm between the radiator and your body. Use on the supplied antenna. Declaration of Conformity for R&TTE directive 1999/5/EC Essential requirements – Article 3 Protection requirements for health and safety – Article 3.1a Testing for electric safety according to EN 60950-1 has been conducted. These are considered relevant and sufficient.
Canada, Industry Canada (IC) Notices This Class B digital apparatus complies with Canadian ICES-003 and RSS-210. Operation is subject to the following two conditions: (1) this device may not cause interference, and (2) this device must accept any interference, including interference that may cause undesired operation of the device. Radio Frequency (RF) Exposure Information The radiated output power of the ASUS Wireless Device is below the Industry Canada (IC) radio frequency exposure limits.
canadiennes ICES-003 et RSS-210. Son fonctionnement est soumis aux deux conditions suivantes: (1) cet appareil ne doit pas causer d’interférence et (2) cet appareil doit accepter toute interférence, notamment les interférences qui peuvent a ecter son fonctionnement.
Everyone is permitted to copy and distribute verbatim copies of this license document, but changing it is not allowed. Preamble The licenses for most software are designed to take away your freedom to share and change it. By contrast, the GNU General Public License is intended to guarantee your freedom to share and change free software--to make sure the software is free for all its users.
We protect your rights with two steps: (1) copyright the software, and (2) offer you this license which gives you legal permission to copy, distribute and/or modify the software. Also, for each author’s protection and ours, we want to make certain that everyone understands that there is no warranty for this free software.
of running the Program is not restricted, and the output from the Program is covered only if its contents constitute a work based on the Program (independent of having been made by running the Program). Whether that is true depends on what the Program does. 1.
the program under these conditions, and telling the user how to view a copy of this License. (Exception: if the Program itself is interactive but does not normally print such an announcement, your work based on the Program is not required to print an announcement.) These requirements apply to the modified work as a whole.
cost of physically performing source distribution, a complete machine-readable copy of the corresponding source code, to be distributed under the terms of Sections 1 and 2 above on a medium customarily used for software interchange; or, c) Accompany it with the information you received as to the offer to distribute corresponding source code.
Therefore, by modifying or distributing the Program (or any work based on the Program), you indicate your acceptance of this License to do so, and all its terms and conditions for copying, distributing or modifying the Program or works based on it. 6. Each time you redistribute the Program (or any work based on the Program), the recipient automatically receives a license from the original licensor to copy, distribute or modify the Program subject to these terms and conditions.
on consistent application of that system; it is up to the author/ donor to decide if he or she is willing to distribute software through any other system and a licensee cannot impose that choice. This section is intended to make thoroughly clear what is believed to be a consequence of the rest of this License. 8.
NO WARRANTY 11 BECAUSE THE PROGRAM IS LICENSED FREE OF CHARGE, THERE IS NO WARRANTY FOR THE PROGRAM, TO THE EXTENT PERMITTED BY APPLICABLE LAW. EXCEPT WHEN OTHERWISE STATED IN WRITING THE COPYRIGHT HOLDERS AND/OR OTHER PARTIES PROVIDE THE PROGRAM “AS IS” WITHOUT WARRANTY OF ANY KIND, EITHER EXPRESSED OR IMPLIED, INCLUDING, BUT NOT LIMITED TO, THE IMPLIED WARRANTIES OF MERCHANTABILITY AND FITNESS FOR A PARTICULAR PURPOSE. THE ENTIRE RISK AS TO THE QUALITY AND PERFORMANCE OF THE PROGRAM IS WITH YOU.
For Turkey only Authorised distributors in Turkey: Penta Teknoloji Urunleri Dagitim Ticaret Anonim Sirketi Tel. No.: 0216 645 8200 Address: DUDULLU ORGANIZE SANAYI BOLGESI NATO YOLU 4. CAD. NO:1 DUDULLU UMRANIYE 34775 ISTANBUL TURKEY EEE Yönetmeliğine Uygundur.
ASUS Contact information ASUSTeK COMPUTER INC. (Asia Pacific) Address Website 15 Li-Te Road, Peitou, Taipei, Taiwan 11259 www.asus.com.tw Technical Support Telephone Support Fax Online support +886228943447 +886228907698 support.asus.com ASUS COMPUTER INTERNATIONAL (America) Address 800 Corporate Way, Fremont, CA 94539, USA Telephone +15107393777 Fax +15106084555 Website usa.asus.com Online support support.asus.
Networks Global Hotline Information Region Country Service Hours 09:00-13:00 ; 14:00-18:00 Mon-Fri 09:00-18:00 Mon-Fri Cyprus 800-92491 France Hungary 0033-170949400 0049-1805010920 0049-1805010923 ( component support ) 0049-2102959911 ( Fax ) 0036-15054561 Italy 199-400089 Greece 00800-44142044 Austria Netherlands/ Luxembourg Belgium Norway Sweden Finland Denmark Poland Spain Portugal Slovak Republic Czech Republic Switzerland-German Switzerland-French Switzerland-Italian United Kingdom Ireland
Networks Global Hotline Information Region Country Australia New Zealand Japan Korea Thailand Asia-Pacific Singapore Malaysia Philippine India India(WL/NW) Indonesia Americas Hotline Numbers 1300-278788 0800-278788 0800-1232787 0081-473905630 ( Non-Toll Free ) 0082-215666868 0066-24011717 1800-8525201 0065-64157917 0065-67203835 ( Repair Status Only ) 0060-320535077 1800-18550163 1800-2090365 0062-2129495000 500128 (Local Only) Vietnam 1900-555581 Hong Kong USA Canada Mexico 00852-35824770 1-812-
Networks Global Hotline Information Region Middle East + Africa Country Egypt Saudi Arabia UAE Turkey South Africa Israel Romania Bosnia Herzegovina Bulgaria Balkan Countries Croatia Montenegro Serbia Slovenia Estonia Latvia Lithuania-Kaunas Lithuania-Vilnius Hotline Numbers 800-2787349 800-1212787 00971-42958941 0090-2165243000 0861-278772 *6557/00972-39142800 *9770/00972-35598555 0040-213301786 Service Hours 09:00-18:00 Sun-Thu 09:00-18:00 Sat-Wed 09:00-18:00 Sun-Thu 09:00-18:00 Mon-Fri 08:00-17:00 M