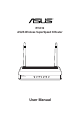
RT-N12 ASUS Wireless SuperSpeed N Router RT-N12 300M SuperSpeed User Manual
E4809 First Edition V1 July 2009 Copyright © 2009 ASUSTeK Computer Inc. All Rights Reserved. No part of this manual, including the products and software described in it, may be reproduced, transmitted, transcribed, stored in a retrieval system, or translated into any language in any form or by any means, except documentation kept by the purchaser for backup purposes, without the express written permission of ASUSTeK Computer Inc. (“ASUS”).
Table of contents About this guide..................................................................................... 4 How this guide is organized............................................................... 4 Conventions used in this guide.......................................................... 5 Chapter 1: Knowing your wireless router Package contents................................................................................... 6 System requirements..........................................
Table of contents Chapter 5: Installing the utilities Installing the utilities............................................................................ 34 Device Discovery.................................................................................. 36 Firmware Restoration........................................................................... 37 WPS Wizard........................................................................................... 38 Using WPS Wizard..............................
• Chapter 4: Configuring via the web GUI This chapter provides instructions on configuring the ASUS Wireless Router using its web graphics user interface (web GUI). • Chapter 5: Installing the utilities This chapter provides information on the utilities that are available from the support CD. • Chapter 6: Troubleshooting This chapter provides you with a troubleshooting guide for solving common problems you may encounter when using the ASUS Wireless Router.
1 Knowing your wireless router Package contents Check the following items in your ASUS Wireless Router package. RT-N12 Wireless Router x1 Power adapter x1 Support CD (manual, utilities) x1 RJ45 cable x1 Detachable antenna x2 Quick Start Guide x1 Note: If any of the items is damaged or missing, contact your retailer.
• Install the device at least 20cm from a person to insure that the product is operated in accordance with the RF Guidelines for Human Exposure adopted by the Federal Communications Commission.
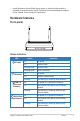
Rear panel Operation mode selector Label WAN Connect an RJ-45 Ethernet cable to this port to establish WAN connection. LAN1-LAN4 Connect RJ-45 Ethernet cables to these ports to establish LAN connection. DC IN Insert the AC adapter into this port to connect your router to a power source. WPS Press this button to establish wireless connection. Restore Description Press this button for more than five seconds to restore the system to its factory default settings.
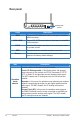
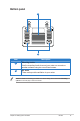
Bottom panel 2 1 Item Description 1 Mounting hooks Use the mounting hooks to mount your router on concrete or wooden surfaces using two round head screws. 2 Air vents These vents provide ventilation to your router. Note: For details on mounting your router on a wall or ceiling, refer to the section Mounting options on the next page of this user manual.
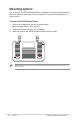
Mounting options Out of the box, the ASUS Wireless Router is designed to sit on a raised flat surface like a file cabinet or book shelf. The unit may also be converted for mounting to a wall or ceiling. To mount the ASUS Wireless Router: 1. 2. 3. 4. Look on the underside for the two mounting hooks. Mark two upper holes in a flat surface. Tighten two screws until only 1/4'' is showing. Latch the hooks of the ASUS Wireless Router onto the screws.
2 Getting started Setting up the wireless router The ASUS Wireless Router includes a web graphics user interface (web GUI) that allows you to configure the wireless router using your web browser on your computer. Note: For details on configuring your wireless router using the web GUI, refer to Chapter 4: Configuring via the web GUI. You can set up the wireless router in any of these three operation modes: Router (IP Sharing), Repeater, and Access Point (AP).
Setting up the wireless router in Router mode In the Router mode, the wireless router connects to the Internet via PPPoE, Automatic IP, PPTP, L2TP, or Static IP, and provides you with wireless radio signal. The NAT, firewall, and IP sharing services for LAN clients are enabled. To set up the wireless router in Router mode: 1. Choose the Router mode. Router AP Repeater RT-N12 2. Connect your devices.
3. Launch your web browser and the QIS starts to detect your Internet connection type. Note: If the QIS web page does not appear after you launched your web browser, disable the proxy settings on your web browser. 4. Key in the user name and password. Click Apply all settings. Note: • The PPPoE Internet connection type is used in this setup case. The setup screen varies with different Internet connection types.
5. The Internet connection setup is completed. • • Click Going to Internet to surf the Internet. Click Simply Wireless Security Setting to configure the basic security settings including the SSID, authentication, and encryption methods for the wireless router. • Click Advanced Setting page to manually configure advanced settings for the wireless router. Click Add to Favorites to add this URL to your Favorites list for quick access to the web GUI.
Setting up the wireless router in Repeater mode In the Repeater mode, the wireless router extends your wireless network coverage and provides you with higher quality wireless radio signal. The NAT, firewall, and IP sharing services are disabled. To set up the wireless router in Repeater mode: 1. Choose the Repeater mode. Router RT-N12 AP Repeater 2. Connect your devices.
3. Launch your web browser and the QIS web page appears automatically. Select the AP whose wireless signal you want to extend, then click Connect. Note: If the QIS web page does not appear after you launched your web browser, disable the proxy settings on your web browser.
Setting up the wireless router in AP mode Note: To set up the wireless router in the AP mode, use Device Discovery included in the support CD to access the web GUI. In the AP mode, the wireless router receives the WAN IP address from the router connected to the WAN port and provides you with wireless radio signal. The NAT, firewall, and IP sharing services are disabled. To set up the wireless router in AP mode: 1. Choose the AP mode. Router RT-N12 AP Repeater 2. Connect your devices.
3. Launch the Device Discovery utility and click Configure to access the web GUI. 4. On the login page, key in the default user name (admin) and password (admin). 5. From the main page, click the navigation menu or links to configure the various features of the wireless router.