RT-N12 RT-N12 B1 ASUS Wireless Super Speed N Router RT-N12/RT-N12B1 Wireless Super Speed N Router User Manual E6473_RT-N1 -B1_Manual.
E6473 First Edition V1 April 2011 Copyright © 2011 ASUSTeK Computer Inc. All Rights Reserved. No part of this manual, including the products and software described in it, may be reproduced, transmitted, transcribed, stored in a retrieval system, or translated into any language in any form or by any means, except documentation kept by the purchaser for backup purposes, without the express written permission of ASUSTeK Computer Inc. (“ASUS”).
Table of contents About this guide..................................................................................... 4 Chapter 1: Knowing your wireless router Package contents................................................................................... 6 System requirements............................................................................. 6 Before you proceed................................................................................ 6 Hardware features............................
Table of contents Chapter 6: Troubleshooting Troubleshooting.................................................................................... 45 ASUS DDNS Service............................................................................. 48 Frequently Asked Questions (FAQs)................................................ 48 Appendices Notices................................................................................................... 51 ASUS Contact information.................................
• Chapter 6: Troubleshooting This chapter provides you with a troubleshooting guide for solving common problems you may encounter when using the ASUS Wireless Router. • Appendices This chapter provides you with the regulatory Notices and Safety Statements. Conventions used in this guide WARNING: Information to prevent injury to yourself when trying to complete a task. CAUTION: Information to prevent damage to the components when trying to complete a task.
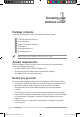
1 Knowing your wireless router Package contents Check the following items in your ASUS Wireless Router package. RT-N12 B1 Wireless Router x1 Power adapter x1 Support CD (manual, utilities) x1 RJ45 cable x1 Detachable antenna x2 Quick Start Guide x1 Note: If any of the items is damaged or missing, contact your retailer.
• Install the device at least 20cm from a person to insure that the product is operated in accordance with the RF Guidelines for Human Exposure adopted by the Federal Communications Commission.
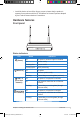
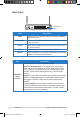
Rear panel Operation mode selector Label Connect an RJ-45 Ethernet cable to this port to establish WAN connection. LAN1-LAN4 Connect RJ-45 Ethernet cables to these ports to establish LAN connection. DC IN Insert the AC adapter into this port to connect your router to a power source. WPS Press this button to establish wireless connection. Restore Description WAN Press this button for more than five seconds to restore the system to its factory default settings.
2 Getting started Setting up the wireless router The ASUS Wireless Router includes a web graphics user interface (web GUI) that allows you to configure the wireless router using your web browser on your computer. Note: For details on configuring your wireless router using the web GUI, refer to Chapter 4: Configuring via the web GUI. You can set up the wireless router in any of these three operation modes: Router (IP Sharing), Repeater, and Access Point (AP).
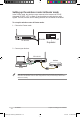
Setting up the wireless router in Router mode In the Router mode, the wireless router connects to the Internet via PPPoE, Automatic IP, PPTP, L2TP, or Static IP, and provides you with wireless radio signals. The NAT, firewall, and IP sharing services for LAN clients are enabled. To set up the wireless router in Router mode: 1. Choose the Router mode. LAN1 LAN2 LAN3 LAN4 Internet Router RT-N12 B1 AP Repeater 2. Connect your devices.
3. Launch your web browser and the QIS starts to detect your Internet connection type. Note: If the QIS web page does not appear after you launched your web browser, disable the proxy settings on your web browser. 4. Key in the user name and password. Click Apply all settings. Note: • The PPPoE Internet connection type is used in this setup case. The setup screen varies with different Internet connection types.
5. The Internet connection setup is completed. • • • 14 Click Going to Internet to surf the Internet. Click Advanced Setting page to manually configure advanced settings for the wireless router. Click Add to Favorites to add this URL to your Favorites list for quick access to the web GUI. RT-N12 B1 E6473_RT-N1 -B1_Manual.
Setting up the wireless router in Repeater mode In the Repeater mode, the wireless router extends your wireless network coverage and provides you with higher quality wireless radio signals. The NAT, firewall, and IP sharing services are disabled. To set up the wireless router in Repeater mode: 1. Choose the Repeater mode. LAN1 LAN2 LAN3 LAN4 Internet Router RT-N12 B1 AP Repeater 2. Connect your devices.
3. Launch your web browser and the QIS web page appears automatically. Select the AP whose wireless signal you want to extend, then click Connect. Note: If the QIS web page does not appear after you launched your web browser, disable the proxy settings on your web browser. 16 RT-N12 B1 E6473_RT-N1 -B1_Manual.
Setting up the wireless router in AP mode Note: To set up the wireless router in the AP mode, use Device Discovery included in the support CD to access the web GUI. In the AP mode, the wireless router receives the WAN IP address from the router connected to the WAN port and provides you with wireless radio signals. The NAT, firewall, and IP sharing services are disabled. To set up the wireless router in AP mode: 1. Choose the AP mode. LAN1 LAN2 LAN3 LAN4 Internet Router RT-N12 B1 AP Repeater 2.
3. Launch the Device Discovery utility and click Configure to access the web GUI. 4. On the login page, key in the default user name (admin) and password (admin). 5. From the main page, click the navigation menu or links to configure the various features of the wireless router. 18 RT-N12 B1 E6473_RT-N1 -B1_Manual.
3 Configuring the network clients Accessing the wireless router Setting an IP address for wired or wireless clients To access the ASUS Wireless Router, you must have the correct TCP/IP settings on your wired or wireless clients. Ensure that the clients’ IP addresses are within the same subnet as the ASUS Wireless Router. By default, the ASUS Wireless Router integrates the DHCP server function, which automatically assigns IP addresses to the clients in your network.
Windows® 9x/ME 1. Click Start > Control Panel > Network to display the Network setup window. 2. Select TCP/IP then click Properties. 3. If you want your computer to automatically obtain an IP address, click Obtain an IP address automatically then click OK. Otherwise, click Specify an IP address, then key in the IP address and Subnet Mask. 20 RT-N12 B1 E6473_RT-N1 -B1_Manual.
4. Select the Gateway tab, and key in New gateway then click Add. 5. Select the DNS configuration tab and click Enable DNS. Key in Host, Domain, and DNS Server Search Order, then click Add. 6. Click OK. Chapter 3: Configuring the clients E6473_RT-N1 -B1_Manual.
Windows® NT4.0 1. Go to Control Panel > Network to display the Network setup window then select the Protocols tab. 2. Select TCP/IP Protocol from the Network Protocols list then click Properties. 3. From the IP Address tab of the Microsoft TCP/IP Properties window, you can: • Select the type of network adapter installed in your system. • Set the router to assign IP address automatically. • Manually set up the IP address, subnet mask, and default gateway. 22 RT-N12 B1 E6473_RT-N1 -B1_Manual.
4. Select the DNS tab then click Add under the DNS Service Search Order and key in DNS. Windows® 2000 1. Click Start > Control Panel > Network and Dial-up Connection. Right-click Local Area Connection then click Properties. Chapter 3: Configuring the clients E6473_RT-N1 -B1_Manual.
2. Select Internet Protocol (TCP/IP), then click Properties. 3. Select Obtain an IP address automatically if you want the IP settings to be assigned automatically. Otherwise, select Use the following IP address: and key in IP address, Subnet mask, and Default gateway. 4. Select Obtain DNS server address automatically if you want the DNS server settings to be assigned automatically. Otherwise, select Use the following DNS server addresses: and key in the Preferred and Alternate DNS server. 5.
Windows® XP 1. Click Start > Control Panel > Network Connection. Right-click Local Area Connection then select Properties. 2. Select Internet Protocol (TCP/IP), then click Properties. 3. Select Obtain an IP address automatically if you want the IP settings to be assigned automatically. Otherwise, select Use the following IP address: and key in IP address, Subnet mask, and Default gateway. 4. Select Obtain DNS server address automatically if you want the DNS server settings to be assigned automatically.
Windows® Vista 1. Go to Start > Control Panel > Network and Internet > Network and Sharing Center. Click View status > Properties > Continue. 2. Select Internet Protocol Version 4 (TCP/IPv4), then click Properties. 3. Select Obtain an IP address automatically if you want the IP settings to be assigned automatically. Otherwise, select Use the following IP address: and key in IP address and Subnet mask. 4.
4 Configuring via the web GUI Configuring via the web GUI The router’s web graphics user interface (web GUI) allows you to configure these features: Network Map and EZQoS Bandwidth Management. To access the web GUI: 1. Launch a web browser, then key in the router’s IP address. The login page of the router’s web GUI appears. Note: • In the Router mode, the router’s IP address is 192.168.1.1. • In the Repeater and AP modes, use Device Discovery included in the support CD to find the router’s IP address. 2.
3. From the main page, click the navigation menu or links to configure the various features of the ASUS Wireless Router. 28 RT-N12 B1 E6473_RT-N1 -B1_Manual.
Using the Network Map Network Map allows you to view the status and configure the connection settings of the Internet, system, and clients in your network. It enables you to quickly set up your Wide Area Network (WAN) using the Quick Internet Setup (QIS) feature, or to quickly set up your Local Area Network (LAN) using the WPS Wizard. Note: For more details on the WPS Wizard, refer to the section WPS Wizard in Chapter 5 of this user manual.
Creating multiple SSID profiles The wireless router allows you to create multiple SSID profiles that meet various working scenarios. To create an SSID profile: 1. Under System status, click Add. 2. Configure the profile settings, then click Add. 30 RT-N12 B1 E6473_RT-N1 -B1_Manual.
Managing bandwidth with EzQoS EzQoS Bandwidth Management enables you to set the bandwidth priority and manage the network traffic. To set up the bandwidth priority: 1. Click EzQoS Bandwidth Management from the navigation menu at the left side of your screen. 2. Click each of these four applications to set the bandwidth priority: Icon Description Gaming Blaster The router handles gaming traffic at first priority.
Upgrading the firmware Note: Download the latest firmware from the ASUS website at http://www.asus.com. To upgrade the firmware: 1. Click Advanced Setting from the navigation menu at the left side of your screen. 2. Under the Administration menu, click Firmware Upgrade. 3. In the New Firmware File field, click Browse to locate the new firmware on your computer. 4. Click Upload. The uploading process takes about three minutes.
Restoring/Saving/Uploading settings To restore/save/upload the settings: 1. Click Advanced Setting from the navigation menu at the left side of your screen. 2. Under the Administration menu, click Restore/Save/Upload Setting. 3. Select the tasks that you want to do: • To restore to the default factory settings, click Restore, and click OK in the confirmation message.
34 RT-N12 B1 E6473_RT-N1 -B1_Manual.
5 Installing the utilities Installing the utilities The support CD contains the utilities for configuring the ASUS Wireless Router. To install the ASUS WLAN Utilities in Microsoft® Windows, insert the support CD in the CD drive. If Autorun is disabled, run setup.exe from the root directory of the support CD. To install the utilities: 1. Click Install...Utilities. 2. Click Next. Note: When you install the utilities, the setup wizard automatically detects your computer’s operating system.
3. Click Next to accept the default destination folder or click Browse to specify another path. 4. Click Next to accept the default program folder or enter another name. 5. Click Finish when setup is completed. 36 RT-N12 B1 E6473_RT-N1 -B1_Manual.
Device Discovery Device Discovery is an ASUS WLAN utility that detects an ASUS wireless router and enables you to configure the device. To launch the Device Discovery utility: From your computer’s desktop, click Start > All Programs > ASUS Utility > RT-N12 B1 Wireless Router > Device Discovery. • • • Click Configure to access the web GUI and configure the wireless router. Click Search to search for ASUS wireless routers within range. Click Exit to exit the application.
Firmware Restoration Firmware Restoration is used on an ASUS Wireless Router that failed during its firmware upgrading process. It uploads the firmware that you specify. The process takes about three to four minutes. Important: Launch the rescue mode before using the Firmware Restoration utility. To launch the rescue mode and use the Firmware Restoration utility: 1. Unplug the wireless router from the power source. 2.
WPS Wizard WPS (Wi-Fi Protected Setup) allows you to set up a secure and protected wireless network easily. Using WPS Wizard Note: • Ensure that you use a wireless LAN adapter with WPS function. • Windows® operating systems and wireless LAN cards/adapters that support WPS: OS Support Wireless Adapter Support Intel wireless LAN card Vista 32/64 ASUS 167gv2 driver v3.0.6.0 or later ASUS 160N/130N driver v2.0.0.0 or later Intel wireless LAN card XP SP2 ASUS 167gv2 driver v1.2.2.
2. Push the WPS button at the rear panel of the wireless router for more than five seconds. WPS button 3. On the WPS Wizard, click Next to continue. Notes: • When running WPS, the Internet connection pauses briefly then reestablishes the connection. • If the WPS button is pushed without running the WPS Wizard, the PWR indicator flashes and Internet connection pauses briefly and then reestablishes the connection. 40 RT-N12 B1 E6473_RT-N1 -B1_Manual.
4. Assign a name to your network, then click Next. 5. Use the auto-generated passphrase as your network’s security key or manually assign a passphrase containing between 8 and 63 characters. Click Next. Chapter 5: Installing the utilities E6473_RT-N1 -B1_Manual.
6. Installation is completed. Click Save or print settings for future reference or Save settings to a USB flash drive to add other devices to the network. Click Next to connect to the Internet. Note: For more details on adding devices to the network using a USB flash drive, refer to the section Adding network devices using a USB flash drive on the next page. 7. You have connected to the wireless router. If you want to configure the Internet settings, click Setup. Click Finish to close the WPS Wizard.
Adding network devices using a USB flash drive With the WPS utility, you can add devices to your network using a USB flash drive. To add network devices using a USB flash drive: 1. In the WPS Wizard, click Save settings to a USB flash drive. 2. Plug a USB flash drive into the USB port on your computer, and then select the drive from the dropdown list. When done, click Next to continue. Chapter 5: Installing the utilities E6473_RT-N1 -B1_Manual.
3. Remove the USB flash drive from this computer, and then plug it to the computer that you want to add to the wireless network. 4. Locate the SetupWireless.exe from the USB drive, and double-click to run it. Click Yes to add the computer to the wireless network. 5. Click OK to exit the Wireless Network Setup Wizard. 44 RT-N12 B1 E6473_RT-N1 -B1_Manual.
6 Troubleshooting Troubleshooting This troubleshooting guide provides solutions to some common problems that you may encounter while installing or using the ASUS Wireless Router. These problems require simple troubleshooting that you can perform by yourself. Contact the ASUS Technical Support if you encounter problems not mentioned in this chapter. Problem Action I cannot access the web GUI for configuring the router. 1. Launch a web browser, then click Tools > Internet Options... 2.
Problem Cannot access the Internet via wireless LAN adapter. Action • • • • • • Internet is not accessible. • • When ADSL Modem “Link” light is ON (not blinking), this means Internet Access is possible. • • • • • • Check the status indicators on the ADSL modem and the wireless router. Check if the WAN LED on the wireless router is ON. If the LED is not ON, change the cable and try again. Restart your computer. Refer to the Quick Start Guide of the wireless router and re-configure the settings.
Problem How to restore the system to its default settings? Action • • Press the Restore button at the rear panel of the wireless router for more than five seconds. Refer to the section Restoring/Saving/ Uploading settings in Chapter 4 of this user manual. The following are the factory default settings: User Name: admin Password: admin Enable DHCP: Yes (if WAN cable is plugged in) IP address: 192.168.1.1 Domain Name: (Blank) Subnet Mask: 255.255.255.0 DNS Server 1: 192.168.1.
ASUS DDNS Service RT-N12 B1 supports the ASUS DDNS service. When exchanging devices at the service center, if you have registered the ASUS DDNS service and want to keep the original domain name, data transfer is a must. Visit your local service center for more information. Notes: • If there is no activity in the domain - such as reconfiguring the router or accessing the registered domain name - within 90 days, the system automatically deletes the registered information.
5. After restarting the router, why is it that I see different WAN IPs in MS DOS and in the router configuration page? This is normal. The interval time between the ISP DNS server and ASUS DDNS results in different WAN IPs in MS DOS and in the router configuration page. Different ISPs may have different interval time for IP updating. 6. Is the ASUS DDNS service free, or is it just a trial version? The ASUS DDNS service is a free and embedded service in some ASUS routers.
50 RT-N12 B1 E6473_RT-N1 -B1_Manual.
Appendices Notices ASUS Recycling/Takeback Services ASUS recycling and takeback programs come from our commitment to the highest standards for protecting our environment. We believe in providing solutions for you to be able to responsibly recycle our products, batteries, other components, as well as the packaging materials. Please go to http://csr.asus.com/english/Takeback.htm for the detailed recycling information in different regions.
Country Code Statement For product available in the USA/Canada market, only channels 1~11 can be operated. Selection of other channels is not possible. Prohibition of Co-location This device and its antenna(s) must not be co-located or operating in conjunction with any other antenna or transmitter. Safety Information To maintain compliance with FCC’s RF exposure guidelines, this equipment should be installed and operated with minimum distance 20cm between the radiator and your body.
GNU General Public License Licensing information This product includes copyrighted third-party software licensed under the terms of the GNU General Public License. Please see The GNU General Public License for the exact terms and conditions of this license. We include a copy of the GPL with every CD shipped with our product. All future firmware updates will also be accompanied with their respective source code. Please visit our web site for updated information.
Also, for each author’s protection and ours, we want to make certain that everyone understands that there is no warranty for this free software. If the software is modified by someone else and passed on, we want its recipients to know that what they have is not the original, so that any problems introduced by others will not reflect on the original authors’ reputations. Finally, any free program is threatened constantly by software patents.
you must cause it, when started running for such interactive use in the most ordinary way, to print or display an announcement including an appropriate copyright notice and a notice that there is no warranty (or else, saying that you provide a warranty) and that users may redistribute the program under these conditions, and telling the user how to view a copy of this License.
accompanies the executable. If distribution of executable or object code is made by offering access to copy from a designated place, then offering equivalent access to copy the source code from the same place counts as distribution of the source code, even though third parties are not compelled to copy the source along with the object code. 4. You may not copy, modify, sublicense, or distribute the Program except as expressly provided under this License.
made generous contributions to the wide range of software distributed through that system in reliance on consistent application of that system; it is up to the author/donor to decide if he or she is willing to distribute software through any other system and a licensee cannot impose that choice. This section is intended to make thoroughly clear what is believed to be a consequence of the rest of this License. 8.
12 IN NO EVENT UNLESS REQUIRED BY APPLICABLE LAW OR AGREED TO IN WRITING WILL ANY COPYRIGHT HOLDER, OR ANY OTHER PARTY WHO MAY MODIFY AND/OR REDISTRIBUTE THE PROGRAM AS PERMITTED ABOVE, BE LIABLE TO YOU FOR DAMAGES, INCLUDING ANY GENERAL, SPECIAL, INCIDENTAL OR CONSEQUENTIAL DAMAGES ARISING OUT OF THE USE OR INABILITY TO USE THE PROGRAM (INCLUDING BUT NOT LIMITED TO LOSS OF DATA OR DATA BEING RENDERED INACCURATE OR LOSSES SUSTAINED BY YOU OR THIRD PARTIES OR A FAILURE OF THE PROGRAM TO OPERATE WITH ANY OTH
ASUS Contact information ASUSTeK COMPUTER INC. (Asia Pacific) Address Website 15 Li-Te Road, Peitou, Taipei, Taiwan 11259 www.asus.com.tw Technical Support Telephone Support Fax Online support +886228943447 +886228907698 support.asus.com ASUS COMPUTER INTERNATIONAL (America) Address Telephone Fax Website Online support 800 Corporate Way, Fremont, CA 94539, USA +15029550883 +15029338713 usa.asus.com support.asus.
Manufacturer: ASUSTeK Computer Inc. Tel: +886-2-2894-3447 Address: No. 150, LI-TE RD., PEITOU, TAIPEI 112, TAIWAN Authorised representative ASUS Computer GmbH in Europe: Address: HARKORT STR. 21-23, 40880 RATINGEN, GERMANY BOGAZICI BIL GISAYAR SAN. VE TIC. A.S. Authorised distributors in Turkey: Tel: +90 212 3311000 Address: AYAZAGA MAH. KEMERBURGAZ CAD. NO.10 AYAZAGA/ISTANBUL CIZGI Elektronik San. Tic. Ltd. Sti. Tel: 0090 2123567070 Address: CEMAL SURURI CD.