User Guide RT-N65U Dual-band Wireless-N750 Gigabit Router The ultra-thin and stylish RT-N65U features a 2.4GHz and 5GHz dual bands for an unmatched concurrent wireless HD streaming; SMB server, UPnP AV server, and FTP server for 24/7 file sharing; a capability to handle 300,000 sessions; and the ASUS Green Network Technology, which provides up to 70% powersaving solution.
E7376 First Edition April 2012 Copyright © 2012 ASUSTeK Computer Inc. All Rights Reserved. No part of this manual, including the products and software described in it, may be reproduced, transmitted, transcribed, stored in a retrieval system, or translated into any language in any form or by any means, except documentation kept by the purchaser for backup purposes, without the express written permission of ASUSTeK Computer Inc. (“ASUS”).
Table of contents 1 A quick look Package contents......................................................................................... 5 Your wireless router..................................................................................... 5 Mounting placement.................................................................................. 7 2 Creating your network Positioning your router.............................................................................. 8 What you need..............
Table of contents Using the Network Place (Samba) Share service.....................33 Using the FTP Share service............................................................34 Using the Miscellaneous setting....................................................36 Configuring the Advanced settings.....................................................37 Setting up the DHCP Server............................................................37 Upgrading the firmware.................................................
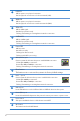
1 A quick look Package contents RT-N65U Wireless Router Power adapter Support CD (Manual, utility software) Network cable (RJ-45) Quick Start Guide Warranty card NOTES: • If any of the items is damaged or missing, contact ASUS for technical inquiries and support, Refer to the ASUS Support Hotline list at the back of this user manual. • Keep the original packaging material in case you would need future warranty services such as repair or replacement.
2 LAN LED O ff: No power or no physical connection. O n: Has physical connection to a local area network (LAN). 3 WAN LED O ff: No power or no physical connection. O n: Has physical connection to a wide area network (WAN). 4 5GHz LED 5 2.4GHz LED 6 Power LED 7 WAN (Internet) port Connect a network cable into this port to establish WAN connection. Y ellow LED: 1000Mbps connection. G reen LED: 10Mbps/100Mbps connection. Flashing: Transmitting or receiving data via wired connection.
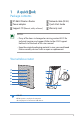
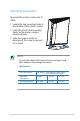
Mounting placement To mount the wireless router into its stand: 1. Locate the two mounting holes at the bottom of the wireless router. 2. Latch the stand’s two mounting hooks to the wireless router’s mounting holes. 3. Slide the wireless router to direction of the arrow to secure it to its stand. 2 2 3 NOTES: • Use only the adapter that came with your package. Using other adapters may damage the device. • Specifications: DC Power adapter DC Output: +19V with max 1.
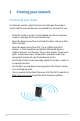
2 Creating your network Positioning your router For the best wireless signal transmission between the wireless router and the network devices connected to it, ensure that you: • Place the wireless router in a centralized area for a maximum wireless coverage for the network devices. • Keep the device away from metal obstructions and away from direct sunlight. • Keep the device away from 802.11g or 20MHz only Wi-Fi devices, 2.
What you need To set up your network, you need one or two computers that meet the following system requirements: • Ethernet RJ-45 (LAN) port (10Base-T/100Base-TX/ 1000BaseTX) • IEEE 802.11a/b/g/n wireless capability • An installed TCP/IP service • Web browser such as Internet Explorer, Firefox, Safari, or Google Chrome NOTES: • If your computer does not have built-in wireless capabilities, you may install an IEEE 802.11a/b/g/n WLAN adapter to your computer to connect to the network.
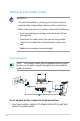
Setting up your wireless router IMPORTANT! • Use wired connection in setting up your wireless router to avoid possible setup problems due to wireless uncertainty. • Before setting up your ASUS wireless router, do the following: • If you are replacing an existing router, disconnect it from your network. • Disconnect the cables/wires from your existing modem setup. If your modem has a backup battery, remove it as well. • Reboot your computer (recommended).
2. Using the bundled network cable, connect your computer to your wireless router’s LAN port. IMPORTANT! Ensure that the LAN LED is blinking. 3 Using another network cable, connect your modem to your wireless router’s WAN port. 4. Insert your modem’s AC adapter to the DC-In port and plug it to a power outlet. Wireless connection 3 Modem ON/OFF DCIN 2 1 To set up your wireless router via wired connection: 1. Insert your wireless router’s AC adapter to the DC-In port and plug it to a power outlet.
NOTES: • For details on connecting to a wireless network, refer to the WLAN adapter’s user manual. • To set up the security settings for your network, refer to the section Setting up the wireless security settings in this user manual. Before you proceed NOTE: Before configuring your wireless router, do the steps described in this section for your host computer and network clients. A. Disable the proxy server, if enabled. Windows® 7 1. Click Start > Internet Explorer to launch the browser. 2.
3. From the Local Area Network (LAN) Settings screen, untick Use a proxy server for your LAN. 4. Click OK when done. MAC OS 1. From your Safari browser, click Safari > Preferences > Advanced > Change Settings... 2. From the Network screen, deselect FTP Proxy and Web Proxy (HTTP). 3. Cllick Apply Now when done. NOTE: Refer to your browser's help feature for details on disabling the proxy server.
B. Set the TCP/IP settings to automatically obtain an IP address. Windows® 7 1. Click Start > Control Panel > Network and Internet > Network and Sharing Center > Manage network connections. 2. Select Internet Protocol Version 4 (TCP/IPv4) or Internet Protocol Version 6 (TCP/IPv6), then click Properties. 3. To obtain the iPv4 IP settings automatically, tick Obtain an IP address automatically. To obtain the iPv6 IP settings automatically, tick Obtain an IPv6 address automatically. 4. Click OK when done.
MAC OS 1. Click the Apple icon located on the top left of your screen. 2. Click System Preferences > Network > Configure... 3. From the TCP/IP tab, select Using DHCP in the Configure IPv4 dropdown list. 4. Cllick Apply Now when done. NOTE: Refer to your operating system’s help and support feature for details on configuring your computer’s TCP/IP settings. C. Disable the dial-up connection, if enabled. Windows® 7 1. Click Start > Internet Explorer to launch the browser. 2.
3 Configuring via the web GUI Logging into the web GUI Your ASUS Wireless Router comes with an intuitive web graphics user interface (GUI) that allows you to easily configure its various features through a web browser such as Internet Explorer, Firefox, Safari, or Google Chrome. To log into the web GUI: 1. On your web browser such as Internet Explorer, Firefox, Safari, or Google Chrome, manually key in the wireless router’s default IP address: 192.168.1.1 2.
3. The wireless router’s web GUI launches. Use the web GUI to configure various settings. Setting up the Internet connection NOTE: When setting the Internet connection for the first time, press the Reset button on your wireless router to reset it to its factory default settings. Quick Internet Setup (QIS) with auto-detection The Quick Internet Setup (QIS) function guides you in quickly setting up your Internet connection. To use QIS with auto-detection: 1.
2. The wireless router automatically detects if your ISP connection type is Dynamic IP, PPPoE, PPTP, L2TP, and Static IP. Key in the necessary information for your ISP connection type. IMPORTANT! Obtain the necessary information about your Internet connection type from your ISP.
NOTES: • The auto-detection of your ISP connection type takes place when you configure the wireless router for the first time or when your wireless router is reset to its default settings. • If QIS failed to detect your Internet connection type, click Skip to manual setting and manually configure your connection settings. • If QIS failed to launch automatically, manually launch your wireless router's web GUI to access the QIS page. To do this, follow these steps: • On your web browser, key in http://192.
4. Your Internet and wireless settings are displayed. Click Next to continue. 5. Read the wireless network connection tutorial. When done, click Finish.
Setting up the wireless security settings To protect your wireless network from unauthorized access, you need to configure its security settings. To set up the wireless security settings: 1. Key in 192.168.1.1 on your web browser. 2. On the login screen, key in the default user name (admin) and password (admin), then click OK. The wireless router’s web GUI launches. 3.
5GHz security settings 4. On the Wireless name (SSID) field, key in a unique name for your wireless network. 5. From the Security Level dropdown list, select the encryption method for your wireless network. IMPORTANT! The IEEE 802.11n standard prohibits using High Throughput with WEP or WPA-TKIP as the unicast cipher. If you use these encryption methods, your data rate will drop to IEEE 802.11g 54Mbps connection. 6. Key in your security passkey. 7. Click Apply when done.
Managing your network clients To manage your network clients: 1. Launch the wireless router’s web GUI. 2. On the Network Map screen, select the Client Status icon to display the information about your network clients.
Monitoring your USB device The ASUS Wireless Router provides two USB 3.0 ports for connecting USB devices such as a USB storage device and USB printer, to allow you to monitor the working environment, share files, and printer with clients in your network. NOTE: To use this feature, you need to plug a USB storage device, such as a USB hard disk or USB flash drive, to the USB 3.0 port on the rear panel of your wireless router. Ensure that the USB storage device is formatted and partitioned properly.
3. On the AiDisk Wizard field, click GO to set up an FTP server for Internet file sharing. NOTES: • For more details, refer to the section Using the Network Place (Samba) Share service and Using the FTP Share service in this user manual. • On USB External HDD/Flash disk: • The wireless router works with most USB HDDs/Flash disks (up to 2TB size) and supports read-write access for FAT16, FAT32, EXT2, EXT3, and NTFS. • To safely remove the USB disk, launch the web GUI (http://192.168.1.
Creating your Guest Network The Guest Network provides Internet connectivity for temporary visitors without providing access to your private network. To create your guest network: 1. Launch the wireless router’s web GUI. 2. On the Guest Network screen, click Create to create a network for your visitors.
Using the Traffic Manager Managing QoS (Quality of Service) Bandwidth The Quality of Service (QoS) allows you to set the bandwidth priority and manage the network traffic. To set up the bandwidth priority: 1. Launch the wireless router’s web GUI. 2. On the Traffic Manager screen, select the QoS tab. 3. Click ON to enable the default rule and fill in the upload and download bandwidth fields. NOTE: • Get the bandwidth information from your ISP.
Monitoring Traffic The traffic monitor function allows you to assess the bandwidth usage and speed of your Internet, LAN, Wired, WLAN (2.4GHz or 5GHz) connections. Using the USB Extension The USB Extension function provides AiDisk, Servers Center, Network Printer Server and Download Master submenus.
Using AiDisk for Files Sharing AiDisk allows you to share files in the USB disk through the Internet. NOTE: Before using AiDisk, ensure that you have inserted a USB disk into the USB port of your wireless router. To use AiDisk: 1. Click the AiDisk icon in USB Extension. 2. From the Welcome to AiDisk wizard screen, click Go.
3. Select the access rights that you want to assign to the clients accessing your shared data. 4. Create your domain name via the ASUS DDNS services, select I will use the service and accept the Terms of service and key in your domain name. When done, click Next.
5. Click Finish to finish the setup. 6. To access the FTP site that you created, launch a web browser or a third-party FTP client utility and key in the ftp link (ftp://) you have previously created.
Using the Servers Center service Your wireless router allows UPnP (Universal Plug and Play) multimedia devices, such as PS3 and XBox 360, to access multimedia files from the USB disk connected to your wireless router. NOTE: Before using the UPnP Media Server function, install a wireless adapter on your UPnP device. To use your router as a Servers center: 1. Click USB Extension from the navigation menu at the left side of your screen. 2. Select Servers Center.
Using the Network Place (Samba) Share service Network Place (Samba) Share allows you to set the account and permission for samba service. To use Samba share: 1. Click the Network place (Samba) Share tab in the Servers Center of USB Extension. 2. Click Add, Delete or Modify to add, delete or modify the account. Click Apply when done.
Using the FTP Share service Sharing files via the FTP server The ASUS Wireless Router enables you to share files from your USB storage device via the FTP server with computers in LAN or through the Internet. IMPORTANT! To use this feature, you need to insert a USB storage device, such as a USB hard disk or USB flash drive, to the USB3.0 port on the rear panel of your wireless router. Ensure that the USB storage device is formatted and partitioned properly. Refer to the ASUS website at http://www.
4. From the list of files/folders, select the type of access rights that you want to assign for specific files/folders: • R/W: Select this option to assign read/write access for a specific file/folder. • W: Select this option to assign write only access for a specific file/folder. • R: Select this option to assign read only access for a specific file/folder. • No: Select this option if you do not want to share a specific file/folder. 5. Click Apply to apply the changes. 6.
Using the Miscellaneous setting Miscellaneous setting allows you to configure other settings for the USB disk, including maximum login user, device name, work group and language on FTP server. To use miscellaneous setting: 1. Click the Miscellaneous setting tab in the Servers Center of USB Extension. 2. Follow the instruction to key in the necessary information. 3. When finish, click Apply.
Configuring the Advanced settings Advanced Setting allows you to configure the advanced features of your wireless router. Setting up the DHCP Server You may enable the DHCP Server function in your wireless router so your network clients can automatically obtain IP addresses from your wireless router. NOTE: The ASUS Wireless Router can support up to 253 IP addresses for your network. To set up the DHCP server: 1. Click Advanced Setting from the navigation menu at the left side of your screen. 2.
3. In the Enable the DHCP Server? field, tick Yes. 4. In the IP Pool Starting Address field, key in the starting IP address. 5. In the IP Pool Ending Address field, key in the ending IP address. 6. In the Lease Time field, key in the time that the IP addresses expire and the wireless router automatically assigns new IP Addresses for the network clients. IMPORTANT! • For the IP Pool Starting and Ending IP addresses, we recommend that you use: • IP address: 192.168.1.
Upgrading the firmware NOTE: Download the latest firmware from the ASUS website at http://www.asus.com To upgrade the firmware: 1. Click Advanced Setting from the navigation menu at the left side of your screen. 2. Under the Administration menu, click Firmware Upgrade. 3. In the New Firmware File field, click Browse to locate the new firmware in your computer. 4. Click Upload. The uploading process takes about three minutes.
Restoring/Saving/Uploading settings To restore/save/upload the settings: 1. Click Advanced Setting from the navigation menu at the left side of your screen. 2. Under the Administration menu, click Restore/Save/Upload Setting. 3. Select the tasks that you want to do: • To restore to the default factory settings, click Restore, and click OK in the confirmation message.
Setting up your network printer Use the Network Printer Setup utility to set up a USB printer on your wireless router and allow network clients to access the USB printer. NOTES: • To check if your USB printer is compatible with your ASUS wireless router, refer to the Plug-n-Share Disk Support List at http://event.asus.com/networks/disksupport • The wireless router's printer server function is not supported on Windows® 2000. To set up your USB Printer: 1.
3. Unzip the downloaded file and click the Printer icon to run the network printer setup program. 4. Follow the onscreen instructions to set up your hardware, then click Next.
5. Wait for a few minutes for the initial setup to finish. Click Next. 6. Click Finish to complete the installation.
7. Follow the Windows® OS instructions to install the printer driver. 8. After the printer’s driver installation is completed, network clients can now use the printer.
4 Using the utilities NOTES: • Install the wireless router's utilities from the bundled support CD. • If Autorun is disabled, run setup.exe from the root directory of the support CD. Device Discovery Device Discovery is an ASUS WLAN utility that detects an ASUS wireless router device, and enables you to configure the device. To launch the Device Discovery utility: • From your computer’s desktop, click Start > All Programs > ASUS Utility > RT-N65U Wireless Router > Device Discovery.
Firmware Restoration Firmware Restoration is used on an ASUS Wireless Router that failed during its firmware upgrading process. It uploads the firmware that you specify. The process takes about three to four minutes. IMPORTANT: Launch the rescue mode before using the Firmware Restoration utility. To launch the rescue mode and use the Firmware Restoration utility: 1. Unplug the wireless router from the power source. 2.
5. Specify a firmware file, then click Upload. NOTE: This is not a firmware upgrade utility and cannot be used on a working ASUS Wireless Router. Normal firmware upgrades must be done through the web interface. Refer to Chapter 3: Configuring via the web GUI for more details.