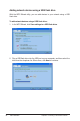
Adding network devices using a USB flash drive With the WPS Wizard utility, you can add devices to your network using a USB flash drive. To add network devices using a USB flash drive: 1. In the WPS Wizard, click Save settings to a USB flash drive. 2. Plug a USB flash drive into the USB port on your computer, and then select the drive from the dropdown list. When done, click Next to continue.
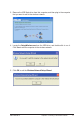
3. Remove the USB flash drive from this computer, and then plug to the computer that you want to add to the wireless network. 4. Locate the SetupWireless.exe from the USB drive, and double-click to run it. Click Yes to add the computer to the wireless network. 5. Click OK to exit the Wireless Network Setup Wizard.
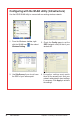
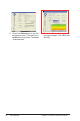
Configuring with the WLAN utility (Infrastructure) Use the ASUS WLAN utility to connect with an existing wireless network. 18 1. From the Windows® taskbar, rightclick the WLAN icon , then select Wireless Setting. 2. Check the Config page to set the SSID (network name) to that of your wireless AP. 3. Use Site Survey if you do not know the SSID of your access point. 4. Encryption settings must match those at the access point. Ask your network administrator about settings if necessary.
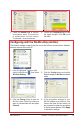
5. Check the Status page to see the association state. If connection is established, the box shows “Connected - xx:xx:xx:xx:xx:xx”. 6. Check the Connection tab to see the signal strength. Click OK to exit the utility. Configuring with the WLAN utility (Ad Hoc) The Network adapter supports Ad Hoc mode that allows communication between wireless stations without an AP. 1. From the Windows® taskbar, rightclick the WLAN icon , then select Wireless Setting. 2.
. Check the Status page to see the association state. If connection is established, the box shows “Connected - xx:xx:xx:xx:xx:xx”. 20 ASUS USB-N10 6. Check the Connection tab to see the signal strength. Click OK to exit the utility.
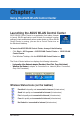
Chapter 4 Using the ASUS WLAN Control Center Launching the ASUS WLAN Control Center ASUS WLAN Control Center is an application that makes it easier to launch WLAN applications and activate the network location settings.It starts automatically when system boots up. When WLAN Control Center is running, you can see a Control Center icon on the Windows® desktop.
Excellent link quality but not connected to Internet (Infrastructure) Good link quality but not connected to Internet (Infrastructure) Fair link quality but not connected to Internet (Infrastructure) Poor link quality but not connected to Internet (Infrastructure) Not linked and not connected to Internet (Infrastructure) Using the Wireless Settings right-click menu To use the Wireless Settings right-click menu: From the Windows® desktop, right-click the WLAN icon Settings right-click menu.
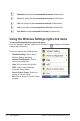
Using the Wireless Settings left-click menu To use the Wireless Settings left-click menu: From the Windows® desktop, left-click the WLAN icon Settings left-click menu. The menu contains the following items: • Wireless Radio On: Click to turn the wireless radio ON. • Wireless Radio Off: Click to turn the wireless radio OFF. • Search & Connect: Click to ��������� view the properties of available access points.
• • • • • Association State: Displays the connection status: • Connected: The network adapter is now associated with one wireless LAN device. When operating in Infrastructure mode, this field shows the access point's MAC address that the network adapter is is communicating with. When operating in Ad Hoc mode, this field shows the virtual MAC address used by computers participating in the Ad Hoc network. • Scanning...
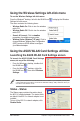
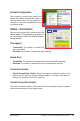
Activate Configuration Auto roaming is enabled by default and makes the adapter automatically switch to APs with better signal. You can uncheck it if you want to connect to a specified AP using a particular profile. Status - Connection You can view the current link statistics about the Network adapter. These statistics are updated once per second and are valid if the Network adapter is correctly installed. Throughput • • Transmitted: The number of frames that were transmitted.