Wireless Kit VUDU_Wireless_Kit02.1.indd 1 Start Here Designed exclusively for use with the VUDU product. ©2008 VUDU, Inc. All Rights Reserved.
FCC Warning Statement This device complies with Par 15 of the FCC Rules Operation is subject to the following 2 conditions: 1) this device may not cause harmful interference and 2) this device must accept any interference, including interference that may cause undesired operation. This device has been tested and found to comply with the limits for a Class B digital device, pursuant to part 15 of the FCC rules.
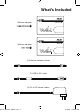
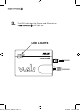
What’s Included Wireless adapter Wireless adapter VUDU_Wireless_Kit02.1.
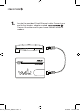
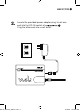
1. Locate the provided 5-foot Ethernet cable. Connect one end to the wireless adapter marked . Connect the other end to your home network router or modem. VUDU_Wireless_Kit02.1.
2. Locate the provided power adapter plug. Insert one . end into the DC-IN socket of Plug the other end into a wall outlet. VUDU_Wireless_Kit02.1.
3. The LED indicators for Power and Ethernet on will light up. VUDU_Wireless_Kit02.1.
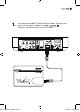
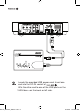
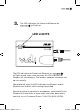
1. Locate the provided 10-foot Ethernet cable. Connect one end to the wireless adapter marked Connect the other end to your VUDU box. VUDU_Wireless_Kit02.1.
2. Locate the provided USB power cord. Insert one end into the DC-IN socket of Affix the other end to one of the USB ports on the VUDU box—on the back or left side. VUDU_Wireless_Kit02.1.
3. The LED indicators for Power and Ethernet on will light up. LED LIGHTS The LED indicators for Power and Ethernet on will light up and, after a few seconds, the LED indicator for Wireless will start blinking. The wireless adapters have been set up successfully. Going forward, when the LED indicators for Wireless and/or Ethernet start to blink, data is being transmitted. Should you have any questions or problems, please refer to the Wireless Kit Instructions at www.vudu.com/vudu_documentation.