Chapter 3 This chapter provides information on the softwares and utilities inside the support CD Software support
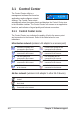
3.1 Control Center The Control Center utility is a management software that launches applications and configures network settings. The Control Center starts automatically when the system boots and displays the Control Center icon in the Windows® taskbar. The Control Center icon serves as an application launcher, and indicator of signal quality and Internet connection. 3.1.1 Control Center icons The Control Center icon indicates the quality of link to the access point and connection to the Internet.
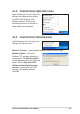
.1.2 Control Center right-click menu Right-clicking the Control Center icon displays the softwares and utilities the ASUS USB Wireless LAN Adapter supports. Refer to the succeeding sections for details on these utilities and softwares. 3.1.3 Control Center left-click menu Left-clicking the Control Center icon displays the left-click menu. Search & Connect – View available wireless networks within range. Wireless Option – Sets your Windows® XP wireless networking environment.
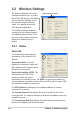
3.2 Wireless Settings The Wireless Settings window is composed of the property window and tabbed property sheets. Click the icons in the property window to display their tabbed property sheets. Tabbed property sheets Property window The Wireless Settings is the main interface that allows you to control the ASUS USB wireless LAN adapter. Use the Wireless Settings to view the operational and connection status, or to modify the wireless LAN adapter configuration. 3.2.
Rescan button - Click to allow wireless LAN adapter to scan available wireless networks and to connect to the network with the best signal quality. Change SSID button - Click to change the SSID. Clicking this button opens the Config-Basic window. See “Basic tab” on page 3-7. Search and Connect button - Click to view all wireless networks within the range of your system. Clicking this button opens the Site Survey window. See page 3-9.
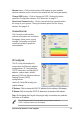
Ping tab The Ping tab allows you to verify the connection of your computer with another computer in a network. To ping a connection: 1. Type the IP address of the connection you want to verify in the IP Address field. 2. Configure the ping session by assigning the size and count of packet to send, and the time limit for a ping session to continue (in milliseconds). 3. Click the Ping button. During the ping session, the Ping button toggles into a Stop button. Click Stop anytime to cancel the ping session.
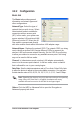
3.2.2 Configuration Basic tab The Basic tab provides general information on network types and other configurations. Network Type. Select the type of network that you wish to use. Select Infrastructure mode to establish a connection with an access point (AP). In this mode, your system can access wireless LAN and wired LAN (Ethernet) via the AP. Select the Ad Hoc mode to communicate directly with other mobile clients within the wireless LAN adapter range. Network Name - Displays the network SSID.
Encryption tab Wireless data transmissions between your wireless LAN adapter and the AP are secured using the Wired Equivalent Privacy (WEP) encryption. Check the Data encryption (WEP enabled) option to assign the WEP keys. Check the Network Authentication (Shared Mode) option if you wish to use a network key to authenticate a preferred wireless network. Unchecking this option allows the network to operate on an Open System mode. Key Format allows you to set a hexadecimal digit or ASCII character WEP key.
• 64-bit and 40-bit WEP keys use the same encryption method and can interoperate on wireless networks. This lower level of WEP encryption uses a 40-bit (10 hexadecimal digits assigned by the user) secret key and a 24-bit Initialization Vector assigned by the wireless LAN adapter. 104-bit and 128-bit WEP keys use the same encryption method. • After assigning the WEP keys, click APPLY to save and activate the encryption.
3.2.4 About Wireless Settings Click the About icon to view the software version, driver version, and copyright information. 3.2.5 Link State Displays the current connection status of the wireless LAN adapter to the AP or to other Wi-Fi devices. An icons represents the Link State for easy identification. Refer to the table below for icon indications.
3.2.6 Command icons Apply. Click to apply the changes made on the Wireless Settings utility. OK. Click to close the Wireless Settings utility window. Cancel. Click to cancel any changes made on the Wireless Settings utility. Clicking Cancel closes the Wireless Settings utility window. Help. Click to display the help menu. 3.2.7 Other right-click options Activate Configuration This option allows you to select the wireless profile to use.
About Control Center Select the About Control Center option to display the Control Center software version and copyright information.
3.3 Mobile Manager The Mobile Manager is a convenient tool to setup and manage network location settings. This utility allows users to configure multiple alternative configurations for different locations. You need to set up this utility once so you can easily switch configurations when you change your location. To launch the Mobile Manager utility: 1. Click the Windows® Start button.
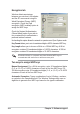
File menu New Configuration – Select this option to launch the New Configuration Wizard. See the next section for details. Import Configuration an INI File. – Select this option to load a configuration from – Save the selected configuration (containing Export Configuration Wireless Settings, TCP/IP Settings, Network Settings, etc.) to an INI file. The INI file may be saved on a floppy disk, and may be imported by other computers with the Mobile Manager utility. You may also use this file as backup.
Down – Lowers the position of the selected wireless network configuration in the preferred network list. Edit menu commands appear when you right-click a configuration in the Mobile Manager window. View menu Large Icons – Displays large icons for each configuration. Small Icons – Displays small icons for each configuration. List – Shows a list of available configurations. – Displays the name, type, and description of a selected Details configuration.
2. Choose the type of configuration you want to create. The configuration types are described below. Click Next when done. • ASUS Wireless Local Area Network Configuration. Select this option if you have an installed ASUS USB Wireless LAN Adapter in your computer. • Wired Local Area Network Configuration. Select this if your computer has an installed network interface card other than ASUS USB Wireless LAN Adapter. • Dialup Networking Configuration.
4. Configure the wireless settings including the network type, SSID, channel and WEP encryption. Click Next when done. 5. Set the IP address of the configuration using this window. Specify the IP address using the DHCP server (automatic) or manual assignment. The wizard auto-detects and displays the current system settings. Click Next when done. 6. Enter the computer name, then click Next.
7. Use this window to set the proxy server and printer sharing. Click Advanced to display the proxy server and printer sharing options. Click Next when finished. 8. Check the Activate Configuration Now option to start using the created configuration. The Mobile Manager window displays the created configuration when it is not activated. Click Finish to close the wizard.
3.3.3 Editing a configuration To edit a configuration: 1. Select a configuration from the Mobile Manager window. 2. Click Edit from the menu bar, then select Edit Configuration. The Edit Configuration dialog box appears. Navigate through the windows by clicking the buttons on the left. General settings Name – The configuration name indicates the location from where you are dialing or connecting to a network.
SSID – SSID stands for Service Set Identifier, a string used to identify a wireless LAN. You can only connect with an Access Point, that has the same SSID. Use different SSIDs to segment the wireless LAN and add security. Channel – The Channel field allow you to select the radio channel for the ASUS USB Wireless LAN Adapter. In an Infrastructure network, your wireless LAN adapter automatically selects the correct frequency channel required to communicate with an Access Point.
Specify an IP address – Ask your network administrator for the IP address and subnet mask you should use. Type in the IP Address and Subnet Mask manually. TCP/IP settings-Gateway tab Specify the gateways. You may specify more than one gateway. Set up the primary gateway first. Add – Click this button to add a new TCP/IP gateway address. The added gateway appears in the Default gateways list. Repeat the process to add another gateway. The value in each gateway field must be between 0 and 255.
Enable Proxy Server – Use the Proxy server to access the Internet. Use the same proxy server for all protocols – Specifies whether you want to use the same proxy server to gain access to the Internet using all protocols. Servers field – Provides fields for you to type the address and port number of the proxy server you want to use to gain access to the Internet over HTTP, Secure, FTP, Gopher, and Socks protocol.
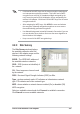
3.4 Site Monitor The Site Monitor utility measures the signal-to-noise (SNR) values of all available wireless networks. Use this utility to determine the best placement of access points in a wireless network. 3.4.1 Launching Site Monitor To launch the Site Monitor: • Click the Windows® Start button, then select Programs > ASUS Utility > WLAN Card > Site Monitor, or • Right-click the Control Center icon on the Windows taskbar, then select Site Monitor. The Site Monitor survey message appears. Click OK. 3.
3.4.3 Monitoring a connection To monitor a connection: 1. Select the connection from the list. 2. Click Command from the menu bar, then select monitor. You may also press in your keyboard. The Monitor window appears. The following connection parameters are displayed in graphical representation. SNR. This indicates the quality of communications within the current network. The communication quality is based on signal level and noise level measurements.
Chapter 4 This chapter contains a troubleshooting guide for solving common problems you may encounter when using the ASUS USB Wireless LAN Adapter.
Troubleshooting This troubleshooting guide provides answers to some common problems which you may encounter while installing and/or using ASUS Wireless LAN card products. These problems requires simple troubleshooting that you can perform by yourself. Contact the Wireless LAN Technical Support if you encounter problems not mentioned in this section. Problem My computer does not recognize the installed ASUS USB Wireless LAN Adapter. A yellow exclamation point or a red plus sign appears on the ASUS 802.
Troubleshooting Problem Action I cannot connect to an Access Point. • Check if the Network Type of the device is set to Infrastructure mode. • Check if the device has the same Service Set Identifier (SSID) as that of the AP. • Check if the device and the AP have the same Encryption. If WEP encryption is enabled, set the same WEP keys for the device and the AP. • Check if the MAC address of the device is added in the AP Authorization Table. Inquire this with your LAN administrator.
Troubleshooting Problem Action I cannot connect to other computers linked via an Access Point or Ad-hoc network. • Check if the device and the other APs and/ or clients have the same Encryption. If you enable WEP encryption, you must set the same WEP keys for the device and the other AP/s and/or clients. • Check the TCP/IP settings (IP address, subnet mask, gateway, and DNS) of your computer. • Enable file and printer sharing in each client computer to allow file sharing.
Troubleshooting Problem Action When I remove the • This is a limitation with computers wireless adapter from my equipped with Intel/NVIDIA USB 2.0 computer running controller and running the newest Windows 98SE, my OrangeWare USB 2.0 driver. system becomes very slow and stops responding.
4-6 Chapter 4: Troubleshooting