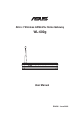
® All-in-1 Wireless ADSL2/2+ Home Gateway WL-600g User Manual E2458 / June 2006
Manufacturer Contact Information $6867H. &20387(5 ,1& $VLD 3DFLÀF Company address: 15 Li-Te Road, Beitou, Taipei 11259 General (tel): +886-2-2894-3447 Web site address: www.asus.com.tw General (fax): +886-2-2894-7798 General email: info@asus.com.tw $686 &20387(5 ,17(51$7,21$/ $PHULFD Company address: 44370 Nobel Drive, Fremont, CA 94538, USA General (fax): +1-510-608-4555 Web site address: usa.asus.
WL-600g All-in-1 Wireless ADSL2/2+ Home Gateway User Manual Table of contents Package contents...........................................................................3 Setup Process Overview ...............................................................4 Hardware overview.........................................................................5 Front panel....................................................................................... 5 Rear panel ................................................
WL-600g All-in-1 Wireless ADSL2/2+ Home Gateway User Manual Setting up virtual server ................................................................. 34 Setting up DMZ host ...................................................................... 35 Allowing SIP request through NAT................................................. 35 )LUHZDOO 2XWJRLQJ ,3 ÀOWHU............................................................. 35 )LUHZDOO ,QFRPLQJ ,3 ÀOWHU.........................................................
WL-600g All-in-1 Wireless ADSL2/2+ Home Gateway User Manual Package contents • WL-600g Wireless ADSL2/2+ Home Gateway • AC power adapter (type varies by region) • Category 5 (Cat.
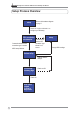
WL-600g All-in-1 Wireless ADSL2/2+ Home Gateway User Manual Setup Process Overview Hardware setup Refer to the hardware diagram on page 7. Check OK. Login to 192.168.1.1 to FRQÀJXUH \RXU :/ J Quick Setup ADSL connection Connection not auto-detection detected OR connection type shown is not correct. Connection detected and connection type is correct. $'6/ VHWXS ÀQLVKHG Quick SetupWireless setup Change wireless settings.
WL-600g All-in-1 Wireless ADSL2/2+ Home Gateway User Manual Hardware overview Front panel The WL-600g Wireless ADSL2/2+ Home Gateway front panel contains LED indicators which shows the status of WL-600g.
WL-600g All-in-1 Wireless ADSL2/2+ Home Gateway User Manual Rear panel ADSL PWR LAN USB 2.0 Antenna Power switch EZSetup Reset Viewed from left to right, the rear panel of WL-600g contains the following elements: • ADSL port • Power connector • Power switch • Four Local Area Network (LAN) ports • USB 2.
WL-600g All-in-1 Wireless ADSL2/2+ Home Gateway User Manual Hardware connections ADSL connection Use the ADSL splitter supplied in the package to split ADSL signal and telephone service. First connect the splitter to the wall telephone outlet either by just plugging your splitter onto the outlet or by inserting the line connector into the outlet. Then connect your ASUS WL-600g to the ADSL or mode port of the splitter with the telephone cable supplied in the package.
WL-600g All-in-1 Wireless ADSL2/2+ Home Gateway User Manual Connecting to the Internet Before you start Before you start, you need to: • make sure the cable connections are correct and WL-600g is powered ON; • acquire an active Internet service, such as an ADSL account. :H UHFRPPHQG XVLQJ ZLUHG FRQQHFWLRQ IRU LQLWLDO FRQÀJXUDWLRQ ZKLFK PD\ help avoid possible setup problems due to wireless uncertainty. Use a CAT5 cable to connect an Ethernet-enabled computer to a LAN port of WL-600g.
WL-600g All-in-1 Wireless ADSL2/2+ Home Gateway User Manual Getting dynamic IP address Open Control Panel -> Local Area Network Connection, double-click Local Connection icon, then double-click ,QWHUQHW 3URWRFRO 7&3 ,3 Select Obtain an IP address automatically and Obtain DNS server address automatically, then click OK. Assigning IP address manually Open Control Panel -> Local Area Network Connection, double-click Local Connection icon, then double-click Internet Protocol (TCP/ ,3 .
WL-600g All-in-1 Wireless ADSL2/2+ Home Gateway User Manual Quick setup /RJLQ WR WKH :/ J FRQÀJXUDWLRQ SDJH 1. Input 192.168.1.1 into the address box of your Web browser and press Enter. 2. A login window appears for user name and password. The default username is admin, password is admin (in lower case). $IWHU ORJJLQJ LQ \RX FDQ VHH WKH :/ J FRQÀJXUDWLRQ SDJH ADSL setup :LWK 4XLFN VHWXS \RX QHHG WR VHW XS WKH $'6/ OLQN ÀUVW WKHQ WKH ZLUHOHVV VHWXS 1.
WL-600g All-in-1 Wireless ADSL2/2+ Home Gateway User Manual ,I LW VKRZV \RXU FRQQHFWLRQ W\SH LV 0(5 '+&3 Click Next if your connection type is MER (DHCP). If your actual connection is not MER(DHCP), click Manual Setting to manually set up WL-600g. Refer to Page 11-13 for manual setting instructions. Wireless setup 1. Choose a Security Level. For detailed security information, refer to Page 21-22. 2. Input a key in the Key ÀHOG 7KH QXPEHU RI GLJLW IRU WKH NH\ GHSHQGV RQ WKH VHFXULW\ level you choose
WL-600g All-in-1 Wireless ADSL2/2+ Home Gateway User Manual Manual Setup ,I \RX HQFRXQWHU DQ\ GLIÀFXOW\ FRQÀJXULQJ \RXU $'6/ FRQQHFWLRQ ZLWK 4XLFN 6HWXS FOLFN Manual Setting to manually set up your WL-600g. ADSL Setup 1. Select your Country and ISP and click Next. 2. If your country and ISP are not on the list, select Not list, key in your VPI and VCI values and click Next. You may ask your ISP for VPI/VCI values.
WL-600g All-in-1 Wireless ADSL2/2+ Home Gateway User Manual 3. Select your connection type and click Next. You can get the connection type from your ISP. -- If your connection type is PPPoA or PPPoE For dynamic IP users, input your PPP user name, password, and service name then click Next. For static IP users, check Use Static IP Address then key in your IP address, then click Next.
WL-600g All-in-1 Wireless ADSL2/2+ Home Gateway User Manual -- If your connection type is MER For dynamic IP users, check Obtain an IP address automatically, Obtain default gateway automatically, and Obtain DNS server address automatically, then click Next. For static IP users, check Use the following IP Address, Use the following default gateway, and Use the following DNS server address, then input the DGGUHVVHV LQ FRUUHVSRQGHQW ÀHOGV -- If your connection type is IPoA Static IP user only.
WL-600g All-in-1 Wireless ADSL2/2+ Home Gateway User Manual Wireless Setup 1. Designate an SSID (network name) for WL-600g. Choose the security level then input a key. The number of digit of your key depends on the security level you FKRRVH 5HIHU WR WKH QRWH RQ WKH ZHE SDJH :KHQ ÀQLVKHG FOLFN Next. 7KLV SDJH SURYLGHV D VXPPDU\ RI :/ J :$1 DQG ZLUHOVV FRQÀJXUDWLRQ &OLFN Save/Reboot WR VDYH DQG DFWLYDWH \RXU FRQÀJXUDWLRQ 3. Setup complete! WL-600g reboots in about 50 seconds.
WL-600g All-in-1 Wireless ADSL2/2+ Home Gateway User Manual EZSetup ASUS WL-600g Wireless ADSL2/2+ Home Gateway provides an easy-to-use setup utility -- EZSetup. With this utility, you can wirelessly setup your Internet connection, wireless LAN with just several clicks. Installing ASUS utility 7R XVH $686 (=6HWXS IRU :/ J FRQÀJXUDWLRQ \RX PXVW LQVWDOO WKH $686 XWLOLWLHV from the support CD included in your package. Insert the CD into your optical drive and autorun the installation program.
WL-600g All-in-1 Wireless ADSL2/2+ Home Gateway User Manual 3. Push the red EZSetup button on the rear panel of WL-600g for over 3 seconds until the PWR LED is blinking. EZSetup 4. Click EZSetup button. 5. The system generates the SSID and Network key automatically. The network key is a 128-bit WEP key by default. You can accept the settings, or assign SSID and keys to your own need. Click Next to save the wireless settings.
WL-600g All-in-1 Wireless ADSL2/2+ Home Gateway User Manual 6. Next, EZSetup will guide you to complete the Internet connection settings. Check &RQÀJXUH ,63 VHWWLQJV then click Next to continue. 7. The system detects your Internet connection type. The progress may take several seconds. If your ADSL connection is successfully detected by WL-600g, skip to Step 8. If your ADSL connection can not be detected, you need follow Step 8 and manually set up your ADSL connection. 8.
WL-600g All-in-1 Wireless ADSL2/2+ Home Gateway User Manual If your country or ISP are not on the list, select Not listed for both country and ,63 ÀHOGV 7KHQ VHOHFW Connection type DQG ÀOO LQ 93, DQG 9&,
WL-600g All-in-1 Wireless ADSL2/2+ Home Gateway User Manual Connecting WL-600g with ASUS WLAN Card &RQÀJXULQJ $686 :/$1 &DUG ZLWK 2QH 7RXFK :L]DUG We recommend you use ASUS WLAN card (WL-100gD, WL-100gE, Wl-107g, WL167g, WL-169gE) for better wireless connection. If you have installed ASUS wireless card together with its utilities and drives on your PC, click Start -> All Programs -> ASUS Utility-> WLAN Card -> One Touch Wizard to launch the One Touch Wizard utility. 20 1.
WL-600g All-in-1 Wireless ADSL2/2+ Home Gateway User Manual 5. Setup the IP address of the WLAN Card according to your network condition. After the setup is completed, click Finish to exit the One Touch Wizard. &RQÀJXULQJ :/$1 FDUG ZLWK :LQGRZV® WZC service You can also use Windows® :LUHOHVV =HUR &RQÀJXUDWLRQ VHUYLFH WR VHW XS WKH ZLUHOHVV connection with WL-600g. 1. Double-click the wireless network icon on the task bar to view available networks. Select your wireless router and click Connect. 2.
WL-600g All-in-1 Wireless ADSL2/2+ Home Gateway User Manual Wireless settings 7KLV FKDSWHU GHVFULEHV KRZ WR FRQÀJXUH WKH ZLUHOHVV IHDWXUHV RI \RXU $686 :/ J ADSL Wireless Router. Setting up SSID 66,' VWDQGV IRU 6HUYLFH 6HW ,GHQWLÀHU DOVR NQRZQ DV WKH QDPH RI D ZLUHOHVV QHWZRUN To connect a wireless router, or to form a wireless bridge system, all wireless routers or APs or clients must have the same SSID.To setup SSID: 1.
WL-600g All-in-1 Wireless ADSL2/2+ Home Gateway User Manual WPA: WPA stands for WiFi-Protected Access. WPA provides two security modes for Home/SOHO user and enterprise network. The former solution adopts Pre-Shared Key for authentication, and the latter uses the existing 802.1X RADIUS server in the enterprise network to process the authentication requests. WPA - PSK: WPA-PSK (Pre-Shared Key) is the solution for home and SOHO users who have no 802.11X authentication server within the LAN.
WL-600g All-in-1 Wireless ADSL2/2+ Home Gateway User Manual 3. Select Enable in the WEP Encryption ÀHOG WR XVH :(3 NH\V IRU GDWD HQFU\SWLRQV Select 64-bit or 128-bit Encryption Strength for key length then click Set Encryption Keys button to setup the keys. If you do not want to encrypt data, select Disable in WEP Encryption and skip to Step 5. 4. After you click the Set Encryption Keys button, you are directed to another page to setup the keys.
WL-600g All-in-1 Wireless ADSL2/2+ Home Gateway User Manual 802.1X 1. Click Wireless -> Security LQ WKH OHIW VLGH PHQX WR RSHQ WKH FRQÀJXUDWLRQ SDJH 2. Select 802.1X in the Network Authentication ÀHOG WR HQDEOH DXWKHQWLFDWLRQ XVLQJ RADIUS server in your network. 3. Input the RADIUS Server IP address, RADIUS port (the default value is 1812), and RADIUS Key. 4. You can choose to enable or disable data encryption. If you want to encrypt data, select Enable in the :(3 (QFU\SWLRQ ÀHOG, select 64-bit or 128
WL-600g All-in-1 Wireless ADSL2/2+ Home Gateway User Manual 3. Set the WPA2 Preauthentication to Enabled if you want to use this function. 4. The Network Re-auth Interval is 36000 seconds by default, you can setup this value according to your network environment. 5. Set up RADIUS server inforamtion by inputting WPA Group Rekey Interval, RADIUS server IP address, RADIUS port and RADIUS Key. 6. Set up WPA encryption methods.
WL-600g All-in-1 Wireless ADSL2/2+ Home Gateway User Manual 0$& ÀOWHU MAC Filter LQ WKH OHIW VLGH PHQX WR RSHQ WKH FRQÀJXUDWLRQ SDJH 6HOHFW WKH UHVWULFWLRQ PRGH IRU WKH ÀOWHU VHOHFW Allow to allow the client and deny the rest; select Deny WR GHQ\ WKH FOLHQW DQG DOORZ WKH UHVW %\ GHIDXOW WKH ÀOWHU LV VHW to Disable which allows all clients.
WL-600g All-in-1 Wireless ADSL2/2+ Home Gateway User Manual :'6 VHWXS :/ J 1. Setting up encryption If you want to use encryption function, select a Network Authentication mode; if not, select Disabled. Click Wireless -> Security WR RSHQ WKH FRQÀJXUDWLRQ SDJH In this example, set authentication to Open and encryption to Enabled, select 128bit for Encryption Strength, then click Set Encryption Keys.
WL-600g All-in-1 Wireless ADSL2/2+ Home Gateway User Manual You can check Enable ASUS PassPhrase and input a string in Passphrase ÀHOG WR OHW the system generate the Network Keys. You can also disable Passphrase and input four NH\V PDQXDOO\ :KHQ ÀQLVKHG FOLFN Save/Apply. 2. Setting up channel Click Wireless -> Advanced. Set Channel to 11 and click Save/Apply.
WL-600g All-in-1 Wireless ADSL2/2+ Home Gateway User Manual 3. Setting IP address Click Advanced Setup -> LAN. Set WL-600g IP address to 192.168.1.1, select Enable DHCP Server and set Start IP address to 192.168.1.4. Click Save/ Reboot. 4. Setting WDS Click Wireless -> Wireless Bridge. Select Wireless Bridge. You can select Enabled 6FDQ to find WL-500gD and WL-500gP. If the stations are on the list, check the checkbox and click Save/Apply. ,I \RX FDQQRW ÀQG :/ J' E\ VFDQQLQJ VHW Bridge Restrict to En
WL-600g All-in-1 Wireless ADSL2/2+ Home Gateway User Manual :'6 VHWXS :/ J' DQG :/ J3 Set up WL-500gD and WL-500gP according to the table on Page 26. 1. Wireless Setting Set WL-500gD, WL-500gP wireless channel, authentication, encryption and keys the same as WL-600g. 2. Set IP address to 192.168.1.2 (WL-500gD), 192.168.1.3 (WL-500gP) 3. Disable DHCP Server and set default gateway to 192.168.1.1, 4. WDS Setting • Open Wireless -> Bridge, set AP Mode to Hybrid. • Set Channel to 11.
WL-600g All-in-1 Wireless ADSL2/2+ Home Gateway User Manual Network security This chapter shows how to set up security defence for your local area network. Setting up access right to WL-600g To protect your wired and wireless LAN, we recommend setting up access protection VR DV WR SUHYHQW :/ J IURP EHLQJ YLHZHG RU PRGLÀHG E\ XQDXWKHQWLFDWHG XVHUV Service restriction WL-600g provides a Service Control List (SCL) that can enable or disable services ZKLFK DUH XVHG WR DFFHVV WKH URXWHU FRQÀJXUDWLRQ LQWHU
WL-600g All-in-1 Wireless ADSL2/2+ Home Gateway User Manual Password protection WL-600g ADSL also provides three levels of access right: admin, support, and user. Account "admin" has full access to change and view configuration of the router, "support" is for ISP technician to view and keep maintenance to the router, "user" can view the router settings and statistics, as well as to update the software. 1.
WL-600g All-in-1 Wireless ADSL2/2+ Home Gateway User Manual 1. Click Advanced Setup -> NAT -> Port Triggering in the left side menu to open the FRQÀJXUDWLRQ SDJH &OLFN Add to create a new rule. 6HOHFW WKH VHUYLFH \RX ZDQW WR FRQÀJXUH DQG OHW WKH V\VWHP DXWRPDWLFDOO\ ÀOO LQ WKH external and internal port number and protocol type. You can also select Custom Server radio button to designate a certain known server. 3.
WL-600g All-in-1 Wireless ADSL2/2+ Home Gateway User Manual Setting up DMZ host The function of DMZ is similar to that of virtual server. The difference between virtual server and DMZ is that DMZ opens all ports to WAN while virtual server opens ports DFFRUGLQJ WR WKH GHPDQG RI WKH HQDEOHG VHUYLFHV 7R FRQÀJXUH '0= KRVW 1. Click Advanced Setup -> NAT -> DMZ Host in the left side menu to open the FRQÀJXUDWLRQ SDJH 2. Enter the IP address of the host to be setup as DMZ host. 3.
WL-600g All-in-1 Wireless ADSL2/2+ Home Gateway User Manual 'HÀQH D Filter Name IRU WKH ÀOWHU UXOH 6SHFLI\ SURWRFRO VRXUFH ,3 DGGUHVV VXEQHW mask and port (range) and destination IP address, subnet mask and port (range). 3. Press Save/Apply to save and activate the settings. )LUHZDOO ,QFRPLQJ ,3 ÀOWHU %\ GHIDXOW DOO LQFRPLQJ ,3 WUDIÀF LV EORFNHG
WL-600g All-in-1 Wireless ADSL2/2+ Home Gateway User Manual Access time restriction This function enables to put time restriction on Internet access by setting up blocking WLPH WDEOH 7R FRQÀJXUH WKH DFFHVV WLPH UHVWULFWLRQ 1. Click Advanced Setup -> Security -> Parental Control in the left side menu to RSHQ WKH FRQÀJXUDWLRQ SDJH &OLFN Add to create a new rule. 2. Fill in the username to whom you want to apply the restriction. )LOO LQ WKH 0$& DGGUHVV RI WKH UHVWULFWHG KRVW ,I \RX DUH DFFHVVLQJ WKLV
WL-600g All-in-1 Wireless ADSL2/2+ Home Gateway User Manual Advanced settings 7KLV FKDSWHU VKRZV KRZ WR FRQÀJXUH RWKHU DGYDQFHG URXWHU IHDWXUHV RI :/ J WAN Click Advanced Setup -> WAN in the left side menu to enter the WAN setup page. This page allows you to edit the WAN settings. LAN 1. Click Advanced Setup -> LAN in the left side menu to enter the Local Area Network /$1 6HWXS page.
WL-600g All-in-1 Wireless ADSL2/2+ Home Gateway User Manual Setting up DNS server Domain Name System (DNS) server is used to translate IP addresses into easy-toremember domain names, such as www.asus.com, and vice versa. Click Advanced Setup -> DNS -> DNS Server WR RSHQ WKH '16 VHUYHU FRQÀJXUDWLRQ page. By default, the DNS server is set to automatically accept the DNS server assigned E\ ,63 ,I \RXU ,63 VSHFLÀHV FHUWDLQ '16 VHUYHU DGGUHVVHV XQFKHFN Enable Automatic Assigned DNS checkbox and type the DNS
WL-600g All-in-1 Wireless ADSL2/2+ Home Gateway User Manual 3. A message prompts out asking you to check your mailbox for the activation letter. Open your mailbox and read the mail.
WL-600g All-in-1 Wireless ADSL2/2+ Home Gateway User Manual 11. Y o u c a n s e e t h i s message when your hostname is successfully created. WL-600g DDNS settings 1. Click Advanced Setup -> DNS -> Dynamic DNS WR HQWHU WKH FRQÀJXUDWLRQ SDJH 3UHVV $GG WR FRQÀJXUH '\QDPLF '16 2. Choose your DDNS provider and fill in the hostname. The supported DDNS provider are DynDNS.org and TZO. DynDNS.org settings require username and password of your DDNS account. TZO requires registered Email address and Key. 3.
WL-600g All-in-1 Wireless ADSL2/2+ Home Gateway User Manual Setting up default gateway This section allows to manually setup default gateway of Internet connection. 1. Click Advanced Setup -> Routing -> Default Gateway WR RSHQ WKH FRQÀJXUDWLRQ SDJH 2. By default, automatic assigned default gateway is enabled, that is, the router accepts the first received gateway assignment from ISP. If your ISP specifies a gateway, uncheck Enable Automatic Assigned Default Gateway and enter the gateway address. 3.
WL-600g All-in-1 Wireless ADSL2/2+ Home Gateway User Manual Setting up routing protocol - RIP RIP stands for Rounting Information Protocol. WL-600g supports RIPv1 and RIPv2. 1. Click Advanced Setup -> Routing -> RIP WR RSHQ WKH FRQÀJXUDWLRQ SDJH 2. To activate RIP, select Enabled radio button for global RIP mode. 7R FRQÀJXUH DQ LQGLYLGXDO LQWHUIDFH VHOHFW WKH GHVLUHG 5,3 YHUVLRQ DQG RSHUDWLRQ and check the Enabled checkbox for the interface. 4. Press Save/Apply to save and activate the settings.
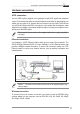
WL-600g All-in-1 Wireless ADSL2/2+ Home Gateway User Manual USB applications WL-600g offers two USB2.0 ports for setting up FTP server and sharing USB printer. FTP server function Before setup, you need to prepare a USB disk for FTP storage. If the format of your external hard disk is NTFS, the FTP server can only be UHDGDEOH 8SORDGLQJ ÀOHV RQ WKH )73 VHUYHU LV QRW DOORZHG %HVLGHV RQO\ Anonymous User can login. Super User can not login under NTFS FTP server.
WL-600g All-in-1 Wireless ADSL2/2+ Home Gateway User Manual If you use web access for Super User Login (as the red circle marks), please set Maximum Users Allowed to Log in to more than 1 or the message "server is busy" will pop up. Setting up FTP account You can set up 12 accounts for your FTP site. 1. Click USB Application -> FTP Server -> User List in the left side menu to open the FRQÀJXUDWLRQ SDJH &OLFN Add to create new FTP account. 'HÀQH WKH Username, Password for the new account.
WL-600g All-in-1 Wireless ADSL2/2+ Home Gateway User Manual Sharing USB printer You can plug your USB printer to the USB2.0 port of WL-600g to share it within your LAN. After you plug a printer to the USB port, you can see the status of printer by clicking USB Application -> Printer Status. Setting up printer client under Windows XP Follow the steps below to install network printer on your clients. 46 1. Run Add Printer Wizard from Start -> Printers and Faxes -> Add a printer. 2.
WL-600g All-in-1 Wireless ADSL2/2+ Home Gateway User Manual 5. Input the IP address of WL-600g in the Printer Name of IP Address ÀHOG DQG FOLFN Next. 6. Select Custom and click Settings. 7. Set Protocol to LPR and type LPRServer in Queue Name field. Click Next to continue. 8. Press Next WR ÀQLVK VWDQGDUG 7&3 IP port setting. 9. Press Finish to complete the settings and return to Add Printer Wizard. 10. Install printer driver from the vendormodel list.
WL-600g All-in-1 Wireless ADSL2/2+ Home Gateway User Manual 11. Click Next to accept the default name for the printer. 12. Select Yes to print a test page. Click Next to print. 13. The installation is complete. Click Finish to quit the Add Printer Wizard. If you have already installed the printer locally on your computer, right click the printer icon and select Property -> Port tab to add a standard TCP/IP port. Click Add Port then select Standard TCP/IP Port and click New Port button.
WL-600g All-in-1 Wireless ADSL2/2+ Home Gateway User Manual Gaming Blaster $686 :/ J·V ´*DPLQJ %ODVWHUµ LV GHVLJQHG WR HQKDQFH \RXU RQOLQH JDPLQJ experience. This technology provides the uninterrupted and latency-free gaming experience that online gamers expect. It intelligently optimizes network resources and automatically prioritizes network traffic to better execute time-sensitive applications including IP phone and multimedia applications.
WL-600g All-in-1 Wireless ADSL2/2+ Home Gateway User Manual 3. Rank the priority (1, 2, 3, ...) of the service (application) according to your preference. 4. If you want to remove the service from the list, just check the Remove box. For more information, refer to the Asus website at http://www.asus.com Management This chapter describes how to maintain your WL-600g wireless ADSL router. &RQÀJXUDWLRQ EDFNXS Setti
WL-600g All-in-1 Wireless ADSL2/2+ Home Gateway User Manual Reset to factory default To clear all settings and return to the factory default settings, you can press the Reset button on the rear panel of the wireless router for 10 seconds; or click Management -> Settings -> Restore Default WR RSHQ WKH FRQÀJXUDWLRQ SDJH DQG FOLFN WKH Restore Default Settings button. Setting up time server
APPENDIX FCC Warning Statement This device complies with Part 15 of the FCC Rules. Operation is subject to the following two conditions: (1) this device may not cause harmful interference, and (2) this device must accept any interference received, including interference that may cause undesired operation. This equipment has been tested and found to comply with the limits for a class B digital device, pursuant to part 15 of the FCC Rules.
APPENDIX Declaration of Conformity for R&TTE directive 1999/5/EC Essential requirements – Article 3 Protection requirements for health and safety – Article 3.1a Testing for electric safety according to EN 60950-1 has been conducted. These are considered relevant and sufficient. Protection requirements for electromagnetic compatibility – Article 3.1b Testing for electromagnetic compatibility according to EN 301 489-1 and EN 301 489-17 has been conducted. These are considered relevant and sufficient.