Quick Installation Guide Applicable Models: AS6004U Ver.2.3.0903 (2015-3-2) Ver.3.0.
Table of Contents Notices .................................................................................................................................... 3 Safety Precautions .................................................................................................................. 4 1. Package Contents .............................................................................................................. 5 2. Optional Accessories ..........................................................
Notices Federal Communications Commission Statement This device complies with FCC Rules Part 15. Operation is subject to the following two conditions: This device may not cause harmful interference. This device must accept any interference received, including interference that may cause undesired operation. This equipment has been tested and found to comply with the limits for a class A digital device, pursuant to Part 15 of the Federal Communications Commission (FCC) rules.
Safety Precautions The following safety precautions will increase the life of the NAS. Follow all precautions and instructions. Electrical Safety Unplug this product from the power source before cleaning. Use only the bundled power adapter. Using other power adapters may damage your device. Ensure that you plug the power adapter to the correct power input rating. Check the label on the power adapter for the power rating. Operation Safety DO NOT place this product in a location where it may get wet.
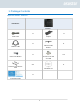
1. Package Contents Applicable Models: AS6004U NAS Device AS6004U x1 x1 Adapter Power Cord x1 x1 USB 3.0 Cable Bracket USB 3.0 Cable x1 x16 Power Cord Bracket Screws for use with 3.5” HDD x16 x1 Screws for use with 2.
2. Optional Accessories The items below may be purchased from the ASUSTOR Accessories Store http://shop.asustor.com.
3. Hardware Installation Guide Tools Needed for Hard Disk Installation Phillips head screwdriver At least one 2.5 or 3.5 inch SATA hard disk. (For a list of compatible hard disks, please see http://www.asustor.com/service/hd?id=hd) Hard Disk Installation 1. Press the button on the lower portion of the hard disk tray to release the latch. 2. Using the latch, gently pull the disk tray out of the disk bay. 3. Mount the hard disk to the disk tray. 3.
2.5-inch hard disks and SSD hard disks: Place the hard disk into the area of the disk tray outlined in red (see picture below). Make sure that the mounting holes on the bottom of the hard disk and disk tray are lined up. Secure the drive with four screws. 4. Slide the disk tray onto the rails of the disk bay. Using the latch, gently push the disk tray all the way into the disk bay. Secure the disk tray in place by pushing down on the latch. The latch should close easily and snap in with an audible ‘click’.
5. Once the latch is secure, you can lock it in place using the disk tray lock. Using a flathead screwdriver, turn the lock counterclockwise to lock the latch mechanism. Turning the lock clockwise will unlock it. Connecting Your Device Note: You can use the provided accessory to secure the USB 3.0 cord in place, if you are concerned about it becoming detached when the NAS is moved. 1. Take the cable bracket accessory and insert it into its corresponding port on the rear panel of the device. 2.
4. Connect the power cable to the device. 5. Connect the other end of the USB 3.0 cable to a USB 3.0 port on the rear panel of your NAS, which should not be powered on yet. When the NAS is powered on, the AS6004U will also be powered on. When the NAS is powered off or in sleep mode, the AS6004U will also enter into sleep mode. When the USB 3.0 cable is not connected to a NAS, pressing the power button on the AS6004U will cause it to enter into sleep mode. Note: 1.
Securing the Power Cord Note: You can use the provided cord bracket to secure the power cord in place, if you are concerned about the NAS power cord becoming detached when the NAS is moved. 1. Take the cord bracket out of the accessories box. 2. Attach the bracket to the power cord as shown in the graphic below. 3. Remove the fan screw by unscrewing it counter-clockwise.
4. Position the bracket over the hole for the removed fan screw. Secure the bracket in place by replacing the fan screw. Powering off Your Device 1. With the blue power indicator lit, press and hold the power button for 4 seconds. The green status indicator will begin to flash quickly. Let go of the power button and the NAS will power off. Note: It is strongly recommended that you do not power off the NAS when data is being transferred between your NAS and the AS6004U. 2.
4. Appendix LED Indicators AS6004U 1. Power LED Indicator 2. Status LED Indicator 3. Hard Disk LED Indicator 4. USB 3.0 Connection LED Indicator 5. Alert LED Indicator LED Indicator Color Description State Blue Steadily lit Power on Orange Steadily lit Sleep mode Power Unlit Status Power off Green Steadily lit RAID mode Red Steadily lit Damage to RAID volume Yellow Steadily lit RAID level downgrade Unlit USB Blue No RAID in use USB 3.
Rear Panel 1. USB 3.0 Port 2. USB 3.0 Cable Bracket Port 3. DC Input 4. K-Lock 5. System Fan Number of Expansion Units Supported NAS models that are able to support 2 simultaneous AS6004U expansion units: AS31 / AS32 / AS50 / AS51/ AS61/ AS62 / AS70 Series NAS models that are able to support 1 simultaneous AS6004U expansion unit: AS10 / AS-2 / AS-3 / AS-6 Series Troubleshooting 1.