
User guide


8-20 Beginning Programming
Circles
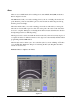
There are two available methods for teaching a circle, Start, Middle, End (SME) and Center.
The SME method asks you to teach a starting point for your circle, a middle point, and an end
point. The three points are treated like points along the circumference of the circle and the
circle will be dispensed along the three points accordingly. The Start and End points may be
the same point, but it is not necessary to program the circle in that manner.
The Center method asks you to teach a starting point on the circle followed by a center point.
This method may be difficult to use if you can not accurately determine the center of your
circle. The Degrees text box will automatically calculate the 360 degrees necessary to
complete the circle. Activating the Clockwise feature determines the direction the dispensing
head moves while dispensing.
The Line Style text box allows you to choose the line style for your circle. Clicking on Edit
takes you to the Edit Line Parameters dialog box for tailoring the line style. Weight Control
lines can also be used for circles.
Estimated time to complete: 30 minutes.
To program circles:
1. Perform the Programming Setup in Chapter 6 - Setup and Configuration.
> Load Side 1 of the Tutorial Board.
> When you create the Workpiece, define the Workpiece Alignment.
> Choose No Fiducials.
2. Click on Dispensing Elements from the Program Commands toolbar.
3. Click on Circle on the Dispensing Elements toolbar.
4. Select the method (SME or Center) for teaching the circle.
5. Use the Position Controls to move the dispensing head to the circle start point.
6. Click on Teach.
7. Do one of the following:
> If using the SME method, use the Position Controls to move the dispensing
head to the second point on the circle.
> If using the Center method, use the Position Controls to move the dispensing
head to the center of the circle.
8. Click on Teach.
> If using the Center method, your circle is complete. Go to Step 12.