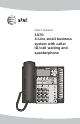
User’s manual 1070 4-Line small business system with caller ID/call waiting and speakerphone 7 1
Congratulations on purchasing your new AT&T product. Before using this AT&T product, please read the Important product information on pages 69-70 of this user’s manual. Please thoroughly read the user’s manual for all the feature operation and troubleshooting information you need to install and operate your new AT&T product. You can also visit our website at www.telephones.att.com or call 1 (800) 222-3111. In Canada, dial 1 (866) 288-4268. © 2007 Advanced American Telephones. All rights reserved.
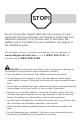
STOP! Do you receive DSL, (Digital subscriber line,) service for highspeed internet access through your telephone line(s) from your telephone company? If so, you will need to add either DSL splitters and/or microfilters to your installation. See page 9 of the installation guide. For customer service or product information, visit our website at www.telephones.att.com or call 1 (800) 222-3111 . In Canada, dial 1 (866) 288-4268 .
User's manual 7 1070 4-Line small business system with caller ID/ call waiting and speakerphone Table of contents Getting started Introduction............................................................................................................................................ 1 Telephone overview........................................................................................................................... 2 Display screen messages...........................................................
Intercom operation Intercom overview ..........................................................................................................................25 Intercom ...............................................................................................................................................26 Make an intercom call with the handset..........................................................................26 Make an intercom call with the speakerphone or headset..........................
To return a call...............................................................................................................................54 To delete an entry or all entries...............................................................................................55 Changing the format of the caller ID number...............................................................55 To remove a specific entry....................................................................................................
Getting started Introduction This AT&T Small Business System is expandable to a 16-extension telephone system. The 1070 telephone is compatible with 1040 and 1080 telephones. For details, see the Installation Guide. This system is not compatible with any other AT&T 4-line small business telephones, except for the 1040 and 1080 telephones. The 1070 telephone is hearing-aid compatible and can be connected to up to four incoming telephone lines.
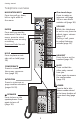
Getting started Telephone overview REMOVE 7 While reviewing the call history, directory or redial stack, press to delete an individual entry. While entering or editing a name or number, press to delete a character. LINE BUTTONS, 1-4 Press to make or answer a call on the desired line (page 9). While on a call, press to release the call privacy feature (page 21). DIR Press to store or display directory entries (page 43). Press again to quit.
Getting started Telephone overview One-touch keys Press to make an intercom call (page 26) or a one-touch outside call (page 38). NAVIGATION KEYS Press to scroll up, down, left or right 7while in the menu. VOLUME While the telephone is not in use, press to adjust ringer volume (page 13). During a call, press to adjust listening volume (page 13). ENTER Press until you see the main menu. Once in the menu, press to select an item or save an entry or setting. Press and hold to exit the menu.
Getting started Display screen messages LCD contrast SPECIAL OPTIONS LEVEL-4 LCD CONTRAST Your set's display provides important information. You can adjust the screen contrast to one of eight levels to optimize readability in different lighting conditions. 1. Press [ENTER]. 2. Press [ ] or [ ] until you see SPECIAL OPTIONS. Press [ENTER]. 3. Press [ ] or [ ] until you see LCD CONTRAST. 4. Press [ ] or [ ] to select the screen contrast level (1-8). 5. To move to the next feature, press [ ].
Getting started Display screen messages continued from previous page (EMPTY) The directory or one-touch location is empty. EXT XX RING There is an incoming Centrex call. FULL! The directory is full. INITIALIZING. . The telephone is warming up. INTERCOM FROM XX Another system telephone XX is calling (XX is the extension number). LIST EMPTY The redial memory is empty. LOW BATT There is no spare battery in the telephone or the battery power is low.
Getting started Indicator lights & tones Indicator lights 7 LINE Green: • On when the line is in use. • Flashing slowly when the line is on hold. • Flashes quickly when a person has transferred a call on that line. • Flashes quickly when there is an incoming auto attendant transferred call on the line. • Flashes rapidly when there is an incoming call. Red: • On when another telephone in the system is using the line. • Flashes slowly when the line is on hold by another telephone in the system.
Getting started Indicator lights & tones continued from previous page NEW CALL • On when there are unreviewed calls. • Flashes when there are new voice mail messages. The screen will display”COVM”, with “1”, “2”, “3”, and/or “4” under “COVM”, depending on which lines have messages waiting. • Flashes when there are new system extension messages. The screen will display ”DTAD: XX/YY”, with “YY” greater than zero.” INTERCOM • On when the telephone is on an intercom call or a paged call.
Getting started Directory card To write names and/or phone numbers on the directory card, follow the steps below: 1. Remove the clear plastic cover by inserting a small item such as paperclip into the hole on the lower right corner. 2. Pull out the directory card. 3. Write the information on the directory card. 4. Replace the directory card and then the plastic cover. NOTE: There is a replacement directory card in the telephone package.
Telephone operation Basic phone operation 7 This phone comes programmed to use line 1 (default prime line) for calls if you do not press a line button. (To change the prime line, see Prime line on page 39 of the installation guide.) When you answer a call, the phone automatically selects the ringing line. Lit line indicators The four indicators above the LINE keys will indicate the state of the corresponding phone line. The four LINE lights have two colors: • Green is for outside calls. a.