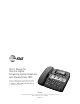
2 User's Manual for Two-Line Digital Answering System Telephone with Speakerphone 1872 Fold open this paper for information about this telephone's installation and operation. Please read Part 1 — Important Product Information, included in this package. Part 2 © Copyright 1998 Philips Consumer Communications L.P. All rights reserved. Printed in Mexico.
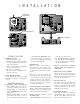
I N S T A L L A T I O N Open battery compartment. Install 4 AA batteries. Remove the base. SETTING UP THE SYSTEM 1 Install the batteries. a Turn the unit upside down. b Lift the base off the phone by pushing in on the triangle at the center of the large end of the base. c Swing open the battery compartment door by pressing the tab. d Insert 4 new AA batteries. e Close the battery compartment door. Leave the base off. 2 Set the Dial Mode switch.
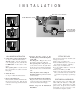
I N S T A L L A T I O N Place line cord in channel. Set the Dial Mode switch. Connect the line cord, as described in instructions. Reverse the handset tab. WALL MOUNTING INSTALLATION 1 Connect line cord(s) to the telephone. See Step 1 in Table/Desk Installation. Two-line jack — Use the 8-inch line cord, and plug into the jack labeled L1 OR L1/L2 on the bottom of the phone. Two separate jacks — Use the 8-inch line cord, and the 7-foot line cord with blue plugs. 2 Attach the base.
IN CASE If you have difficulty operating this phone, try the suggestions below. If you still have trouble, call 1 800-722-9125. NO DIAL TONE ❥ Make sure all plugs are connected properly. Inspect the line cord connections at the modular jack and at the telephone. Also inspect the coiled handset cord connection at both ends. ❥ Unplug the telephone and connect it to another modular jack. CALL CANNOT BE DIALED, OR IS DIALED SLOWLY See “Setting Up the System” in Installation to set the Dial Mode switch.
ANSWERING SYSTEM OPERATION A w a y You can use many answering system features when you are away from home. To protect your privacy, most features can only be used after you enter a 3-digit Remote Access Code. Enter commands using the keys on any touch tone phone, or by using Voice Activated Commands. F r o m H o m e FORWARD To skip an entire message, press 5 while that message is playing. To skip part of a message, hold down 5. Release 5 to resume playing. STOP Press # to stop message playback.
ANSWERING SYSTEM OPERATION A w a y Voice Activated Commands When a touch tone telephone is not available, you can still call the system to listen to your messages. Use your voice to enter the Remote Access Code, to repeat the messages, and to delete messages. Speak in response to the prompts presented by the system as described below. You must speak quickly and loudly in order for the system to detect your voice.
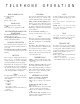
T E L E P H O N E MAKE OR ANSWER A CALL 1 Lift the handset — OR — Press K 2 Press L or l. ENDING A CALL Place the handset in the cradle — OR — Press K (if on a speakerphone call). SWITCHING BETWEEN HANDSET AND SPEAKERPHONE To switch from handset to speakerphone during a call, press K. To switch from speakerphone to handset during a call, lift the handset. AUTOMATIC LINE SELECTION The system is preset to select a line for you in most cases when you lift the handset or press K.
Message Window Choose settings. Record outgoing announcement Choose feature. Set clock or review time. Skip a message. Stop message playback. Line Ringing Lights Turn Answering System On or Off. Message playback light. Repeat a message. Listen to messages. Memory dialing buttons. Delete messages. Press before memory button to access "gray" memory numbers. Record a memo or phone call. Volume Up or Down Store numbers in memory. Use Flash to access subscriber services. Redial last number called.
T E L E P H O N E This telephone can store up to 16 telephone numbers, each up to 16 digits long. NOTE: The number stored in memory may be lost if the batteries are missing or low on power and there is a power failure. STORING A NUMBER IN MEMORY 1 Press p. 2 Enter the telephone number. To insert a hyphen between digits, press _. The screen displays the number as you enter it.
ANSWERING SYSTEM OPERATION LINE SELECTION OPTIONS VOICE MAILBOXES RECORD AN ANNOUNCEMENT The system is preset so that when you lift the handset or press K, it will choose the ringing line. The system is preset to choose Line 1 (preferred) if both lines are are not in use. This system provides four voice mailboxes for you to customize. Mailbox 1 normally handles calls received on Line1. Mailbox 2 normally handles calls received on Line 2.
ANSWERING SYSTEM OPERATION SECONDARY MAILBOX ANNOUNCE ONLY You can set the system to play an announcement, but not record messages, for callers who access Mailbox 3 or 4. 1 Press A. 2 Press s to choose MBOX 3 or MBOX 4. 3 Press F. 4 Press 1 to set to Announce Only (AO). Press 0 to turn off Announce Only. NOTE: You cannot select Announce Only for Mailboxes 3 and 4 unless the mailbox has an announcement. ANSWER CALLS To choose which lines the system will answer, or to turn the system off, press O.
ANSWERING SYSTEM OPERATION REPEAT/REVIEW MESSAGES To repeat an entire message, tap r. To return to an earlier message, press r two or more times until the number of the desired message is displayed. To repeat part of a message (review), hold down r for a few seconds, then release it to resume playing. (The system beeps while the button is held.) FORWARD/SKIP MESSAGES To skip to the next message, tap f. To skip part of a message (cue), hold down f for a few seconds, then release it to resume playing.
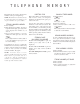
2 Answering System 1872 1 Dial telephone number and wait for system to answer. 2 Enter Remote Access Code. 3 Listen for messages — OR — Enter touch tone command. 4 Hang up to save messages. Your Remote Access Code ______ © Copyright 1998 Philips Consumer Communications L.P. All Rights Reserved Printed in Mexico 848229530 Issue 1AT&T 2 Answering System 1872 1 Dial telephone number and wait for system to answer. 2 Enter Remote Access Code. 3 Listen for messages — OR — Enter touch tone command.
Play all messages 7 Play all new messages 6 Play all messages in a mailbox 17, 27, 37, or 47 Play new messaes in a mailbox 16, 26, 36, or 46 Repeat message 2 Skip message 5 Delete selected message 3 Delete all message 03 Delete all message in a mailbox 13, 23, 33, or 43 Turn system on 00 Turn system off 88 Change Remote Access Code 99 Help menu # Play all messages 7 Play all new messages 6 Play all messages in a mailbox 17, 27, 37, or 47 Play new messaes in a mailbox 16, 26, 36, or 46 Repeat message 2 Ski