Plug&Share™ Wireless PCI Adapter 802.11g / 108 Mbps 6550G User Manual Copyright © 2004 Advanced American Telephones. All Rights Reserved. AT&T and the Globe Design are trademarks of AT&T Corp., licensed to Advanced American Telephones. All marks are trademarks of their respective corporations.
Table of Contents Table of Contents INTRODUCTION..........................................................................3 Overview ........................................................................3 Package contents............................................................3 System requirements ......................................................3 DRIVER & ADAPTER INSTALLATION ......................................4 Step 1: Install driver & configuration utility......................
Introduction Overview The AT&T Plug&Share™ Wireless PCI Adapter allows you to connect any desktop computer with an available PCI slot to a compatible wireless network. Package Contents Please check to make sure your package contains the following items: Quick Start Guide Plug&Share™ Wireless PCI Adapter 108 Mbps 802.11g CD-ROM Contains installation software and printable versions of this User Manual, Quick Start Guide and Safety & Warranty Information.
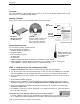
Installation Install software BEFORE installing the adapter (see Step 1 on previous page). CAUTION: Turn OFF and UNPLUG your computer before opening it. STEP 2: Install the Wireless PCI Adapter 1 Turn off and unplug your computer. Following the instructions in your computer user manual, open the computer cover. 2 Locate an empty PCI slot. 3 Remove the slot cover. You’ll have to remove the screw or clip that holds the slot cover in place.
Adapter Configuration Wizard • Link Info. • Configuration • Security • Site Survey • About STEP 4: Configure the PCI adapter for your wireless network Check the Utility icon (four vertical bars) next to your computer’s time display. If the bars are green, you are already connected and do not need to run the Wizard (skip to bottom of page 6). If the bars are not green within 30 seconds, double-click the Utility icon, then click the Run Wizard button at the next screen.
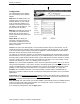
Adapter Configuration Wizard • Link Info. • Configuration • Security • Site Survey • About Wizard screen 2 This screen shows the status of your network connection. Your adapter should have found the network associated with the SSID you entered, and automatically set the channel to agree with your wireless router and/or access point. If you see Pass in the top two fields on this screen, you are ready to close this window and begin using your wireless network. Test this by visiting the Internet (see below).
Adapter Configuration Wizard • Link Info. • Configuration • Security • Site Survey • About Link Info This screen displays current settings. (To change any of these settings, click Configuration at the top of the screen.) Status: The MAC address of the router, or access point, associated with the wireless adapter. SSID: The Service Set Identifier of the network. This is the setting given to the access point, or router. TX Rate: The current transmission speed setting.
Adapter Configuration Wizard • Link Info. • Configuration • Security • Site Survey • About Configuration The Configuration screen displays the current settings of the wireless adapter. SSID: Enter the SSID used by your wireless router or access point. All wireless adapters on your network must use the same SSID as your wireless router and/or access point. The SSID is case sensitive (i.e., “cat” and “Cat” are not the same).
Adapter Configuration Wizard • Link Info. • Configuration • Security • Site Survey • About Security The Security screen allows you to set the privacy settings of your wireless PCI adapter. All settings must match the settings of your wireless router or access point. Click the drop-down menu to select a security option: Disable: No security. Not recommended. WEP: Moderate security (see below). WPA: Suitable only for large enterprise networks (see page 10).
Adapter Configuration Wizard • Link Info. • Configuration • Security • Site Survey • About WPA Enterprise Security (WiFi Protected Access): Select this option only if you are using your adapter in a large enterprise network environment such as a company or school. Consult your network administrator for advice before selecting this option.
Adapter Configuration Wizard • Link Info. • Configuration • Security • Site Survey • About Site Survey The Site Survey screen shows a list of wireless networks nearby that are available for connection. Select a network and click Connect to establish a connection. Click Refresh to update the list and show additional networks that may have become available since you last checked.
Configuring the Wireless Network — Windows® XP Windows® XP • Windows® 2000 • Windows® Me/98 SE Configure Windows® XP for Network Sharing Caution Before making any changes to your networking settings, please review this section carefully. Failure to follow these instructions precisely may result in the inability to log into your network or computer. If your computer is part of a work environment, please contact your IT professional before proceeding. Step 1 Click Start > Control Panel.
Configuring the Wireless Network — Windows® XP Windows® XP • Windows® 2000 • Windows® Me/98 SE Step 4 Click Wireless Network Connection. Step 5 Click the Properties button. Step 6 Make sure File and Printer Sharing for Microsoft Networks appears in this list, and check it if it is unchecked. If you do not see it in the list, click the Install button and follow directions to install File and Printer Sharing for Microsoft Networks. Click OK when File and Printer Sharing is installed and checked.
Configuring the Wireless Network — Windows® XP Windows® XP • Windows® 2000 • Windows® Me/98 SE Step 7 Highlight the My Computer icon on your desktop, then click the right mouse button. Scroll down to click on Properties. Step 8 Click the Change button. Step 9 Enter a unique name to identify your computer. Each computer must have a different name. Enter a workgroup name. All computers must use the same workgroup. It may be easiest to use the default name, “Workgroup.
Configuring the Wireless Network — Windows® XP Windows® XP • Windows® 2000 • Windows® Me/98 SE Step 10 When configuration is complete, you must restart Windows®. When Windows® restarts you will be prompted to enter a user name and password. Be sure to record these in a safe place. You will be required to enter them for access to the network each time you restart Windows®.
Configuring the Wireless Network — Windows® XP Windows® XP • Windows® 2000 • Windows® Me/98 SE Configure Windows® XP for Printer Sharing Step 1 Click Start > Printers and Faxes. Step 2 Place the cursor on the printer you want to share, then click the right mouse button. Scroll down to select Sharing. NOTE: If your printer is not listed in this window, double-click Add a Printer, then follow the instructions to set up your printer for use.
Configuring the Wireless Network — Windows® XP Windows® XP • Windows® 2000 • Windows® Me/98 SE Configure Windows® XP for File Sharing Step 1 Double-click the My Computer icon on your desktop. Step 2 Place the cursor on the disk drive you want to share (usually Drive C:), then click the right mouse button and scroll down to select Sharing and Security. NOTE: This will allow others access to all files on this computer.
Configuring the Wireless Network — Windows® XP Windows® XP • Windows® 2000 • Windows® Me/98 SE To Share Network Files in Windows® XP Step 1 Double-click the My Network Places icon on your desktop. Step 2 Double-click View Workgroup Computers to see a list of all computers connected to your network. Step 3 Double-click any icon to see a list of all shared folders on that computer. Step 4 Double-click any folder for access to any file in that folder.
Configuring the Wireless Network — Windows® 2000 Windows® XP • Windows® 2000 • Windows® Me/98 SE Configure Windows® 2000 for Network Sharing Caution Before making any changes to your networking settings, please review this section carefully. Failure to follow these instructions precisely may result in the inability to log into your network or computer. If your computer is part of a work environment, please contact your IT professional before proceeding.
Configuring the Wireless Network — Windows® 2000 Windows® XP • Windows® 2000 • Windows® Me/98 SE Step 5 Click Start > Settings > Control Panel. Step 6 Double-click System. Step 7 Click the Properties button. Step 8 Enter a unique name to identify your computer. Each computer must have a different name. Enter a workgroup name. All computers must use the same workgroup. It may be easiest to use the default name, “Workgroup.
Configuring the Wireless Network — Windows® 2000 Windows® XP • Windows® 2000 • Windows® Me/98 SE Step 9 When configuration is complete, you must re-start Windows®. When Windows® restarts you will be prompted to enter a user name and password. Be sure to record these in a safe place. You will be required to enter them for access to the network each time you restart Windows®.
Configuring the Wireless Network — Windows® 2000 Windows® XP • Windows® 2000 • Windows® Me/98 SE Configure Windows® 2000 for Printer Sharing Step 1 Click Start > Settings > Printers. Step 2 Place the cursor on the printer you want to share, then click the right mouse button. Scroll down to select Sharing. NOTE: If your printer is not listed in this window, double-click Add Printer, then follow the instructions to set up your printer for use.
Configuring the Wireless Network — Windows® 2000 Windows® XP • Windows® 2000 • Windows® Me/98 SE Configure Windows® 2000 for File Sharing Step 1 Double-click the My Computer icon on your desktop. Step 2 Place the cursor on the disk drive you want to share (usually Local Drive C:), then click the right mouse button and scroll down to select Sharing. NOTE: This will allow others access to all files on this computer.
Configuring the Wireless Network — Windows® 2000 Windows® XP • Windows® 2000 • Windows® Me/98 SE To Share Network Files in Windows® 2000 Step 1 Double-click the My Network Places icon on your desktop. Step 2 Double-click Computers Near Me to see a list of all computers connected to your workgroup. Step 3 Double-click any icon to see a list of all shared folders on that computer. Step 4 Double-click any folder for access to any file in that folder.
Configuring the Wireless Network — Windows® 98 SE/Windows® Me Windows® XP • Windows® 2000 • Windows® Me/98 SE Configure Windows® 98/Me for Network Sharing Caution Before making any changes to your networking settings, please review this section carefully. Failure to follow these instructions precisely may result in the inability to log into your network or computer. If your computer is part of a work environment, please contact your IT professional before proceeding.
Configuring the Wireless Network — Windows® 98 SE/Windows® Me Windows® XP • Windows® 2000 • Windows® Me/98 SE Step 5 Click the Access Control tab at the top of this screen, then click on the Share- Level access control button. Step 6 Click the Configuration tab at the top of this screen, then click the File and Print Sharing button. Step 7 Check the first option (I want to be able to give others access to my files). Check the second option if you want to share a printer connected to this computer.
Configuring the Wireless Network — Windows® 98 SE/Windows® Me Windows® XP • Windows® 2000 • Windows® Me/98 SE Step 9 To verify that configuration is complete, doubleclick the Network Neighborhood icon on your desktop. In the next window displayed you should see the names of all network computers. If any computers do not appear, you will have to follow the steps in this section on each computer to configure them for network sharing.
Configuring the Wireless Network — Windows® 98 SE/Windows® Me Windows® XP • Windows® 2000 • Windows® Me/98 SE Configure Windows® 98/Me for Printer Sharing Step 1 Click Start > Settings > Printers. Step 2 Place the cursor on the printer you want to share, then click the right mouse button and scroll down to select Sharing. NOTE: If your printer is not listed in this window, double-click Add Printer, then follow the instructions to set up your printer for use.
Configuring the Wireless Network — Windows® 98 SE/Windows® Me Windows® XP • Windows® 2000 • Windows® Me/98 SE Configure Windows® 98/Me for File Sharing Step 1 Double-click the My Computer icon on your desktop. Step 2 Place the cursor on the disk drive you want to share (usually Drive C:), then click the right mouse button and scroll down to select Sharing. NOTE: This will allow others access to all files on this computer.
Configuring the Wireless Network — Windows® 98 SE/Windows® Me Windows® XP • Windows® 2000 • Windows® Me/98 SE To Share Network Files in Windows® 98/Me Step 1 Double-click the Network Neighborhood icon on your desktop. Step 2 Double-click any icon to see a list of all shared folders on that computer. Step 3 Double-click any folder for access to any file in that folder.
Troubleshooting Troubleshooting If your wireless network adapter does not work properly, try the following suggestions before seeking repair assistance. Problem Solution Network performance is sometimes fast, sometimes slow • Another network nearby may be using the same channel, and causing interference. Change the Channel to a different setting on all devices connected to your network (see page 8).
Troubleshooting Problem Solution Cannot connect to the Internet If remedies suggested on the previous page do not work, you can set your computer to automatically detect IP settings, which may allow you to connect to the Internet. (Setting your computer to automatically detect IP settings may correct this problem.) If your computer is new, it may not have an IP address, which is required for Internet access.
Glossary Glossary Access Point DNS Access points are the contact points (wireless routers and transmitters) in a wireless LAN that are connected to an Ethernet hub or server. Users can roam within the range of access points and their wireless device connections are passed from one access point to the next. DNS stands for Domain Name System. DNS converts domain names to the IP addresses that all machines on the Internet have. It translates from name to address and from address to name.
Glossary Gateway Gateways are computers that convert protocols enabling different networks, applications, and operating systems to exchange information. Host Name The name given to a computer or client station that acts as a source for information on the network. LANs consist of a group of computers and related devices that share a common communication link (wired and/or wireless). A LAN allows you to share data and resources among the devices on the LAN.
Glossary Packet Radius Server A packet is a portion of data that is transmitted in network communications. Packets are also sometimes called frames and datagrams. Packets contain not only data, but also the destination IP address. RADIUS (Remote Authentication Dial-in User Service) Server must be configured to properly authenticate client devices for access to the network. The IP address and port number are based on the configuration of the RADIUS server in your enterprise network.
Glossary SMTP TCP/IP SMTP (Simple Mail Transfer Protocol) is the standard Internet e-mail protocol. SMTP is a TCP/IP protocol defining message format and includes a message transfer agent that stores and forwards mail. TCP/IP (Transmission Control Protocol/Internet Protocol) is the main Internet communications protocol suite. TCP ensures that data is completely sent and received at the other end.
Glossary Wireless LAN (WLAN) Wireless LANs are local area networks that use wireless communications for transmitting data. Transmissions are usually in the 2.4 GHz band. WLAN devices do not need to be lined up for communications like infrared devices. WLAN devices use routers which are connected to the wired LAN and provide connectivity to the LAN. The radio frequency of WLAN devices is strong enough to be transmitted through non-metal walls and objects, and can cover an area up to a thousand feet.
Technical Specifications Technical Specifications Standards • IEEE 802.11 • IEEE 802.11b • IEEE 802.11g Operating Systems • Windows® XP, 2000, Me, 98 SE Bus Type • 32-bit PCI Wireless Data Rates (Mbps) With Automatic Fallback • 108, 54, 48, 36, 24, 18, 12, 11, 9, 6, 5.
For customer service, please call 1-877-800-5400 (USA) • 1-866-669-4730 (Canada) or visit www.plugandshare.att.com for product information and driver upgrades as they become available Copyright © 2004 Advanced American Telephones. All Rights Reserved. AT&T and the Globe Design are trademarks of AT&T Corp., licensed to Advanced American Telephones. All marks are trademarks of their respective corporations.