D E F I N I T Y ® Communications System Generic 1 and System 75 7407 Plus Voice Terminal User's Guide
Contents Your 7407 Plus Voice Terminal 1 What the Features Do 4 Voice Features 4 Display Features 7 How to Use the Features 8 Special Instructions 8 Conventions 9 Troubleshooting 10 Quick Reference Lists 10 Voice Features Handset and Speaker Abbreviated Dialing (AD) Automatic Callback Bridging Call Coverage Call Forwarding All Calls Call Park Call Pickup Conference Drop Hold Intercom Last Number Dialed Leave Word Calling (LWC) Message Mute Priority Calling Reset Speakerphone Select Ring (
Display Features 28 Activating and Clearing the Display 28 Normal Mode 28 28 29 30 31 31 32 32 Inspect Integrated Directory Message Retrieval Normal Stored Number Time/Date Timer Tones and Their Meanings 33 Ringing Tones 33 Handset Tones 33 Troubleshooting System 75 Version Notes Key Words to Know 34 35 36 Quick Reference Lists ii
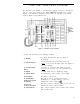
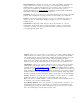
Your 7407 Plus Voice Terminal The 7407 Plus voice terminal is comprehensively equipped so that you can make the best use of the many features of the AT&T DEFINITY ® Communications System Generic 1 and System 75. Familiarize yourself with your 7407 Plus voice terminal, shown in Figure 1 and explained below. Figure 1. 7407 Plus Voice Terminal Starting with the handset and continuing clockwise: 1) Handset For placing and answering calls (also known as the receiver).
10) Select button Can be used in 3 different ways: 1) Used with [ Drop Test ], to initiate a self-test of your voice terminal; 2) Used with [ Conference Ring ], to select your own personalized ring from among 8 available patterns; 3) Used with [ Sepaker Reset Spkr ] to perform an acoustic test of the environment and adjust the speakerphone to the surrounding acoustic environment for optimal performance (for using the built-in speakerphone only).
18) Call appearance/ feature buttons At least 3 of these 10 buttons are devoted to incoming and outgoing calls (call appearances) and are labeled with an extension number; the remainder access features (feature buttons) and are labeled with a feature name. Each has a red in-use light to tell you that this is the line you are using or that this is the line you will get when you lift your handset.
What the Features Do Here are brief descriptions of 31 features, including what each one does and how you might want to use it. The first 24 are voice features and the final 7 are display features. Note: You will automatically have the following features on your voice terminal: Conference, Drop, Hold, Message, Mute, the Select Button, Select Ring, Self-Test, and Transfer voice features and Normal mode among the display features.
Call Pickup Lets you answer a call at your voice terminal for another extension in your pickup group. Use when you wish to handle a call for a group member who is absent or otherwise unable to answer. Note: You can only use this feature if you and the called party have been assigned to the same pickup group by your System Manager. Conference Allows you to add parties to a call, so that you can conduct up to a 6-way conversation.
Initiates an acoustic test of the surrounding environment by using a series of tones. When the tones stop, your speakerphone has finished adjusting itself for optimal performance. It is now ready for use. Use whenever you move your voice terminal to a different location (even in the same room), or whenever the light next to [ Speaker Reset Spkr ] is fluttering. (For best results, use the Reset Speakerphone feature when the handset is on-hook.
Display Features Inspect Shows you call-related information for an incoming call when you are already active on a call. Use to identify and screen new calls. Searches for the extension of another user by allowing you to key in the user’s name with the dial pad. Use as a handy quick reference source for extension number information. Integrated Directory Allows you to retrieve messages left for you that have turned on your Message light.
How to Use the Features The procedures which follow give short, step-by-step instructions for using each of the voice features and display features. For your convenience, features in both categories are listed alphabetically. Special Instructions The first time you use these procedures, you will need to customize them for yourself by following the directions below. Your System Manager can supply the information required. ● To the right of each feature name is a box.
Conventions The following conventions are used in the procedures: Gray Type Procedure steps in gray type are to be followed if you do not have a button assigned for the feature. A shaded box containing xxxxx represents any button used exclusively for placing, receiving, or holding calls, and labeled with an extension number (shown here as XXXXX ). The button will have a red in-use light and a green status light. Also known as a call appearance button.
Troubleshooting Later in this guide you will find a short section on troubleshooting. Use the procedures listed here for problems that you may have in using your voice terminal. Quick Reference Lists Following the procedures is a set of quick reference lists. Use them to record your feature codes and trunk codes, Abbreviated Dialing personal list items, and frequently called miscellaneous extensions.
Voice Features Handset and Speaker When placing calls or using the voice features, you have the option of doing so off-hook (by lifting the handset) or on-hook (by pressing [ Speaker ] ). If your voice terminal is set for the Speakerphone feature, pressing [ Speaker ] simultaneously activates the built-in microphone so that you can place and answer calls without lifting the handset. Abbreviated Dialing (AD) To program/reprogram an AD button 1 Note: AD buttons must first be assigned by System Manager.
To program/reprogram an outside number, extension, or feature code into a personal list 1 On a separate sheet of paper, jot down the outside numbers, extensions, and/or feature codes you want to program as items on your personal lists(s) (see example to the left) Note: Each phone number or feature code is stored as a separate item. 2 [dial tone] Pick up handset Note: If you are using the built-in speakerphone, you must press a call appearance button before you proceed to Step 3.
Automatic Callback To place another call to an extension that was busy, did not answer, or returned a call waiting ringback tone 1 Press [ ● Auto Callback ] during call attempt [confirmation tone] Green light is on until callback is completed or canceled Note: If you send your calls to coverage after activating Automatic Callback, your callback calls will still ring at your extension and will not be redirected to coverage.
Call Coverage Press [ xxxxx ] of incoming call when ring begins or green light flashes To answer a call for a co-worker for whom you are a coverage point 1 To leave a message for a co-worker to call the original caller’s extension 1 To talk privately with co-worker after answering a redirected call 1 Press [ Note: The call is not at your terminal until the green light is flashing.
To cancel Call Forwarding 1 Press [ Call Forward ] again or Dial Call Forward Cancel code [confirmation tone] Call Park To park a call at your extension (for retrieval at any extension) 1 Press [ 2 Press [ Call Park ] or Dial Call Park code Transfer [dial tone] ] [confirmation tone] 3 Press [ ● To retrieve a parked call from any extension 1 Transfer ] again Call is parked Dial Answer Back code [dial tone] 2 Dial extension where call is parked [confirmation tone] ● If returning to call p
Call Pickup To answer a call placed to a member of your pickup group To pick up a call while you are active on another call 1 Press [ Call Pickup ] or Dial Call Pickup code ● Called voice terminal stops ringing ● You are connected to ringing call 1 Press [ 2 Hold ] ● Present call is put on hold ● Green light flutters Press [ Call Pickup ] ● Called voice terminal stops ringing ● You are connected to incoming call Note: To return to held call after completing pickup call, press flutterin
To add a call you’ve put on hold to another call you’re connected to 1 Press [ Conference Ring ] ● Held call light flutters; active call light also flutters ● You are given a new call appearance 2 Press [ 3 Press [ Conference Ring ] again ] of call on hold xxxxx ✔ Drop To disconnect from a regular call, or to drop the last party added to a conference call 1 Press [ Drop Test ] Note: Parties other than the last one must disconnect to be released from the conference call.
Intercom To make a call to your predetermined Automatic Intercom partner 1 Press [ ● Icom Auto xxx [ringback tone] ] Special intercom ring is sent Note: If call is unanswered, press [ Go to Cover ] while call is ringing if you want to redirect it to coverage.
Leave Word Calling (LWC) To leave a message after dialing an extension (when your call is not answered, you hear a coverage or busy tone, or you have been put on hold) 1 To leave a message before dialing an extension (called extension will not ring) 1 Press [ ● ] any time after you complete dialing [confirmation tone] Message light goes on at called voice terminal Note: If reorder tone is heard, message is not stored; try again.
✔ Mute Note: Use the Mute button in one of the following ways. ● If your voice terminal has the Speakerphone (speak and listen) feature, use the Mute button to turn off the microphone associated with the built-in speakerphone or the handset. ● If your voice terminal has the Speaker (listen-only) function, the Mute button affects only the handset. This feature has no effect on an external speakerphone attached to your voice terminal nor does it have any effect on the handset.
Reset Speakerphone You can adjust the speakerphone to the surrounding room acoustics to provide optimal performance. Use the Reset Speakerphone feature in the following ways: ● Whenever you move your voice terminal to another place (even in the same room) ● Whenever the green light next to [ Speaker Reset Spkr ] flutters intermittently Note: You may also use this feature when you are on a call in the unlikely event that your speakerphone makes a squealing noise during the call.
✔ Select Ring (and Ringer Volume) To select a personalized ring 1 While on-hook, press [ ● 2 Select ] Green light goes on steadily Press [ Conference Ring ] ● Green light next to [ Select ] winks; current ringing pattern plays and repeats every 4 seconds ● Display shows [ Personal Ring #x ] (x will be a number from 1 to 8) ] to cycle through all 8 3 Continue to press [ ringing patterns 4 When you hear the desired ringing pattern, press [ Select ] again ● ● Conference Ring Your new ring
✔ Self-Test To test the lights and ringer of your voice terminal 1 While on-hook, press [ ● 2 Select ] Green light goes on steadily Press and hold [ Drop Test ] ● All columns of lights go on steadily ● Ringer sounds ● Display darkens 3 Release [ Drop Test ] to end test ● Ringer and lights return to pretest state; green light next to [ Select ] goes off Note: If ringer or lights do not respond during test, notify your System Manager.
Speaker Note: Your voice terminal is set for either the Speaker (listen-only) or the Speakerphone (listen and talk) function. Check with your System Manager to see which of these two features you can use. You can use the Reset Speakerphone feature only if your voice terminal is set for Speakerphone (listen and talk). Use the following procedures if your voice terminal is set for the Speaker (listen only) feature.
To turn off the speaker and return to handset 1 Pick up handset Green light next to [ Speaker Reset Spkr ] and red light next to [ Mute ] go off ● ● To end a call (while handset is on-hook and only speaker is active) 1 Speaker goes off Press [ Speaker Reset Spkr ] Green light next to [ Speaker Reset Spkr ] and red light next to [ Mute ] go off ● Speakerphone Note: If you are uncertain whether your voice terminal is set for the Speaker button (listen-only) feature or the Speakerphone (listen and
● Red light goes off and other party can hear you again Note: If the handset is active and the Speakerphone feature is not active, the Mute feature turns off the microphone associated with the handset (not the speakerphone).
Voice Message Retrieval To retrieve your voice messages when your Message light is on 1 Dial the Voice Message Retrieval code 2 Dial your own extension followed by [ # ] [voice prompting] [dial tone] Note: Do not press [ # ] if calling from someone else’s extension; instead, dial your own extension number and (if prompted) your security code.
Display Features Activating and Clearing the Display Your display is automatically activated when you press a call appearance or feature button which requires displayed information. The display screen is usually cleared by pressing [ Normal ] or, for some features, the display automatically returns to normal mode after the information has been displayed for a designated number of seconds. To clear the display after using the Timer feature, you must press [ Timer ] a second time.
To see who’s on hold while on a call 1 Press [ Inspect 2 Press [ xxxxx ● To answer new call while on a call ] ] of held call You remain connected to present call 3 Press [ Normal ] to exit Inspect mode 1 Press [ Normal ] (if not already in normal mode) ● 2 Finish present call or put on hold Press [ xxxxx ] of new call Integrated Directory To search directory for a name 1 Press [ 2 Key in selected name with dial pad: last name, comma (use [ * ], first name or initial 3 Press [
Message Retrieval To see your messages when your Message light is on (while on-hook, off-hook, or on a call) To return a call to message sender 1 Press [ 2 Press [ Next Message ] to see first message (and then for each following message) 1 Lift handset 2 Press [ ] Msg Rtrv ] while any part of message is shown Call Disp Note: You can also leave your handset on-hook. The speakerphone will turn on automatically when you press [ Call Disp ].
To leave Message Retrieval and return to normal display 1 Press [ Normal ] ✔ Normal To return to normal display after using any display feature 1 Press [ ● Normal ] Display will show call information for active call appearance Stored Number To see number stored on an AD button 1 Press [ 2 Press selected [ ● To see number stored as a list item Stored # ] AD xxxxx ] Stored number shown 3 Press [ Normal ] to return to normal display or repeat Step 2 to see another stored number 1 Press
3 Dial selected list item (1, 2, 3...
Tones and Their Meanings Ringing tones are produced by an incoming call. Handset tones are those which you hear through the handset (receiver). Ringing Tones ● 1 ring — A call from another extension. ● 2 rings — A call from outside or from the attendant. ● 3 rings — A priority call from another extension, or from an Automatic Callback call you placed.
Troubleshooting Solution Problem A feature doesn’t work as noted in the book. There are no Feature Codes (such as Call Forward code or Send All Calls code) written in the appropriate blanks in this guide. 1 Reread the procedure and try again. 2 For many features you must lift the handset before you can use the feature. 3 Check with your System Manager to be sure this feature is administered on your voice terminal.
Solution Problem The telephone doesn’t ring. The lights do not go on next to the buttons. 1 Set the ringer volume to a higher level. 2 Check if you have pressed the "Ringer Off" feature button. 3 Place a test call from another extension to your extension. 4 Check the line cord to make certain that it is securely connected at both ends. 5 If there is still a problem, see your System Manager. 1 Check the line cord to make certain that it is securely connected at both ends.
Key Words to Know activate To begin or turn on the operation of a feature. attendant The person who handles incoming and outgoing calls at the main telephone console. AUDIX Audio Information Exchange, an optional voice mail and message service which provides coverage for calls to you by recording callers' messages and reporting Leave Word Calling messages. call appearance A button used exclusively to place, receive, or hold calls.
party A person who places or answers a call. personal list One of the 4 type of Abbreviated Dialing lists; programmable by the System Manager or by you, the user. Contains phone numbers of your choice, and stores each of them as a single-digit list item. personal list item One of the 10 available slots on an Abbreviated Dialing personal list. The first nine personal list items are given digits 1 to 9, with 0 for the tenth item.
trunk A telecommunications channel between your switch and the local or long distance calling network. Trunks of the same kind connecting to the same end points are assigned to the same trunk group. trunk code A dial code of 1, 2, or 3 digits which you dial to access a trunk group to place an outside call. voice terminal A telephone equipped with an array of specially designed features (for example, speakerphone, display, administrable buttons, etc.
Quick Reference Lists Feature Codes Code Feature ABBREVIATED DIALING List 1 List 2 List 3 Program CALL FORWARDING ALL CALLS Cancel CALL PARK Answer Back Code Feature CALL PICKUP LAST NUMBER DIALED LEAVE WORD CALLING Cancel PRIORITY CALLING SEND ALL CALLS Cancel VOICE MESSAGE RETRIEVAL Coverage
Abbreviated Dialing* Trunk Codes Description Code Item No.