
User`s manual


9
Getting started
Wall mounting
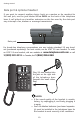
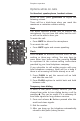
Two one-line wall jacks
If there are two separate one-line wall jacks, use both line cords.
NOTE: This product is designed to operate optimally with two telephone lines.
If you choose to install only one telephone line, the telephone will continue to
operate normally as long as the unused line is not selected. If you experience diffi-
culty, make sure you have pressed the correct LINE key.
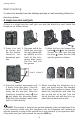
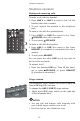
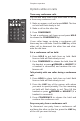
1. Press the tab
as shown and
flip the brack-
et towards
th e d o wn-
ward position.
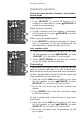
3. Wind the line cords around
the hooks and on the
bracket. Thread the line cords
through the hole . Insert the
line cords into the groove as
shown.
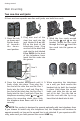
4. Press the bracket downwards until it
firmly clicks into place. Then plug the
free end of the clear line cord for Line 1
firmly into the Line 1 wall jack. Plug the
free end of the black line cord for Line 2
firmly into the Line 2 wall jack. Place the
telephone mounting holes and just
above the mounting studs, then slide
the telephone base down until it is held
securely.
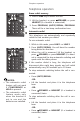
5. When mounting the telephone
on a wall, you must reverse the
handset tab to hold the handset
in place. Hold down the switch-
hook, and slide the tab up and
out of its slot. Turn the tab so
that the end with the lip is up.
Insert the tab back into its slot.
2. Plug one end of the
clear line cord into the
jack labeled L1 or L1/
L2 on the back of the
telephone base. Plug
one end of the black line
cord into the jack labeled
L2 or DATA on the back
of the telephone base.
Insert the line cords into
the groove.
Line 1
Line 2