V3 User’s Manual Congratulations on your wise purchase to keep your family safe. At Amber Alert GPS, Inc. we are dedicated to child safety and hope that through the use of our Device your lives will be enriched. Please call us if you need help in setting up your Device or if you have any questions. You can reach us toll free at: 1-888-334-3958 Monday through Friday from 9am to 5pm MST Amber Alert GPS, Inc. 1196 W.
Table of Contents What is Included in the Packaging? ---------------------------------------------------- 3 Your Amber Alert GPS V3 Device LED Light Status ------------------------------------------------------------------------ 4 Turning Device ON/OFF ------------------------------------------------------------- 5 Easy Smartphone Applications --------------------------------------------------------- 5 Coverage Map ------------------------------------------------------------------------------ 5 Alerts -----
What Is Included in the Packaging? Included in your packaging: Amber Alert GPS Device 1 attached Faceplate Mini USB Charger Quick Start Guide (pictured below) The back of the Quick Start Guide contains important information, such as your Username, Password, and Device phone number. You will need this information to log into the Tracking Portal and to call the Device. Please keep this information in a secure place for future reference.
Your Amber Alert GPS V3 Device The Amber Alert GPS Device (the “Device”) does not have an ON or OFF button. The unit is on at all times and can only be turned off by pressing the green and red buttons simultaneously for 10-12 seconds. The charging port is located on the side of the Device between the Voice and SOS buttons. The Device comes with a battery charger, but is compatible with any standard micro USB charger.
Turning Device ON/OFF There is 1 way to turn the Device on and off. To Turn Off: To Turn On: or Press and hold the green and red buttons simultaneously for 10-12 seconds. You will hear a beep to indicate the Device is turning off. Plug the Device into a power source (best option). Press and hold either the green or red button (or both buttons simultaneously) for approximately 10-12 seconds to turn the Device back on. Once turned back on, the Device will beep.
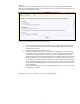
Setting Up your Amber Alert GPS Device The Device comes activated and ready for use after being fully charged (as previously explained above) and has been tested for quality assurance before shipment. NOTE: The Device will not work unless Set Up is completed by the user. To set up the Device preferences, go to www.amberalertgps.com. In the top right-hand corner, click LOGIN. The following screen will appear: Click the login link located at the bottom right.
Settings When you log into the Tracking Portal, you will be directed to the Map page. FIRST TIME USERS MUST GO TO THE SETTINGS PAGE to set your preferences for the Device. Click the Settings tab to reset or revise your settings at any time. Four important things take place in the Settings tab: 1. 2. 3. 4. 5. Select a name for your Device and type that name into the box entitled “Device Name”. Choose the unit of measurement for the speed setting (MPH or KPH) and the distance setting (feet/kilometers).
SOS – Help Me Alert The SOS Alert is one of the most popular features on the Device, and is activated by pressing and holding down the red button on the Device for at least 4 seconds. To ensure proper use of this feature, practice with your child how to press and hold down the button. When practicing with your child, include practicing pressing the button discreetly, or when the Device is in a pocket or jacket. The SOS (red) button has a bump on its surface so it has a different feel than the green button.
Setting Up Alert Recipients Users (Email and SMS/Text) The type of Alerts you are entitled to receive (SOS, Zones, Predator, Breadcrumb, Speed, Battery), as well as how you are entitled to receive them (SMS and/or Email) is determined by the type of Monthly Service Plan you have purchased. If you have purchased a plan that does not entitle you to receive certain Alerts, you may upgrade your plan at any time.
VERY IMPORTANT: In order to receive Alerts for a Device, the User must be linked to the Device. Please check the box located after the words “Link User With This Device”. Make sure to select how you would like each particular user to receive Alerts (SMS, Email, or both) and which Alert Type(s) you would like the user to receive, such as Battery, Breadcrumb, Predator, SOS, Speed, and Zone.
Voice Users 1 Way Voice with Voice Alert Voice Alert: If the wearer of the Device would like to alert the Primary User to listen in, they can press and hold the green button on the Device for 4 seconds. The Device will place a call to the number listed as the Current Voice User (pictured below). To set up the designated telephone number for this feature, click on the User’s tab.
Features Map Page To locate your Device at any time, simply log in to the Tracking Portal via your computer or your Smartphone Applacation (coming soon). Device locations are updated every 5 minutes on the Map page.
Map Page: Reports The Reports are now visible on the right side of the Map page. The map markers correspond with report details such as Date/Time, Battery, and GPS strength. These details are represented by the following words and icons: To display the Report details, check the box next to the word “REPORTS”. As you scroll through each individual report, the Map Marker related to that report will bounce on the page, making it easy for you to associate each report to a particular Map Marker location.
Home Page The Home page enables you simultaneously to view multiple devices on the same screen. Each Device is represented by a different color so you can easily distinguish between Devices. If you wish to view the address of a particular Device, click the Detail button located to the right side of your selected Device. If you wish to see all the locations for a particular device, click the More button located to the right side of your selected Device.
Alerts Zone Alert Zone Alerts are a very popular and effective feature. You may set up to 20 Zones at any one time. Zones can be set up around your child’s school, home, and neighborhood or anywhere you designate. Once a Zone is created and activated on the Tracking Portal, these parameters will remain set until edited or deleted. You may configure your Zone Alert to be delivered to you and other designated Users via email and/or SMS (text message).
If you successfully create a new Zone, a pop-up window will appear with the message: Zone Successfully Created. Click OK. Now you should see your new Zone added to the right column of predefined zones. After you create your first Zone, you will see a “Current Status” notice in the top right-hand corner of your screen. If the “Current Status” indicates “ON”, that means that your Zones are all active and Alerts will be sent to your Users in the manner you have designated.
Zones can be changed at any time. To edit a Zone, Click the EDIT button next the Zone you want to change, and the following screen will appear: You may enter a new address, change the radius, or change when you receive alerts. After you make your changes, click SAVE.
Speed Alert To be notified that your child is driving too fast or is in a speeding car with someone else, simply set a Speed Alert. During the interval in which the Device pings the satellites, the speed is recorded. If the speed exceeds the threshold you set, an alert will be sent to each of the designated Users. Each time the Device drops below the threshold speed and then exceeds the threshold speed, a new alert will be sent.
Breadcrumb Breadcrumb is an easy and convenient way to receive regular Alerts specifying the location of the Device at your preset interval. To select a reporting interval for the Device, log in to the Tracking Portal, select Alerts from the main menu, and click the Breadcrumb tab. From the drop down menu, select a tracking interval of 15, 30, 45 or 60-minutes. Click the START button to activate. Alerts will be sent to designated Users at the selected interval.
Predator Alert Our Device is the only children’s GPS device on the market that lets you know when it is near a registered sex offender’s residence. Amber Alert GPS ties in with US Department of Justice Dru Sjopdin National Sex Offender database and identifies when the Device is near the home of a registered sex offender. To receive Predator Alerts, select Alerts from the main menu and then click the Predator tab.
Low Battery Alerts The server will send one low battery Alert to designated Users when the battery life is at 15%. If you wish to disable Battery Alerts, log on to the Tracking Portal, select Alerts from the main menu, followed by clicking the Battery tab. To deactivate Battery Alerts to all Users, click the STOP button.
Change Password Change Password Changing your Login Password is simple. To keep the location of your child secure, we recommend changing your Password at least every 3 months. The Username cannot be changed online. If you would like to change the Username, please call Technical Support at 1-888-334-3958. To change your Password, log in to the Tracking Portal. On the far right side of the screen, there is a drop down arrow located to the immediate right of your name.
History To view or download the Device location data for a particular day, select the History tab. A monthly calendar will display the number of locates per day and the number of Email and SMS/Text Alerts sent out. To view the location data for a particular day, click on the Locates link. A map will then display all of the location data generated by the Device on that day. To download the location data for a particular day, click on the Export button and follow the prompts.
Firmware Periodically, you will be asked to perform a firmware update on your Device. You may receive an email or phone request. The firmware on the Device controls the capabilities on the Device. Our engineering team is constantly working to improve Device functionality. Firmware updates are designed to enhance the performance of the Device. If you receive a request to update, please follow the instructions given in the email or phone conversation.
Device Specifications PHYSICAL SPECIFICATIONS: Dimensions Housing Weight Standard Battery 1.94” x 1.94” x1.03” ABS , PC 50g 650 mAh Rechargeable Lithium Ion OPTIONAL EXTENDED BATTERY: Dimensions 1.94” x 1.94” x1.25” Housing ABS , PC (Acrylonitrile Butadiene Styrene/Polycarbonate) Weight 60g Battery 1100 mAh Rechargeable Lithium Ion ELECTRICAL SPECIFICATIONS: Operating Voltage 3.
Attaching the Amber Alert GPS Device How you attach the Device to your child is a matter of personal preference. Some simple principles apply: Make it secure Make it inconspicuous Make it easy and comfortable Make it a habit A variety of accessories are available on our website that make it fun for your child to wear their Amber Alert GPS Device every day. If using a pouch to carry your Device, please make sure that the green and red buttons are facing up.
GPS for Beginners How does GPS work? A GPS satellite orbits the Earth at an altitude of a little over 12,000 miles and travels almost 9,000 miles per hour. It completes an orbit about twice a day. It transmits data that indicates its location and the current time. All GPS satellites synchronize operations so that these repeating signals are transmitted at the same instant.