User’s manual 993 Two-line speakerphone with caller ID/call waiting
Congratulations on purchasing your new AT&T product. Before using this AT&T product, please read the Important product information on pages 63-64 of this manual. Please thoroughly read the user’s manual for all the feature operation and troubleshooting information necessary to install and operate your new AT&T product. You can also visit our website at www.telephones.att.com or call 1 (800) 222-3111. In Canada, dial 1(866) 288-4268.
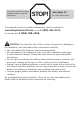
You must install the power adapter before using the telephone. STOP! See page 11 for easy instructions. For customer service or product information, visit our website at www.telephones.att.com or call 1 (800) 222-3111. In Canada, dial 1 (866) 288-4268. CAUTION: To reduce the risk of fire or injury to persons or damage to the telephone, read and follow these instructions carefully: • Use only alkaline 9V batteries (purchased separately). • Do not dispose of the battery in a fire.
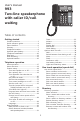
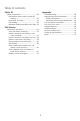
User’s manual 993 Two-line speakerphone with caller ID/call waiting Table of contents Getting started Timer.......................................................................32 Volume...................................................................32 Redial......................................................................33 Display dial .........................................................33 Auto redial............................................................34 Chain dialing.............
Table of contents Caller ID Appendix Caller ID operation................................................50 Information about caller ID with call waiting..............................................................50 How caller ID works........................................51 Call waiting..........................................................52 Message waiting and NEW CALL light...52 Troubleshooting......................................................58 Important product information................
Getting started Product overview This AT&T 993 two-line speakerphone with caller ID/call waiting can be used with one or two incoming telephone lines and features a speakerphone for hands-free use. It is hearing-aid compatible and can also be used hands-free with a two-band 2.5 mm headset (purchased separately). This telephone can be used on a desk or mounted on a wall and does not require AC power for basic operation when a fresh 9V alkaline battery is installed.
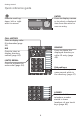
Getting started Quick reference guide ENTER Press to display a menu or to select a displayed item from the menu or save an entry. Press to scroll up, down, left or right while in menus. CALL HISTORY Press to display caller ID information (page 53). REMOVE Press to delete the displayed directory or caller ID entry (page 49). DIR Press to store or display directory entries (page 44). (AUTO) REDIAL Press to activate the auto-redial (page 34).
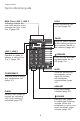
Getting started Quick reference guide NEW CALL LINE 1, LINE 2 Indicates if there are new calls and/or voice message for line 1 and line 2 (page 52). HOLD Press to place a call on hold (page 36). PAUSE Press to insert a pause in the dialing sequence of a number stored in the memory (page 41). LINE 1, LINE 2 Press, then lift handset to make or answer a call on line 1 or 2 (page 30). SPEAKER Press to turn the base speakerphone on or off (page 31).
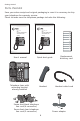
Getting started Parts checklist Save your sales receipt and original packaging in case it is necessary to ship your telephone for warranty service: Check to make sure the telephone package includes the following: User’s manual Quick start guide 993 Two-line speakerphone with caller ID/call waiting 993 Two-line speakerphone with caller ID/call waiting User's manual Quick start guide Telephone base with mounting bracket already installed Handset Seven-foot black telephone line cord (4-connector) Sev
Getting started Glossary Caller ID: Caller identification is a subscriber service available from most local telephone companies for a fee. When you subscribe to caller identification, you can see the name and telephone number of the caller before answering the telephone if you and the caller are both in areas offering caller ID service with compatible equipment. Caller ID with call waiting: This is a single, combined subscriber service which may be available from your local telephone company.
Getting started Telephone location Choose a central location close to a telephone jack and an electrical outlet not controlled by a wall switch. The telephone can be placed on a flat surface or mounted on a standard wall plate. Avoid placing the telephone too close to: • Communication devices such as: personal computers, computer routers, television sets, VCRs, wireless routers (wireless broadband, wi-fi, or 802.11) or cordless telephones. • Excessive heat sources.
Getting started Optional spare battery You can purchase a 9V alkaline battery and keep it in the spare battery compartment of the telephone base at all times. In the event of a power failure and with the optional spare battery installed in the telephone, all the telephone functions will work normally until the battery needs to be replaced. . Remove the mounting bracket from the underside of the telephone base.
Getting started Telephone installation 1. Connect the telephone line cord(s) to the telephone and the modular wall jack(s). If there is a single two-line wall jack, use only the black (4-connector) telephone line cord. Plug one end into the jack labeled L1 or L1/L2 on the back of the telephone. Plug the other end into the wall jack. Make sure the telephone line cord snaps firmly into place at both ends.
Getting started Telephone installation 2. Connect the handset to the telephone. Plug the handset coiled cord into the handset jack on the left side of the telephone. Plug the other end of the handset coil cord into the handset, then hang up. 3. Connect the power adapter. Fit the power adapter behind the slot at the back of the telephone base. Then plug the smaller end of the power adapter into the jack labeled 9V AC POWER on the back of the telephone.
Getting started Data port If you want to connect another device (such as a modem or a fax machine) to the wall jack, use the jack labeled DATA on the telephone. The data port uses line 2 only. Data port NOTES: . Use only the power adapter supplied or equivalent with this product. To order a replacement www.telephones.att.com, or call 1 (800) 222-3111. In Canada, dial 1 (866) 288-4268. power adapter, visit our website at 2. Be sure to use an electrical outlet not controlled by a wall switch. 3.
Getting started Wall mounting A wall jack with mounting studs is required for wall mounting. This wall jack with mounting studs may be available for purchase from a hardware store or consumer electronics retailer and may require professional installation. 1. Rotate the mounting bracket. The mounting bracket should be rotated into the downward position as shown below. 2. Reverse the handset tab. Hold down the switchhook, and slide the tab up and out of its slot.
Getting started Wall mounting 3. Connect the power cord to the telephone. Plug the smaller end of the power adapter into the jack labeled 9V AV POWER on the back of the telephone. Route the cord through the slot and plug the other end into an electrical outlet not controlled by a switch. POWER jack slot 4. Connect the handset to the telephone. Plug the handset cord into the handset jack on the left side of the telephone. Plug the other end of the handset cord into the handset, then hang up. 5.
Getting started Wall mounting • If there are two separate one-line wall jacks, use two telephone line cords. Plug one end of the clear telephone line cord into the jack labeled L1 or L1/L2 on the back of the telephone. Plug one end of the black telephone line cord into the jack labeled L2 on the back of the telephone. Route the cords through the channel on the bottom of the telephone. For line 2 you will need to lift up the bracket and put the cord through the hole in the bracket.
Getting started Optional headset Make sure the headset is firmly plugged into the headset jack under the rubber flap on the right side of the telephone. There is an error tone if you press HEADSET when the headset is not plugged in. For hands-free telephone conversations, use any industry standard 2.5 mm headset (purchased separately). For best results, use an AT&T 2.5 mm headset. To order an AT&T 2.5 mm headset, visit our website at www.telephones.att.com or call 1 (800) 222-3111.
Telephone operation Menu operation Menu topic or data FEATURE SETUP ONE TOUCH Menu indicator Menu item Menu PHONE SETTINGS LINE 1 PRIMARY LINE Feature Current Setting Feature setup, memory programming and a few individual feature operations for the 993 use the menus shown in the screen display. Use the navigation buttons ( , , , , ENTER) to begin, end and move through menu operations (for example, FEATURE SETUP). . Press ENTER to activate a menu operation.
Telephone operation Menu structure Use the menu to set the values for the 993 features. Access the menu by pressing ENTER when the telephone is in idle. The menu for feature setup is below.
Telephone operation Feature setup Turn auto speaker on or off ONE TOUCH ON AUTO SPEAKER ONE TOUCH MAIN MENU Choose whether pressing a one touch key while the telephone is on hook automatically initiates a speed dial call or displays the speed dial number without dialing. If you want to automatically dial the speed dial numbers by pressing a one touch key without taking the handset off hook first, set auto speaker to ON.
Telephone operation Feature setup Turn automatic line selection on or off When this feature is turned on and the telephone is off hook, it automatically connects to a pre-selected line. Lines are prioritized in the following order: ringing primary, ringing non-primary, idle primary, idle non-primary, and busy primary. Ringing primary: When the primary line is set to Line 1 and Line 1 is ringing, Line 1 is automatically connected.
Telephone operation Feature setup Set preferred mode Choose the mode (headset or speakerphone) which will be used automatically when dialing a number from the directory, speed dial or call history without lifting the handset. The preferred mode will also be used when auto speaker is set to ON, and you dial a speed dial number without lifting the handset. For information about the auto speaker setting, see Turn auto speaker on or off on page 19. Press ENTER to begin feature setup.
Telephone operation Feature setup Set the time and date If you subscribe to caller ID service, the time and date are set automatically with each incoming call. You can set the time and date manually following these instructions. PHONE SETTINGS SET TIME/DATE . 2. 3. 4. 5. 6. 7. 8. 9. 0. . 2. Press ENTER to begin feature setup. Press until the screen displays PHONE SETTINGS. Press ENTER. The screen displays PRIMARY LINE. Press until the screen displays SET TIME/DATE. Press ENTER.
Telephone operation Feature setup Turn screen backlight on or off Press ENTER to begin feature setup. Press until the screen displays PHONE SETTINGS. Press ENTER. The screen displays PRIMARY LINE. Press until the screen displays LCD BACKLIGHT and the current setting. 5. Press or to select ON and OFF. 6. When the correct setting is shown, press or ENTER to save your choice. The screen displays SCROLL RATE. 7. Proceed to step 5 of Set the scroll rate below to set the next feature (Scroll rate).
Telephone operation Feature setup Turn the central office voicemail (COVM) indicator on or off VOICE MESSAGES ON L1 COVM ON/OFF VOICE MESSAGES ON L2 COVM ON/OFF If you subscribe to voice mail service with your local telephone company; turn the COVM indicator on to have the NEW CALL light for that line flashing when there are messages waiting. If you do not subscribe to voice mail service, turn the COVM indicators off for each line. . Press ENTER to begin feature setup. 2.
Telephone operation Feature setup Turn NEW CALL light off If a NEW CALL light continues to flash when there are no messages on that line, you may have received a false signal from your telephone company. You can turn off the light manually. VOICE MESSAGES L1 LIGHT OFF VOICE MESSAGES L2 LIGHT OFF Press ENTER to begin feature setup. Press until the screen displays VOICE MESSAGE. Press ENTER. The screen displays L1 COVM ON/OFF. Press until the screen displays L1 LIGHT OFF.
Telephone operation Feature setup Program home and local area codes HOME AC=(empty) 908-555-0100 calls 12 : 08 PM 12/26 SMITH, JOHN 19085550100 CL05 L1 - OR HOME AC=908 908-555-0100 calls 12 : 08 PM 12/26 SMITH, JOHN 5550100 CL06 L1 AREA CODES 908 HOME Home area code is the area code for your telephone number. Most users dial the seven digits of a telephone number to make a call within their own area code and 11 digits outside of their area code.
Telephone operation Feature setup Program home and local area codes 6. When finished entering all of the area codes you need to program, press until the screen displays DONE then press ENTER. The screen displays CALL HISTORY. 7. Proceed to step 5 of Set call history on page 28 to set the next feature (Call history). —OR — Press and hold ENTER to return to the idle screen.
Telephone operation Feature setup Set call history FEATURE SETUP CALLER ID CALLER ID All Calls CALL HISTORY You can choose whether or not to store calls in call history. . Press ENTER to begin feature setup. 2. Press until the screen displays CALLER ID. 3. Press ENTER. The screen displays AREA CODES. 4. Press until the screen displays CALL HISTORY and the current setting. 5. Press or to select between All Calls and No Calls. 6. When the correct setting is shown, press or ENTER to save your choice.
Telephone operation Feature setup Turn caller ID with call waiting on or off FEATURE SETUP CALLER ID CALLER ID On CID-CALL WAIT If you subscribe to combined caller ID with call waiting service from your local telephone company, activate this feature in order to see call information for call waiting calls. . Press ENTER to begin feature setup. 2. Press until the screen displays CALLER ID. 3. Press ENTER. The screen displays AREA CODES. 4.
Telephone operation Basic operation Make, Answer or End a call Handset To make a call, lift the handset and dial the number. The number appears on screen when dialing. To answer a call, lift the handset. To override automatic line selection, lift the handset, then press and release a LINE button. — OR — Press the LINE button for the desired line and lift the handset. To end the call, replace the handset. Speakerphone To make a call, press SPEAKER. The SPEAKER light goes on.
Telephone operation Basic operation Make, Answer or End a call Headset Make sure the headset is plugged into the headset jack. There will be an error tone if you press HEADSET when the headset is not plugged in. To make a call, press and release HEADSET. The HEADSET light goes on. Wait for a dial tone, then dial the call. The number appears on screen when dialing. To answer a call, press HEADSET. To override automatic line selection, press HEADSET, then press and release a LINE button.
Telephone operation Basic operation Timer When making or answering a call, the timer automatically starts. For outgoing calls, the timer starts when dialing. The screen displays the elapsed time in minutes and seconds (up to 59:59) and then displays the hours and minutes up to 10 hours (09:59) before starting at 00:00 again. The timer stops automatically when the line is disconnected. When you put a call on hold, the timer remains on the screen.
Telephone operation Basic operation Redial The last number dialed on this telephone (up to 24 digits) is stored in redial memory until another number is dialed. Handset To dial the same number again, lift the handset, listen for the dial tone, and press (AUTO) REDIAL. Speakerphone or Headset To dial the same number again, press SPEAKER or HEADSET, then press (AUTO) REDIAL. The telephone automatically dials the last number using the primary line selected. (See Set a primary line on page 19.
Telephone operation Basic operation Auto redial The telephone can automatically redial the last outgoing number up to ten times, until the other telephone rings or you cancel auto redial. Auto redial calls are made using the speakerphone. . While the telephone is on hook, press (AUTO) REDIAL. It dials the number in redial memory using the primary line selected or automatic line selection if it is turned on. (See Set a primary line on page 19 or Turn automatic line selection on or off on page 20.
Telephone operation Basic operation Chain dialing If the number you want to store is too long, you can split the number and store it in two or more one-touch locations (both the upper and lower locations). To dial a number that is stored in both the upper and lower locations of a one-touch key: . Press one of the LINE keys to select a line, then lift the handset or press SPEAKER or press HEADSET (if a headset is connected). 2. Press the one-touch key for the number you stored. 3.
Telephone operation Options while on calls Hold While on a call, press HOLD. The LINE light for the call will flash slowly while the call is on hold. You can replace the handset in the cradle without disconnecting the line and the speakerphone or headset is automatically disabled. To release hold and return to the call: Press the LINE button for the call. The call will automatically be reconnected in the original mode (speakerphone or headset), or you can lift the handset.
Telephone operation Options while on calls Mute Mute allows you to hear the other party, but the other party cannot hear you. To activate this feature, press and release MUTE. The MUTE light goes on. To return to the conversation, press and release MUTE again. NOTE: Switching from handset to speakerphone or headset, or from speakerphone or headset to handset, changing lines, and putting a call on hold will cancel Mute.
Telephone operation Options while on calls Conference calls Talk privately with one caller . Press HOLD. 2. Press the LINE button of the person with whom you wish to speak privately. 3. Press CONFERENCE to continue the conference call. To disconnect one party from a conference call and keep the other on the line, press the LINE button of the call you want to continue. Low battery indicator The screen displays Batt when the battery needs to be replaced, or when no battery is installed.
One touch operation (speed dial) One touch (speed dial) This telephone has 18 one touch locations for storing telephone numbers. You can store up to 24 digits in each location. The first nine locations can be accessed by using only the one touch keys. To access the remaining nine locations, press LOWER and then the one touch key for the desired location.
One touch operation (speed dial) One touch (speed dial) Store a number in one touch ONE TOUCH PROGRAM PROGRAM 12341 - 567 WAIT . Press ENTER to enter the feature menu. The screen displays ONE TOUCH. 2. Press ENTER. The screen displays PROGRAM. 3. Press ENTER. The cursor flashes on the screen. 4. Enter the phone number using the dial pad keys. — OR — Press (AUTO) REDIAL to copy the last number dialed from this telephone to this one touch location. The screen will show the number as you enter it.
One touch operation (speed dial) One touch (speed dial) Store a pause in a one touch entry You can include a pause while storing a dialing sequence which requires a pause during actual dialing. When entering a pause, press PAUSE. Each pause counts as one digit and appears on the screen as P. Continue storing the number as usual. Store a flash in a one touch entry You can store the flash signal required for some special services as part of a dialing sequence. When entering a flash signal, press FLASH.
One touch operation (speed dial) One touch (speed dial) Dial a one touch number If the auto speaker is turned on, numbers will be dialed using the method selected in the Set preferred mode on page 21. If the preferred mode is Headset but no headset is connected, the number will be dialed using the speakerphone. Press and release a one touch key. — OR — Press and release LOWER, then press the desired one touch key. The number is dialed automatically and displayed on the screen.
One touch operation (speed dial) One touch (speed dial) Edit a one touch number PROGRAM 1234 - 567 WAIT . Press ENTER to enter the feature menu. The screen displays ONE TOUCH. 2. Press ENTER. The screen displays PROGRAM. 3. Press until the screen displays VIEW. 4. Press ENTER. The screen displays VIEW on the top line. 5. Press the one touch key. The screen displays the number stored in that location. 6. Press or until the screen displays EDIT. Press ENTER. 7. Use the dial pad keys to change the number.
Directory Directory operation DIRECTORY VIEW ENTRIES This telephone can store up to 100 names and telephone numbers in the directory. Names can be up to 16 characters and numbers can have 24 digits. Because directory entries are stored in alphabetical order, you may wish to enter names with the last name first in order to maintain consistency with the information stored automatically through the caller ID function of this system. To enter directory mode, press DIR.
Directory Directory operation Store a name and number in the directory Press DIR to begin working with the directory. Press until the screen displays ADD ENTRY. Press ENTER. The screen displays Enter name. Use the dial pad keys and the chart below to enter the letters, digits or symbols to be stored. Press the key repeatedly until the desired character is shown on the screen. For example, press 2 once for A, twice for B, three times for C, and four times for 2.
Directory Directory operation Store a name and number in the directory AARON 5775141 SAVED! 6. Use the dial pad keys to enter the telephone number to be stored. —OR— Press (AUTO) REDIAL to copy the last number dialed at this extension onto the screen. Press to move to the next character or add a space as -. Press to backspace. The number will appear on the second line of the screen when entering. 7. When finished entering the number, press ENTER to store the name and number in the directory.
Directory Directory operation Review directory entries . Press DIR to begin working with the directory. 2. Press ENTER, then press or to scroll through the directory entries in alphabetical order. —OR— Press ENTER, then press the dial pad key for the first character of the entry to be reviewed until the desired character is displayed. Then press or to scroll through the entries beginning with this character.
Directory Directory operation Edit a directory entry JIM 123456789 EDIT NUMBER Edit a number in the directory . Find the directory entry to be changed by following the directions under Review directory entries on page 47. 2. When the desired entry is displayed, press ENTER. The screen displays DIAL. 3. Press until the screen displays EDIT NUMBER. 4. Press ENTER to begin editing the number using the dial pad keys. Press to backspace or to move to the next character or add a space as a -.
Directory Directory operation Dial a number from the directory . 2. 3. 4. JIM 5775141 DIAL Press DIR. Press ENTER and or to view entries. Press ENTER. The screen displays DIAL. Press ENTER to dial the number on the screen. The call is dialed in the mode (speakerphone or headset) programmed (see Set preferred mode on page 21) using the primary line programmed (see Set primary line on page 19). — OR — Lift the handset or press SPEAKER or HEADSET, then press ENTER.
Caller ID RING! 12 : 08 PM 12/26 SMITH, JOHN 5550123 L2 Caller ID operation Information about caller ID with call waiting This product has a caller ID function with call waiting feature which works with service from your local telephone company. Caller ID with call waiting lets you see the name and telephone number of the caller before answering the telephone, even while on another call. It may be necessary to change your telephone service to use this feature.
Caller ID RING! 12 : 08 PM 12/26 SMITH, JOHN 5550123 L2 Caller ID operation How caller ID works If you subscribe to caller ID service provided by your local telephone company, information about each caller will start to be displayed between the first and second ring.
Caller ID Call ID operation Call waiting If you subscribe to the caller ID with call waiting service and there is a call waiting call, the screen displays call information for the call: . Press FLASH to access the call waiting call. 2. To switch back to the original call, press FLASH again. Message waiting and NEW CALL light There is a NEW CALL light for each line. A NEW CALL light stays on when there is unreviewed call information on that line.
Call history Call history operation CALL HISTORY L1 15 CLS 10 New L2 05 CLS 00 New ALL LINES 10 : 27 PM 11/12 SMITH, JOHN 5550123 New CL01 L2 Rep5X Information about the last 99 incoming calls is stored in the call history. You can review the call history to find out who has called, return the call or save the caller’s name and number into the one touch keys or directory. When the call history is full, the earliest entry is deleted to make room for new incoming call information.
Call history Call history operation Review records in call history by line CALL HISTORY L1 15 CLS 10 New L2 05 CLS 00 New ALL LINES . Press CALL HISTORY. The screen displays the numbers of total calls and new calls in call history. 2. Press or until the bottom line of the screen displays the line for the calls to be reviewed (LINE 1 or LINE 2). Then press ENTER to view the most recent caller’s information for that line. 3.
Call history Call history operation Dial a number from call history 10 : 27 AM 11/12 JOHN SMITH 5775141 DIAL 10 : 27 AM 11/12 JOHN SMITH 5775141 DIAL ALTERNATE When reviewing call history records, you can dial a displayed telephone number. If you have already entered the home and local area codes as discussed on page 26, the telephone numbers shown in the Call history will already be displayed correctly. . Locate the desired number in call history (see Call history operation on page 53). 2.
Call history Call history operation Save a name and number from call history to the directory 10 : 27 AM 11/12 JOHN SMITH 5775141 COPY TO DIR . Locate the desired call record to be saved (see Review records in call history on page 53). 2. Press ENTER. The screen displays DIAL. 3. Press until the screen displays COPY TO DIR. 4. Press ENTER to save the name and telephone number to the directory. The screen displays the entry and added to DIR! The screen automatically returns to the previous CID screen.
Call history Call history operation Save a number from call history in a one touch location 10 : 27 AM 11/12 JOHN SMITH 5775141 COPY TO 1-TOUCH JOHN SMITH 5775141 . Locate the call record to be saved (see Review records in call history on page 53). 2. Press ENTER. The screen displays DIAL. 3. Press until the screen displays COPY TO 1-TOUCH. 4. Press ENTER to begin to save the number. The screen displays the entry and PRESS 1-TOUCH. 5. Press the one touch key where it is to be saved.
Appendix Troubleshooting If you have difficulty with your telephone, please try the suggestions below. For Customer Service, visit our website at www.telephones.att.com, or call 1 (800) 222-3111. In Canada, dial 1 (866) 288-4268. My telephone does not work at all. • Make sure the power adapter is securely plugged into an outlet not controlled by a wall switch. • Make sure the telephone line cord is plugged firmly into the telephone base and the modular wall jack. • Unplug the telephone’s electrical power.
Appendix Troubleshooting • Eliminate any background noise. Noise from a television, radio, or other appliances may cause the telephone to not dial out properly. If you cannot eliminate the background noise, first try muting the telephone before dialing, or dialing from another room in your home with less background noise. Batt is displayed on screen. • There is no spare battery in the telephone or the battery power is low. • Remove and re-install the battery and use it normally.
Appendix Troubleshooting My calls fade out or cut in and out when I am using the telephone. • Other electronic products can cause interference to your telephone. Try installing your telephone as far away as possible from the following electronic devices: wireless routers, radios, radio towers, pager towers, cellular telephones, digital telephones, room monitors, televisions, VCRs, personal computers, kitchen appliances, wireless routers, and other cordless telephones.
Appendix Troubleshooting The system does not receive caller ID or the system does not display caller ID during call waiting. • Make sure you subscribe to caller ID with call waiting features services provided by the local telephone company. • The caller may not be calling from an area which supports caller ID. • Both you and the caller’s telephone companies must use equipment which are compatible with caller ID service. • If you subscribe to DSL service, you need to have a DSL filter installed.
Appendix Troubleshooting Speakerphone does not work • If the other person cannot hear you, make sure the MUTE light is off. Power Failure is flashing • Set the time and date following the directions in Set the time and date on page 22. —OR— • If you subscribe to caller ID service, the time and date will be reset automatically with the next incoming call. Memory Error CID del shown in display • This display indicates that a rare memory error has occurred in the call history.
Appendix Important product information This symbol is to alert you to important operating or servicing instructions that may appear in this user’s manual. Always follow basic safety precautions when using this product to reduce the risk of injury, fire, or electric shock. Safety information • Read and understand all instructions in the user’s manual. Observe all markings on the product. • Avoid using a telephone during a thunderstorm. There may be a slight chance of electric shock from lightning.
Appendix Important product information Especially about corded telephones • Electrical power: The telephone base must be connected to a working electrical outlet. The electrical outlet should not be controlled by a wall switch. Calls cannot be made from the handset if the telephone base is unplugged or switched off, or if the electrical power is interrupted. • Power adapter: The power adapter is intended to be correctly oriented in a vertical or floor mount position.
Appendix FCC and ACTA information If this equipment was approved for connection to the telephone network prior to July 23, 2001, it complies with Part 68 of the Federal Communications Commission (FCC) rules. If the equipment was approved after that date, it complies with the Part 68 rules and with Technical Requirements for Connection of Equipment to the Telephone Network adopted by the Administrative Council for Terminal Attachments (ACTA). We are required to provide you with the following information. 1.
Appendix FCC and ACTA information 4. Rights of the telephone company If this equipment is causing harm to the telephone network, the telephone company may temporarily discontinue your telephone service. The telephone company is required to notify you before interrupting service. If advance notice is not practical, you will be notified as soon as possible.
Appendix Part 15 of FCC rules Some telephone equipment generates, uses, and can radiate radio-frequency energy and, if not installed and used properly, may cause interference to radio and television reception. This product has been tested and found to meet the standards for a class B digital device, as specified in part 15 of the FCC rules. These specifications area designed to provide reasonable protection against such interference in a residential installation.
Appendix Limited warranty The AT&T brand is used under license - any repair, replacement or warranty service, and all questions about this product should be directed to: In the United States of America call 1 (800) 222-3111 or visit www.telephones.att.com. In Canada, call 1 (866) 288-4268. 1.
Appendix Limited warranty 4.
Appendix Limited warranty 6. What must you return with the PRODUCT to get warranty service? You must: a. Return the entire original package and contents including the PRODUCT to the service location along with a description of the malfunction or difficulty; and b. Include “valid proof of purchase” (sales receipt) identifying the PRODUCT purchased (PRODUCT model) and the date of purchase or receipt; and c. Provide your name, complete and correct mailing address, and telephone number. 7.
Appendix Default settings FEATURE DEFAULT Speakerphone Volume 5 Handset Volume minimum Headset Volume minimum Ringer Volume 3 Auto Speaker Off Primary Line Line 1 Automatic Line Selection On Preferred Mode Speakerphone Time and Date 12:00 AM, 1/01 Screen Backlight On Scroll Rate Medium COVM Indicators Off Call History All calls Repeat Calls Combined CID-Call Wait On Language English 71
Appendix General product care To keep your telephone working and looking good, follow these guidelines: • Avoid putting it near heating appliances and devices which generate electrical noise (for example, motors or fluorescent lamps). • DO NOT expose it to direct sunlight or moisture. • Avoid dropping the telephone and/or other rough treatment. • Clean with a soft cloth. • Never use a strong cleaning agent or abrasive powder because this will damage the finishing.
Appendix Technical specifications Operating temperature 32°F — 122°F (0°C — 50°C) Power adapter input: AC 120V 60Hz Power adapter output: AC 9V, 300mA Backup battery: Alkaline 9V Headset jack: 2.
Appendix Index A Add entry, 45 All calls, 28 ALS ON/OFF, 20 Area codes, 26 Auto speaker, 19 Auto redial, 34 Automatic line selection, 20 H Hands-free, 16 Handset cord, 14 Handset jack, 14 Handset tab, 13 Headset, 31 Hold, 36 Home area code, 26 C Call history, 53 Call information, 57 Call record, 53 Call record number, 53 Call waiting, 52 Call waiting call, 29 Caller ID, 7 Caller ID information, 51 Caller ID service, 22 Caller ID with call waiting, 7 Caller identification, 7 Central office voice mail, 7 C
Appendix Index R Redial, 33 REMOVE, 4, 49, 54 Ringer volume, 32 S Screen display, 7 Scroll button, 23 Scroll rate, 23 Speakerphone, 30 Speakerphone does not work, 62 Switch lines, 36 T Telephone does not ring, 59 Telephone installation, 10 Telephone location, 8 Telephone operation, 17 Time and date, 22 Timer, 32 Troubleshooting, 58 V Voice mail, 24 Volume, 32 W WAIT, 46 Wall jack, 10 Wall mounting, 13 75
www.telephones.att.com © 2007 Advanced American Telephones. All rights reserved. AT&T and the AT&T logo are trademarks of AT&T Intellectual Property II, L.P. d/b/a AT&T Intellectual Property licensed to Advanced American Telephones. Printed in China. Issue 2 AT&T 12/07.