PPC4100 Users Guide 3/25/04 1:47 PM Page 1 PPC4100 USER’S GUIDE PPC4100 POCKET PC Audiovox Communications Corporation • 555 Wireless Boulevard • Hauppauge, New York 11788 • 800.229.1235 ©2004 Audiovox Communications Corporation • www.audiovox.
AUDIOVOX PPC4100 Tri-band GSM (850/1800/1900) Pocket PC with Built-in Phone In today’s fast paced world, it has become a necessity to have access to real time information. Your communications tools must provide you with this access from anywhere at anytime. With that in mind, Audiovox developed the PPC4100, a tri-band GSM Pocket PC device with built-in phone functionality.
TABLE OF CONTENTS CHAPTER 1 FIRST THINGS FIRST . . . . . . . . . . Package Contents . . . . . . . . . . . . . . . . . . . . . . Handset Setup . . . . . . . . . . . . . . . . . . . . . . . . . Installing the Battery Pack . . . . . . . . . . . . . . . . . Connecting the USB Cradle . . . . . . . . . . . . . . . . Charging the Handset . . . . . . . . . . . . . . . . . . . . . Starting Up the Handset . . . . . . . . . . . . . . . . . . . System Procedures . . . . . . . . . . . . . . . . . . . . .
TABLE OF CONTENTS CHAPTER 3 MANAGING PROGRAMS . . . . . . . . Accessing Programs . . . . . . . . . . . . . . . . . . . . . Opening a Program . . . . . . . . . . . . . . . . . . . . . . . Switching Between Programs . . . . . . . . . . . . . . . Program List . . . . . . . . . . . . . . . . . . . . . . . . . . . . . Using Find . . . . . . . . . . . . . . . . . . . . . . . . . . . . Using File Explorer . . . . . . . . . . . . . . . . . . . . . . Using ActiveSync . . . . . . . . . . . . . . . . . . . . . . .
TABLE OF CONTENTS CHAPTER 7 GETTING CONNECTED . . . . . . . . . Infrared Connection . . . . . . . . . . . . . . . . . . . . . . Internet Connection . . . . . . . . . . . . . . . . . . . . . . Network Connection . . . . . . . . . . . . . . . . . . . . . . Email Server Connection . . . . . . . . . . . . . . . . . . CHAPTER 8 MICROSOFT POCKET OUTLOOK . Pocket Outlook Overview . . . . . . . . . . . . . . . . . . Calendar . . . . . . . . . . . . . . . . . . . . . . . . . . . . . . Contacts . . . . . . . . . . .
CHAPTER 1 FIRST THINGS FIRST Please read this User’s Guide before using your PPC4100 Pocket PC. This chapter describes the procedures you need to follow to prepare your handset for operation. 1. Package Contents 2. Handset Setup 3.
PACKAGE CONTENTS Thank you for purchasing the PPC4100 Pocket PC wireless handset. The PPC4100's giftbox contains all of the items listed below.
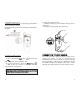
To install the battery pack: 1. Align the battery marker on the battery pack with the one located on the device. 2. Slide the battery pack into the battery bay until it clicks into place. To detach the battery pack: 1. If the device is on: a. Press and hold the End button until 2. Follow the substeps below: (1) With one hand, press and hold the battery release switch, then (2) Slide the battery pack out from its bay. CONNECTING THE USB CRADLE on your device appears in the navigation bar. b.
To connect the cradle to a power source: 1. Connect the AC adapter cord to the power socket at the back of the cradle. 2. Press and hold the connector button on the AC adapter cord. 3. Plug it into the power socket at the back of the cradle. 4. Plug the AC adapter into any AC current outlet. To charge your PPC4100: 1. Plug the AC adapter into any AC current outlet. 2. Connect the AC adapter cord to the power socket at the back of the cradle. 3.
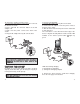
If the battery level becomes low in the course of normal use, a status icon appears on the device screen indicating low or very low battery status (see “Status icons” on page 44). In both cases, perform an ActiveSync operation to back up your data, then recharge your device as soon as possible. To remove your PPC4100 from the cradle: 1. Gently tilt the device forward. 2. Pull the device up to detach it from the cradle.
SYSTEM PROCEDURES STARTING UP THE HANDSET After initially charging your device for about eight (8) hours it is ready to be used. You can now start up your device where you’ll calibrate the display, learn some basic stylus usage, and set up the system date and time. To start up your PPC4100: 1. Turn on your device by pressing the Power button on the front panel. The following sections describe various system procedures that will help you use the device more efficiently.
Back up individual Word, Excel or Notes files using the Rename/Move command. Follow the steps below. 1. Insert an SD or MMC card into the SD/MMC slot on the top edge of your device. 2. Open the file you want to back up. 3. Tap Tools, then Rename/Move. 4. On the Rename/Move screen, enter a file name in the Name field. 5. Tap the Location pick list, then select Storage Card. 6. Tap the Folder pick list, then select the folder where you want to save the file. 7. Tap OK. 8.
LOCKING THE HANDSET Your device is not just a financial investment but a wealthy source of personal information, some of which may be confidential so it is only logical to protect it from any unauthorized access. The Security setting gives you the option of assigning a lock password that will be required to access your device after a set period of inactivity. To assign a lock password: 1. Tap , then Settings. 2. On the Personal tab, tap Password . The Password Settings window appears.
CHAPTER 2 GETTING STARTED After completing the setup procedures, you can now familiarize yourself with the hardware and software functions of your handset to better understand the basics on how to use your device. This chapter explains the handset features. It also gives you a tour of the hardware and software interface of your device. 1. Handset Features 2. Handset Tour 3. Peripherals Tour 4.
HANDSET FEATURES Listed below are the system features of your new PPC4100 Pocket PC. PERFORMANCE Intel Mobile Media Technology of up to 400 MHz Integrated Intel XScaleTM Technology System memory: - 64 MB SDRAM for application storage - 64 MB Flash ROM for operating system Windows Mobile™ 2003 software for Pocket PC Phone Edition DISPLAY 3.
Operation time - MP3 Playback Time (LCD off): up to 12 hours - WMV Playback Time (LCD on, average level backlight, phone function off): up to 7 hours - Internet Browsing Time: up to 4 hours NOTE: Length of battery operation will depend on power consumption which in turn is based on system resources use. For example, constantly using the backlight or using power-demanding applications will shorten the length of battery operation.
NO. COMPONENT DESCRIPTION NO. COMPONENT DESCRIPTION 1 Earphone jack cap Earphone jack A non-detachable protective covering for the earphone jack. Connects to audio line-out devices (earphones/headphones). Uses infrared technology to transmit and receive data from other IR-enabled devices. Accepts SD, MMC, and SDIO (Secure Digital Input Output) cards, allowing you to add more memory. Install add-on applications or use audio or text files stored in it for use with internal applications.
REAR VIEW LEFT VIEW NO. COMPONENT DESCRIPTION 1 2 Main battery release latch Reset button 3 Main battery Press to release the main battery from its bay. Press the end of the stylus into the hole to reset your device. Removable and rechargeable 1480 mAh Lithium Ion battery pack. NO. COMPONENT DESCRIPTION 1 Jog dial Pressing the jog dial results in an action similar to pressing the Enter key on a regular keyboard.
NO. 2 3 COMPONENT DESCRIPTION Jog dial In Dialer: ! Rotate up to access Call History. ! Rotate down to access Speed Dial. From Speed Dial: ! Rotate up/down to scroll through the list. ! Press to call the currently selected number. From Call History: ! Rotate up/down to scroll through the log items. ! Press to call the currently selected log item. ! Press and hold to display the pop-up menu for the currently selected log item.
USING THE SD/MMC SLOT Your device has an expansion slot compatible with a range of SD, MMC, and SDIO storage cards that you can use to back up or transfer files and data. To insert a storage card: Hold your device securely, then push the card into the slot until you hear an audible system sound; this will signal that the card is already properly seated within the slot. The card is secure when it is not protruding from the base. To remove a storage card: 1.
PERIPHERALS TOUR NO. COMPONENT DESCRIPTION 4 5 Front pocket Spare battery indicator Recharges your device. Lights up to indicate charging status for the spare battery pack. Rear pocket LED status description: ! Flashing green - Charging battery pack ! Solid green - Charging complete Recharges a spare battery pack. This sections provides an overview of the peripheral devices bundled with your handset. This include the USB cradle, stereo headset, and the single earbud headset.
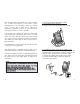
CHARGING AN OPTIONAL SPARE BATTERY PACK The dual-pocket design of the USB cradle that comes with your device allows you to simultaneously charge the the device and an optional spare battery pack. Stereo Headset To charge an optional spare battery pack: 1. Plug the AC adapter into any AC current outlet. 2. Press and hold the connector button on the AC adapter cord, then plug it into the power socket at the back of the cradle. 3.
COMMAND INTERFACE SEND/END BUTTON OPERATION This section describes the action of the Send/End button on the stereo headset/single earbud headset when there’s an active call. When there’s no active call or when the phone function is turned off, the headset's Send/End button is disabled.
The Today screen provides an at-a-glance view of important reminders and details for the day. Tap to view the Start menu Indicates the mobile connection status. Tap to change date and time. Tap to adjust volume or mute all sounds. NOTE : For status icons related to the phone function, refer to page 92. The navigation bar is located at the top of the screen. It displays the active program and current time, as well as the Start menu , which allows you to switch to other programs.
COMMAND BAR Use the command bar at the bottom of the screen to perform tasks in programs. The command bar includes menu names, buttons, and the Input Panel button . To create a new item in the current program, tap New. To see the name of a button, tap and hold the stylus on the button. Drag the stylus off the button so that the command is not carried out. Tap and hold a selected item to display a pop-up menu. ! ! Menus New button Tap outside the menu to close it without performing an action.
CHAPTER 3 MANAGING PROGRAMS Your handset has several preinstalled programs that you can use to organize your daily activities. These include programs that will help you search, organize, and synchronize information. This chapter describes the procedures for launching programs. It also shows how to use Find and File Explorer, as well as procedures for performing an ActiveSync operation. 1. Accessing Programs 2. Using Find 2. Using File Explorer 4.
ACCESSING PROGRAMS PROGRAM USAGE Inbox Send and receive email and SMS messages. Games Play your favorite computer games, including Jawbreaker and Solitaire, for on-the-road entertainment. Microsoft Reader for Pocket PC Download and read eBooks on your device. MSN® Messenger Send and receive instant messages from your MSN Messenger contacts. Notes Create handwritten or typed notes, drawings, and recordings. Pictures Access and edit JPEG files on your device.
ICON PROGRAM USAGE Terminal Services Client Log onto a Windows NT server type PC that is running Terminal Services software and use all of the programs that are available on that PC from your device. Windows MediaTM Player Play digital audio and video files that are stored on your device or on a network. WiBackup Create backup files of data and applications stored on your device. USING FIND The Find function helps you quickly locate specific files. 1. Tap , then Find . 2.
USING FILE EXPLORER USING ACTIVESYNC Use File Explorer to locate files on your device and to organize these files into folders. Use Microsoft® ActiveSync® technology to synchronize information between your Pocket PC and your computer and/or a server so you always have the most up-to-date information wherever you are. ! Tap , Programs, then File Explorer . Tap here to select a sort order for the list. Tap and hold a blank area to display the New Folder command.
If you choose continuous synchronization, changes made on the computer or device are duplicated immediately. To recover a sudden loss of data, you can configure ActiveSync to back up data on your device. Choose whether to copy all information in the internal storage on your device, or just the information that has changed since the last backup. Select which information types are synchronized and control how much information is synchronized.
To create a partnership: 1. Dock your device in the front pocket of the cradle. 2. Plug the cradle’s USB connector into a USB port on your computer. To prevent synchronization problems, select the “Synchronize with Microsoft Mobile Information Server and/or this desktop computer” option in the New Partnership setup wizard only if you are certain that your company is running Microsoft Exchange Server with Exchange ActiveSync and you know the server name.
After the initial synchronization, take a look at Calendar, Contacts, and Tasks on your device. You'll notice that information you've stored in Microsoft Outlook on your computer has been copied to your device, and you didn't have to type a word. Disconnect your device from your computer and you're ready to go! 4.
SYNCHRONIZING WITH A SERVER The option to synchronize your device with a server is available when you first create a partnership. Before you can begin to synchronize information with a server, you need to request the following server configuration information, either from your service provider or from your corporate network administrator: Your user name and password in your corporate network The name of the Microsoft Exchange server 9.
To stop synchronizing with a server: You can stop synchronizing an information type with a server, and instead synchronize it with your computer. 1. On your device tap , then ActiveSync. T o o l s O p t i o n s 2. Tap , , then Server tab. 3. Under “Sync these items”, deselect the check box opposite the types of information that you no longer want to synchronize with the server. 4. Tap OK.
Tasks created on your device are copied to your computer during synchronization, and vice versa. By default, only incomplete tasks will be synchronized. Similarly, tasks that are deleted from your device are deleted from your computer during synchronization, and vice versa. ! ! USING ACTIVESYNC TO EXCHANGE FILES You can use ActiveSync to exchange information from your device your computer and vice versa. Changes you make to the information on one location will not affect the information on the other one.
ACTIVESYNC ERRORS Whenever ActiveSync cannot successfully synchronize information, it displays an Error link on the ActiveSync window on your device. Tap the link to display more information about the error that occurred. Some types of errors can interfere with automatic synchronization. If you suspect that a scheduled automatic synchronization has not occurred, you should try to manually synchronize your information. Successfully completing manual synchronization will reset automatic synchronization.
USING THE INPUT PANEL Use the input panel to enter information in any program on your device. You can either type using the soft keyboard or write using Letter Recognizer, Block Recognizer, or Transcriber. In either case, the characters appear as typed text on the screen. Tap here if this is the correct word. To show or hide the input panel: 1. Tap the Input Panel button . 2. Tap the arrow next to the Input Panel button to see your choices.
Write lower case letters here. Tap the onscreen keys with your stylus. USING LETTER RECOGNIZER With Letter Recognizer you can write letters using the stylus just as you would on paper. To use the Letter Recognizer: 1. Tap the arrow next to the Input Panel button, then tap Letter Recognizer. 2. Write a letter in the box. When you write a letter, it is converted to typed text that appears on the screen.
Write numbers here. Write letters here. Using Transcriber To learn how to write a letter in Transcriber: Transcriber allows you to write anywhere on the screen using the stylus just as you would on paper. 1. Tap on the toolbar. 2. In the screen that appears, select the letter you want to learn about, then tap one of the examples. To use the Transcriber: 1. Tap the arrow next to the Input Panel button, then tap Transcriber. 2. Write anywhere on the screen.
WRITING ON THE SCREEN To punctuate in Transcriber: 1. Tap on the toolbar. 2. Tap the punctuation mark you need. 3. Tap OK to hide the toolbar. In any program that accepts writing, such as Notes, and in the Notes tab of Calendar, Contacts, and Tasks, you can use your stylus to write directly on the screen. Write the way you do on paper. You can edit and format what you've written and convert the information to text at a later time. To write on the screen: Tap the Pen button to switch to writing mode.
To select and edit written text: If you want to edit or format written text, you must select it first. 1. Tap and hold the stylus next to the text you want to select until the insertion point appears. 2. Without lifting, drag the stylus across the text you want to select. If you accidentally write on the screen, tap Edit, then Undo, and try again. -or- To convert writing to text: Tap Tools, then Recognize.
DRAWING ON THE SCREEN You can draw on the screen in the same way that you write on the screen. The difference between writing and drawing on the screen is how you select items and how they can be edited. For example, selected drawings can be resized, while writing cannot. CONVERSION REMINDERS Hyphenated and foreign words that use special characters such as accents and some punctuation cannot be converted.
To select a drawing: If you want to edit or format a drawing, you must select it first. Tap and hold the stylus on the drawing until the selection handle appears. To select multiple drawings, deselect the Pen button RECORDING A MESSAGE ! ! and then drag to select the drawings you want. In any program where you can write or draw on the screen, you can also quickly capture thoughts, reminders, and phone numbers by recording a message.
To play a recording: Tap it in the list or tap its icon in the note. ! Indicates an embedded recording USING MY TEXT When using Inbox or MSN Messenger, use My Text to quickly insert preset messages into the text entry area. To insert a My Text message: 1. Tap My Text on the screen’s command bar. 2. Tap a message. 3. Tap OK. Tap to begin recording. Tap to show or hide the Recording toolbar. You can add text after inserting a My Text message before sending it. To edit a My Text message: 1.
CHAPTER 5 USING THE PHONE FUNCTION The phone function of your PPC4100 Pocket PC boasts of standard cell phone features—such as mailbox and SMS—as well as several handy call features including Speed Dial, Caller ID, Conference Call, Call Waiting, Call Barring, Call History, speakerphone mode, note taking, voice mail, and emergency number setting. The Phone program is integrated with both Microsoft Contacts and Inbox. This means you can make a call and send email/SMS messages from any of these three programs.
PHONE SETUP (4) Press the SIM card holder down. (5) Slide the SIM card holder to the left to lock it into place. INSTALLING THE SIM CARD If you wish to use the phone function, you need to first install a valid SIM (Subscriber Identity Module) card. A SIM card is a small printed circuit board that must be installed when signing on as a subscriber in a GSM-based mobile phone like your PPC4100. It contains subscriber details, security information and memory for a personal directory of numbers.
DIALER SCREEN To enter your PIN: 1. Tap , then Phone . 2. On the Dialer screen, enter the preset PIN from your mobile phone service provider. Launching Phone opens the Dialer screen. To do this you can do either of the following: Tap , then Phone . On your device’s front Send button . ! ! panel, press the This icon indicates the status of the mobile service connection. The last number called is displayed here. 3. Tap Tap to back space over individual numbers Tap to view the Call History entries .
BUTTON PHONE OPERATION ACTION Tap to call the displayed number. Tap to end a call. Tap during a call to create a note for that particular call. Phone Status Icons The list below shows the Phone-related status icons. ICON 92 NAME DESCRIPTION Network search Indicates that the device is attempting to establish mobile service connection. No network Indicates that the device is not able to establish mobile service connection. Phone off Tap to display the Connectivity callout.
To turn off the phone function: Press and hold the End button ANSWERING A CALL on your device ! until ! Tap Answer or press the Send button . appears in the navigation bar. REJECTING A CALL - or - ERASING NUMBER INPUT If you entered a wrong phone number when dialing, you can either backspace to erase individual digits or you can delete the entire phone number ! Tap Tap Ignore or press the End button .
USING THE SPEAKERPHONE MUTING A CALL To attend to phone calls, attach the single earbud headset or activate the speakerphone mode. The speakerphone function allows you to talk hands-free and/or let other people listen to the caller. During a call you can mute the microphone so that the person with whom you are speaking cannot hear you, but you can still hear him or her. This is useful if, for example, you do not want the other person to hear a conversation or background noise on your side of the call.
MAKING PHONE CALLS The integrated nature of your device’s phone function lets you make calls in a variety of ways across different applications. You can make a call by: Manually entering a phone number using the Dialer keypad. Accessing numbers using Speed Dial, Call History, Microsoft Contacts or SIM Manager. ! ! Once a call has been initiated this icon MAKING A CALL USING MICROSOFT CONTACTS There are several ways to make a call in Contacts.
MAKING A CALL USING SPEED DIAL Speed Dial is a list you create for numbers you call regularly. Only numbers stored in Microsoft Contacts can be added to this list. To make a call using Speed Dial: You can make a call in two ways: By memorizing a phone number’s position in the Speed Dial list, you can dial the number by entering its location number. ! Alternatively, if you don’t remember the position of a number in the Speed Dial list follow the steps below: ! 1. Tap or rotate the jog dial down . 2.
3. Once the number has been selected, make the call by doing any of the following: Press the jog dial. Press the Send button . Tap the category icon on the left of the selected number. ! ! ! Tap here to select a call category. Tap a category icon to call the number opposite it. 3. Once the number has been selected, make the call by doing any of the following: Press the jog dial. Press the Send button . Tap and hold the selected number, then select Call from the pop-up menu.
To make an emergency call: 1. Dial the emergency number by using Dialer. For international emergency calls, dial 112. For US/Canada emergency calls, dial 911. ! ! 2. Tap or press the Send button . MAKING AN EMERGENCY CALL Your handset supports the international emergency number 112, and for US/Canada residents, the emergency number 911 as well. You can call these numbers for emergency police, fire, and medical assistance.
PHONE FEATURES Flexibility is a hallmark of your device’s phone function. This is best exemplified in such features as Call Notification, Call Hold and Conference Call, which allows you to attend to more than one call simultaneously—all with a simple tap of your stylus. CALL NOTIFICATION AND IDENTIFICATION The Call Notification feature lets you know if another person is trying to call you when you are talking on the phone. When this happens the following callout appears.
CALL HOLD CONFERENCE CALL After being notified of an incoming call while already on the phone, you can choose to reject a call by tapping the Ignore button on the Call Notification callout, or you can use the Call Hold feature to attend to both calls. With the Conference Call feature you can create a conversation line between several callers.You can either, put a call on hold, then dial another number and wait for it to be picked up; or accept an incoming call when you already have one in progress.
CALL NOTES The Call Notes feature allows you to create a written or recorded note during a call. The call note will be saved as an attachment to your call as viewed in Call History. To create a call note: 1. During an active call, tap Note on the command bar. 2. In the Notes window, use any of the input methods to compose your call note. From Notes: In the Notes window, tap the call note from the list. A call note’s label corresponds to the name or phone number of the related contact. ! 3.
SMS SERVICE Just like a regular mobile phone, you can send and receive SMS messages using your device. Your SMS account is automatically setup in Inbox when you activated your mobile service subscription. To view an SMS message: You can view an SMS message whether the phone function is on or off. When the phone function is on, you can view an SMS message from its notification callout: Tap the SMS notification icon on the navigation bar to display the message.
To send an SMS message: 1. On the Dialer screen’s navigation bar, tap Tools, then Send SMS. Character counter To enter preset or frequently used messages, tap My Text, then select a message. Inbox will be launched displaying a new message window. 2. Tap the double arrows next to the Subject field. 3. Tap the Account field, then SMS. 4. In the To field, enter the SMS number of one or more recipients, separating them with a semicolon.
VOICE MAIL CONTACTS INTEGRATION With the voice mail service you need not miss a message when you miss a call. Unattended calls (i.e., no answer, phone function is turned off or is out of network service) or a busy line will automatically forward callers to your voice mailbox where they can leave their messages. Your device’s phone function is integrated with other applications making it easy for you to share contacts—phone numbers—between programs.
To export contacts from Microsoft Contacts: 1. Do either of the following: Tap and hold a contact to display the pop-up menu. Tap a contact to select it, then tap the Tools menu. If you do not select a contact, the first entry on the list will be exported. 2. Select the location where to export the contact. To export a contact to a SIM card: a. Tap Save To SIM. ! ! ! c. Select a location. You can either: - Accept the default location which is the first available position in the Speed Dial list.
To export SIM Manager contacts: You can choose to export individual or all SIM Manager contacts to Microsoft Contacts. To export individual SIM Manager contact: 1. Tap and hold a contact, then from the pop-up menu, select Save to Contacts. A pop-out message will confirm export to Microsoft Contacts. ! A screen appears to display the transfer status. 2. After completing the export, tap OK. SHARING CONTACTS IN CALL HISTORY Call History is a record of all incoming, outgoing, and missed calls.
CALL HISTORY All calls made on your device are recorded in Call History. You can refer to it to check call details as well as access any notes taken during a call. You can set a limit on the number of entries or delete them as necessary to save memory space. CALL DETAILS Call History allows you to check the date and time a call was made, as well as the duration. To view call details: Find the call you are interested in, then tap it once.
PHONE PREFERENCES You can configure most features of the phone function to suit your preferences. You do this by accessing the Phone option under Settings. Tap to select a basis for the call history limit. To access Phone settings: From the Dialer screen’s command bar, tap Tools, then Options. - or ! 3. Tap OK. To delete individual Call History entries: Tap and hold the entry you want to delete, then from the pop-up menu, select Delete.
VIEWING THE RING TONE LIST 1. Tap , Settings, then Personal tab. 2. Tap My Ring Tone . 2.Tap the Ring tab to display the My Ring Tone window. CONFIGURING RING TYPE, RING TONE, AND KEYPAD SOUNDS Under the Sounds option, tap the pick list for each field, then select your choice from the drop-down menu. ! Keypad Sounds Ring Type Ring Tone To download ring tones: For a more personalized ring tone, you can choose to download additional sound files to your device. File formats supported include .
To remove a ring tone from Phone Settings: Deselect the box next to the ring tone file you want to remove, then tap Apply. ! 2. Enter the old PIN, input a new one, then retype it for confirmation. To adjust the ring tone volume: 1. Tap the Volume tab. 2. To adjust the ring tone volume drag the slider. SERVICES TAB Configure the different phone services in this tab—Call Barring, Caller ID, Call Forwarding, Call Waiting; and Voice Mail and SMS.
CALL BARRING You have the option to block calls in specific situations. To enable or disable call barring: 1. Tap Call Barring from the services list. 2. Tap the Get Settings button (retrieving settings may take a few minutes). 3. In the next screen, define the call barring settings.
To enable or disable call forwarding: 1. Tap Call Forwarding from the services list. 2. Tap the Get Settings button (retrieving settings may take a few minutes). 3. In the next screen, follow these steps to enable or disable call forwarding: To enable call forwarding: – Tap the “Forward all incoming calls” check box, then specify the call forward phone number on the To field. - or – Tap the check box for one or all particular conditions, then specify the call forward phone number on the box opposite it.
To select a network: Set the mode for conducting a network search. Under “Network selection”, tap either Automatic or Manual. Retrieving network settings may take a few minutes if you select Manual. ! To set preferred networks: If there are many mobile phone service providers available in your area, you can configure this function to select your preferred ones and set its priority level. 1. Under Network selection, tap the Set Networks button.
SPECIAL TAB In this tab you can enable the auto-pickup function as well as set the ringing mode for incoming calls when the stereo headset or the single earbud headset is plugged into the device. CHAPTER 6 CUSTOMIZING YOUR HANDSET You can customize your PPC4100 Pocket PC based on your personal requirements and preferences as well as depending on your usual work modes. Customize your device by either adjusting the device settings or by adding/removing programs. 1. Adjusting Settings 2. Adding Programs 3.
ADJUSTING SETTINGS You can adjust the settings of your device to suit the way you work. Adjusting certain settings, such as backlight, auto power off timer, system volume, and processor speed, from the factory default settings may decrease your standby time. BUTTONS Assign the Send/End button on the stereo headset/ single earbud headset to commonly-used programs. You can also adjust the onscreen scrolling speed here. To access Settings: Tap , then Settings.
MENUS Customize what appears on the New button menu. menu, and on the MY RING TONE Manage and listen to all ring tones stored on your device, as well as adjust the phone volume. 140 OWNER INFORMATION Enter personal information and customize text display when device is turned on. PASSWORD Set a password to prevent unauthorized access to your device.
PHONE Set up the phone function of your device. For more information on this Settings option, see page 125. TODAY Customize the look and the information that is displayed on the Today screen. SOUNDS & NOTIFICATIONS Set the volume level for system sounds and select the types of action you want to hear sounds for. You can also define how you want to be notified about different events. Options for personalizing sound notifications are also available.
ABOUT Displays your device’s version and copyright information; includes an option to define a device ID. ABOUT MY DEVICE Displays your device’s hardware, version, and model information. Also displays a log showing the duration of all calls received and made on your device. 144 BRIGHTNESS Define settings for the display brightness and backlight control.
CERTIFICATES View and manage the public key certificates available on your device. CLOCK Change the settings for time zone, time and date; and set alarms. 146 MEMORY Adjust allocation of storage and main memory. POWER View the power level for both the main and backup battery. To minimize power consumption, you can define settings for the auto-off function and CPU operation mode.
REGIONAL SETTINGS Set default number and time display formats and other related options. REMOVE PROGRAMS Removes programs from storage memory. SCREEN Recalibrate screen and enable the ClearType feature.
CONNECTIONS TAB CONNECTIONS Adjust settings for connecting to your ISP or to a local network. BEAM Define settings for the beam function.
ADDING PROGRAMS ADDING PROGRAMS TO YOUR DEVICE Programs bundled with your device at the factory are stored in ROM (read-only memory). You cannot remove these programs, and you'll never accidentally lose ROM contents. ROM programs can be updated using special installation programs with a *.xip extension. All other programs and data files installed to your device after factory installation are stored in RAM (random access memory).
To add a program directly from the Internet: 1. Determine your device and processor type so that you know which version of the software to install. a. Tap , Settings, then System tab. b. Tap About . c. In the Version tab, make a note of the processor information. 2. Download the program to your device straight from the Internet using Pocket Internet Explorer. You may see a single *.xip, *.exe or *.zip file, a Setup.exe file, or several versions of files for different device types and processors.
REMOVING PROGRAMS CHAPTER 7 To save storage space on your device, you may want to remove programs that are rarely or never used. You can choose to reinstall them later as long as you keep the installation file for the removed program. GETTING CONNECTED 1. Tap , Settings, then System tab. 2. Tap Remove Programs . You can use your PPC4100 Pocket PC to exchange information with other mobile devices and connect to your computer, a network, or the Internet.
INFRARED CONNECTION Using infrared, you can send and receive information, such as contacts and appointments from another IR-enabled device. RECEIVING INFORMATION 1. Align the IR port of your device with that of the IR-enabled device so they are unobstructed and within a close range. 2. Have the owner of the other device send the information to you. Your device will automatically receive it. 3. On the Receiving Data callout, tap Yes. SENDING INFORMATION 1.
INTERNET CONNECTION NETWORK CONNECTION Your PPC4100 Pocket PC allows you to connect to the Internet via GPRS (General Packet Radio Service). Once connected you can: Use Inbox to send and receive email messages Use Pocket Internet Explorer to access Web or WAP pages Use Windows Media Player 9 Series for Pocket PC to listen to streaming media If you have access to a network at work, you can send email messages, view Intranet pages, synchronize your device, and possibly access the Internet.
6. In the Select a modem list, select your modem type. If your modem type does not appear, try re-inserting the modem card. If you are using an external modem that is connected to your device with a cable, select Hayes Compatible on COM1. 7. Tap Next to continue configuring your modem connection depending on the modem type you selected. You need not change any settings in the Advanced window. Most ISPs now use a dynamically assigned address.
SETTING UP AN POP3/IMAP4 ACCOUNT For an explanation on any of the setup screens, tap , then Help. 1. In Inbox, tap Accounts on the command bar. 2. Tap New Account. 3. Fill out the email address field, then tap Next. This will initiate auto-configuration which attempts to connect your device to your email server and automatically download the necessary email connection settings. If auto-configuration is successful you can begin sending/receiving emails straight away.
POCKET OUTLOOK OVERVIEW CALENDAR Microsoft Pocket Outlook includes Calendar, Contacts, Inbox, Notes and Tasks. You can use these programs individually or in tandem with each other. For example, email addresses stored in Contacts can be used to address email messages in Inbox. Calendar enables you to conveniently manage your schedules and appointments or any other activities associated with a time and date. You can schedule appointments, including meetings and other events.
SCHEDULING AN APPOINTMENT You can use Calendar to create an appointment schedule. To create an appointment: 1. If you are in Day or Week view, tap the desired date and time for the appointment. 2. Tap New. 3. Using the soft keyboard, enter a description and a location. To select a field, tap it. 4. If needed, tap the date and time to change them. 5. Enter other desired information. You will need to hide the input panel to see all available fields. 6. To add notes, tap the Notes tab.
USING THE CALENDAR SUMMARY SCREEN When you tap an appointment in Agenda or Day view, a summary screen is displayed. To change the appointment, tap Edit. View appointment details. CONTACTS KEEPING TRACK OF FRIENDS AND COLLEAGUES Contacts maintains a list of your friends’ and colleagues’ contact information. Using your device’s infrared (IR) port, you can quickly share this list with other Windows-based, IR-enabled device users. View appointment notes. To open Contacts: Tap , then Contacts .
In the contact list, you can display contacts by category by tapping the pick list on the top-left corner of the screen. 4. To add notes, tap the Notes tab. 5. After completing the details, tap OK. Tap to return to the contacts list (the new contact is saved automatically). ! ! Tap , then Find , enter the contact name, select Contacts for the type, then tap the Go button. Tap a field to enter contact information. Notes is a good place for additional contact information.
CALLING A CONTACT You can make a call to a contact using either the contact list or the contact card. To make a call from the contact list: There are several ways to make a call from the contact list. Using commands in the pop-up menu 1. Tap and hold a contact to display a pop-up menu of actions. ! Tap any of the Call options to make a call. 2. Tap any of the Call options to make a call. Using the contact list abbreviation 1. Tap the letter in the right column next to the contact you want to call.
To make a call from a contact card: Tap any of the listed phone numbers. Rotate the jog dial up/down to scroll through the listed numbers and select one, then press the jog dial to make the call. ! ! SENDING A MESSAGE TO A CONTACT You can send an email or SMS message to a contact either from the contact list or from a contact card window. To send a message from the contact list: 1. Tap and hold a contact to display a pop-up menu of actions.
TASKS KEEPING A TO DO LIST Use Tasks to keep track of what you have to do and prioritize them based on their importance and urgency. 4. To assign the task to a category, tap Categories and select a category from the list. In the task list, you can display tasks by category by tapping the pick list on the top-left corner of the screen. 5. To add notes, tap the Notes tab. You can enter text, draw, or create a recording. 6. After completing the details, tap OK.
NOTES USING THE TASKS SUMMARY SCREEN When you tap a task in the task list, a summary screen is displayed. To change the task, tap Edit. View task details. Tap to show and hide additional summary information View task notes. CAPTURING THOUGHTS AND IDEAS Quickly capture thoughts, reminders, ideas, drawings, and phone numbers with Notes. You can create a written note or a recording. You can also include a recording in a note.
CREATING A NOTE 1. Tap New. 2. Create the note by writing, drawing, typing, or recording. For more information about using the input panel, writing and drawing on the screen, and creating a recording, go to Chapter 4 on page 69. Tap to return to the note list (the note is saved automatically). To send a note by beaming: 1. In the task list, tap and hold the note. 2. Tap Beam File on the pop-up menu. 3.
OFFICE ONLINE CHAPTER 9 Office Online software allows you to wirelessly access your Microsoft Outlook or Lotus Notes office email, calendar and contacts when you're on the go. This convenient service comes in two versions: Pro and Premier. Everything you do with Office Online while you are mobile is reflected back on your PC, so there's no need to sync up when you return to the office.
POCKET WORD With Pocket Word you can: Create new documents on your device or you can copy documents from your PC to your device. Synchronize documents between your PC and your device so that you have the most up-to-date content in both locations. ! ! To open Word: ! Tap , Programs, then Pocket Word . Word will open to the Pocket Word file list. CREATING A NEW DOCUMENT In the document list window, tap New. A blank document appears.
You can change the zoom magnification by tapping View, Zoom, then select the percentage you want. Select a higher percentage to enter text and a lower one to see more of your document. Typing Mode Using the input panel, enter typed text into the document. To format existing text and to edit text, first select the text. You can select text as you do in a Word document, using your stylus instead of the mouse to drag through the text you want to select. To find text in a document, tap Edit, then Find/Replace.
Drawing Mode In drawing mode, use your stylus to draw on the screen. Gridlines appear as a guide. When you lift your stylus off the screen after the first stroke, you'll see a drawing box indicating the boundaries of the drawing. Every subsequent stroke within or touching the drawing box becomes part of the drawing. POCKET EXCEL With Pocket Excel you can: Create new spreadsheets on your device or you can copy spreadsheets from your PC to your device.
Tap to return to the spreadsheet list (changes are saved automatically). Cell contents appear here as you enter them. AutoSum button Zoom button 4. Tap OK. Every time you open the workbook, you will need to enter the password, so choose one that is easy for you to remember but hard for others to guess. TIPS FOR WORKING IN POCKET EXCEL Note the following when working in large worksheets in Pocket Excel: View in full-screen mode to see as much of your worksheet as possible. - Tap View, then Full Screen.
WINDOWS MEDIA PLAYER Enjoy your favorite music and movies on the road, online or offline, with the new Windows Media Player 9 Series for Pocket PC. The Player provides you with the highest quality audio and video experience for your mobile entertainment. PROGRAM ENHANCEMENTS A lot of new features are added to the new Windows Media Player 9 Series for Pocket PC.
CUSTOMIZED ENTERTAINMENT EXPERIENCE Match the Player’s look with your style and mood by downloading a variety of custom skins ranging from cute rubber duckies to retro Elvis themes. Use your favorite WMA music to create and apply your own custom WMA ring tones. NOTE: To facilitate faster copying of audio files to your device, it is recommended that you configure Windows Media Player on your computer to automatically determine the quality level settings applicable to your PPC4100 Pocket PC.
CREATING A PLAYLIST 1. Tap Playlist in the Player window. 2. Tap the pick list, then Organize Playlists. 3. Tap New, and then enter a playlist name. 7. Tap the check box opposite each item you want to include in the playlist. To control which files are displayed, tap the pick list. 8. Tap OK. NOTE: You can not use the following characters in a playlist name: \[]:;|,+“& 4. If you want, specify the folder where you want to save the playlist. 5.
EDITING THE PLAYLIST 1. Tap Playlist in the Player window. 2. Tap the pick list, then the playlist you want to edit. 2. Do any of the following: Tap to add items to the playlist. Tap Tap to delete the selected item from the playlist. to move the selected item up in the playlist. Tap playlist. to move the selected item down in the ! ! ! ! VIEWING TRACK PROPERTIES You can check the file properties of a track for your reference. You can do this either in a playlist window or in the Player window.
To view track properties from the Player window: Tap Tools, then Properties. ! FILE PLAYBACK The Player supports playback of the following file formats: Windows Media - Including .asf, .asx, .wax, .wm, .wma, .wmv, .wmx, and .wvx files. MPEG - .mp3 files You can play files stored in your device, a storage card, or a network. ! ! Tap the scroll bar to view more fields. DELETING A PLAYLIST 1. Tap Playlist in the Player window. 2. Tap the pick list, then Organize Playlists. 3.
PLAYBACK CONTROLS The user interface of the Player window lets you easily manage all aspects of the track playback. The screenshot below shows the functions of the Player control buttons, as well as all available menus. Displays the track title and/or artist name. Tap to go to http:// windowsmedia.com. Tap to shift to full screen mode. Tap to stop playback. Adjust the progress of the current track. Tap to play or pause. Tap to adjust volume. Tap to display the playlist window.
CHANGING YOUR AUDIO AND VIDEO SETTINGS You can change the audio and video settings of the Player to suit your listening preferences. CHANGING YOUR NETWORK SETTINGS You can define Player settings for connecting to a network to optimized playback of streaming media. To set audio and video preferences: 1. Tap Tools, Settings, then Audio & Video. 2. Do any of the following: In the “While using another program” pick list, select whether to pause or continue playback when another program window is displayed.
SETTING HARDWARE PLAYBACK CONTROLS The button mapping function allows you to assign hardware buttons on your device to perform standard playback functions. You can also assign a button to toggle off the screen to help minimize power consumption while continuing to listen to music. LICENSES AND PROTECTED FILES Some digital media content from the Internet, CD tracks, and videos have associated licenses that protect them from being unlawfully distributed or shared.
MICROSOFT READER Use Microsoft Reader for Pocket PC to read eBooks on your device. You can also download books from your favorite eBook Web site to your computer. Then, use ActiveSync to copy the book files to your device. The books appear in the Reader Library, where you can tap them in the list to open them. To open Microsoft Reader: ! Tap , Programs, then Microsoft Reader . USING GUIDEBOOK Guidebook contains all the information you'll need to use the Microsoft Reader.
USING LIBRARY The Library is your Reader home page; it displays a list of all eBooks stored on your device or storage card. To open Library: On the Reader command bar, tap Library. -orOn a book page, tap the book title, and then tap Library on the pop-up menu. ! Tap to select a sort order. Tap to scroll through the Library list. In addition to the text, each book page includes a page number and book title. Navigation options are listed in the bottom portion of the cover page.
To copy text: You can copy text from books that support this feature into any program that accepts text. 1. On a book page, select the text you want to copy. 2. Tap Copy Text on the pop-up menu. The text can be pasted into the program of your choice. To search for text: 1. Tap Find on the pop-up menu. 2. Enter the word you want to search for. 3. Tap the desired Find option. Reader highlights matching text on the page. To close Find, tap outside the box.
CHAPTER 10 WIRELESS DATA PROGRAMS Your PPC4100 Pocket PC has built-in support for a range of wireless data communication programs: Use Pocket Internet Explorer to browse the Web and view WAP-enabled sites. Use Inbox to send and receive email/SMS messages. Use MSN Messenger to send and receive instant messages. Use Terminal Services Client to wirelessly log onto a Windows NT server type PC that is running Terminal Services software Use ActiveSync to remotely synchronize with your computer.
POCKET INTERNET EXPLORER BROWSING THE INTERNET To connect and start browsing, do one of the following: Tap Favorites , then tap the favorite you want to view. Tap View, then Address Bar. In the address bar that appears at the top of the screen, enter the Web address you want to visit and then tap Go . Tap the Address Bar pick list to choose from previously entered addresses. ! Use Pocket Internet Explorer to view Internet or intranet sites from your device.
MOBILE FAVORITES 1. To display the Mobile Favorites navigation window tap Favorites . 2. Tap the page you want to view. You'll see the page that was downloaded the last time you synchronized with your computer. If the page is not on your device, the favorite will be dimmed. You will need to synchronize with your computer again to download the page to your device, or connect to the Internet to view the page. To add a favorite link: 1. While on the page you want to add, tap and hold on the page. 2.
To create a mobile favorite: 1. In Internet Explorer on your computer, click Tools, then Create Mobile Favorite. 2. To change the link name, enter a new name in the Name box. 3. Optionally, in Update, select a desired update schedule. If you did not specify an update schedule, you will need to manually download content to keep the information updated on both your computer and device. Before synchronizing with your device, in Internet Explorer on your computer, click Tools , then Synchronize.
INBOX Use Inbox to: Send and receive email messages by connecting directly to an email server through an Internet service provider (ISP) or a network. Synchronize email messages with Microsoft Exchange or Microsoft Outlook on your computer. Send and receive SMS messages through your mobile service subscription. Inbox supports 8 bits data with class 0, 1, 2, 3, as well as USDD (Unstructured Supplementary Service Data).
Tap to select the sort order for messages. Tap and hold a message to display a pop-up menu of actions. Tap to connect to the selected service. Tap to connect and to send and receive e-mail. When you receive a message, tap it to open it. Unread messages are displayed in bold. Tap to return to the message list. Tap to reply to or forward this message. Tap to delete this message. 226 Tap to view the previous or next message.
To create an email message: 1. In the command bar, tap New. 2. Tap the double arrows next to the Subject field. 3. Tap the Account field, then ActiveSync. 4. Enter the email address of your intended recipients in the To, Cc, and/or Bcc fields. You can do this in different ways. Manually enter the address using any of the input panel options. Type the first few letters of an email address that is stored in Contacts.
Tap to select an account. Tap to append signature to all outgoing messages. Enter your signature here. MANAGING EMAIL MESSAGES AND FOLDERS By default, messages are displayed in one of five folders for each service you have created—Inbox, Deleted Items, Drafts, Outbox, and Sent Items. The behavior of the Deleted and Sent Items folders depends on the options you have chosen. To set these options, in the message list: 1. Tap Tools, then Options. 2. On the Message tab, select your options.
MSN M E S S E N G E R MSN Messenger on your device is an instant messaging program that lets you: See who is online Send and receive instant messages Conduct instant message conversations with groups of contacts Tap anywhere on the screen to sign in. ! ! ! REQUIREMENTS TO USE MSN MESSENGER For MSN Messenger Service, a Passport. If you have a Hotmail® or MSN account, you already have a Passport. Sign up for a Microsoft Passport account at (http://www.passport.com/).
Select the “Save password” check box so you need not enter these information again the next time you sign in. 3. Tap Sign in. If you already use MSN Messenger on your computer, your contacts will show up on your device without being added again. CHATTING WITH CONTACTS 1. To open a chat window, tap a contact name. 2. Enter your message in the text entry area at the bottom of the screen, or tap My Text to enter a preset message. 3. Tap Send.
TERMINAL SERVICES CLIENT You can use Terminal Services Client to log onto a Windows NT server type PC that is running Terminal Services software and use all of the programs that are available on that PC from your device. For example, instead of running Microsoft Pocket Word, you can run the PC version of Microsoft Word and access all of the .doc files on that PC from your device. NOTE: You cannot use Transcriber when entering information in T e r m i n a l S e r v i c e s .
NAVIGATING INSIDE TERMINAL SERVICES CLIENT Once connected to the server, the PC’s screen may more than fill your device’s screen. If scroll bars are displayed on the server’s screen, you will see more than one set of scroll bars on your device—one to scroll information on the PC, and the other one to scroll the PC display through the Terminal Services window in Terminal Services Client.
SIM MANAGER PICTURES SIM Manager enables you to manage all contacts stored on your SIM card. This program complements your device’s phone function by enabling not just the addition of new phone numbers on your SIM card, but more importantly, exporting such contact information to Microsoft Contacts. This eliminates the need to manually enter these new contact information in your device. Pictures extends your device’s function to the visual scene with its image management, viewer and editing functions.
COPYING JPEG FILES TO YOUR DEVICE USING PICTURES To view your JPEG files in Pictures, copy the files to the My Pictures folder of your device or on a storage card folder. You can use Pictures to view and edit your JPEG files. Pictures display images in any of the three view modes—thumbnail (default), full screen, and slide show. To copy JPEG files from your computer to your device: 1. Connect your device to your computer. 2. In ActiveSync on your computer, click Explore .
To perform image management tasks: It is only in thumbnail mode can you perform most of the image management tasks. 1. Tap and hold a thumbnail to display a pop-up menu of available actions. 2. Do any of the following: Tap Create Copy to create a duplicate image file. This is useful when you want to edit an image but still want to retain an original copy of the image. Tap Delete to remove the selected thumbnail from its location. You will be prompted to confirm the deletion.
4. Tap OK. 5. Tap Yes. 6. Fill out the fields in the Save As window. To crop part of an image: You have the option to specify a portion of an image and then save that portion as a new JPEG file. 1. Tap to enable the Crop tool. 2. Drag your stylus across part of the image you want to crop. 3. Tap inside the selection. 7. Tap the OK button. To zoom in/zoom out the image: To view images in a larger or smaller scale use the Zoom tool. 1. Tap to enable the Zoom tool.
3. Do any of the following: ! Tap to magnify the size of the image. ! Tap to reduce the size of the image. Tap to return the image to its original view size. Drag the red border to pan the image in any direction you want. ! ! 3. Tap again to hide the zoom selection panel. To adjust the brightness and contrast settings of an image You can modify the brightness and contrast settings of an image to suit your preferences. 1. Tap Edit, then Brightness and Contrast.
To view the Slide Show toolbar: During the slide show, tap anywhere on the screen or press the jog dial. ! SLIDE SHOW MODE You can view images in a slide show much like viewing a PowerPoint presentation in your computer. Images are adjusted to fit the entire display area and are shown in a 5-seconds interval (default). To view image in slide show mode: In thumbnail mode, tap . During the slide show, you can use hardware buttons to control the image display.
CUSTOMIZING PICTURES Using the Options command you can set preference settings on how to use Pictures. 3. In the Slide Show tab, set the following options: Select the “Delay between slide” pick list to set the interval period between images during a slide show. Select the “Play a screensaver when docked” check box to set the JPEG files in the My Pictures folder act as a screensaver whenever your device is docked in the USB cradle and is idle for a specified number of minutes.
WIBACKUP USING WiBackup WiBackup has two major functions—to create backup files and to restore such backup files. WiBackup is a powerful backup tool that enables you to create backup files of data files and applications stored in your PPC4100 Pocket PC to a storage card. Encryption and compression options are available when creating a backup file. You can also use the program to restore back files to your device’s internal memory.
If you are performing a specific file backup, select the check box opposite the file or folder you want to back up. Backup Buttons The Backup windows share similar command buttons, including: Main - Tap to display the WiBackup main page. The Main button is also available in a Restore window. Scheduled - Tap to set a scheduled backup. Backup - Tap to perform the backup process. When your device is running on battery power, you need at least 30% battery charge to be able to perform data backup.
To delete the scheduled backup log entries: 1. In the “Scheduled backup log” window, tap Clear log. You will be prompted to confirm the deletion. 2. Tap the OK button. 3. Tap Close. RESTORE FUNCTION Based on the size of the available internal storage space in your device, you can restore backup files. During data restore, information on the backup data is displayed, including the date when the backup file was created, file size, and data type.
4. Tap the OK button. The restore status is shown in a progress bar. Once data restore is completed, a message window appears prompting you to reset your device to complete the restore process. 5. Tap OK. 6. Perform a soft reset. See page 21 for instructions. CUSTOMIZING WiBackup Using the Options command, you can set preference settings on how WiBackup perform data backup and restore procedures.
CUSTOMER SUPPORT If you encounter a problem with your device, do not call for technical assistance until you have reviewed the following troubleshooting section. If the problem still persists, contact your local dealer or distributor. For information on how and where to contact the service centers available in your area, go to the Audiovox web site at http://www.audiovox.com.
Battery loses power When the main battery is low, you will see a low battery icon (see “Status Icons” on page 44) in the navigation bar and a callout that tells you to recharge the battery as soon as possible. Your device uses both a detachable main battery pack and an embedded backup battery cell. When the main battery pack is removed or is completely drained out, your device will shutdown.
MEMORY PROBLEM Device memory run out If you receive a message stating that storage or program memory is unavailable, try the following solutions. To find space in storage memory: Move data to an SD or MMC storage card. 1. Insert a storage card to your device’s SD/MMC slot. Set programs such as Notes, Pocket Word, and Pocket Excel to automatically save new items on the storage card. In the program’s file list, tap Tools, then Options.
If this doesn’t work, you can stop the program manually. 1. Close all open confirmation dialog boxes and return the program to list view. 2. Stop the program by tapping Stop or Stop All on the Running Programs tab. Clear storage memory as described in the preceding section. This will free some storage memory so that it can be allocated to program memory. Soft reset your device. For instructions, see page 21.
PHONE CONNECTION PROBLEM If you have a problem using the phone function, try the following: Check if your device’s wireless connection to your mobile service provider is switched on and the signal unobstructed. Contact your mobile phone service provider for assistance. ! ! INTERNET CONNECTION PROBLEM If you’re having difficulty establishing Internet connection, try the following: Make sure you have properly set up a connection to your device’s ISP.
CABLE AND CRADLE PROBLEM The following solutions may help if you encounter problems when connecting to your computer. Make sure that your device is turned on. Check that you do not have any other active connections. CHAPTER 13 ! ! 1. Tap , then Today . 2. Tap or on the command bar. 3. On the pop up menu, tap Disconnect. Plug the other end of the cable securely into the universal connector on the base of your device.
SAFETY INFORMATION Read The Information In This Chapter Before Using Your PPC4100 Pocket PC Phone RADIOFREQUENCY (RF) ENERGY EMISSION All portable computers produce low levels of RF energy due to the generation of digital timing pulses by its clock oscillator circuits. Your wireless handheld portable PPC4100 Pocket PC phone is a low power radio transmitter and receiver. When it is ON, it receives and sends out RF signals.
Posted facilities Turn your device OFF in any facility where posted notices require so. Blasting areas To avoid interfering with blasting operations, turn your device OFF when in a “blasting area” or in areas posted “Turn off two-way radio”. Obey all signs and instructions. Within certain radius from some electronic equipment Most modern electronic equipment is shielded from RF signals.
Driving Safety When driving: - Always secure your device in its leather pouch. - Never place your device on the passenger seat or any place else in the car where it can become a projectile during a collision or stop. - An air bag inflates with great force. DO NOT place objects, including both installed or portable wireless equipment, in the area over the air bag or in the air bag deployment area. If in-vehicle wireless equipment is improperly installed and the air bag inflates, serious injury could result.
Never touch any fluid that might leak from the built-in battery. Such liquid when in contact with the eyes or skin, could cause injury to the skin or eyes. Should the liquid come into contact with the eyes, irrigate the eyes thoroughly with clean water and immediately seek medical attention. In the event the liquid comes into contact with the skin or clothing, wash it away immediately with clean water. Never allow metallic objects, such as staples and paper clips, to get into the inside of your device.
Under certain conditions, data may be lost, including: Failure to follow all instructions for use and warnings in this User’s Guide Misuse of your device Subjecting the device to static electricity and/or noise Total loss of electric charge in the backup battery Servicing of your device Use of your device in locations where the following ambient environmental conditions are exceeded: - Under normal operational use ambient temperatures not less than 32°F and not in excess of 104°F (0°C and 40°C); - With humi
- Do not carry your device with the card connected to it. This can result in the damage or loss of the card. - When the device is operating, do not insert or remove the storage card into or out of the SD/MMC slot or connect or disconnect the device from the cradle as this may cause loss of stored data, or product failure/malfunction. - Never connect cradle terminals with metallic objects, such as wires.
AC ADAPTER PRECAUTIONS Never attempt to disassemble or repair an AC adapter, and never alter the power cables or plugs as exposure to electric shock hazards may result. Always contact an authorized Audiovox service center, if repair or replacement is required. If the plug will not fit into the available outlet, have a proper outlet installed by a qualified electrician. Improper connection can result in the risk of electric shock.
Always locate the power supply cable in an area where it will not be stepped on, tripped over, or otherwise subjected to damage or stress. Never place heavy objects on the power supply cable, as this could result in damage to the cable. Never bend or twist a power supply cable, and never pull it in an attempt to remove the AC adapter or accessory plug from a socket. Always grasp the AC adapter or the accessory plug directly when unplugging the power supply cable in order to avoid damaging the cable.
PHONE USAGE REGULATIONS Never violate any of the following FCC Rules and Regulations when using your PPC4100 Pocket PC phone. The following offenses are punishable by fine, imprisonment, or both: Using obscene, indecent, or profane language. Using the unit to give off false distress calls. Wiretapping or otherwise intercepting a telephone call, unless that person has first obtained the consent of the parties participating in the call. Making anonymous calls to annoy, harass, or molest other people.
NOTE: In the United States and Canada, the SAR limit for mobile phones used by the public is 1.6 watts/kg (W/kg) averaged over one gram of tissue. The standard incorporates a substantial margin of safety to give additional protection for the public and to account for any variations in measurements. Before a phone model is made available for sale to the public, it must be tested and certified by the FCC that it does not exceed the limit established by the government-adopted requirement for safe exposure.
In such a case, FDA could require the manufacturers of wireless phones to notify users of the health hazard and to repair, replace or recall the phones so that the hazard no longer exists.
What are the results of the research done already? The research done thus far has produced conflicting results, and many studies have suffered from flaws in their research methods. Animal experiments investigating the effects of RF energy exposures characteristic of wireless phones have yielded conflicting results that often cannot be repeated in other laboratories. A few animal studies, however, have suggested that low levels of RF could accelerate the development of cancer in laboratory animals.
FDA and the Cellular Telecommunications & Internet Association (CTIA) have a formal Cooperative Research and Development Agreement (CRADA) to do research on wireless phone safety. FDA provides the scientific oversight, obtaining input from experts in government, industry, and academic organizations. CTIA-funded research is conducted through contracts to independent investigators. The initial research will include both laboratory studies and studies of wireless phone users.
If you must conduct extended conversations using your Pocket PC phone every day, you could place more distance between your body and the device, since the exposure level drops off dramatically with distance. It is also advisable to carry your Pocket PC phone away from your body. Again, the scientific data do not demonstrate that wireless phones are harmful.
Where can I find additional information? For additional information, please refer to the following online resources: FDA web page on wireless phones: http://www.fda.gov/cdrh/phones/index.html FCC RF Safety Program: http://www.fcc.gov/oet/rfsafety International Commission on Non-Ionizing Radiation Protection: http://www.icnirp.de WHO International EMF Project: http://www.who.int/emf National Radiological Protection Board (UK): http://www.nrpb.org.
WARRANTY PROTECTION 12 MONTH LIMITED WARRANTY Read your Warranty carefully, with special consideration to paragraph seven of the Limited Warranty for your unit. Audiovox Communications Corp. (“Audiovox”) warrants to the original retail purchaser (“Purchaser”) that this Audiovox product will be free from defects in materials and workmanship under normal consumer use for one year from the date of original purchase from Audiovox or an Audiovox authorized reseller.
Audiovox is not liable for any damages caused by the product or the failure of the product to perform, including lost profits, lost savings, incidental damages or consequential damages. Audiovox is not liable for any claim made by a third party or made by you for a third party. This Warranty extends only to product purchased in the United States and Canada and it is not transferable or assignable.
SOFTWARE WARRANTY THIS AUDIOVOX PRODUCT MAY INCLUDE THIRD PARTY SOFTWARE, THE USE OF WHICH IS GOVERNED BY THE APPLICABLE SOFTWARE LICENSE, END-USER LICENSE OR PROGRAM LICENSE AGREEMENT. THIS LIMITED WARRANTY DOES NOT APPLY TO SUCH THIRD PARTY SOFTWARE AND SUCH SOFTWARE IS PROVIDED “AS IS”. FOR THE APPLICABLE WARRANTY, PLEASE REFER TO THE SOFTWARE LICENSE, END-USER LICENSE OR PROGRAM LICENSE GOVERNING THE USE OF SUCH SOFTWARE OR THE DOCUMENTATION ACCOMPANYING SUCH SOFTWARE.
If you need more information, send your inquiries to: In USA: AUDIOVOX COMMUNICATIONS CORP. 555 Wireless Blvd. Hauppauge, NY 11788 (800) 229-1235 In Canada: AUDIOVOX COMMUNICATIONS CANADA CO.