Quick start guide CL2909 Speakerphone with caller ID/call waiting LOWER This quick start guide provides you with basic installation and use instructions. A limited set of features are described in an abridged form. Please refer to the online user’s manual for a full set of installation and operation instructions at www.telephones.att.com/manuals. Before using this AT&T product, please read Important safety information on pages 14-15 of this quick start guide.
Parts checklist Your package contains: • • • • • Telephone base with mounting bracket and directory card attached Handset Coiled handset cord Telephone line cord Quick start guide Basic steps to set up & operate your phone Basic installation 1 2 3 Install battery Install telephone base Wall mount installation (optional) Common settings 4 Set the date and time 5 Set ringer volume 6 Set contrast 7 Set home area code 8 Set local area code Common operations 9 Directory 10 Speed dial 11 Caller ID
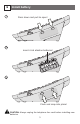
1 1 Install battery Press down and pull to open! 2 Insert 4 AA alkaline batteries! 3 Close and snap into place! CAUTION: Always unplug the telephone line cord before installing new batteries.
2 Install telephone base 1 Plug! Plug! If you have DSL high-speed Internet service, a DSL filter (not included) is required. The DSL filter must be plugged into the telephone wall jack.
3 Wall mount installation (optional) 1 Slide! Insert! 2 Press to release! 3 Flip over! Press to secure! Plug! Plug! Align Wrap! If you have DSL high-speed Internet service, a DSL filter (not included) is required. The DSL filter must be plugged into the telephone wall jack.
4 Set date and time . Press OPTIONS repeatedly until the screen displays: 12:00AM 1-01 SET CLOCK 2. Use the dial pad keys (0-9) to change the blinking digits. • Press or� to move to the previous or next digit. • Press # (pound key) to select between AM and PM. 3. Press OPTIONS to save the new setting and move to the next option. 5 Set ringer volume Slide the ringer switch on the right side of the telephone to adjust the ringer volume to OFF, LO or HI.
Set home area code . Press OPTIONS repeatedly until the screen displays: 12:00AM 1-01 HAC-_ _ _ HOME AREA CODE? 2. Use the dial pad keys (0-9) to enter the home area code. • Press to backspace and erase a digit. • Press� to move to the next digit. • Press REMOVE to delete all digits entered. 3. Press OPTIONS to save the setting. 8 Set local area code . Press OPTIONS repeatedly until the screen displays: 12:00AM 1-01 LAC1-_ _ _ LOCL AREA CODE? 2.
9 Directory This telephone has a directory where you can store up to 25 telephone numbers and names. Numbers can be up to 24 digits long and names can be up to 15 characters. To add a directory entry: . Press DIRECTORY -> / -> STORE is flashing -> OPTIONS. 2. Enter the telephone number -> OPTIONS. 3. Enter the name -> OPTIONS. To review and dial a directory entry: . Press DIRECTORY -> OPTIONS. 2. Press / to scroll through the directory -> press DISPLAY DIAL then lift the handset to call�.
11 Caller ID To review the call history: . Press CALL LIST or CALL LIST to enter the call history. 2. Press / to scroll through the caller ID entries. 3. Press CLEAR to exit and return to idle mode. To dial a caller ID entry: Lift the handset -> press / to scroll to the desired entry -> DISPLAY DIAL. -ORPress / to scroll to the desired entry -> ������ Press SPEAKER. To delete call records: Delete a single call record / to scroll to the desired caller ID entry���� ��� -> REMOVE.
Telephone operation • Press to delete the displayed entry. • Press and hold to remove all call history entries when in idle mode. • Review call history records. • Scroll through options when in the feature menu. • Dial the displayed number. • Press to return to idle mode. LOWER • Press to enter lower locations of speed dial keys. • Enter the directory. • Display the menu. • Save the setting and advance to the next feature setting. LOWER • Press to save numbers in speed dial locations.
Troubleshooting If you have difficulty with your telephone, please try the suggestions below. For customer service, visit our website at www.telephones.att.com, or call 1 (800) 222-3111. In Canada, dial 1 (866) 288-4268. No dial tone. • Make sure all plugs are connected properly. Inspect the telephone line cord connections at the wall jack and telephone. Also inspect the coiled handset cord connections at both ends. • Unplug the telephone and connect it to another wall jack.
Troubleshooting No caller ID information while on a call. • Make sure your telephone service provider provides caller ID information while you are on a call. This is sometimes known as caller ID on call waiting or type 2 caller ID. • The telephone cannot display the caller ID information if another telephone on the same line is in use. Make sure all extensions are on hook. Display dial does not work. • A home area code must be programmed.
Maintenance Taking care of your telephone • Your telephone contains sophisticated electronic parts, so it must be treated with care. Avoid rough treatment. • Place the handset down gently. Save the original packing materials to protect your telephone if you ever need to ship it. Avoid water • Your telephone can be damaged if it gets wet. Do not handle it with wet hands. Do not install the telephone near a sink, bathtub or shower.
Important safety information This symbol is to alert you to important operating or servicing instructions that may appear in this user’s manual. Always follow basic safety precautions when using this product to reduce the risk of injury, fire, or electric shock. Safety information • Read and understand all instructions in the user’s manual. Observe all markings on the product. • Avoid using a telephone during a thunderstorm. There may be a slight chance of electric shock from lightning.
Important safety information Battery warning information . 2. 3. 4. 5. 6. 7. CAUTION: To reduce the risk of fire or injury to persons or damage to the telephone, read and follow these instructions carefully: Use only four AA alkaline batteries (not included). Dispose of these batteries in a safe manner. Do not burn or puncture. Like other batteries of this type, if burned or punctured, they could release caustic material which could cause injury. Do not open or mutilate the battery.
FCC and ACTA information If this equipment was approved for connection to the telephone network prior to July 23, 2001, it complies with Part 68 of the Federal Communications Commission (FCC) rules. If the equipment was approved after that date, it complies with the Part 68 rules and with the Technical Requirements for Connection of Equipment to the Telephone Network adopted by the Administrative Council for Terminal Attachments (ACTA). We are required to provide you with the following information. 1.
FCC and ACTA information 3. Repair instructions If this equipment is malfunctioning, it must be unplugged from the modular wall jack until the problem has been corrected. Repairs to this telephone equipment can only be made by the manufacturer or its authorized agents. For repair procedures, follow the instructions outlined under the limited warranty. 4.
Part 15 of FCC rules Some telephone equipment generates, uses, and can radiate radio frequency energy and, if not installed and used properly, may cause interference to radio and television reception. This product has been tested and found to meet the standards for a Class B digital device, as specified in Part 15 of the FCC rules. These specifications are designed to provide reasonable protection against such interference in a residential installation.
Limited warranty 2. What will be done if the PRODUCT is not free from defects in materials and workmanship during the limited warranty period (“materially defective PRODUCT”)? During the limited warranty period, the manufacturer’s authorized service representative will repair or replace at the manufacturer’s option, without charge, a materially defective PRODUCT. If the manufacturer repairs the PRODUCT, they may use new or refurbished replacement parts.
Limited warranty • PRODUCT purchased, used, serviced, or shipped for repair from outside the United States of America or Canada, or used for commercial or institutional purposes (including but not limited to products used for rental purposes); or • PRODUCT returned without valid proof of purchase (see item 6 below); or • Charges for installation or setup, adjustment of customer controls, and installation or repair of systems outside the unit. 5.
Limited warranty 7. Other limitations This warranty is the complete and exclusive agreement between you and the manufacturer of this AT&T branded PRODUCT. It supersedes all other written or oral communications related to this PRODUCT. The manufacturer provides no other warranties for this PRODUCT. The warranty exclusively describes all of the manufacturer’s responsibilities regarding the PRODUCT. There are no other express warranties.
www.telephones.att.com © 2009-2013 Advanced American Telephones. All Rights Reserved. AT&T and the AT&T logo are trademarks of AT&T Intellectual Property licensed to Advanced American Telephones, San Antonio, TX 78219. Printed in China. Issue 9 AT&T 04/13.