AT&T AT&T 999-506-143 Comcode 10654341 Issue 2, April 1991 MLC-6 Cordless Telephone Installation and Troubleshooting
AT&T 999-506-143 Issue 2 April 1991 Copyright © 1991 AT&T All Rights Reserved Printed in U.S.A. Notice Every effort was made to ensure that the information in this booklet was complete and accurate at the time of printing. However, information is subject to change. Federal Communications Commission (FCC) Information For details, see “FCC Information.” Trademarks PARTNER and MLS-6 are trademarks of AT&T. Warranty AT&T provides a limited warranty for this phone; see “AT&T Limited Warranty.
Contents Important Safety Instructions ■ Safety Instructions for Installation Personnel Introduction ■ ■ 1 4 5 5 5 Privacy Information Automatic Security Coding Telephone Components 6 Parts List 8 Installation ■ ■ ■ ■ ■ ■ ■ ■ ■ Positioning the Base Installing the Base Inserting the Battery Pack Replacing the Battery Pack Charging the Batteries Installing the Flexible Antenna Testing the Installation Filling Out Labels Programming Channels (More Than One Cordless Phone) 9 9 11 13 14 14 15 15 16 17
Important Safety Instructions Follow these basic safety precautions when using your MLC-6 cordless phone. WARNING: Risk of Electric Shock Failure to properly ground this product will result in a risk of electrical shock, which can cause serious personal injury. This product requires a 3-prong AC power receptacle for safe operation. You should have your receptacle checked by a qualified electrician before connecting this equipment. WARNING Do not open or mutilate batteries.
■ Never push objects of any kind into this telephone through housing slots, since the objects may touch hazardous voltage points or short out parts that could result in a risk of electric shock. Never spill liquid of any kind on the telephone. ■ To reduce the risk of electric shock, do not disassemble this product. There are no user serviceable parts inside. Opening or removing covers may expose you to hazardous voltages.
■ This product is equipped with a three-wire grounding-type plug with a third (grounding) prong. This plug will only fit into a standard grounding-type power outlet. If you are unable to insert the plug into the outlet, contact a qualified electrician to replace your obsolete outlet. Do not cut or remove the grounding prong, or use 2-wire extension cords or adapters to defeat this safety feature of the product. ■ Do not allow anything to rest on the power cord.
Safety Instructions for Installation Personnel WARNING: This product must be properly grounded. Failure to do so can result in a risk of electrical shock, which may cause serious personal injury. Before product installation, verify that you are installing the equipment at a properly grounded 3-prong AC receptacle. If not, stop the installation and contact a qualified service technician. ■ Never install telephone wiring during a lightning storm.
Introduction The AT&T MLC-6 cordless telephone is compatible with your PARTNER™ Plus or PARTNER Communications System. It gives you the freedom of a cordless phone while providing the same features as a corded MLS™-model telephone. The MLC-6 cordless phone is functionally similar to the MLS-6™ corded phone. The cordless phone can be programmed with system features and dialing restrictions the same as any other MLS-model phone.
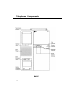
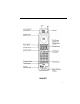
Telephone Components BASE 6
HANDSET 7
Parts List Along with this booklet, the box should contain the items shown on this page. If it does not, call the AT&T Helpline at 1 800 628-2888.
Installation Important: Before beginning installation, please read and understand “Important Safety Instructions” and “Safety Instructions for Installation Personnel” at the beginning of this booklet. Be sure the base is unplugged before you begin. Positioning the Base The MLC-6 cordless phone uses radio transmissions to communicate. Its range depends on your particular operating environment, and can be improved by placing the base in an optimal location.
The handset does not need to be located with the base except for charging. For best coverage, place the base in a central location, away from concentrations of structural metal such as steel and aluminum or reinforced concrete. Use the handset at another desk or while moving about your work location. For indoor use, place the base so that walls do not block the base from the area where the handset will be used. (See the figure below.) Intervening walls will reduce the phone’s range.
Installing the Base If desk mounting, skip step 1 and steps 3–6. If wall mounting, remove the four screws in the bottom of the base. Turn the bottom of the base 180° as shown above, then screw it back into place. Plug one end of the modular telephone cord into the jack on the bottom of the base. Then route it and the AC power cord along their respective channels. Reverse the handset hook.
Install mounting sleeves and Mount the base. Place the screws. Lightly tap a nail into marks base over the screws, than slide it on wall to start holes. Then slip each downward slightly to lock it into screw into a mounting sleeve (with place. screw head in wider barrel of sleeve and screw securely into wall. Plug modular telephone cord into a modular wall jack. (Alternatively, you can plug the cord directly into a system 206 module, but you must place the base at least 20 feet from the 206 module.
Inserting the Battery Pack Remove battery cover from the handset by pressing down on the raised dots and sliding the cover towards you. If a battery pack is already in the compartment, first unplug the battery cord from the handset and remove the old battery pack. Place the new battery pack in the compartment with the battery cord coming from the top left side of the battery pack. Plug the white plastic end of the cord attached to the battery pack into the battery connector jack compartment.
Replacing the Battery Pack When the power in the battery pack for the MLC-6 phone is low, the message BATT appears in the handset display. The life of the battery pack is approximately two years. To order a replacement battery pack, see “Ordering Replacement Parts.” To install a new battery pack, see “Inserting the Battery Pack.” Be sure to properly dispose of the old battery. WARNING: Do not open or mutilate batteries. They contain caustic and toxic chemicals. Do not dispose of in fires.
Installing the Flexible Antenna The handset comes with a rigid telescoping antenna installed. Normal operation of the cordless phone requires you to manually extend this antenna when making a call. If you prefer, you can use the flexible antenna, which does not need to be extended or retracted. To install the flexible antenna: 1. Remove the telescoping antenna from the handset by unscrewing it counterclockwise. 2.
Filling Out Labels Using a ball-point pen or pencil only, write the following information on the erasable labels and directory card: On the labels above and below the handset display, first peel off the protective plastic overlay, then write line numbers or programmed features assigned to each of the outside line/programmable buttons. See the above illustration and Quick Reference: Controls and Displays.
Programming Channels (More Than One Cordless Phone) Channels 0-9 are available to MLC-6 cordless phones. If you use more than one cordless phone, you should program each one to operate on different channels to avoid channel interference. To program channels: 1. Verify that the antennas on the base and handset are fully extended. 2. While the handset is turned off, press [ Feat ] and then press the Channel button.
Using the Carrying Holster The carring holster allows you to carry the handset with you without having to hold it in your hand. To attach the holster to your belt, simply thread your belt through the holster's belt loop. Then slip the handset in to the holster. To easily remove the handset from the carrying holster, place one hand on the holster to hold it in place (as shown in the figure above) and pull the handset out with the other hand.
Troubleshooting If you have a problem with your cordless phone, you may be able to solve it by following the procedures listed here. If you cannot resolve a problem using these procedures, call the AT&T Helpline at 1 800 628-2888, 24 hours a day. Symptom Possible Causes Possible Solutions RANGE indicator appears on handset display. Handset is out of range of base. Move closer to base. Another cordless user is on the same channel.
Symptom Possible Causes Possible Solutions No ring on incoming call, or handset makes hissing sounds. Out of range. Move closer to base. Retractable antenna not fully extended. Fully extend telescoping antennas on base and handset. If you have more than one MLC-6, wrong handset placed in base. Place correct handset in base for at least 10 seconds. System is programReprogram extension med so line does not so the line rings (see ring at extension. system documentation).
Maintenance Treated properly, your telephone will require no maintenance other than periodic cleaning. To clean, wipe the housing with a soft, dust-free cloth. If absolutely necessary, clean it with a soft cloth slightly dampened with a mild soap and water solution. Dry quickly with a soft cloth. To prevent damaging the phone, avoid dropping the base and the handset. Always place the handset on the base gently.
Ordering Replacement Parts To order replacement parts or optional equipment, call either AT&T "Sourcebook" Catalog Sales or the AT&T National Parts Sales Center toll free. When ordering, please use the part numbers shown in the table below.
AT&T Limited Warranty What is covered: Any defect in material and workmanship. For how long: One year. What we will do: If your telephone is defective within one year of the date of purchase, we will repair it or, at our option, replace it at no charge to you. If we repair your telephone, we may use new or refurbished replacement parts. If we choose to replace your telephone, we may replace it with a new or refurbished one of the same or similar design.
What we ask you to do: To get warranty service for your telephone you must provide proof of the date of purchase. If you purchased your telephone directly from AT&T: Call our Helpline for complete instructions and details on service. If you purchased your telephone from an AT&T Authorized Dealer: Your AT&T warranty service is provided to you by your Dealer under the AT&T Authorized Dealer Warranty Plan. Please contact your Dealer directly for details and instructions (or call our Helpline).
Customer Support Helplines AT&T provides these Helplines 24 hours a day to help you program and use your phone: U.S.A. Eastern Canada and Ottawa Central and Western Canada Ontario 1 800 628-2888 1 800 363-1882 1 800 663-9817 1 800 387-4268 Before calling the Helpline, please refer to “Troubleshooting.
FCC Information Federal Communications Commission (FCC) rules require that you be notified of the following: FCC Part 15 Rules The AT&T MLC-6 Cordless Telephone has been tested and has been found to comply with FCC Part 15 Rules. These specifications are designed to provide reasonable protection against harmful interference in a commercial or residential installation.
Using the Wall Mount Template 1. If you wish, remove the template from this booklet by cutting or tearing along this dotted line. (if you do not use the template, not that screws should be installed on a vertical line. exactly 4 inches apart.) 2. Referring to the figure below, hold the template against the place on the wall where you want to mount the base. Make sure you hold the template perfectly straight (use a level if needed). 3.