8500cov.
bbbbb b bbbbbbbbbbbbbbbbbbbbbbbbbbbbbbbbbbbbbbbbbbb NOTICE While reasonable efforts were made to ensure that the information in this document was complete and accurate at the time of printing, AT&T can assume no responsibility for any errors. Changes or corrections to the information contained in this document may be incorporated into future reissues.
bbbbb b bbbbbbbbbbbbbbbbbbbbbbbbbbbbbbbbbbbbbbbbbbb IMPORTANT SAFETY INSTRUCTIONS When using your telephone equipment, the following safety precautions should always be followed to reduce the risk of fire, electric shock, and injury to persons. Read and understand all instructions. Follow all warnings and instructions marked on the telephone. This telephone can be hazardous if immersed in water.
bbbbb b bbbbbbbbbbbbbbbbbbbbbbbbbbbbbbbbbbbbbbbbbbb Do not overload the AC wall outlets and extension cords as this can result in risk of fire or electric shock. Before cleaning, disconnect all cords from the telephone. Do not use liquid cleaners or aerosol cleaners. Use a damp cloth for cleaning. Disconnect the cords on the telephone and refer servicing to qualified service personnel when these conditions exist: when the power supply cord or plug is damaged or frayed.
bbbbb bb b bbbbbbbbbbbbbbbbbbbbbbbbbbbbbbbbbbbbbbbbbbb Contents bbbbbbbbbbbbbbbbbbbbbbbbbbbbbbbbbbbb 1 Introduction bb bb 1-1 Overview 1-1 Data Features 1-6 Voice Terminal Control Features 1-7 System Dependencies 1-8 Hearing and Visually Impaired Users 1-9 The System Administrator: An Important Note to All Users 1-9 Organization of the Users Manual 1-10 Conventions Used in This Manual 1-11 bbbbbbbbbbbbbbbbbbbbbbbbbbbbbbbbbbbb 2 Getting Started 2-1 Communicating with the 8500 Series Display Terminal
bbbbb bb bb bb bb bb b bbbbbbbbbbbbbbbbbbbbbbbbbbbbbbbbbbbbbbbbbbb Contents bbbbbbbbbbbbbbbbbbbbbbbbbbbbbbbbbbbb 4 Data Options and Profiles Data Option Definitions Data Option Profiles Typical Data Option Settings for Data Transfer 4-1 4-3 4-22 4-30 bbbbbbbbbbbbbbbbbbbbbbbbbbbbbbbbbbbb 5 Testing Local Loopback Test Remote Loopback Test Self-Test 5-1 5-1 5-3 5-4 bbbbbbbbbbbbbbbbbbbbbbbbbbbbbbbbbbbb 6 Troubleshooting Using Reset to Clear a Locked-up ADM Self-Test 6-1 6-1 6-5 bbbbbbbbbbbbbbbbbbb
bbbbb b bbbbbbbbbbbbbbbbbbbbbbbbbbbbbbbbbbbbbbbbbbb Introduction 1 bbbbbbbbbbbbbbbbbbbbbbbbbbbbbbbbbbbb b bbbbbb Overview Congratulations on the addition of an Asynchronous Data Module (ADM) to your AT&T Integrated Services Digital Network (ISDN) 8500 series display terminal. Following our tradition of excellent quality and high reliability, the ADM is designed to provide you with the latest in telecommunications technology.
bbbbb Introduction b bbbbbbbbbbbbbbbbbbbbbbbbbbbbbbbbbbbbbbbbbbb There are two versions of the 8510 and 8528 display terminals with ADM. One version of these two terminals provides the standard 25-pin asynchronous EIA232 interface. The other version of both of these terminals provides the standard 25-pin asynchronous EIA-232 interface, along with an additional interface called the Telephone Multimedia Interface (TMI).
bbbbb Introduction b bbbbbbbbbbbbbbbbbbbbbbbbbbbbbbbbbbbbbbbbbbb AT&T’s ISDN 8500 series display terminal, with the ADM, provides you with simultaneous voice and data communications capabilities in one unit. As a telephone, the 8510 ISDN display terminal offers 10 call appearances, Conference, Drop, Hold, Mute, Redial, and Transfer buttons, a speakerphone, a message indicator, a Volume control button, and an adjunct jack.
bbbbb Introduction b bbbbbbbbbbbbbbbbbbbbbbbbbbbbbbbbbbbbbbbbbbb The 8520 ISDN display terminal offers 20 call appearances, Conference, Drop, Hold, Mute, Redial, and Transfer buttons, a speakerphone, a message indicator, a Volume control button, and an adjunct jack.
bbbbb Introduction b bbbbbbbbbbbbbbbbbbbbbbbbbbbbbbbbbbbbbbbbbbb The 8528 ISDN display terminal offers 28 call appearances, Conference, Drop, Hold, Mute, Redial, and Transfer buttons, a speakerphone, a message indicator, a Volume control button, and an adjunct jack.
bbbbb Introduction b bbbbbbbbbbbbbbbbbbbbbbbbbbbbbbbbbbbbbbbbbbb b bbbbbb Data Features Asynchronous full-duplex operation at data rates from 1200 bits per second (bps) to 57.6 kilobits per second (kbps) through an EIA-232 interface. X.25 packet switched data communication including receipt of X.29 commands from a remote X.25 host for setting packet switched data parameters. Circuit switched data communication over 56 or 64 kbps facilities via industry standard V.120 rate adaption protocol.
bbbbb Introduction b bbbbbbbbbbbbbbbbbbbbbbbbbbbbbbbbbbbbbbbbbbb An automated personal phone book that looks up the number and places a call to the specified person. The application also puts any notes about the person being called on the PC screen. An automated data lookup that identifies an incoming call and searches for any data available on the caller. The information is available on a timely basis so you are knowledgeable about the incoming call when you answer the telephone.
bbbbb Introduction b bbbbbbbbbbbbbbbbbbbbbbbbbbbbbbbbbbbbbbbbbbb b bbbbbb System Dependencies Your 8500 series display terminal with the ADM is intended for use with the AT&T 5ESS switch, or the AT&T DEFINITY Generic 2 or Generic 3 Communications Systems. You should be aware of which system your ADM is connected to because some differences exist in the data transport capabilities of each system. The 5ESS switch supports both X.
bbbbb Introduction b bbbbbbbbbbbbbbbbbbbbbbbbbbbbbbbbbbbbbbbbbbb b bbbbbb Hearing and Visually Impaired Users The following features have been included for the hearing and visually impaired person: Two small bars have been placed on the 5 dial pad key. The length of time that information messages appear on your display can be set at Slow, Medium, or Fast. Confirmation and error tones may be added to display information messages. b bbbbbb Compatibility with inductively coupled hearing aids.
bbbbb Introduction b bbbbbbbbbbbbbbbbbbbbbbbbbbbbbbbbbbbbbbbbbbb b bbbbbb Organization of the User´s Manual This manual is arranged into the following chapters. Chapter 1: Introduction Chapter 2: Getting Started — Explains how to set some data options from the softkeys of your 8500 series display terminal and how to make a data call. Chapter 3: Using the CMD and AT Commands — Explains when to type commands, and how to use CMD and AT Local Mode Commands.
bbbbb Introduction b bbbbbbbbbbbbbbbbbbbbbbbbbbbbbbbbbbbbbbbbbbb b bbbbbb Conventions Used in This Manual The following conventions are used in this manual: bbbbb A rectangular box containing a feature name, such as cbMenu bbbbc , represents any button having a feature assigned to it. The 8510 and 8528 display terminal is represented by a 2-line by 24-character screen.
bbbbb Introduction b bbbbbbbbbbbbbbbbbbbbbbbbbbbbbbbbbbbbbbbbbbb Information in bold italic characters, such as DIAL 3784 represents commands or command options you can enter on the data terminal or PC keyboard. If the manual instructs you to type H for help, dial when you are making a data call, and so forth, you can type any and all information in either lowercase or uppercase, whichever you find easier.
bbbbb b bbbbbbbbbbbbbbbbbbbbbbbbbbbbbbbbbbbbbbbbbbb Getting Started 2 bbbbbbbbbbbbbbbbbbbbbbbbbbbbbbbbbbbb This chapter explains how to prepare your 8500 series display terminal Asynchronous Data Module (ADM) for data operations and how to make data calls. b bbbbbb Communicating with the 8500 Series Display Terminal ADM You can ‘‘talk’’ to the 8500 series ADM through an attached data terminal or personal computer by means of commands typed on the keyboard of the data terminal or PC.
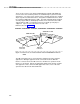
bbbbb Getting Started b bbbbbbbbbbbbbbbbbbbbbbbbbbbbbbbbbbbbbbbbbbb bbbbbbbbbbbbbbbbbbbbb Data Mode Local Mode Data Terminal ISDN 8500 Series or Display Set Personal Computer ADM ISDN Network Host or Other Data Endpoint bbbbbbbbbbbbbbbbbbbbbbbbbbbbbbbb Figure 2-1. Local and Data Mode Operation bbbbbbbbbbbbbbb Local Mode In local mode, commands typed at the data terminal or PC keyboard are read, interpreted, and acted upon by the ADM to make and end data calls as well as to modify data option values.
bbbbb Getting Started b bbbbbbbbbbbbbbbbbbbbbbbbbbbbbbbbbbbbbbbbbbb b bbbbbb Setting Critical Options to Make a Data Call The ADM is shipped to you with default data option settings. Depending on your particular needs, you may need to change some of these options. This section briefly describes the four most important data options —local mode, data mode, speed, and parity. It also explains how to set them from the softkeys of your 8500 series display terminal.
bbbbb Getting Started b bbbbbbbbbbbbbbbbbbbbbbbbbbbbbbbbbbbbbbbbbbb Local Mode The local mode option lets you select which form of commands and responses your ADM will use after it is powered up. Local mode option values are CMD, AT, Enhanced AT, and Off. Select CMD (factory setting) for the most user friendly interface with onscreen help. Select AT if your PC communications package requires the use of an AT command set.
bbbbb Getting Started b bbbbbbbbbbbbbbbbbbbbbbbbbbbbbbbbbbbbbbbbbbb Place a data call Disconnect a data call Reset a locked data set Set the PC Call Progress Option. To access these features on the 8510 or 8528, use the four softkeys labeled with bbb arrows ( cbbbc ) located directly below the display. To access these features on the 8520, use the 10 softkeys located to the left and right of the display.
bbbbb Getting Started b bbbbbbbbbbbbbbbbbbbbbbbbbbbbbbbbbbbbbbbbbbb bbbbbbbbbbbbbbbbbbbbbbbb > MENU < MENU Next Directory CallLog Test Option Data SELF-TEST Begin DIRECTORY Cancel Call View Add/Del Done DATA (Not Active) DataOptions Call Done CALL LOG Incoming Outgoing Done DIAL:_ Quit DATA OPTIONS < > Send DATA OPTIONS Next Reset Change ViewCurrent Done OPTIONS > < Next Spkr Clock Next Indicator Done OPTIONS Next Call-Progress Lock Done Done PC CALL PROGRESS: ON Off De
bbbbb Getting Started b bbbbbbbbbbbbbbbbbbbbbbbbbbbbbbbbbbbbbbbbbbb bbbbbbbbbbbbbbbbbbbbbbbb MENU Directory Call Log Lock Options OPTIONS Ring Tones Call Progress Contrast Home Screen Call Log Names Screen Done SET ACTIVATION OF THE SPEAKER WHEN DIALING FROM THE PC: DELAYED Off On Delayed Done LOCK Lock/Unlock Items Change Password Remove Password MENU Self-Test Service Info Next Data Set Spkr Set Clock Home Screen DATA (NOT ACTIVE) Data Options Call Done DIAL:_ Quit Send DATA OPTIONS Done Ind
bbbbb Getting Started b bbbbbbbbbbbbbbbbbbbbbbbbbbbbbbbbbbbbbbbbbbb bbbbbbbbbbbbbbb Entering and Exiting Softkey Mode bbbbb 1. Press cbMenu bbbbc to access the main menu screen.
bbbbb Getting Started b bbbbbbbbbbbbbbbbbbbbbbbbbbbbbbbbbbbbbbbbbbb The following is displayed on the 8520 display terminal screen: b bbbbbbbbbbbbbbbbbb b bbbbb c c cbMENU bbbbbcc Self-Test c Service Info c c c c bbbbbbbbbbbbbbbbbbc b Notes: bbbbb If you press cbMenu bbbbc on your 8510 or 8528 display terminal while the first page of the main menu is on your screen, you will exit softkey mode.
bbbbb Getting Started b bbbbbbbbbbbbbbbbbbbbbbbbbbbbbbbbbbbbbbbbbbb bbbbbbbbbbbbbbbb bbbbbb Setting the Options on the 8500 Series Display Terminal Changing the Data Options When you change the options through the softkeys, the settings take effect immediately in the currently active profile and are also stored in the power-up profile. NOTE: The values initially displayed are the power-up values. These values may not be the same as the currently active values.
bbbbb Getting Started b bbbbbbbbbbbbbbbbbbbbbbbbbbbbbbbbbbbbbbbbbbb 2. Press the softkey associated with Data. The following is displayed on the 8510 and 8528 display terminal screen: b bbbbbbbbbbbbbbbbbb c DATA (Not Active) c DataOptions Call Done c bbbbbbbbbbbbbbbbbb b c The following is displayed on the 8520 display terminal screen: b bbbbbbbbbbbbbbbbbb b bbbbb c cbDATA (Not Active) c bbbbbcc c c c Data Options c Call Done c bbbbbbbbbbbbbbbbbbc b 3.
bbbbb Getting Started b bbbbbbbbbbbbbbbbbbbbbbbbbbbbbbbbbbbbbbbbbbb 4. Press the softkey associated with Change or Change Options to change the data options. The following is displayed on the 8510 and 8528 display terminal screen: b bbbbbbbbbbbbbbbbbb c SET DATA MODE: DX25 c + Skip Save c bbbbbbbbbbbbbbbbbbc b The following is displayed on the 8520 display terminal screen: b bbbbbbbbbbbbbbbbbb c SET DATA MODE: DX25 c c c Quit c Mode(-) Skip c Mode(+) Save c bbbbbbbbbbbbbbbbbb b c 5.
bbbbb Getting Started b bbbbbbbbbbbbbbbbbbbbbbbbbbbbbbbbbbbbbbbbbbb The following is displayed on the 8510 and 8528 display terminal screen: b bbbbbbbbbbbbbbbbbb c SET DATA RATE: 9600 c + Skip Save c bbbbbbbbbbbbbbbbbbc b The following is displayed on the 8520 display terminal screen: b bbbbbbbbbbbbbbbbbb c SET DATA RATE: 9600 c c c Quit c Rate(-) Skip c Rate(+) Save c bbbbbbbbbbbbbbbbbb b c 7.
bbbbb Getting Started b bbbbbbbbbbbbbbbbbbbbbbbbbbbbbbbbbbbbbbbbbbb The following is displayed on the 8510 and 8528 display terminal screen: b bbbbbbbbbbbbbbbbbb c SET PARITY: Even c + Skip Save c bbbbbbbbbbbbbbbbbbc b The following is displayed on the 8520 display terminal screen: b bbbbbbbbbbbbbbbbbb c SET PARITY: EVEN c c c Quit c Parity(-) Skip c Parity(+) Save c bbbbbbbbbbbbbbbbbb b c 9.
bbbbb Getting Started b bbbbbbbbbbbbbbbbbbbbbbbbbbbbbbbbbbbbbbbbbbb The following is displayed on the 8510 and 8528 display terminal screen: b bbbbbbbbbbbbbbbbbb c SET LOCAL MODE: CMD c + Skip Save c bbbbbbbbbbbbbbbbbbc b The following is displayed on the 8520 display terminal screen: b bbbbbbbbbbbbbbbbbb c SET LOCAL MODE: CMD c c c Quit c Local(-) Skip c Local(+) Save c bbbbbbbbbbbbbbbbbb b c 11.
bbbbb Getting Started b bbbbbbbbbbbbbbbbbbbbbbbbbbbbbbbbbbbbbbbbbbb bbbbbbbbbbbbbbb Viewing the Current Data Options When viewing the options, the currently active values are displayed. NOTE: These active values may be different from the values initially displayed on the change options screens. Refer to the section ‘‘Changing the Data Options’’ earlier in this chapter. To view the currently active settings using the softkeys on your 8500 series display terminal, do the following: bbbbb 1.
bbbbb Getting Started b bbbbbbbbbbbbbbbbbbbbbbbbbbbbbbbbbbbbbbbbbbb 4. Press the softkey associated with ViewCurrent or View Current to view the current options.
bbbbb Getting Started b bbbbbbbbbbbbbbbbbbbbbbbbbbbbbbbbbbbbbbbbbbb Press the softkey associated with Continue to continue stepping through the display of the current options. The current data rate is displayed, for example, b bbbbbbbbbbbbbbbbbb c CURRENT DATA RATE: 9600 c Continue Quit c bbbbbbbbbbbbbbbbbb b c 6. Do one of the following: Press the softkey associated with Quit if you have completed viewing the options. You are returned to the DATA OPTIONS menu.
bbbbb Getting Started b bbbbbbbbbbbbbbbbbbbbbbbbbbbbbbbbbbbbbbbbbbb bbbbbbbbbbbbbbb bbbbbbbbbbbbbbb Resetting the Current Data Options Refer to the section ‘‘Using Reset to Clear a Locked-up ADM’’ in Chapter 6. Setting the Data Call Indicator The data call indicator appears on the second line of the 8500 series display terminal screen. If you set the data call indicator to Yes, the data call indicator appears when you have established a data call.
bbbbb Getting Started b bbbbbbbbbbbbbbbbbbbbbbbbbbbbbbbbbbbbbbbbbbb bbbbbb 4. If you have an 8510 or 8528 display terminal, press cbNext bbbbbc to access the second data options screen. The following is displayed: b bbbbbbbbbbbbbbbbbb c < DATA OPTIONS c Reset Indicator Done c bbbbbbbbbbbbbbbbbbc b 5. Press the softkey associated with Indicator.
bbbbb Getting Started b bbbbbbbbbbbbbbbbbbbbbbbbbbbbbbbbbbbbbbbbbbb NOTE: If you have the data call indicator set to Yes, the main softkey screen on the 8510 and 8528 will show the data indicator. For example, b bbbbbbbbbbbbbbbbbb c Aug 13, 1992 11:15AM c Data c bbbbbbbbbbbbbbbbbb b c Press the softkey below Data (only on the 8510 and 8528 display terminal) to quickly access the data screens.
bbbbb Getting Started b bbbbbbbbbbbbbbbbbbbbbbbbbbbbbbbbbbbbbbbbbbb b bbbbbb Making a Data Call You can use the softkeys of your 8500 series display terminal to initiate a data call, or you can initiate it from your data terminal or PC. If you initiate the call from your data terminal or PC, you can use CMD commands or AT commands. Check the documentation from your PC communications package to determine if you need to use AT commands. The procedures for all three methods follow.
bbbbb Getting Started b bbbbbbbbbbbbbbbbbbbbbbbbbbbbbbbbbbbbbbbbbbb The following is displayed on the 8520 display terminal screen: b bbbbbbbbbbbbbbbbbb b bbbbb c cbDATA (Not Active) c bbbbbcc c c c Data Options c Call Done c bbbbbbbbbbbbbbbbbbc b 4. Press the softkey associated with Call.
bbbbb Getting Started b bbbbbbbbbbbbbbbbbbbbbbbbbbbbbbbbbbbbbbbbbbb 5. Dial the telephone number on your 8500 series display terminal keypad. The blinking cursor indicates that you should enter the telephone number, for example, b bbbbbbbbbbbbbbbbbb c DIAL:1908555_ c Backspace Quit Send c bbbbbbbbbbbbbbbbbbc b To erase the previous character, press the softkey associated with Backspace. bbbbbb bbbbbb Prev or cbNext To move the cursor to the left or right, press cbbbbbbc bbbbbc .
bbbbb Getting Started b bbbbbbbbbbbbbbbbbbbbbbbbbbbbbbbbbbbbbbbbbbb bbbbbbbbbbbbbbb Ending a Data Call from your 8500 Series Display Terminal bbbbb 1. If you have an 8510 or 8528 display terminal, press cbMenu bbbbc to access the bbbbbb main softkey menu screen and then press cbNext bbbbbc to access the second menu screen. bbbbb If you have an 8520 display terminal, press cbMenu bbbbc to access the main softkey menu screen. 2. Press the softkey associated with Data.
bbbbb Getting Started b bbbbbbbbbbbbbbbbbbbbbbbbbbbbbbbbbbbbbbbbbbb bbbbbbbbbbbbbbb Checking the Status of a Data Call bbbbb 1. If you have an 8510 or 8528 display terminal, press cbMenu bbbbc to access the bbbbbb main softkey menu screen and then press cbNext bbbbbc to access the second menu screen. bbbbb If you have an 8520 display terminal, press cbMenu bbbbc to access the main softkey menu. 2. Press the softkey associated with Data.
bbbbb Getting Started b bbbbbbbbbbbbbbbbbbbbbbbbbbbbbbbbbbbbbbbbbbb 1. Turn on your data terminal or PC. If you are using a PC, make sure your communications software is configured properly at the speed and parity you want to use. The CMD: prompt should appear on your data terminal or PC screen. NOTE: If the CMD: prompt does not appear on your data terminal or PC, the speed and parity options in your ADM may not be matched to your data terminal or PC.
bbbbb Getting Started b bbbbbbbbbbbbbbbbbbbbbbbbbbbbbbbbbbbbbbbbbbb Once you see the CONNECT message, you should ignore the message, Type E to end call. You are now ready to communicate with the far end. Enter data to be transmitted. 5. To end a data call, rapidly type the Attention sequence: +++ (see the description of the Attention option in Chapter 4, ‘‘Data Options and Profiles’’). The CMD: prompt is displayed. Type e or end to end the call.
bbbbb Getting Started b bbbbbbbbbbbbbbbbbbbbbbbbbbbbbbbbbbbbbbbbbbb bbbbbbbbbbbbbbb Making a Data Call From a Data Terminal or PC Using AT Local Mode Commands The Local Mode data option must be set for AT Local Mode. See the section ‘‘Setting Critical Options to Make a Data Call’’ earlier in this chapter. 1. Turn on your data terminal or PC. (If you are using a PC, make sure your communications software is configured properly at the speed and parity you want to use.) 2. Type atd and the telephone number.
bbbbb Getting Started b bbbbbbbbbbbbbbbbbbbbbbbbbbbbbbbbbbbbbbbbbbb b bbbbbb Messages on the 8500 Series Display Terminal, the Attached Data Terminal, or the PC This section describes various messages that may appear on your 8500 series display terminal, your attached data terminal, or your PC. CONTINUE may appear when dialing a call or a particular feature access code. At this point, additional digits may be required to complete the call. For further information, call your system administrator.
bbbbb b bbbbbbbbbbbbbbbbbbbbbbbbbbbbbbbbbbbbbbbbbbb Using the CMD and AT Commands 3 bbbbbbbbbbbbbbbbbbbbbbbbbbbbbbbbbbbb b bbbbbb When to Type Commands You can only type commands using the data terminal keyboard to dial calls, program, and maintain your system when your ADM is in Local Mode. When your ADM is in CMD Local Mode or AT Local Mode, you are not transmitting data; your ADM is interpreting and acting upon the instructions you type.
bbbbb Using the CMD and AT Commands b bbbbbbbbbbbbbbbbbbbbbbbbbbbbbbbbbbbbbbbbbbb bbbbbbbbbbbbbbbbbbbbb Table 3-1.
bbbbb Using the CMD and AT Commands b bbbbbbbbbbbbbbbbbbbbbbbbbbbbbbbbbbbbbbbbbbb CMD: help Type HELP and the topic you want to learn more about. Examples: help test, h attention COMMANDS: continue program copy redial dial set end test OPTIONS: answer dcd forwarding min.timer v120.ps attention dtr idle.timer mode v120.ws autoadjust echo line.erase rec.flow break edit local.echo text EIA INTERFACE: speed parity UNSTORED OPTIONS local.cr local.erase X.
bbbbb Using the CMD and AT Commands b bbbbbbbbbbbbbbbbbbbbbbbbbbbbbbbbbbbbbbbbbbb You can get additional help in any of the following ways: 1. Type help option to display the possible values for the option: CMD: help dtr the ADM responds: current value = ignore possible values = follow ignore 2. Type help followed by a partial command to list all commands or options that begin with the letters typed: CMD: help re and press RETURN . The ADM responds: redial rec.flow ? 3.
bbbbb Using the CMD and AT Commands b bbbbbbbbbbbbbbbbbbbbbbbbbbbbbbbbbbbbbbbbbbb bbbbbbbbbbbbbbb Suspending and Continuing Data Transmission Once a data call has been established, you can suspend transmission and return to local mode so you can ‘‘talk’’ directly to the ADM. The procedure below explains how to do this. Rapidly type the attention sequence: +++. (If you pause between keystrokes, the ADM will send the + characters as end-to-end data.) CMD: appears on your screen.
bbbbb Using the CMD and AT Commands b bbbbbbbbbbbbbbbbbbbbbbbbbbbbbbbbbbbbbbbbbbb bbbbbbbbbbbbbbb Changing from CMD Local Mode to AT Local Mode To change from CMD local mode to AT local mode, at the CMD: prompt, type: &&h and press RETURN . The ADM responds: AT COMMAND MODE bbbbbbbbbbbbbbb X.25 Call Options If you are using the DX.25 Data Mode, you may need to specify call options when you dial a data call. The call options that can be used for DX.25 data calls are listed below.
bbbbb Using the CMD and AT Commands b bbbbbbbbbbbbbbbbbbbbbbbbbbbbbbbbbbbbbbbbbbb bbbbbbbbbbbbbbb Programming Telephone Numbers for Memory Dialing You can program up to nine telephone numbers for memory dialing of data calls and assign them customized names for easy access. Up to 30 digits can be entered. These numbers are labeled m1 through m9. Options associated with a memory dialing number include the telephone number, user selectable name, data profile, and X.
bbbbb Using the CMD and AT Commands b bbbbbbbbbbbbbbbbbbbbbbbbbbbbbbbbbbbbbbbbbbb 3. Type the value for that option (for example, 5552222). The ADM responds by displaying a table of all values for this memory location and prompts again: Type option name (or Q to quit): 4. Type in the next option name for which you want to assign a value and repeat Step 3.
bbbbb Using the CMD and AT Commands b bbbbbbbbbbbbbbbbbbbbbbbbbbbbbbbbbbbbbbbbbbb bbbbbbbbbbbbbbb Memory Dialing The ADM dials the number and loads any data profile stored with the telephone number. For example, use the following command to dial a number stored at memory location 1: At the CMD: prompt, type: dial m1 or dial name or just simply name where name is the actual name you have assigned to the memory number.
bbbbb b bbbbbbbbbbbbbbbbbbbbbbbbbbbbbbbbbbbbbbbbbbb Data Options and Profiles 4 bbbbbbbbbbbbbbbbbbbbbbbbbbbbbbbbbbbb The 8500 series ADM stores data options (configuration information) to tell it how to communicate with the far end. The options, listed in Table 4-1 are explained in this chapter. For most applications, you will find that the CMD Local Mode factory default settings (those settings are in bold print in the table) will work for you.
bbbbb Data Options and Profiles b bbbbbbbbbbbbbbbbbbbbbbbbbbbbbbbbbbbbbbbbbbb bbbbbbbbbbbbbbbbbbbbb Table 4-1.
bbbbb Data Options and Profiles b bbbbbbbbbbbbbbbbbbbbbbbbbbbbbbbbbbbbbbbbbbb b bbbbbb Data Option Definitions The following descriptions assume single-stream operation which is the case when API is not being used. Refer to the ISDN Application Programming Interface Programmer’s Reference Manual for more information on Single-Stream and AutoStream. Note that the examples used in this section assume the use of CMD mode.
bbbbb Data Options and Profiles b bbbbbbbbbbbbbbbbbbbbbbbbbbbbbbbbbbbbbbbbbbb Interactions with DTR: If the DTR option is set to follow and Answer is set to auto, then the ADM checks to make sure the DTR lead is on (usually indicating that your terminal is turned on) before automatically answering the call. If you have set the DTR option to ignore and Answer to auto, the ADM answers data calls whether or not the DTR lead is turned on.
bbbbb Data Options and Profiles b bbbbbbbbbbbbbbbbbbbbbbbbbbbbbbbbbbbbbbbbbbb If Autoadjust is off, you must set speed and parity with the set command. bbbbbbbbbbbbbbb Break Option Values: off, attention, interrupt, break, discard, reset Applicable Data Protocols: See below This option determines what the ADM does when you press attached data terminal during data transfer. BREAK on your For X.25 and Mode 3 data protocols: If you select off, the ADM does not respond to BREAK .
bbbbb Data Options and Profiles b bbbbbbbbbbbbbbbbbbbbbbbbbbbbbbbbbbbbbbbbbbb when a data call is not present. You may also select follow if your application will not enter data mode unless it sees the DCD go from off to on. See the instruction manual for your data terminal or PC application package to determine which setting is appropriate.
bbbbb Data Options and Profiles b bbbbbbbbbbbbbbbbbbbbbbbbbbbbbbbbbbbbbbbbbbb bbbbbbbbbbbbbbb Edit Option Values: on, off Applicable Data Protocols: X.25, Mode 3, BV64I, and BV56I This option is used with the Forwarding option and allows you to correct characters and lines of text before transmitting data packets to the far end. If you type more than a full packet of data, then a packet is sent out automatically. Select on if you want to be able to edit packets before you send them; select off otherwise.
bbbbb Data Options and Profiles b bbbbbbbbbbbbbbbbbbbbbbbbbbbbbbbbbbbbbbbbbbb An FCPN selection of on is used to request a window size of three and a maximum packet size of 256 in the X.25 Flow Control Parameter negotiation facility. Check with your system administrator to find out if on is a selection that is available to you. If this option is changed during an active data call, it does not take effect until the next data call.
bbbbb Data Options and Profiles b bbbbbbbbbbbbbbbbbbbbbbbbbbbbbbbbbbbbbbbbbbb bbbbbbbbbbbbbbb Idle.timer Option Values: 0.0 (off), .05 - 12.75 (seconds) Applicable Data Protocols: X.25, Mode 3, BV64I, and BV56I When the Data Mode is set to X.25, Mode 3, BV56I or BV64I, the ADM sends data through the network in packets. If the time between characters exceeds the idle.timer, less than the full packet will be sent out. Interaction with Min.timer: An Idle.timer value greater than .
bbbbb Data Options and Profiles b bbbbbbbbbbbbbbbbbbbbbbbbbbbbbbbbbbbbbbbbbbb bbbbbbbbbbbbbbb Local.erase Option Values: Any ASCII character except NUL, SOH, Ctrl - U , Ctrl - S , (default = BS) Ctrl - X , Applicable Data Protocols: N/A This option selects the character used to backspace (erase) a Local Mode command character. Some PC communications packages access this option from the AT Local Mode. Individual users should not change this option value. Unlike most data options, Local.
bbbbb Data Options and Profiles b bbbbbbbbbbbbbbbbbbbbbbbbbbbbbbbbbbbbbbbbbbb ADM and the remote endpoint) are trying to control the higher speed endpoint simultaneously. If the conditions in the above paragraph cannot be met, then Mode 3 or V.120 are the recommended data protocols. When Match.speed is set to off, a Mode 2 call to another endpoint can only be established if the other endpoint is running at the same speed.
bbbbb Data Options and Profiles b bbbbbbbbbbbbbbbbbbbbbbbbbbbbbbbbbbbbbbbbbbb packet switched data service for Mode DX25 and ISDN B-channel circuit switched data service for the other Modes). B2 An abbreviation for B-channel Mode 2, configures the ADM for establishment of outgoing data calls using AT&T’s Mode 2 circuit switched data transmission protocol. B2 and BA are appropriate selections for circuit switched connections over 64 kbps facilities to endpoints supporting one or both of these protocols.
bbbbb Data Options and Profiles b bbbbbbbbbbbbbbbbbbbbbbbbbbbbbbbbbbbbbbbbbbb NOTE: Mode 2 and Mode 3 are defined in the AT&T Digital Multiplexed Interface (DMI) Technical Specification , 555-025-204. For a copy of this manual, call the GBCS Publications Fulfillment Center at 1 800 457-1235. DX25 An abbreviation for D-channel X.25, configures the ADM for establishment of outgoing data calls using X.25 packet switched data on the D-channel. DX25 mode uses the PAD data options. V.
bbbbb Data Options and Profiles b bbbbbbbbbbbbbbbbbbbbbbbbbbbbbbbbbbbbbbbbbbb NOTE: For further information about the new industry standard V.120 rate adaption protocol, you can obtain ANSI Standard T1.612 from Global Engineering Documents.
bbbbb Data Options and Profiles b bbbbbbbbbbbbbbbbbbbbbbbbbbbbbbbbbbbbbbbbbbb During a circuit switched data call, your ADM transports all eight bits of an asynchronous data character end-to-end as information, rather than checking or generating a parity bit. V.120 data calls are accepted by your ADM from endpoints provided the parity setting carried within the call setup information indicates a valid character size and parity combination: 8-bit none, 7-bit odd, 7-bit even, 7-bit mark, or 7-bit space. V.
bbbbb Data Options and Profiles b bbbbbbbbbbbbbbbbbbbbbbbbbbbbbbbbbbbbbbbbbbb bbbbbbbbbbbbbbb Rec.flow (Receive Flow Control) Option Values: xon/xoff, eia, off Applicable Data Protocols: X.25, Mode 3, and all V.120 modes* This option determines which method is used to control the flow of data from the ADM to your data terminal. When you select xon/xoff, your ADM expects the data terminal to send an xoff character (with proper parity) when it is not ready to receive data.
bbbbb Data Options and Profiles b bbbbbbbbbbbbbbbbbbbbbbbbbbbbbbbbbbbbbbbbbbb bbbbbbbbbbbbbbb Speed Option Values: 1200, 2400, 4800, 9600, 19.2, 38.4, 57.6 kbps Applicable Data Protocols: All Use this option to change the speed at which data communications take place. To set this option from an asynchronous attached terminal, do the following: 1. Type set speed value (for example, set speed 9600) to tell the ADM the speed at which you want to communicate. 2. Change your data terminal speed.
bbbbb Data Options and Profiles b bbbbbbbbbbbbbbbbbbbbbbbbbbbbbbbbbbbbbbbbbbb bbbbbbbbbbbbbbb Trans.flow (Transmit Flow Control) Option Values: xon/xoff, eia, off Applicable Data Protocols: X.25, Mode 3, all V.120 modes, and Mode 2* This option determines which method is used to control the flow of data from your data terminal to the ADM. When you select xon/xoff, the ADM sends your data terminal an xoff character (with current parity) when it is not ready to receive data.
bbbbb Data Options and Profiles b bbbbbbbbbbbbbbbbbbbbbbbbbbbbbbbbbbbbbbbbbbb When you select off, the ADM cannot control the flow of data from your data terminal. Once the ADM sends an xoff character, it will continue to accept up to 32 more characters of data from the data terminal. bbbbbbbbbbbbbbb V120.ps Option Values: 128, 256 Applicable Data Protocols: BV64I and BV56I The V.120 packet size option determines the maximum number of data characters transmitted in a V.120 I-frame.
bbbbb Data Options and Profiles b bbbbbbbbbbbbbbbbbbbbbbbbbbbbbbbbbbbbbbbbbbb b bbbbbb Data Option Profiles This section describes the available data option profiles and how to create and use your own profiles. bbbbbbbbbbbbbbb Types of Data Option Profiles A data option profile is a group of option settings. You create a profile by selecting values for each option. Option settings determine in precise and specific ways how your ADM operates.
bbbbb Data Options and Profiles b bbbbbbbbbbbbbbbbbbbbbbbbbbbbbbbbbbbbbbbbbbb pA updated To replace one stored profile with another, copy the replacement profile to the replaced profile; for example, type: copy p2 to p1 The above command copies the values of p2 into p1 so they are identical.
bbbbb Data Options and Profiles b bbbbbbbbbbbbbbbbbbbbbbbbbbbbbbbbbbbbbbbbbbb Table 4-2 summarizes the information that is described in detail in the following sections. bbbbbbbbbbbbbbbbbbbbb Table 4-2.
bbbbb Data Options and Profiles b bbbbbbbbbbbbbbbbbbbbbbbbbbbbbbbbbbbbbbbbbbb bbbbbbbbbbbbbbb Creating (Programming) a Data Option Profile It is possible for you to program profiles p1, p2, p3, and p4. Profile 1 (p1) is automatically loaded after a set self-test or power-up. The values of p1 should be set to your most frequently used settings. To change the option values of any of the stored profiles use the program command. The program command provides a series of prompts to help you with this task.
bbbbb Data Options and Profiles b bbbbbbbbbbbbbbbbbbbbbbbbbbbbbbbbbbbbbbbbbbb 4. The ADM displays the new values and prompt again: Type option name (or Q to quit): 5. Type the name of the next option you want to change and repeat steps 2 and 3. 6. When you are finished changing options, type q to quit. 7. The ADM prompts: Do you want to save the change(s) you must (Y or N)? Type y to save new values. The ADM responds: p1 updated Type n to cancel new values. The ADM responds: No changes to p1 8.
bbbbb Data Options and Profiles b bbbbbbbbbbbbbbbbbbbbbbbbbbbbbbbbbbbbbbbbbbb bbbbbbbbbbbbbbb Setting Options: Changing Your Active Profile, pA To change the option values in the active profile (pA), use the set command. The program command cannot be used to change options in pA. To change an option value in pA, at the CMD: prompt type: set option to value For example: set echo to on set text to diagnostic NOTE: Values in pA are not automatically stored.
bbbbb Data Options and Profiles b bbbbbbbbbbbbbbbbbbbbbbbbbbbbbbbbbbbbbbbbbbb bbbbbbbbbbbbbbb Storing an Active Profile, pA If you want to save the active profile as a stored profile, type: copy pA to p2 The above command stores your active profile in p2. The system responds: p2 updated If you want to store your active profile in p1, repeat the steps above but substitute p1 for p2. Remember, in pA you cannot program your options; the settings in pA, therefore, are not automatically stored.
bbbbb Data Options and Profiles b bbbbbbbbbbbbbbbbbbbbbbbbbbbbbbbbbbbbbbbbbbb NOTE: In all of the above command procedures, the word ‘‘to’’ is optional. Examples of the command without ‘‘to’’ are: copy p1 pA copy pA p1 copy p0 p1 bbbbbbbbbbbbbbb Viewing an Option Profile To display the option values for any profile, use the view command. Type view to display the values of the active profile. Type view p1 to display the values of stored profile p1.
bbbbb Data Options and Profiles b bbbbbbbbbbbbbbbbbbbbbbbbbbbbbbbbbbbbbbbbbbb b bbbbbb Typical Data Option Settings for Data Transfer This section describes the options you may need to modify for three common types of data transfer. bbbbbbbbbbbbbbb Character by Character Transmission or ASCII File Transfer For typical character by character data transmission, activate the factory profile (p0).
bbbbb Data Options and Profiles b bbbbbbbbbbbbbbbbbbbbbbbbbbbbbbbbbbbbbbbbbbb If it does, eia flow control will be required. Note, however, that not all computer interfaces support eia flow control. If your PC does not support eia flow control, you will have to set the flow control options to off and ensure that flow control is not required. That is, both endpoints must operate at the same speed and the speed cannot exceed the effective throughput capability of the data channel.
bbbbb Data Options and Profiles b bbbbbbbbbbbbbbbbbbbbbbbbbbbbbbbbbbbbbbbbbbb bbbbbbbbbbbbbbb Worksheet — Option Profile Settings Complete the following worksheet to record your desired option profile settings for p1, p2, p3, and p4. Information entered in this worksheet helps you when you are programming an option profile. bbbbbbbbbbbbbbbbbbbbb Table 4-3.
bbbbb Data Options and Profiles b bbbbbbbbbbbbbbbbbbbbbbbbbbbbbbbbbbbbbbbbbbb NOTE: We strongly recommend that after you complete the (Option Profile Settings) worksheet, you copy it and then post it where you can easily find it for reference. Factory default speed and parity are set at 9600 bps and space, respectively. Speed and parity settings span all profiles.
bbbbb b bbbbbbbbbbbbbbbbbbbbbbbbbbbbbbbbbbbbbbbbbbb Testing 5 bbbbbbbbbbbbbbbbbbbbbbbbbbbbbbbbbbbb b bbbbbb You can perform three tests on your 8500 series display set ADM: local loopback test, remote loopback test, and self-test. Taken together, these three tests help you isolate data communications problems.
bbbbb Testing b bbbbbbbbbbbbbbbbbbbbbbbbbbbbbbbbbbbbbbbbbbb To initiate a local loopback test, do the following: 1. At the CMD: prompt, type test local on your data terminal. The ADM displays: LOCAL LOOPBACK TEST ENTER ATTENTION SEQUENCE TO END TEST 2. Type characters on your terminal keyboard. They will be echoed on your screen. If you find no errors, the ADM passed the test. If you find errors, refer to Chapter 6, ‘‘Troubleshooting.’’ 3.
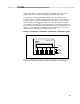
bbbbb Testing b bbbbbbbbbbbbbbbbbbbbbbbbbbbbbbbbbbbbbbbbbbb b bbbbbb Remote Loopback Test This test requires compatible AT&T equipment at the remote end. The remote loopback test ensures that no problems with data transmission are occurring in the data transfer circuit. When you initiate a remote loopback test, data is transmitted from the module at the far-end, where it is looped back to your ADM. A data call must be established before you initiate a remote loopback test.
bbbbb Testing b bbbbbbbbbbbbbbbbbbbbbbbbbbbbbbbbbbbbbbbbbbb bbbbbbbbbbbbbbbbbbbbbbbb Local DTE ADM Characters Sent Transmitter Characters Received Receiver Remote Data Endpoint S w i t c h Transmitter Remote DTE Receiver bbbbbbbbbbbbbbbbbbbbbbbbbbbbbbbbbbbb b bbbbbb Figure 5-2. Remote Loopback Test Self-Test The self-test can be used to reset the data options in the Active profile.
bbbbb b bbbbbbbbbbbbbbbbbbbbbbbbbbbbbbbbbbbbbbbbbbb Troubleshooting 6 bbbbbbbbbbbbbbbbbbbbbbbbbbbbbbbbbbbb b bbbbbb Using Reset to Clear a Locked-up ADM The following is a list of circumstances which can result in a lock-up condition between the ADM and your data terminal or PC. Note, there may be other similar conditions which will cause a lock-up as well.
bbbbb Troubleshooting b bbbbbbbbbbbbbbbbbbbbbbbbbbbbbbbbbbbbbbbbbbb If the autoadjust option is off and your data terminal or PC is running at a different speed than the ADM, you will not be able to communicate. If you inadvertently set the local.cr option to the space character, you will not be able to set it back. The Data Reset command allows you to reset all the data options in the active profile to their factory default (p0) values.
bbbbb Troubleshooting b bbbbbbbbbbbbbbbbbbbbbbbbbbbbbbbbbbbbbbbbbbb 2. Press the softkey associated with Data. The following is displayed on the 8510 and 8528 display terminal screen: b bbbbbbbbbbbbbbbbbb (Not Active) c c DATA DataOptions Call Done c bbbbbbbbbbbbbbbbbb b c The following is displayed on the 8520 display terminal screen: b bbbbbbbbbbbbbbbbbb b bbbbb (Not Active) c c cbDATA bbbbbc c c c c Data Options Call Done c bbbbbbbbbbbbbbbbbbc b 3.
bbbbb Troubleshooting b bbbbbbbbbbbbbbbbbbbbbbbbbbbbbbbbbbbbbbbbbbb bbbbbb 4. If you have an 8510 or 8528 display terminal, press cbNext bbbbbc to access the second DATA OPTIONS screen. The following is displayed on the 8510 and 8528 display terminal screen: b bbbbbbbbbbbbbbbbbb DATA OPTIONS c < c Reset Indicator Done c bbbbbbbbbbbbbbbbbbc b 5. Press the softkey associated with Reset.
bbbbb Troubleshooting b bbbbbbbbbbbbbbbbbbbbbbbbbbbbbbbbbbbbbbbbbbb b bbbbbb Self-Test Although it is not recommended, self-test can also be used to reset the data options in the Active profile. Unlike Data Reset, which resets the options to their factory default values, the self-test resets all the data options in the Active profile to their power-up (p1) values and loads the power-up values for the profile independent data options (speed, parity, and local mode) and the unstored data options (local.
bbbbb b bbbbbbbbbbbbbbbbbbbbbbbbbbbbbbbbbbbbbbbbbbb Technical Information 7 bbbbbbbbbbbbbbbbbbbbbbbbbbbbbbbbbbbb b bbbbbb EIA-232-D Lead Operation The following description assumes single-stream operation, which is the case when API is not being used. Refer to the ISDN Application Programming Interface Programmer’s Reference Manual for more information on single-stream and autostream. This section describes the assignments of the EIA-232-D leads.
bbbbb Technical Information b bbbbbbbbbbbbbbbbbbbbbbbbbbbbbbbbbbbbbbbbbbb bbbbbbbbbbbbbbbbbbbbbbbb Table 7-1.
bbbbb Technical Information b bbbbbbbbbbbbbbbbbbbbbbbbbbbbbbbbbbbbbbbbbbb terminal is ready to receive data, OFF - indicates the data terminal is not ready to receive data. If the Rec.Flow option has been set to xon/xoff, the Request-to-Send signal is ignored. Pin 5 — Clear-to-Send (CB) For data modes other than Mode 2, the Clear-to-Send circuit is controlled by the ADM to indicate when data can be received from the data terminal. If the trans.
bbbbb Technical Information b bbbbbbbbbbbbbbbbbbbbbbbbbbbbbbbbbbbbbbbbbbb Pin 22 — Ring Indicator (CE) A pulsed signal appears on this circuit when the data terminal receives an incoming data call. This signal is maintained until the data terminal answers or clears the call, or until the network clears the call attempt. The cadence is designed to simulate ringing: two seconds on and four seconds off. The initial pulse remains on for a minimum of one second.
bbbbb Technical Information b bbbbbbbbbbbbbbbbbbbbbbbbbbbbbbbbbbbbbbbbbbb b bbbbbb Packet Assembler Disassembler (PAD) Capabilities The ADM options provide capabilities outlined in the CCITT X.3, X.28, and X.29 specifications. The local mode commands provide the functions analogous to those specified in X.28. The ADM supports receipt of X.29 SET and READ parameter messages received from a remote X.25 host. Receipt of an X.
bbbbb Technical Information b bbbbbbbbbbbbbbbbbbbbbbbbbbbbbbbbbbbbbbbbbbb bbbbbbbbbbbbbbbbbbbbb Table 7-2. X.
bbbbb Technical Information b bbbbbbbbbbbbbbbbbbbbbbbbbbbbbbbbbbbbbbbbbbb bbbbbbbbbbbbbbbbbbbbb Table 7-2. X.
bbbbb b bbbbbbbbbbbbbbbbbbbbbbbbbbbbbbbbbbbbbbbbbbb Appendix A — Cause Code Tables A bbbbbbbbbbbbbbbbbbbbbbbbbbbbbbbbbbbb The Text option allows you to select numeric (diagnostic) or verbal formats for the ADMs presentation of network generated call progress and error code information. These tables are used to translate between numeric codes and their English text equivalents. In the following tables, there are references to unknown numeric cause and diagnostic codes in the form of xxx and nnn.
bbbbb Appendix A — Cause Code Tables b bbbbbbbbbbbbbbbbbbbbbbbbbbbbbbbbbbbbbbbbbbb bbbbbbbbbbbbbbbbbbbbbbbb Table A-1. X.25 Cause Messages bbbbbbbbbbbbbbbbbbbbbbbbbbbbbbbbbbbbbbbbbbbbbbbbbbbbbbbbbbbbbbbbbbbbbbbbbbbbbbbbb Packet Type Stimulus c c c c c c Clear Reset Restart c 40 Character LCD & EIA Port c 24 Character LCD c c Decimal Decimal Decimal Verbal Text c c c Abbreviated Text c c c Cause,Diag. Cause,Diag. Cause,Diag.
bbbbb Appendix A — Cause Code Tables b bbbbbbbbbbbbbbbbbbbbbbbbbbbbbbbbbbbbbbbbbbb bbbbbbbbbbbbbbbbbbbbb Table A-2. Q.
bbbbb Appendix A — Cause Code Tables b bbbbbbbbbbbbbbbbbbbbbbbbbbbbbbbbbbbbbbbbbbb bbbbbbbbbbbbbbbbbbbbb Table A-3. Q.
bbbb b bbbbbbbbbbbbbbbbbbbbbbbbbbbbbbbbbbbbbbbbbbb b Index bbbbbbbbbbbbbbbbbbb A Abbreviating CMD commands, 3-3 Activating a stored profile, 4-28 Active profile pA, 4-22, 4-29 storing, 4-28 ADM 25-pin asynchronous EIA-232, 1-2 Telephone Multimedia Interface, 1-2 ADM Options CCITT, 7-5 Answer data call data option, 4-3 Application automated data lookup, 1-7 automated personal phone book, 1-7 automatic conference, 1-7 automatic redial, 1-7 call screening, 1-7 variable call forwarding, 1-7 Asynchronous, 1-
bbbb Index b bbbbbbbbbbbbbbbbbbbbbbbbbbbbbbbbbbbbbbbbbbb b Automatic conference application, 1-7 redial application, 1-7 Autostream, 4-3, 7-1 bbbbbbbbbbbbbbbbbbb B B-channel, 4-14, A-1 Adaptive, 4-14 B2, 4-14 BA, 4-14 BV56I, 2-3, 4-15 BV56U, 2-3, 4-15 BV64I, 2-3, 4-15 BV64U, 2-3, 4-15 Mode 2, 2-3, 4-14 Mode 3/2, 2-3 V.120 protocol, 2-3 Binary (8-bit) file transfer, 4-30 Break data option, 4-5 BV56I, 4-15 BV56U, 4-15 BV64I, 4-15 BV64U, 4-15 b bbbbbbbbbbbbbbbbbbb C Call options X.
bbbb Index b bbbbbbbbbbbbbbbbbbbbbbbbbbbbbbbbbbbbbbbbbbb data carrier detect, 4-6 data terminal ready, 4-6 echo, 4-7 edit, 4-8 FCPN, 4-8 flow control parameter negotiation, 4-8 forwarding, 4-9 idle.timer, 4-10 line.erase, 4-10 local.cr, 4-11 local.echo, 4-11 local.erase, 4-11 local.lf, 4-12 match.speed, 4-12 minimum delay timer, 4-13 min.timer, 4-13 mode, 4-13 parity, 4-16 receive flow control, 4-18 speed, 4-19 text, 4-19 transmit flow control, 4-20 V120.
bbbb b Index b bbbbbbbbbbbbbbbbbbbbbbbbbbbbbbbbbbbbbbbbbbb bbbbbbbbbbbbbbbbbbb E Echo data option, 4-7 Edit data option, 4-8 EIA-232 interface, 1-8 EIA-232-D assignments, 7-2 lead operation, 7-1 Ending a data call ISDN set, 2-25 Enhanced AT commands, 6-1 b bbbbbbbbbbbbbbbbbbb F b Factory profile p0, 4-22 Flow control option, 6-1 Flow Control Parameter Negotiation (FCPN) data option, 4-8 Forwarding data option, 4-9 bbbbbbbbbbbbbbbbbbb H b Hearing and visually impaired users, 1-9 Hotline dialing, 3-
bbbb Index b bbbbbbbbbbbbbbbbbbbbbbbbbbbbbbbbbbbbbbbbbbb CONTINUE, 2-30 data terminal, 2-30 DENIED DTR IS OFF, 2-30 DIAL, 2-30 INCOMING DATA CALL, 2-30 LINK DOWN, 2-30 PC, 2-30 Minimum delay timer, 4-13 Min.
bbbb Index b bbbbbbbbbbbbbbbbbbbbbbbbbbbbbbbbbbbbbbbbbbb Pin 8 received line signal detect (CF), 7-3 Profile active profile, 4-22 factory profile, 4-22 stored profile, 4-23 Programming Data option profile, 4-25 Telephone numbers, 3-7 b bbbbbbbbbbbbbbbbbbb R Receive flow control data option, 4-18 Received data (BB), 7-2 Received line signal detect (CF), 7-3 Rec.
bbbb b b Index b bbbbbbbbbbbbbbbbbbbbbbbbbbbbbbbbbbbbbbbbbbb bbbbbbbbbbbbbbbbbbb T Testing local loopback test, 5-1 remote loopback test, 5-3 self-test, 5-4 Text data option, 4-19 Trans.flow data option, 4-20 Transmit Flow Control data option, 4-20 Transmitted data (BA), 7-2 b Voice Terminal Control Features, 1-7 bbbbbbbbbbbbbbbbbbb X X.25 call options, 3-6 packet switched data, 1-8 permanent virtual circuit, 1-8 virtual calls, 1-8 X.25 packet switched, 1-6 bbbbbbbbbbbbbbbbbbb V V.