
User Manual
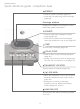
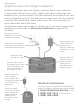
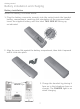

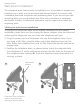
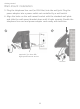
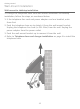
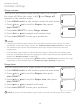
Table Of Contents
- Getting started
- Technical specifications
- Limited warranty
- California Energy Commission battery charging testing instructions
- FCC Part 68 and ACTA
- FCC Part 68 and ACTA
- Especially about telephone answering systems
- ECO mode
- Pacemaker patients
- Precautions for users of implanted cardiac pacemakers
- Important safety information
- Maintenance
- Troubleshooting
- Handset display screen messages
- Screen icons, indicator lights and alert tones
- Deregistering handsets
- Remote access
- Message window displays
- Recording and playing memos
- Message playback
- Answering system overview
- Recording time
- Message alert tone
- Remote access code
- Number of rings
- Call screening
- Answer on/off
- Answering system settings
- Reasons for missing caller ID information
- Caller ID operation
- About caller ID
- Speed dial
- Dial, delete and edit a directory entry
- Search by name
- Review the directory
- Create directory entries
- Directory overview
- Call transfer using intercom
- Intercom
- Web address
- Handset locator
- Options while on calls
- Redial
- Making, answering and ending calls
- Telephone base ringer volume
- Handset settings
- Menu overview
- Wall-mount installation
- Battery charging
- Battery installation and charging
- Telephone base and charger installation
- Quick reference guide - handset
- Caller ID log
- Index

Getting started
10
Wall-mount installation
The telephone base comes ready for tabletop use. If you want to mount your
telephone on a wall, use the provided wall-mount bracket to connect with
a standard dual-stud telephone wall-mounting plate. If you do not have this
mounting plate, you can purchase one from many hardware or consumer
electronics retailers. Professional assistance may be required to install the
mounting plate.
Tabletop to wall-mount installation
To change the telephone base from tabletop installation to wall-mount
installation, make sure you first unplug the power adapter from the electrical
outlet and the telephone line cord from the telephone wall jack.
Plug the power cord and telephone line into the telephone base. If you
are using a DSL filter, plug the other end of the telephone line into the
filter. Route the telephone line cord (or DSL filter) through the wall-mount
bracket hole.
Position the telephone base, as shown below. Insert the extended tabs
(see illustration 2) of the wall-mount bracket into the slots on the back of
the telephone base (marked B). Push the telephone base down until it is
securely in place.
1.
2.
A DSL filter (not included) is
required if you have DSL
high-speed Internet service.
Wall-mount
bracket
1
2