User’s manual EL52200/EL52210/EL52250/ EL52260/EL52300/EL52350/ EL52400/EL52410/EL52450/ EL52500/EL52510 DECT 6.
Congratulations on purchasing your new AT&T product. Before using this AT&T product, please read Important safety information on pages 67-68 of this user’s manual. Please thoroughly read the user’s manual for all the feature operations and troubleshooting information you need to install and operate your new AT&T product. You can also visit our website at www.telephones.att.com or call 1 (800) 222-3111. In Canada, dial 1 (866) 288-4268.
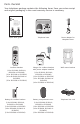
Parts checklist Your telephone package contains the following items. Save your sales receipt and original packaging in the event warranty service is necessary. Quick start guide EL52200/EL52210/EL52250/ EL52260/EL52300/EL52350/ EL52400/EL52410/EL52450/ EL52500/EL52510 DECT 6.
User’s manual EL52200/EL52210/EL52250/ EL52260/EL52300/EL52350/ EL52400/EL52410/EL52450/ EL52500/EL52510 DECT 6.0 cordless telephone/ answering system with caller ID/call waiting Table of contents Getting started Speakerphone..........................................................17 Quick reference guide...................................................2 Ending a call.............................................................17 Telephone base and charger installation.............4 Redial..........
To add a predialed telephone number to the directory.............................................................28 Answering system overview....................................44 Reviewing the directory.............................................29 Message capacity...................................................44 To review directory entries................................29 Call screening..........................................................44 To search by name...............................
See pages 5 and 6 for easy instructions. You must install and charge the battery before using the cordless handset. Install the telephone base close to a telephone wall jack and an electrical outlet not controlled by a wall switch. The telephone base can be placed on a flat surface or vertically mounted on the wall (page 7). For optimum range and better reception, place the telephone base in a central and open location.
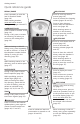
Getting started Quick reference guide REDIAL/PAUSE DIR/VOLUME Press repeatedly to view the last 20 numbers dialed (page 18). Press to scroll up while in menus (page 10). Press to increase the listening volume (pages 20 and 47). While entering numbers, press and hold to insert a dialing pause (pages 16 and 27). Press to show directory entries when the handset is not in use (page 29). PHONE/FLASH While entering names or numbers in the directory, press to move the cursor to the right (page 27).
Getting started Quick reference guide The > symbol indicates the feature to select. Main menu Using menus PLAY MESSAGES (page 46) Press MENU/SELECT to enter the main menu. ANSWERING SYS (page 39) DIRECTORY (page 27) Press DIR or CID to scroll through menu items. CALL LOG (page 36) >PLAY MESSAGES ANSWERING SYS Press MENU/SELECT to select or modify an item. RINGERS (page 11) SETTINGS (pages 11-14) Press OFF/CLEAR to cancel an operation, back up to the previous menu, or exit the menu display.
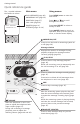
Getting started Telephone base and charger installation Install the telephone base and charger as shown below. If you subscribe to high-speed Internet service (DSL - digital subscriber line) through your telephone line, you must install a DSL filter between the telephone line cord and the telephone wall jack. The filter prevents noise and caller ID problems caused by DSL interference. Please contact your DSL service provider for more information about DSL filters.
Getting started Battery installation and charging Battery installation Install the battery as shown below. 1. Plug the battery connector securely into the socket inside the handset battery compartment, matching the color-coded label. 2. Insert the supplied battery with the label THIS SIDE UP facing up as indicated. 3. Align the cover flat against the battery compartment, then slide it upwards until it clicks into place. CHARGE light 4.
Getting started Battery installation and charging Battery charging Once you have installed the battery, the screen indicates the battery status (see the table below). If necessary, place the handset in the telephone base or charger to charge the battery. For best performance, keep the handset in the telephone base or charger when not in use. See Technical specifications on page 73 for battery charging and operating times.
Getting started Wall mount installation The telephone base comes ready for tabletop use. If you want to mount your telephone on a wall, use the provided wall mount bracket to connect with a standard dual-stud telephone wall mounting plate. If you do not have this mounting plate, you can purchase one from many hardware or consumer electronics retailers. Professional assistance may be required to install the mounting plate.
Getting started Wall mount installation 4. Plug the other end of the telephone line cord into the telephone wall jack. Plug the large end of the larger power adapter into an electrical outlet not controlled by a wall switch. DSL filter (not included) is required if you have DSL highspeed Internet service. 5. Align the holes on the wall mount bracket with the mounting studs of the wall mounting plate and slide the bracket down until it locks securely.
Getting started Wall mount installation Wall mount to tabletop installation To change the telephone base from the wall mount installation to tabletop installation, follow the steps below. 1. Unplug the large end of the larger power adapter from the electrical outlet. 2. If the telephone line cord and power adapter cord are bundled, untie them first. Slide the wall mount bracket up and remove it from the wall mounting plate. Unplug the end of the telephone line cord from the telephone wall jack. 3.
Telephone settings Menu overview Use the menu to change the telephone settings. 1. Press MENU/SELECT in idle mode (when the handset is not in use) to enter the main menu. 2. Press DIR or CID to scroll until the > is next to the feature you want to select. 3. Press MENU/SELECT to select or save the indicated item. -ORPress OFF/CLEAR to cancel an operation, back up to the previous menu or exit the menu display. -ORPress and hold OFF/CLEAR to cancel an operation and return to idle mode.
Telephone settings Handset settings Ringer volume You can set the handset ringer volume level (1-6), or turn the ringer off. When the ringer is off, appears on the handset screen. 1. Press MENU/SELECT in idle mode to enter the main menu. 2. Press DIR or CID to scroll to >RINGERS. Press MENU/SELECT. 3. Press MENU/SELECT to select >RINGER VOLUME. 4. Press DIR or CID to sample each volume level. 5. Press MENU/SELECT to save your preference.
Telephone settings Handset settings Voicemail waiting (visual message waiting) indicator If you subscribe to a voicemail service offered by your telephone service provider, this feature provides a visual indication when you have new voicemail messages. NEW VOICEMAIL and appear on the handset screen. HANDSET 1 NEW VOICEMAIL 10:30PM 11/20 NOTES: • Your telephone service provider might alert you to new voicemail messages with a stutter (broken) dial tone.
Telephone settings Handset settings Key tone The handset is programmed to beep with each key press. You can turn KEY TONE off, so there are no beeps when you press keys. 1. Press MENU/SELECT in idle mode to enter the main menu. 2. Press DIR or CID to scroll to >SETTINGS, then press MENU/SELECT. 3. Press DIR or CID to scroll to >KEY TONE, then press MENU/SELECT. 4. Press DIR or CID to select ON or OFF. 5. Press MENU/SELECT to save your preference.
Telephone settings Handset settings Home area code If you dial seven digits to make a local call (no area code required), enter your area code into the telephone as the home area code. When you receive a call from within your home area code, the caller ID history only displays the seven digits of the telephone number. This feature makes it easy for you to place a call from the caller ID history. If you dial 10 digits to make a local telephone call, do not use this home area code feature.
Telephone settings Telephone base ringer volume When the telephone is not in use, press VOLUME on the telephone base to set the ringer volume level (1-5), or turn the ringer off. A sample of the ringer sounds as you adjust the volume. The telephone base announces, “Base ringer is off” when you set the volume to 0. NOTE: If a handset is on an outside call, the telephone base volume cannot be changed.
Telephone operation Making, answering and ending a call Making a call To make a call: 1. Press PHONE/FLASH, then wait for the dial tone. -ORPress SPEAKER to use the speakerphone, then wait for the dial tone. 2. Use the dial pad keys to enter the telephone number. PHONE 0:01:30 888-722-7702 10:30PM 11/20 The screen displays the elapsed time as you talk (in hours, minutes and seconds). On-hook dialing (predialing): 1. Use the dial pad keys to enter the telephone number (up to 30 digits).
Telephone operation Making, answering and ending a call Answering a call • Press any dial pad key (known as Any Key Answer) or PHONE/FLASH. -OR• Press SPEAKER to use the speakerphone. Speakerphone During a call, press SPEAKER to switch between speakerphone and normal handset use. Press SPEAKER 0:01:30 888-722-7702 OFF/CLEAR to hang up. 10:30PM 11/20 NOTE: After installing the battery in the handset, the screen may show LOW BATTERY.
Telephone operation Redial Each handset stores the 20 most recently called numbers in the redial list. To review numbers in the redial list 1. Press REDIAL/PAUSE in idle mode. 2. Press DIR or CID, or press REDIAL/PAUSE repeatedly to scroll through the 20 recently called numbers (up to 30 digits each). The handset beeps twice at the beginning or end of the list. 3. Press OFF/CLEAR to exit the redial list. NOTE: If you access an empty redial list, the handset sounds an error tone.
Telephone operation Redial To delete a number from the redial list • While reviewing a number in the redial list, press MUTE/DELETE to delete the displayed number from the redial list.
Telephone operation Options while on calls Volume control While on a call, press DIR/VOLUME to increase or press CID/VOLUME to decrease the listening volume. When the volume reaches the minimum or maximum setting, you hear two beeps. NOTE: The handset earpiece volume setting (1-5) and speakerphone volume setting (1-6) are independent. Mute Use the mute function to turn off the microphone while on a call. You can hear the caller, but the caller does not hear you. To mute the call: • Press MUTE/DELETE.
Telephone operation Options while on calls Temporary tone dialing If you have dial-pulse (rotary) dialing service only, you can temporarily switch from dial-pulse to touch-tone dialing during a call. 1. During a call, press TONE . Buttons pressed after this send touch-tone signals. 2. Use the dial pad keys to enter the number. 3. The telephone automatically returns to pulse dial mode after you end the call.
Telephone operation Options while on calls • To access the redial list while on a call: 1. Press REDIAL/PAUSE. The screen shows the number most recently called. If it is not the desired number, press DIR or CID to scroll to the desired number. 2. Press MENU/SELECT. The handset dials the displayed number. REDIAL 888-722-7702 NOTES: • While on a call, you cannot edit a directory entry or copy a caller ID entry into the directory.
Telephone operation Handset locator You can use the handset locator feature to find misplaced handsets. To start the paging tone: • Press HANDSET LOCATOR on the telephone base to start the paging tone on all handsets for 60 seconds. To stop the paging tone: • Press PHONE/FLASH, SPEAKER, or any dial pad key (0-9, , or #) on the handset(s). -OR• Press HANDSET LOCATOR on the telephone base. -OR• Put the handset in the telephone base or charger.
Telephone operation Intercom To make and answer an intercom call Use the intercom feature for conversations between handsets. 1. Press INT on your handset when not in use. • If you have two handsets, your handset screen shows CALLING HANDSET X. • If you have more than two handsets, your screen shows INTERCOM TO: Use the dial pad keys to select the other handset. Your handset screen shows CALLING HANDSET X. • The other handset rings and its screen shows HANDSET X IS CALLING. 2.
Telephone operation Call transfer using intercom Use the intercom feature to transfer an outside call to another system handset. 1. During a call, press INT. • If you have two handsets, the outside call is put on hold and your handset screen shows CALLING HANDSET X. The other handset rings and its screen shows HANDSET X IS CALLING. • If you have more than two handsets, your screen shows INTERCOM TO: Use the dial pad keys to enter a handset number.
Directory Directory overview Shared directory The directory is stored in the telephone base, and is shared by all handsets. Changes made to the directory on any one handset apply to all. Charlie Johnson 888-883-2445 NOTE: Only one handset can review the directory at a time. If another handset attempts to enter the directory, the screen shows NOT AVAILABLE AT THIS TIME.
Directory Create directory entries To create a new directory entry Press MENU/SELECT in idle mode. Press DIR or CID to scroll to >DIRECTORY, then press MENU/SELECT. Press DIR or CID to scroll to >ADD CONTACT. Press MENU/SELECT. ENTER NUMBER 888-883-2445_ Enter the telephone number when prompted. • Copy a number from redial: a. Press REDIAL/PAUSE. b. Press DIR or CID or press REDIAL/PAUSE repeatedly to locate the number to copy. c. Press MENU/SELECT to copy the number.
Directory Create directory entries • The first letter of every word is capitalized. The remaining letters in a word start as lower case letters as shown in the character chart below: Characters by number of key press Dial Key 1 1 1 .
Directory Reviewing the directory To review directory entries 1. Press DIR when in idle mode to show the first entry in the directory. DIRECTORY EMPTY appears if there are no directory entries. -ORYou can also show the first entry in the directory by pressing MENU/SELECT when in idle mode. Press DIR or CID to scroll to >DIRECTORY, then press MENU/SELECT twice to select >REVIEW. 2. Press DIR or CID to browse through the directory. Entries appear alphabetically by the first letter in the name.
Directory Dialing, deleting and editing a directory entry You can dial, delete or edit the displayed directory entry. See To review directory entries or To search by name on page 29 to show an entry from the directory first. Robert Brown 800-360-4121 To dial a directory number • While reviewing a directory entry, press PHONE/FLASH or SPEAKER to dial the displayed telephone number from the directory (known as Display Dial). PHONE 10:30PM To delete a directory entry 1.
Directory Speed dial locations To assign or reassign a directory entry to a speed dial location 1. Press MENU/SELECT in idle mode. 2. Press DIR or CID to scroll to >DIRECTORY. Press MENU/SELECT. 3. Press DIR or CID to scroll to >SPEED DIAL. Press MENU/SELECT. 4. To assign a speed dial location, press DIR or CID to scroll to an empty speed dial location. -ORTo reassign a speed dial location, press DIR or CID to scroll to the desired speed dial location. 5. Press MENU/SELECT to show the directory. 6.
Directory Speed dial locations To dial a speed dial number 1. When in idle mode, press and hold a dial pad key (0 through 9) to display the desired speed dial entry. 2. Press PHONE/FLASH or SPEAKER to dial the displayed telephone number (known as Display Dial). NOTE: If the speed dial location you selected is empty, the screen shows the speed dial list.
Caller ID About caller ID This product supports caller ID services offered by most telephone service providers. Caller ID allows you to see the name, number, date and time of calls. The available caller ID information will appear after the first or second ring. Information about caller ID with call waiting Caller ID with call waiting lets you see the name and telephone number of the caller before answering the call, even while on another call.
Caller ID Caller ID history How caller ID history (call log) works The telephone stores caller ID information about the last 50 incoming calls in the telephone base. Each entry may have up to 24 digits for the telephone number and 15 characters for the name. Entries are stored in reverse chronological order. The telephone deletes the oldest entry when the log is full to make room for new calls. This information is common to all handsets, so changes made in any handset are reflected in all other handsets.
Caller ID Caller ID operation Missed (new) calls indicator When you have calls that have not been reviewed, the handset idle screen shows XX MISSED CALLS. All entries that have not been reviewed are counted as missed (new) calls. Each time you review a caller ID history entry marked NEW, the number of missed calls decreases by one.
Caller ID Caller ID operation To review the caller ID history Review the caller ID history to find out who called, to return the call or to copy the caller’s name and number into your directory. CALL LOG EMPTY appears if there are no records in the caller ID history. 1. When a handset is in idle mode, press CID to review the caller ID history in reverse chronological order starting with the most recent call. -ORYou can also review the caller ID history by pressing MENU/SELECT.
Caller ID Caller ID operation To dial a caller ID history number 1. While reviewing the caller ID history, press DIR or CID to browse through the caller ID history and find the entry. 2. Press PHONE/FLASH or SPEAKER to dial the displayed telephone number from the caller ID history (known as Display Dial). Christine Smith 888-722-7702 10:30PM PHONE NOTES: 11/20 0:01:30 Christine Smith • If the telephone number has more than 15 digits, only the last 15 digits appear in the caller ID history.
Caller ID Caller ID operation Saving a caller ID history entry in the directory 1. While reviewing the caller ID history, press DIR or Christine Smith CID to browse through the caller ID history and find the 888-722-7702 desired entry. 2. Press MENU/SELECT. The screen shows EDIT NUMBER. 10:30 11/20 3. Use the dial pad keys to modify the telephone number EDIT NUMBER (up to 24 digits). 722-7702_ • Press DIR or CID to move the cursor to the right or left.
Answering system settings Answering system setup Use the answering system menu of a system handset to turn on or off the answering system, record your announcement, activate the call screening, change the number of rings, set the remote access code and activate the message alert tone. Answering on/off Unless you change it, the answering system is on and ready to record messages.
Answering system settings Answering system setup Announcement The announcement is the greeting callers hear when calls are answered by the answering system. The telephone has a default announcement, “Hello. Please leave a message after the tone.” You can use this announcement, or record your own announcement. You can record an announcement up to 90 seconds. The system does not record any announcement shorter than two seconds. To play the current announcement: 1. Press MENU/SELECT when in idle mode. 2.
Answering system settings Answering system setup To delete your announcement: 1. Follow Steps 1 through 4 in To play the current announcement on page 40 to play the announcement. 2. Press 3 during playback to delete your recorded announcement. The system announces, “Announcement deleted.” If your announcement is deleted, calls are answered with the default announcement, “Hello. Please leave a message after the tone.
Answering system settings Answering system setup 5. Press DIR or CID to scroll and choose among 2, 4, 6 or TOLL SAVER. • Toll saver - the answering system answers a call after two rings if you have new messages, and after four rings when there are no new messages. This feature allows you to check for new messages and avoid paying long distance charges if you are calling from out of your local area. 6. Press MENU/SELECT to confirm your setting. A confirmation tone sounds.
Answering system operation Answering system and voicemail About answering system and voicemail Your telephone has separate indicators for two different types of voice messages: those left on its built-in answering system and those left at your service provider’s voicemail (fees may apply). Your telephone’s builtin answering system messages and voicemail messages are separate. Each alerts you to new messages differently.
Answering system operation Answering system overview Voice prompts The system provides voice prompts to guide you through recording announcements and remote access. Message capacity The answering system can record up to 99 messages, depending on the length of each message. Individual messages can be up to four minutes, and the approximate recording time is 14 minutes. The actual recording time depends on individual message characteristics. Messages remain available for replay until you delete them.
Answering system operation Answering system overview Call intercept While call screening, you can press PHONE/FLASH or SPEAKER on the handset to stop recording and speak to the caller. Temporarily turning off the message alert tone Follow the step below to temporarily silence the message alert tone: • When the telephone base is in idle mode, press any telephone base key (except HANDSET LOCATOR). The message alert tone is activated again with the next incoming message.
Answering system operation Message playback To listen to messages You can use either a handset or the telephone base to play messages. If there are new messages, the system plays back only the new messages (oldest first). If there are no new messages, the system plays back all old messages (oldest first). When playback begins, the total number of messages is announced. Before each message, you hear the day and time it was received. After the last message, you hear “End of messages.
Answering system operation Message playback Options during playback When a message is playing, you can adjust the playback volume, skip, repeat, or delete the message. When messages are playing on the telephone base: • Press VOLUME to adjust the message playback volume (1-8). • To repeat the message currently playing, press REPEAT after the answering system plays the day and time the current message was received.
Answering system operation Message playback To delete all old messages Use this feature to delete all old messages. Once deleted, you cannot retrieve the deleted messages. New (unheard) messages cannot be deleted until you have listened to them. NOTE: If there are no old messages and you press DELETE on the telephone base, the system announces, “You have no old message.” On the handset, when you select DELETE ALL OLD, the screen shows NO MESSAGE. To delete all old messages at the telephone base: 1.
Answering system operation Recording and playing memos Memos are messages you record yourself. They are saved, played back and deleted exactly like incoming messages. You can record a memo as a reminder to yourself, or leave a message for someone else using the same telephone. To record a memo 1. Press MENU/SELECT when in idle mode to enter the main menu. 2. Press DIR or CID to scroll to >ANSWERING SYS, then RECORD MEMO... press MENU/SELECT. 5-STOP 3. Press DIR or CID to scroll to >RECORD MEMO. 4.
Answering system operation Message window displays The message window on the telephone base displays the total number of messages. See the table below for other message window displays. 0 0 (flashing) 1-99 There are no messages in the answering system. After a power failure, the number in the message window flashes to indicate the date and time need to be set. • Total number of messages and memos. • Current message number during old message playback.
Answering system operation Remote access You can access the answering system remotely by dialing your home telephone number from any touch-tone telephone. To remotely access the answering system 1. Dial your telephone number from any touch-tone telephone. 2. When the answering system answers, enter the two-digit remote access code (19, unless you have changed it; refer to Remote access code on page 42). The answering system automatically announces the number of messages (new or old) if there are any. 3.
Answering system operation Remote access 5. Hang up to end the call and save all messages. There is a wallet card listing the remote commands at the back of this user’s manual. Cut it out and keep it in your wallet for quick reference. NOTES: • If you do not enter a valid remote access code, the system answers the call automatically. • If the date and time is not set when a message is recorded, the system announces, “Time and date not set” before the answering system announces the number of messages.
Appendix Screen icons, indicator lights and alert tones Screen icons (flashing) HANDSET 1 16 MISSED CALLS 10:30PM or or Low battery; place the handset in the telephone base or charger to recharge. Indicates the battery voltage level. Battery is charging. MSG # 10/16 (animated display) or (animated display) The speakerphone is in use. The handset ringer is turned off. New voicemail received from the telephone service provider. ANS ON Answering system is turned on.
Appendix Screen icons, indicator lights and alert tones Telephone base indicator lights ANS ON/OFF light On when the built-in answering system is on. IN USE light On when the handset is in use, when the answering system is answering an incoming call or when the answering system is being accessed remotely. Flashes when another telephone on the same line is in use. Flashes quickly when there is an incoming call. Handset alert tones One short beep (Key tone or playback confirmation tone) A key is pressed.
Appendix Handset display screen messages CALL LOG EMPTY CALL TRANSFERRED CALLING HANDSET X DIRECTORY EMPTY DIRECTORY FULL You are accessing an empty caller ID history. You have transferred an outside call to another cordless handset. • The handset is calling another handset (for intercom calls). • The handset is going to transfer an outside call to another handset. There are no directory entries. The directory is full. You cannot save any new entries unless you delete some current entries.
Appendix Handset display screen messages OUT OF RANGE OR NO PWR AT BASE The handset has lost communication with the telephone base. OUTSIDE CALL You have connected to the external call during call transfer. PAGING PHONE PLACE IN CHARGER The telephone base is paging all handsets. The handset is on a call. The battery is very low. The handset should be placed in the telephone base or charger. REC MEM FULL The answering system memory is full.
Appendix Troubleshooting If you have difficulty with your telephone, please try the suggestions below. For customer service, or to purchase accessories or replacement parts, visit our website at www.telephones.att.com, or call 1 (800) 222-3111. In Canada, dial 1 (866) 288-4268. When you call customer service, you will need the serial number or model number found on the bottom of the telephone base. My telephone doesn’t work at all. • Make sure the power cord is securely plugged in.
Appendix Troubleshooting • Check that all the telephones connected to the same telephone line are hung up. • Make sure to set the dial mode to the correct setting (pulse dialing or tone dialing) for the service in your area (see Dial mode on page 14). • Eliminate any background noise. Noise from a television, radio or other appliances may cause the telephone to not dial out properly.
Appendix Troubleshooting The batteries do not hold a charge. • If the cordless handset is in the telephone base or charger and the charge light does not come on, refer to the item The charge light is off on this page. • Make sure the battery is fully charged. See Technical specifications on page 73 for battery charging times. For optimum daily performance, return the cordless handset to the telephone base or charger when not in use.
Appendix Troubleshooting • Relocate your telephone to a higher location. The telephone will likely have better reception when installed in a high area. • If the other telephones in your home are having the same problem, the problem is in your wiring or telephone service. Contact your telephone service provider (charges may apply). I experience poor sound quality when using the speakerphone.
Appendix Troubleshooting • Relocate your telephone base to a higher location. The telephone will have better reception when installed in a high area. • If the other telephones in your home are having the same problem, the problem is in your wiring or telephone service. Contact your telephone service provider (charges may apply).
Appendix Troubleshooting • Your telephone line cord might be defective. Try installing a new telephone line cord. My caller ID isn’t working. • Caller ID is a subscription service. You must subscribe to this service from your telephone service provider for this feature to work on your telephone. • Your caller must be calling from an area that supports caller ID. • Both your and your caller’s telephone service providers must use caller ID compatible equipment.
Appendix Troubleshooting • If the caller pauses for longer than seven seconds, the answering system stops recording and disconnects the call. • If the answering system’s memory becomes full during a message, the answering system stops recording and disconnects the call. • If the caller’s voice is very soft, the answering system may stop recording and disconnects the call.
Appendix Troubleshooting • The answering system may not detect the remote access code while your announcement is playing. Try waiting until the announcement is over before entering the code. • There may be interference on the telephone line you are using. Press dial pad keys firmly. The answering system does not record messages. • Make sure the answering system is on (see Answering on/off on page 39). • Make sure the memory of the answering system is not full.
Appendix Troubleshooting Common cure for electronic equipment: If the telephone is not responding normally, try resetting the telephone. Do the following in the order listed: 1. Disconnect the power to the telephone base. 2. Disconnect the cordless handset battery, and spare battery, if applicable. 3. Wait a few minutes. 4. Connect power to the telephone base. 5. Completely remove then replace the battery. Place the cordless handset into the telephone base. 6.
Appendix Maintenance Taking care of your telephone • Your cordless telephone contains sophisticated electronic parts, so it must be treated with care. • Avoid rough treatment. • Place the handset down gently. • Save the original packing materials to protect your telephone if you ever need to ship it. Avoid water • Your telephone can be damaged if it gets wet. Do not use the handset in the rain, or handle it with wet hands. Do not install the telephone base near a sink, bathtub or shower.
Appendix Important safety information This symbol is to alert you to important operating or servicing instructions that may appear in this user’s manual. Always follow basic safety precautions when using this product to reduce the risk of injury, fire, or electric shock. Safety information • Read and understand all instructions in the user’s manual. Observe all markings on the product. • Avoid using a telephone during a thunderstorm. There might be a slight chance of electric shock from lightning.
Appendix Important safety information • Electrical power: The telephone base of this cordless telephone must be connected to a working electrical outlet which is not controlled by a wall switch. Calls cannot be made from the handset if the telephone base is unplugged, switched off or if the electrical power is interrupted. • Potential TV interference: Some cordless telephones operate at frequencies that may cause interference to TVs and VCRs.
Appendix FCC Part 68 and ACTA This equipment complies with Part 68 of the FCC rules and with technical requirements adopted by the Administrative Council for Terminal Attachments (ACTA). The label on the back or bottom of this equipment contains, among other things, a product identifier in the format US:AAAEQ##TXXXX. This identifier must be provided to your telephone service provider upon request.
Appendix FCC Part 15 This equipment has been tested and found to comply with the requirements for a Class B digital device under Part 15 of the Federal Communications Commission (FCC) rules. These requirements are intended to provide reasonable protection against harmful interference in a residential installation. This equipment generates, uses and can radiate radio frequency energy and, if not installed and used in accordance with the instructions, may cause harmful interference to radio communications.
Appendix Limited warranty The AT&T brand is used under license - any repair, replacement or warranty service, and all questions about this product should be directed to our website at www.telephones.att.com or call 1 (800) 222-3111. In Canada, dial 1 (866) 288-4268. 1.
Appendix Limited warranty 5. How do you get warranty service? To obtain warranty service in the United States of America, visit www.telephones.att.com or call 1 (800) 222-3111. In Canada, dial 1 (866) 288-4268. NOTE: Before calling for service, please review the user’s manual. A check of the PRODUCT’s controls and features might save you a service call.
Appendix Technical specifications RF frequency band 1921.536MHz — 1928.448MHz Channels 5 Operating temperature 32°F — 122°F 0°C — 50°C Telephone base voltage (AC voltage, 60Hz) 96 — 130Vrms Telephone base voltage (DC adapter output) 6VDC @400mA Handset voltage 2.4 — 3.2VDC Charger voltage (AC adapter output) 6VAC @300mA Operating times and charging time differ depending on the capacity of the battery you are using.
Appendix Index A Alert tones, 54 Alphabetical search, 29 Announcement, 40 Answer a call, 17 Answer an incoming call during an intercom call, 24 Answering mode, 39 Answering system, 43–52 Answering system and voicemail, 43 Answering system settings, 39–42 Any key answer, 17 Area code, 14, 33, 36 Auto off, 17 Delete messages, 47, 51 Dial a directory number, 30 Dial a number from caller ID history, 37 Dial a redial list number, 18 Dial a speed dial number, 32 Dialing options, 36 Dial mode, 14 Directory, 26–3
Appendix Index L Language, 11 Limited warranty, 71-72 S Screen icons, 53 Skip messages, 47, 51 Speakerphone switching, 17, 40, 47 Speed dial, 31–32 M Maintenance, 66 Make a call, 16 Memo, 49 Memory match, 34 Menu, 10–18 Message alert tone, 42 Message playback, 46 Message window displays, 50 Missed (new) call indicator, 35 Mute, 20 T Tabletop installation, 4 Technical specifications, 73 Temporary ringer silencing, 16 Temporary tone dialing, 21 Three-way conversation, 22, 25 Toll saver, 42 Troubleshooting
Appendix Remote access wallet card The wallet card below lists the commands needed to control your answering system from any touch-tone telephone. Cut along dotted line. Call your telephone number, then enter your two-digit remote access code (preset to 19). Fold here. Action Remote command Play all messages......................1 Play new messages...................2 Delete the message..................3 (during playback) Delete all old messages.........33 Repeat or go back.....................4 Stop.
www.telephones.att.com © 2009-2012 Advanced American Telephones. All Rights Reserved. AT&T and the AT&T logo are trademarks of AT&T Intellectual Property licensed to Advanced American Telephones, San Antonio, TX 78219. Printed in China. Issue 11 AT&T 04/12.