AT&T Navigator v3.0 GPS Navigation Suite for AT&T®: Android Devices To see whether your device is supported, visit http://www.telenav.com/products/tn/devices/att.
Copyright © 2011 TeleNav, Inc. All rights reserved. TeleNav GPS Navigator™ is a trademark and TeleNav® is a registered trademark of TeleNav, Inc., Sunnyvale, California in the United States and may be registered in other countries. AT&T and the AT&T logo are trademarks of AT&T Intellectual Property. All other trademarks or registered trademarks are acknowledged as the exclusive property of their respective owners.
Table of Contents 1. Welcome...........................................................................................................................................................7 2. Safety and Legal Notices ...............................................................................................................................8 3. Data Service Options......................................................................................................................................8 4.
Editing Your Route.......................................................................................................................................29 Edit Origin..............................................................................................................................................29 Edit Destination .....................................................................................................................................29 Edit Route Settings ...........................
Sort by Best Match.......................................................................................................................................47 Sort by Distance...........................................................................................................................................47 Sort by Rating...............................................................................................................................................47 Sponsored Results.....................
Taking an Incoming Call .....................................................................................................................................63 Calendar and E-mail Events...............................................................................................................................64 15. Exiting AT&T Navigator................................................................................................................................64 16. Removing AT&T Navigator ...........
1. Welcome AT&T Navigator™ v3.0 utilizes the integration of GPS position determination technology, the Android™ programming environment, and access to your wireless carrier’s data network. The AT&T Navigator application provides: GPS navigation that punctually guides you turn-by-turn to any destination address in the United States. If you miss a turn or get off-track, AT&T Navigator will calculate a new route for you.
2. Safety and Legal Notices Please read this section carefully before using AT&T Navigator AT&T and TeleNav will not accept any responsibility whatsoever for accidents resulting from failure to observe common sense precautions. Your personal judgment, traffic regulations, and common sense must always take precedence over any driving direction produced by AT&T Navigator. WARNING: Keep your eyes on the road.
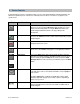
4. Device Controls Your Android device provides several different ways for you to control AT&T Navigator and input information. The table below explains the phone controls most commonly referenced. Please refer to the user's guide for your specific model. Key Name Function Back button In most AT&T Navigator screens, the Back button will return you to the previous screen. Pressing the Back button while in a Drive To session will open the End Trip prompt.
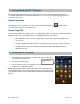
5. Getting Started with AT&T Navigator The AT&T Navigator application that resides within your device requires an AT&T subscription and means of accessing the public Internet. This allows the application to access its servers for mapping, routing, and search services from your device. Software Installation AT&T Navigator comes preloaded on your device. Tap on the AT&T Navigator logo screen instructions to pay for a subscription service.
4. During your first use of AT&T Navigator, the phone will download the audible and graphical content needed to build the displays and produce audible messages. The time it takes to complete the download depends on wireless data connection. When AT&T Navigator is using data service to contact the AT&T Navigator servers, it will present a message such as: a) Reading GPS, b) Waiting, c) Sending, d) Receiving, e) Logging in, f) Personalizing, g) Loading, and h) Storing.
Search The Search box at the top of most of the application screens lets you conveniently key in an address or business name or category. For example, you can type in “coffee” or a specific address to drive to. Speak It Use the voice command feature by choosing the Microphone icon at the bottom toolbar. Then speak in a command to find businesses or driving directions. Some examples on the screen will prompt you on the types of voice command you can give.
8. Using a Bluetooth Headset You can use a Bluetooth headset with AT&T Navigator for features such as Drive To navigation instructions, or to speak in an address. To do so, you must first pair your Bluetooth headset from the Android menu. The following instructions are for a Samsung Galaxy device; your Bluetooth menu options may vary. 1. From the Android main menu, go to Settings >> Wireless and Network >> Bluetooth Settings. 2.
Map Menu Options The follow graphic explains the interactions on the Map screen from the Maps & Traffic menu. To get a map for a different area, type an address in the Search box at the top of the screen or Choose Menu >> Change Location and tap on a button for Home, Work, Favorites, Places, Recent, Address, Contacts or Airport.
Display Traffic & Speed Cameras In the Maps menu, you can check traffic conditions and any speed cameras around a certain area. 1. Choose Maps on the toolbar. The map of your location appears. 2. Choose Layers >> Traffic Layers >> Speed Cameras to show or hide traffic display and to show or hide cameras. Traffic alerts, shown as icons, and traffic flow information shown as colored outlines on major roads, are then shown on the map.
1. From the “Map” option for Favorites and Recent Places in the Drive To menu. For example, from the toolbar, select Drive To >> Favorites >> press and hold a location to call up the Menu >> Map. © 2011 TELENAV, INC.
2. From the “Map” option for any location that you have found using the Places search. For example, from the toolbar, select Places. Search the categories for your desired location, and then select the Map option on the location’s Details page. 10. Drive To Menu Use Drive To and choose from a variety of ways to navigate to an address. The Drive To Menu options are: © 2011 TELENAV, INC. Resume Trip – Your last trip destination appears at the top of the screen if your navigation session was interrupted.
Recent – You can get directions to a Recent Place that you found in a Places search or located with other Drive To options. Addresses sent to your phone for use by Navigator are also stored here. The entries here are listed chronologically, with the most recent showing first. Address – Enter a street address. Contacts – Select saved contacts from your device’s Address Book. Airports – Quickly find airports by 3-letter code or city name.
Set Up Home This option lets you save a Home address so you can easily select it for use in the future. Once you have set this up, you can Edit your Home address by doing a press-and-hold on the Home button. Set Up Work This option lets you save a Work address so you can easily select it for use in the future. Once you have set this up, you can Edit your Work address by doing a press-and-hold on the Work button. Favorites Favorites are places that you have saved in the past so you can quickly access them.
You have the following options in the Favorites screen: – Pull in addresses that you saved in the Sync with Website AT&T Navigator website at http://www.attnav.com. – These are folders that you can User-Created Categories create when you save or edit a favorite. – These are Favorites that you have not Individual Favorites organized into categories. Press and hold on any Favorite for additional options: o Drive To – Get driving directions to this location.
Category This option allows you to organize where a location should be stored. 1. In Drive To >> Favorites, press and hold an individual Favorite from the list. 2. In the Menu that appears, choose Edit. The Edit Favorite screen appears. 3. Under “Categorize Favorites,” choose the category folder in the list to add the location to the folder. 4. Choose Done. © 2011 TELENAV, INC.
Create New Category 1. In Drive To >> My Favorites, press and hold an individual Favorite from the list. 2. In the Menu that appears, choose Edit. The Edit Favorite screen appears. 3. Under “Categorize Favorite,” choose “New Category.” 4. On the next screen, enter a category name and choose Add. Delete or Edit a Category You can delete or edit a category that you have created in My Favorites. © 2011 TELENAV, INC.
1. Choose Drive To >> Favorites. 2. Press and hold the category that you want to edit or delete. In the Menu that appears, you can choose Edit to rename a category, or Delete. NOTE: Deleting a Category folder also deletes all the Favorites stored in it. If you change your mind, press the Back key to return to the Favorites menu. © 2011 TELENAV, INC.
Places You can get to the Places screen from the Maps, Drive To, or Extras screens by tapping the Places button in the bottom toolbar. To search for businesses from this screen, tap any category button such as ATM, Food/Coffee, Gas, Grocery, or Lodging, or type a business or category name in the top Search field. You can also include a location with your typed entry, as in these examples: “Movies in Atlanta, GA” and “Chinese Restaurant near Hollywood and Vine, Hollywood.
Recent Recent Places are addresses used recently for navigation or Places searches. When an address in the list is used within AT&T Navigator, it is promoted to the head of the list. AT&T Navigator automatically saves all of the places that you: Chose for navigation. Located using a street address, contact, or airport. Received from someone using AT&T Navigator’s Share Address feature. icon to pull in Recent Places that you saved in the AT&T Choose the Navigator website at http://www.attnav.com.
Address You can enter an address by typing into the one-box Search field at the top of most AT&T Navigator screens, or by tapping the Microphone icon at the bottom toolbar and speaking the address (see page 12 for more information on speech input). However, if you prefer a two-box entry, you can do the following (the address is automatically saved to your Recent Places list): 1. Choose Drive To from the bottom toolbar and tap the Address button. 2. In the fields that appear, type in a street address.
Airports Quickly find airports by Airport Code or City Name. The airports closest to your current location are displayed for your convenience. The airport is automatically saved to your Recent places list. 1. From the Drive To screen, tap the Airport button. 2. In the Airport screen, enter the three-letter abbreviation of the airport, or type the whole name of the airport (see page 12 for more information on speech input). NOTE: As you type, matching airports will be suggested.
2. Use the Places option on the bottom toolbar and search for a business or Point of Interest (POI). In the Details screen for the business, choose the green address button to get driving directions. 3. Type an address, business, or category name into the One-Box Search field at the top of most AT&T Navigator screens. 4. Tap the Microphone icon at the bottom toolbar and speak an address, business, or category name. © 2011 TELENAV, INC.
Trip Confirmation Screen Moments after you select a Drive To location, the Trip Confirmation screen appears. AT&T Navigator calculates the optimal route(s) to your destination, offering up to three route alternatives for your trip. Editing Your Route AT&T Navigator assumes that you want to start from your current location, but you can edit your route. 1. Choose the Route Settings box at the top-right of the Trip Confirmation screen for editing options. 2.
Edit Route Settings This option lets you edit your route style in the following ways: Fastest – This default Route Style finds the fastest driving route. Shortest – This Route Style may or may not take more time to drive but it shows you the shortest distance. Avoid Highway – Use local streets instead of highways if possible. Pedestrian – Find walking directions.
Audible Guidance During Navigation The lead times for the audible guidance are increased proportionally to your driving speed. This allows more time for changing lanes before a turn if you are driving at highway speeds as opposed to driving more slowly on local streets. Audio Replay If you wish to hear an updated informational message for the current route segment, simply tap the top navigation bar.
3D Moving Map A 3-dimensional map with turn icons (default). This view allows you to see how the road ahead is organized, similar to the perspective of a bird flying above the route. You can see the route to your destination as a blue overlay on one of the roads with white triangles leading you in the correct direction. Orange arrows mark any upcoming turns. The name of the street you are currently on is displayed at the bottom of the screen. The street name for your next turn is shown at the top.
In 2D and 3D moving maps, you can zoom in or out while navigating by pinching the screen or by using the “+” and “-“ buttons on the screen. You can also pan the map up, down, left, and right by sliding your finger along the screen. You may see a small network activity indicator comprised of two arrows in the upper-right corner of the display when you change map scale factor. If you pan out of the current route, the map will snap back to the current route after 15 seconds with no tapping activity required.
On-Screen Navigation Icons The following table explains some of the icons that you may see during a navigation session when viewing a 2D or 3D Map. Icon Name Lane Assist Appearing at the bottom of the screen during Navigation, the Lane Assist feature is designed to help you determine which lane(s) to be in at a multilane highway junction or an intersection. As you approach a turn or junction, the Lane Assist graphic will be displayed with correct lanes highlighted for your route.
Navigation Toolbar Options Tap the navigation screen to call up the bottom toolbar and other navigation options. These are described in the sections below. When you arrive at your destination, press the Back button. The navigation screen will also automatically exit after a period of inactivity. The bottom toolbar, Zoom buttons, and the Traffic button shown below appear when you tap on the screen during navigation.
Route Tap on the navigation screen to call up the toolbar and then choose Route for the following options. Turns This screen shows a text listing of every turn for this navigation session from your starting location to your destination, along with mini turn icons. Tap on any row with turn instructions to view a turn-by-turn map of that segment along the route. © 2011 TELENAV, INC.
Traffic This screen shows you any delays from traffic, a summary of incidents on the route, and the average speed for each segment where available. You can tap on any line to view more details. NOTE: This screen can also be accessed by tapping the Traffic icon on on the navigation the navigation screen. If there is a Traffic Alert icon screen and you tap on it instead of the Traffic icon, a summary of the specific incident coming up on your route will be displayed instead.
If you tap an incident line, you can view the details. Below is an explanation of what you will see on the Traffic Detail screen: Distance – The total distance of the road segment is displayed immediately below the road name. Average Speed Bar – Average speed of the road segment on a scale of 0 mph to the maximum-posted speed for that segment.
Avoiding Traffic from Traffic Summary While you are in a navigation session, you can choose to re-route starting from the Traffic Summary screen to avoid traffic congestion. 1. During navigation, tap on the screen and choose the Traffic icon . 2. You have two options to route around traffic: Minimize Delays – Reroute to minimize traffic delays for the entire current route. Avoid Segment (this option appears when you tap on a segment with an incident detail) – Reroute to avoid the selected segment.
Avoiding Traffic from Traffic Alert When you hear an audio warning about a traffic incident during your navigation session, you can re-route directly from this screen to avoid congestion ahead. 1. During navigation, an audio warning sounds to alert you to traffic incidents along your route. An alert icon appears on the map, showing severity and distance to the incident. (Audio) “Accident 1.4 miles ahead on US 101 at Lawrence Expressway; 1 lane closed. Tap the traffic alert to avoid.” 2.
Map The entire route from your starting location to your destination is drawn on a map. The route is displayed as a blue line connecting the Start and Finish flags. Use a pinching motion to zoom in and out of the map. Slide your finger along the map to pan. To go back to the Navigation screen, press the Back key on the phone or the Nav key at the bottom toolbar. Places When in Navigation mode, tapping the Places button at the bottom toolbar finds the desired places along your navigation route.
The results screen displays either the number of miles from your current location (if you chose Up Ahead), or the number of miles from your destination (if you chose Near Destination). Select a restaurant from the Search Along list to get driving directions from your current location to the restaurant. Choose the Map button map along your route. You can change the sorting options (by Best Match, Distance, or Rating), or page through the Search Results list by using your finger to scroll the screen.
Navigation Menu Options Press the Menu key on your Android device to call up the menu during a navigation session for the following options. End Trip End the navigation session. See “End Trip” on page 42 for more information. Report Traffic Camera Traffic Camera data is generated by AT&T Navigator users. To report a Traffic Camera, choose Menu >> Report Traffic Camera during a navigation session.
11. Places Menu The Places menu provides you with a few different ways to find the addresses and phone numbers of businesses such as restaurants, hotels, and gas stations, and parking lots or garages. If the search succeeds, a list of businesses will appear. These businesses will be near your current position or near the location you chose.
3. A list of nearby results will be displayed, typically showing a sponsored listing at the top of the list. For most searches, the results will be ordered by “Best Match,” which is a combination of distance and rating. You can also change this to sort by “Distance” or by “Rating.” NOTE: If you choose Food/Coffee or Gas, a list of options will appear before any results are displayed. 4. Make a selection from the list. 5. The Results screen appears with details about your selection.
A quick-reference graphic of the Search Details screen is shown below: Save location to Favorites Star ratings and number of reviews Get driving directions Write a review or read others’ reviews Call location View map of area Search for nearby businesses Share address with others © 2011 TELENAV, INC.
Change Location for Search Results By default, searches for the business are centered on your current location. However, you can change this to another location that you specify. 1. In the Search Results list, choose the Current Location text box. 2. The Choose Location screen appears. Choose a new location to conduct your search. Sorting Options You have a variety of options to sort your search results (this option may not be available for all searches).
Sponsored Results 1. Icons next to business names indicate that more information is available in the Details screen. 2. The Sponsored Results (Details) screen shows business details and descriptions. The tabs you see may vary, depending on what is available for the business. Browse any deals or promotions that the business may be offering. View menus for restaurant searches. © 2011 TELENAV, INC.
Most Popular Category You can search for the most popular food/coffee places. 1. In the Places screen, choose Food/Coffee and then Most Popular. 2. The Most Popular search results screen displays items that are frequently given higher star ratings. By default, results are sorted by the number of points they have received (popularity). Items with no points or negative points are not displayed.
3. The Search Results screen displays with a list of gas prices sorted by price. 4. Choose a gas station to go to its Details screen. On the Main tab, you can tap Map to go to full map view, share the address with a friend (see “Share Address” on page 51), or search for nearby businesses. On the Gas Prices tab, you can view available gas prices. © 2011 TELENAV, INC.
Map Results You can view your search results plotted on a map by choosing the Map icon on the Search Results screen. The Map Results screen can also be accessed when you tap on the Map button on the Search Details screen (Main tab). Use your finger to pan the map. Zooming out may allow you to view more results on the page.
1. In the business’s Search Details screen (Main tab), choose Share at the bottom of the screen. 2. Choose a contact in “Select from Contacts,” or type in phone numbers using “Enter Phone Numbers.” Choose Done. 3. This screen allows you to change any of the following: Label – This field is optional. Give the address a name for easier identification. Send To – Choose this field to add or remove a contact or phone number.
Search Nearby Search for nearby businesses from the Places menu. Ratings and Reviews The star ratings under certain businesses indicate ratings and reviews submitted by other users. You can also submit your own rating and review for businesses. © 2011 TELENAV, INC.
Submit Your Own Rating and Review 1. In the Search Results screen, select a location. 2. In the Details screen, choose the Review tab, and then choose Write a Review. 3. On the next screen, choose a rating from 1 to 5 stars and enter optional comments. NOTE: If you choose the Write a Review option for a location that you have already rated, the original rating is displayed by default.
12. Extras The Extras menu lets you search for movie listings and check your local weather conditions. You can also purchase different voices for the navigation audio announcements (when available), as well as different car icons for the navigation screen. AT&T Navigator is constantly adding fun and useful new features, so be sure to check back often to see what’s available. Movies Choose Extras >> Apps tab >> My Apps >> Movie.
Search by Theaters On the Theaters tab, choose a theater to view a list of available movies, show times, and run times. Elapsed show times are crossed out in the list. Search by Movies On the Movies tab, choose a movie to view a synopsis, and a list of the closest theaters where the movie is showing. Elapsed show times are crossed out in the list. You can also view movie duration and star rating when available. Where available, you can also choose Buy to purchase tickets to your movie.
1. Choose Extras >> Apps tab >> My Apps >> Weather. 2. The weather condition for your current location is displayed, along with the forecast for the next six days. 3. Choose the Change Location icon location. to view weather for another My Accounts Choose Extras >> Account to view a list of your subscriptions, your purchase history, and any payment information you have on file. You can add a credit card to your file for quick payment from within the AT&T Navigator application. © 2011 TELENAV, INC.
13. Menu Features Choose the Menu key on the Android device to call up a menu for additional options. The choices in this menu vary, depending on the AT&T Navigator screen you are on. Below are the main features. About Go to Menu >> About to find important information about your AT&T Navigator account such as the version number you are using and your PIN. You can quickly find contact information for AT&T Navigator Customer Support and access Diagnostic Tools to help you troubleshoot the application.
Your PIN Number Get your PIN number by choosing this option. A text message will be sent to you with the PIN, and it will briefly appear at the top of your AT&T Navigator screen. After it disappears, you can open the text message to view it again. Your PIN is by default the last four digits of your phone number and is used to log into “My AT&T Navigator” at http://www.attnav.com for pre-planning.
Settings Choose Menu >> Settings for options on setting your preferences and other features. Be sure to choose Save to keep any changes you have made. You can also access this menu from Extras >> Settings. Profile In Menu >> Settings >> Profile, you can edit the following: First/Last Name – Edit your name here. This name will be displayed to users when you share addresses with them. Email – Edit your e-mail here.
Navigation In Menu >> Settings >> Navigation, you can edit the following: Route Settings – Fastest, Shortest, Avoid Highway, or Pedestrian. By default, all routes are “Fastest” to minimize traffic delays. You can also choose to avoid traffic and tolls, or use carpool lanes along your trip. Map Color – Choose from Auto, Daytime, Nighttime. Nighttime colors have greater contrast to let you better see the navigation screen in the dark.
Audio In Menu >> Settings >> Audio, you can edit the following: Audio Guidance – Directions & Traffic, Directions Only, Traffic Only, or None. “Directions Only” lets you listen to turn-by-turn directions, but without any traffic information. Audio During Call – Suspend or Play. This controls audio guidance when you are on a phone call while navigating. Home Address In Menu >> Settings >> Home Address, you can enter or edit a home address. This option appears in the Drive To menu for quick selection.
14. Suspending AT&T Navigator Making a Phone Call from AT&T Navigator You can Call In to a location that you have found in a Search such as a restaurant, a hotel, or a store. When available, tap the phone number in the Search Details screen for a business. AT&T Navigator Options from Phone Contact List You can interact with AT&T Navigator from your device’s Contact List. Choose a Contact, tap on the address, and then choose AT&T Navigator.
If you answer the call, AT&T Navigator will be operating but “suspended.” After the call, press the Back button to end the call. At this point, AT&T Navigator should resume from its suspended state. If you are navigating and have gotten off the route, AT&T Navigator will say “Rerouting” and obtain a new route for you. NOTE: When AT&T Navigator briefly uses the data network, incoming calls may be blocked.
1. The Application Info screen loads for AT&T Navigator. Choose the Uninstall button to proceed and follow the on-screen prompts. 17. The AT&T Navigator Website To access the general AT&T Navigator website, go to http://www.wireless.att.com/lbs. You can also log in to the AT&T Pre-Planning website http://www.attnav.com. Access features such as: Route planning for planning a trip by entering the starting and destination addresses.
NOTE: Favorites created on the website will only show up in your My Favorites list on the phone after you choose the ”Sync with Website” option on the Favorites page within AT&T Navigator. Manage addresses in your My Favorites and Recent lists (both of which update information on your phone). These lists can grow to an unlimited length. You can also delete addresses you no longer need. Manage an independent Web address book (saved to your Web address book only, not saved to your phone).
charging cable. If you get a low battery warning, connect a charging cable as soon as possible. In some cases, you may need to wait a while for the battery to become sufficiently charged so the GPS receiver will work. Network signal weak If the carrier network signal is weak, move to an area where reception is better and try the function that requires network access again. AT&T Navigator encountered an error AT&T Navigator is having technical problems with the specific request that you made.
Why do I need a PIN number? You may need a four-digit PIN to log in to AT&T Navigator for the very first time. It is unique to your account and identifies that your account is active. How do I find my PIN number? Your PIN can be found in the About menu. See Page 59 for details. You can use this PIN for pre-planning on http://www.attnav.com. I have recently changed phone numbers. How do I move my subscription over to my new phone number? Contact your carrier to change the phone number.
How do I know that my device is receiving GPS signals? AT&T Navigator alerts you if your device is not receiving GPS signals. If this happens, move to an area where there is a clear view of the sky so your device can receive GPS signals from space. How can I get a route when there is no GPS? When there is no GPS, the navigator is not able to provide turn-by-turn navigation in real time.
How do I reinstall the application on my phone? You can go to the Android Marketplace in order to obtain the latest build for AT&T Navigator. How do I delete my list of “Recent” list? You may remove multiple addresses by logging into your AT&T Navigator account online at http://www.attnav.com. In Recent Places, check the addresses you want to remove. You may also do this from your handset in the Recent screen.
will TeleNav or any of its affiliates, directors, officers or employees, or any third party be liable for any direct, indirect, incidental, special or consequential damages that results from your use or your inability to use the services.