Nokia 6350 User Guide Issue 2
0434 DECLARATION OF CONFORMITY Hereby, NOKIA CORPORATION declares that this RM-455 product is in compliance with the essential requirements and other relevant provisions of Directive 1999/5/EC. A copy of the Declaration of Conformity can be found at http://www.nokia.com/phones/declaration_of_conformity/. © 2010 Nokia. All rights reserved. Inside pages contain 10% recycled paper. Nokia, Nokia Connecting People, and Navi are trademarks or registered trademarks of Nokia Corporation.
The third-party applications provided with your device may have been created and may be owned by persons or entities not affiliated with or related to Nokia. Nokia does not own the copyrights or intellectual property rights to the third-party applications. As such, Nokia does not take any responsibility for end-user support, functionality of the applications, or the information in the applications or these materials. Nokia does not provide any warranty for the third-party applications.
Contents SAFETY.............................................. 6 About your device............................ 7 Network services............................................... 7 Shared memory ................................................. 8 Access codes ...................................................... 8 Configuration settings service ...................... 8 Accessories, batteries, and chargers ........... 9 Setting for telecoil hearing aid users.......... 9 Software updates........................
17. Settings .................................... 39 19. Tools......................................... 51 Set profiles....................................................... Set theme......................................................... Tones ................................................................. Main display.................................................... Mini display..................................................... Set time and date ..........................................
SAFETY Read these simple guidelines. Not following them may be dangerous or illegal. Read the complete user guide for further information. SWITCH ON SAFELY Do not switch the device on when wireless phone use is prohibited or when it may cause interference or danger. ROAD SAFETY COMES FIRST Obey all local laws. Always keep your hands free to operate the vehicle while driving. Your first consideration while driving should be road safety.
About your device The wireless device described in this guide is approved for use on the UMTS 850, 1900, and 2100, and GSM 850, 900, 1800, and 1900 MHz networks. Contact your service provider for more information about networks. When using the features in this device, obey all laws and respect local customs, privacy and legitimate rights of others, including copyrights. Copyright protection may prevent some images, music, and other content from being copied, modified, or transferred.
limitations that affect how you can use some features of this device requiring network support such as support for specific technologies like WAP 2.0 protocols (HTTP and SSL) that run on TCP/IP protocols and language-dependent characters. Your service provider may have requested that certain features be disabled or not activated in your device. If so, these features will not appear on your device menu. Your device may also have customized items such as menu names, menu order, and icons.
provider, nearest authorized Nokia dealer, or visit the support area on the Nokia website, www.nokia.com/support. When you have received the settings as a configuration message, and the settings are not automatically saved and activated, Configuration settings received is displayed. ■ Accessories, batteries, and chargers Check the model number of any charger before use with this device. This device is intended for use when supplied with power from the AC-6 charger.
For the availability of different services and pricing, contact your service provider. Important: Use only services that you trust and that offer adequate security and protection against harmful software. ■ Assisted Global Positioning System Your phone may have Assisted Global Positioning System (A-GPS), a positioning system that uses an assistance server and reference network to make measurements and determine location. A-GPS is dependent on your network service.
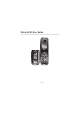
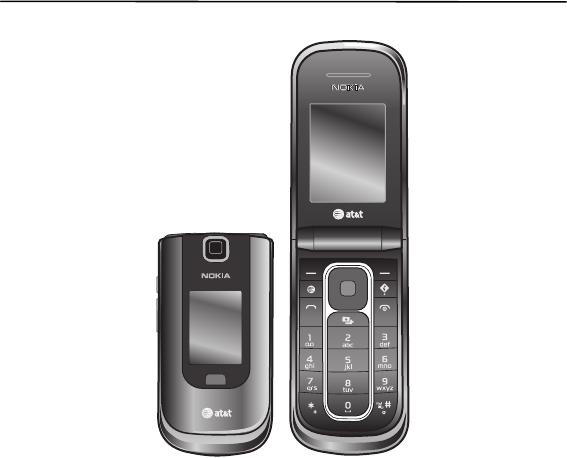
1. Get started ■ Insert SIM card and battery Always switch the device off and disconnect the charger before removing the battery. This device is intended for use with the BP-6MT battery. Always use original Nokia batteries. See “Nokia battery authentication guidelines”, page 57. The SIM card and its contacts can easily be damaged by scratches or bending, so be careful when handling, inserting, or removing the card. To remove the back cover of the phone, slide the back cover down, and lift the cover.
Insert the SIM card properly into the holder. Gold contacts face you. Replace the battery. Insert and then push down. To replace the back cover, align the top edge of the cover to the back of the phone (1). Push the cover into place as shown (2).
■ Insert a microSD card Use only compatible microSD cards with this device. Other memory cards, such as reduced size MultiMedia cards, do not fit in the microSD card slot and are not compatible with this device. Using an incompatible memory card may damage the memory card as well as the device, and data stored on the incompatible card may be corrupted. 1. The device can be on or off. 2. Remove the back cover. Pull up the plastic strip 3.
1. Connect the charger to a wall outlet. 2. Open the USB connector door. Connect the charger to the micro USB connector on your phone. 3. When the device indicates the battery is fully charged, disconnect the charger from the device, then from the wall outlet. You may also charge the battery using a USB data cable with power from a computer. 1. Connect a USB data cable to the USB port of a computer and to your device. 2. When the battery is fully charged, disconnect the USB cable.
■ Antenna Your device may have internal and external antennas. Avoid touching the antenna area unnecessarily while the antenna is transmitting or receiving.Contact with antennas affects the communication quality and may cause the device to operate at a higher power level than otherwise needed and may reduce the battery life.
2.
Switch the phone on and off Warning: Do not switch the phone on when wireless phone use is prohibited or when it may cause interference or danger. To switch the phone on or off, press and hold the power key. See “Keys and parts”, page 16. If the phone asks for a PIN or a UPIN code, enter the code (displayed as ****), and select OK.
The alarm clock is activated. The countdown timer is running. The stopwatch is running. The phone is registered with the GPRS or EGPRS network. A GPRS or EGPRS connection is established. The GPRS or EGPRS connection is suspended (on hold). A Bluetooth connection is active. A push-to-talk connection is active or suspended. , All incoming calls are forwarded to another number. The loudspeaker is activated, or the music stand is connected to the phone. Calls are limited to a closed user group.
■ Keypad lock (keyguard) With the fold open, select Menu or Unlock, and press * within 1.5 seconds to unlock the keypad. Repeat the sequence to lock the keypad. By default, the keypad is locked. With the fold closed, press Rewind, and press Fastforward within 1.5 seconds to unlock the media keys. To set the automatic keyguard, select Menu > Settings > Phone settings > Automatic keyguard. To answer a call when the keyguard is on, press the call key, or open the phone.
To change profiles, select Settings > Set profile, and a profile. If your phone continues to ask if you want to go offline, select Menu > Settings > Phone settings > Offline mode query. ■ Functions without a SIM card Several functions of your phone may be used without inserting a SIM card (for example, data transfer with a compatible PC or another compatible device). Without a SIM card, some functions appear dimmed in the menus and cannot be used.
Enhanced voice dialing You can say the name saved in the contact list of the phone to make a phone call. Voice commands are not language-dependent. Note: Using voice tags may be difficult in a noisy environment or during an emergency, so you should not rely solely upon voice dialing in all circumstances. 1. In the standby mode, press and hold the right selection key or press and hold the volume down key. A short tone is played, and Speak after the tone is displayed. 2. Say the voice command clearly.
Warning: Do not hold the device near your ear when the loudspeaker is in use, because the volume may be extremely loud. During a call, you can also navigate the menus and access other features. 4. Navigate the menus The phone offers you a range of functions that are grouped into menus. The name of each menu item appears in the upper left corner of the main display. 1. To access the main menu, select Menu by pressing the center key.
6. Enter text You can enter text (for example, when entering messages) using traditional or predictive text input. When you enter text, text input indicators appear at the top of the display. indicates traditional text input. indicates predictive text input. Predictive text input allows you to enter text quickly using the phone keypad and a built-in dictionary. You can enter a letter with a single keypress. , , or press #. indicates the character case. To change the character case, indicates number mode.
2. When you finish entering the word and it is correct, to confirm it, press 0 to add space. If the word is not correct, press * repeatedly. To insert a number, press * until the number appears. To insert a period, press 1. To insert other characters, press *. If the word does not appear, you can add it to the dictionary. First, select Spell. Complete the word (traditional text input is used), and select Save. 7. Messaging You can read, create, send, and save your text, multimedia, and audio messages.
■ Multimedia messages A multimedia message can contain different types of media, such as text, pictures, sound clips, calendar notes, business cards, streaming links, and video clips. Only devices that have compatible features can receive and display multimedia messages. The appearance of a message may vary depending on the receiving device. The wireless network may limit the size of MMS messages. If the inserted picture exceeds this limit the device may make it smaller so that it can be sent by MMS.
Send messages To send the message, select Send. The phone saves the message in the Outbox folder and sending starts. Note: The message sent icon or text on your device screen does not indicate that the message is received at the intended destination. If the message sending is interrupted, the phone tries to resend the message a few times. If these attempts fail, the message remains in the Outbox folder. To cancel the sending of the messages in the Outbox folder, select Options > Cancel sending.
■ Voice mail If you subscribe to voice mail (network service), AT&T supplies a voice mailbox number to access your messages. The number may appear in your phone’s address book during the activation process. If not, you need to save this number to your phone to use voice mail. When you receive a voice message, a tone sounds, a message displays, or both. To call your voice mailbox, in the standby mode, press and hold 1, or select Menu > Messaging > Voice mail > Listen to voice mails.
9. Mobile Web You can access various mobile internet services with your phone browser. Important: Use only services that you trust and that offer adequate security and protection against harmful software. For availability of these services, pricing, and instructions, contact AT&T. With the phone browser, you can view the services that use wireless markup language (WML) or extensible hypertext markup language (XHTML) on their pages. Appearance may vary due to screen size.
copyrights or intellectual property rights to the third-party applications. As such, Nokia does not take any responsibility for end-user support, functionality of the applications, or the information in the applications or these materials. Nokia does not provide any warranty for the third-party applications. BY USING THE APPLICATIONS YOU ACKNOWLEDGE THAT THE APPLICATIONS ARE PROVIDED AS IS WITHOUT WARRANTY OF ANY KIND, EXPRESS OR IMPLIED, TO THE MAXIMUM EXTENT PERMITTED BY APPLICABLE LAW.
multimedia, and applications that may be purchased and downloaded to your phone. For information about billing, or about accessing this website, contact AT&T. 11. Mobile Video Mobile Video provides links to a variety of content such as video clips from TV shows, news, sports, and weather. Access the wireless internet with MEdia™ Mall to purchase and download music, games, graphics, multimedia, and applications to your phone. In the standby mode, to access Mobile Video, select Menu > Mobile Video.
■ Add a new contact Names and numbers are saved in the used memory. Select Menu > Address Book > Add new. Complete the fields with as much information as you want, and select Save. To add more detail, select Options. For example, to add a personalized ring tone, select Options > Add Detail > Multimedia > Tone or to add an image to display when the contact calls, Options > Add Detail > Multimedia > Image.
■ Business cards You can send and receive a person’s contact information from a compatible device that supports the vCard standard as a business card. To send a business card, find the contact whose information you want to send, and select Details > Options > Send business card > Via multimedia, Via text message, or Via Bluetooth. When you have received a business card, select Show > Save to save the business card in the phone memory. To discard the business card, select Exit > Yes.
■ Service and my numbers Select Menu > Address Book and from the following: Service numbers — to call the service numbers of AT&T, if the numbers are included on your SIM card (network service) My numbers — to view the phone numbers assigned to your SIM card. This option is only displayed if the numbers are included on your SIM card. 14. AT&T Social Net AT&T Social Net combines access to social networking applications and news feeds. Use this application to view and manage your social networking accounts.
To manage the files and folders, do the following: 1. Select Menu > My Stuff > Tones & Graphics. A list of folders is displayed. If a memory card is inserted in the phone, NO Name, or the name of the memory card is displayed. 2. Scroll to desired folder. To view a list of files in the folder, select Open. For the available options, select Options. 3. Scroll to the desired file to view, and select Open. For the available options, select Options.
For the availability of different services and pricing, contact AT&T. Your device may have preinstalled bookmarks and links for third-party internet sites. You may also access other third-party sites through your device. Third-party sites are not affiliated with Nokia, and Nokia does not endorse or assume liability for them. If you choose to access such sites, you should take precautions for security or content.
Self-portrait To begin to take a self-portrait, select Menu > My Stuff > Multimedia > Camera, and close the fold. To take the picture, press the PTT key. To view the picture, open the fold. Tip: To activate self-portrait mode with the fold closed, press and hold the up volume key. Record a video clip Select Menu > My Stuff > Multimedia > Video recorder > Record or press and hold the camera key on the keypad. To pause recording, select Pause; to resume recording, select Continue.
4. To rewind the current song, select and hold . To fast forward the current song, select and hold . Release the key at the position you want. 5. To pause the playback, select . Warning: Listen to music at a moderate level. Continuous exposure to high volume may damage your hearing. Do not hold the device near your ear when the loudspeaker is in use, because the volume may be extremely loud.
Voice recorder You can record speech, sounds, or an active call. For example, you can record a phone number to enter later. You can also record a message for a ringtone. Record sound 1. Select Menu > My Stuff > Multimedia > Voice recorder. 2. To start recording, select . To start recording during a call, select Options > Record. While recording a call, all parties to the call hear a faint beeping sound. When recording a call, hold the phone in the normal position near to your ear. 3.
Important: Exercise caution when opening messages. E-mail messages may contain malicious software or otherwise be harmful to your device or PC. E-mail provides access to certain common e-mail services. If you have an e-mail account with one of the supported e-mail services, you can use this application to access your e-mail account. With this application you can view your inbox, compose and send e-mail, receive e-mail, receive notification of new e-mail, and delete e-mail.
Customize — to customize the profile. Select the setting you want to change, and make the changes. Timed — to set the profile to be active until a specified time, up to 24 hours, and set the end time. When the time set for the profile expires, the previous profile that was not timed becomes active. ■ Set theme A theme contains elements for personalizing your phone, such as the wallpaper and font color used in the main display.
Fold animation — to set your phone to display an animation when you open and close the phone Font size — to set the font size for messaging, address book, and Mobile Web web pages ■ Mini display Select Menu > Settings > Mini display. You can change the settings for Wallpaper. ■ Set time and date To change the time, time zone, and date settings, select Menu > Settings > Set time/date > Date & time settings, Date and time format, or Auto-update of time (network service).
Navigation key To assign other phone functions from a predefined list to the navigation key (scroll key), select Menu > Settings > My shortcuts > Navigation key. Home screen key To select a navigation key to activate the active home screen mode, select Menu > Settings > My shortcuts > Home screen key. The default setting is Nav. key up/ down. ■ Sync and backup Create a backup of your personal data.
Features using Bluetooth technology or allowing such features to run in the background while using other features, increase the demand on battery power and reduce the battery life. Bluetooth technology allows you to connect the phone to a compatible Bluetooth device within 10 meters (32 feet).
To define how to use the service, select Menu > Settings > Connectivity > Packet data > Packet data conn. and from the following: When needed — to set the packet data connection to be established when an application needs it. The connection is closed when the application is terminated.
Call forwarding — to forward your incoming calls (network service). You may not be able to forward your calls if some call restriction functions are active. Anykey answer — to answer an incoming call by briefly pressing any key, except the power key, or the left and right selection keys Automatic redial — to make a maximum of 10 attempts to connect the call after an unsuccessful call attempt Speed dialing — to dial the names and phone numbers assigned to the speeddialing keys 2 - 9.
Offline mode query — the phone asks whether to use the offline profile every time when switched on. With the offline profile all radio connections are switched off. The offline profile should be used in areas sensitive to radio emissions.
Preferred access pt. — to view the saved access points. Scroll to an access point, and select Options > Details to view the name of the service provider, data bearer, and packet data access point or GSM dial-up number. Device manager sett. — to select when to allow service software updates Personal config. sett. — to add new personal accounts for various services manually, and to activate or delete them.
■ Reset device To reset some of the menu settings to their original values, select Menu > Settings > Reset device. Select Restore settings only only to restore preference settings and to prevent personal data from being deleted. To set to factory settings and delete personal information, select Restore all. Enter the security code. By default, this is12345. You may be prompted to create one. The names and phone numbers saved on the SIM card are not deleted. 18.
Service is disconnected Notices are pending Your status is Do Not Disturb ■ Add contacts Add a one-to-one contact To add a contact to the PTT contacts list, select Menu > My Stuff > Tools > Push to Talk > Add contact. Enter the name and telephone number of the new contact. If the contact has a PTT compatible phone, an invitation is sent. Add a contact group You can save a group of contacts to be able to call them collectively.
Make a one-to-one call To start a one-to-one call from the list of contacts, press and hold the PTT key; or select Menu > My Stuff > Tools > Push to Talk > PTT contacts. Scroll to a contact, and press and hold the PTT key while talking. Remember that you must release the PTT key to hear their response. To start a one-to-one call from the list of PTT groups, select PTT contacts, scroll to the desired group, and select View. Scroll to the desired contact, and press and hold the PTT key while talking.
recipients can then join your mobile call by pressing the PTT key. The call cannot be converted back to PTT. ■ Call Me Alerts If a person is unavailable, you can send a request for the person to call you back. Send a Call Me Alert To send a Call Me Alert from the contacts list in the PTT menu, select PTT Contacts. Scroll to a contact, and select Options > Call me alert. Respond to a Call Me Alert When someone sends you a Call Me Alert, Please call is displayed with the caller’s name in the standby mode.
To set a snooze time-out, select Snooze time-out and the desired time. After making changes to the alarm settings, scroll to and select Save. Alert tone and message The phone sounds an alert tone and flashes Alarm! and the current time on the display, even if the phone is switched off. To stop the alarm, select Stop. If you let the phone continue to sound the alarm for a minute or select Snooze, the alarm stops for the selected snooze time-out, and then resumes.
■ Calendar The calendar helps you keep track of reminders, calls that you need to make, meetings, and birthdays. Select Menu > My Stuff > Tools > Calendar. The current day is indicated by a frame in the month view. If there are notes set for a day, the day is in bold. To view the day notes, select View. To view a week, select Options > Week view. To delete all notes in the calendar, select the month or week view and Options > Delete notes > Delete all notes.
■ Notes Select Notes to enter and send notes to compatible devices by using text messaging or MMS. 1. Select Menu > My Stuff > Tools > Notes. 2. To make a note if one is not added, select Add; otherwise, select Options > Make a note. 3. Create the note, and select Save. 4. To view a note, scroll to it, and select View.
the phone can be used. To set the stopwatch timing in the background, press the end key. Using the stopwatch or allowing it to run in the background when using other features increases the demand on battery power and reduces the battery life. 20. PC connectivity You can access the Internet when your phone is connected to a compatible PC through a Bluetooth or a data cable connection. You can use your phone with a variety of PC connectivity and data communications applications.
The battery can be charged and discharged hundreds of times, but it will eventually wear out. When the talk and standby times are noticeably shorter than normal, replace the battery. Use only Nokia approved batteries, and recharge your battery only with Nokia approved chargers designated for this device. Use only replacement batteries qualified with the device per the IEEE-1725-2006 standard. Use of other batteries or chargers may present a risk of fire, explosion, leakage, or other hazard.
■ Nokia battery authentication guidelines Always use original Nokia batteries for your safety. To help ensure that you are getting an original Nokia battery, purchase it from a Nokia authorized service centre or dealer, and inspect the hologram label using the following steps: Authenticate hologram 1. When looking at the hologram on the label, you should see the Nokia connecting hands symbol from one angle and the Nokia Original Enhancements logo when looking from another angle. 2.
• Do not drop, knock, or shake the device. Rough handling can break internal circuit boards and fine mechanics. • Do not use harsh chemicals, cleaning solvents, or strong detergents to clean the device. Only use a soft, clean, dry cloth to clean the surface of the device. • Do not paint the device. Paint can clog the moving parts and prevent proper operation. • Use only the supplied or an approved replacement antenna.
■ Medical devices Operation of any radio transmitting equipment, including wireless phones, may interfere with the functionality of inadequately protected medical devices. Consult a physician or the manufacturer of the medical device to determine if they are adequately shielded from external RF energy or if you have any questions. Switch off your device in health care facilities when any regulations posted in these areas instruct you to do so.
bag deployment area. If in-vehicle wireless equipment is improperly installed and the air bag inflates, serious injury could result. Using your device while flying in aircraft is prohibited. Switch off your device before boarding an aircraft. The use of wireless teledevices in an aircraft may be dangerous to the operation of the aircraft, disrupt the wireless telephone network, and may be illegal.
■ Hearing aid compatibility (HAC) Warning: For hearing aid compatibility, you must turn off the Bluetooth connectivity. Your mobile device model complies with FCC rules governing hearing aid compatibility. These rules require an M3 microphone or higher value. The M-value, shown on the device box, refers to lower radio frequency (RF) emissions.
Index A Address Book 30 alarm clock 51 alert tone and message 52 applications 34 AT&T Mall 29 AT&T Music 30 B battery charging 13 charging, discharging 55 insertion 11 Bluetooth connectivity 42 bookmarks 28 browser 29 business cards 32 C calculator 54 calendar 53 call counters 52 functions 20 options 21 settings 44 timers 52 voice mail 27 waiting 21 caller groups 32 calls 20, 21 calls made 52 calls received 52 camera 35 effects 36 record a video clip 36 settings 36 take a photo 35 character case 23 charge
H N handsfree. See loudspeaker.
call 44 camera 36 clock 41 configuration 46 connectivity 42 contacts 32 date 41 enhancements 46 fold animation 41 GPRS, EGPRS 43 main display 40 messages 27 mini display 41 my shortcuts 41 phone 45 profiles 39 restore factory settings 48 security 47 themes 40 time 41 tones 40 USB data cable 44 wallpaper 40 shortcuts 41 SIM card card 20 insertion 11 speed dial list 32 speed dialing 20 standby mode 17, 41 stopwatch 54 subscribed names list 31 switch on and off 17 64 T take a photo 35 text 23 themes 40 time