AT&T ® Page Pac Plus Paging Controller Programming and Operation Guide
AT&T 463-248-204 Copyright 1993 AT&T All Rights Reserved Written/Printed in U.S.A. 0II722580-002 Issue 3, May 1993 Notice Every effort was made to ensure that the information in this guide was complete and accurate at the time of printing. However, information is subject to change. Federal Communications Commission (FCC) Interference Notice This equipment has been tested and found to comply with the limits for a Class A digital digital device, pursuant to Part 15 of the FCC rules.
Contents About This Guide 1. 2.
3. 3-1 Operation ■ Power Up 3-2 ■ System Administrator 3-2 ■ End User 3-2 ■ User Quick Reference Card 3-4 A. Application Notes IN.
About This Guide READ THIS GUIDE FIRST, before using the Installation Guide to install PagePac Pius equipment. You will need to complete the Zone Map (table 1-2) and Zone Configuration Tables (tables 1-3 and 1-4) to lay out your paging system zones before setting switches on the equipment and before programming the controller unit. After programming the unit, fill out the User Quick Reference Card, at the end of section 3, and distribute to all system users.
■ Solving Problems. Should any problem arise that requires technical assistance beyond the information provided in this guide, call: AT&T Technical Support, 1-800-552-3293. AT&T National Technical Marketing, 1-800-222-1313. AT&T National Service Assistance Center, 1-800-628-2888. Getting Started 1. Fill out the Zone Map (table 1-2) and Zone Configuration Tables (1-3 and 1-4) at the end of section 1. 2. Go to the Programming Quick Reference Chart at the end of section 2 and program the system. 3.
Overview 1 Contents About PagePac Plus Managing the System 1-3 1-6 ■ Installing System Hardware 1-6 ■ Changing System Settings 1-6 ■ Training Co-Workers 1-6 ■ Solving Problems 1-6 ■ Daily Operation 1-7 ■ Application Notes 1-7 Features and Capabilities 1-7 ■ Factory-Set Default Inputs 1-8 ■ Eight Primary Paging Zones 1-9 ■ 48 Expansion Zones 1-9 ■ PagePac Plus Amplicenter Interface 1-9 ■ Music Input 1-9 ■ Three Output Types 1-10 ■ Talk-Back Amplifier 1-10 ■ Tone G
Hardware Configuration Indicators and Connectors 1-11 ■ LED Indicators 1-11 ■ Back Panel Nomenclature 1-11 ■ Connectors on Rear 1-14 Power Interface Considerations Zone Map Zone Configuration Tables 1-2 1-10 Overview 1-14 1-15 1-16 1-22
About PagePac Plus Telephone Access and Talk-back The PagePac Plus Controller is a paging system controller that incorporates into one unit many paging system features previously obtainable only by purchasing multiple separate units. It is bi-directional, enabling two-way (talk-back) conversation via the paging system. PagePac Plus supports numerous modes of Telephone Access to the paging system, which allows you to access the system by simply dialing its extension, in-facility or off-premises.
Security Protection 1-4 Overview An Access Password and a Programming Password can easily be established for the PagePac Plus system. Both passwords are operative for both on- and off-premises access, and the Programming password is effective for both telephone keypad and PC programming access.
Figure 1-1.
Managing the System Installing System Hardware Please refer to the Installation Guide for complete instructions for installing the PagePac Plus Unit, Amplicenter, and Zone Expansion Units, to form a fully integrated functional paging controller system in your facility. Changing System Settings You can change the Control Unit’s settings easily to accommodate new or changing needs.
Daily Operation Depending on how your system is set up, you may need to oversee some of the system’s daily operation. For example, if your system is programmed to use the Night Bell feature, you will need to activate Night Bell service at the end of each day before leaving the office. Application Notes Application Notes are located at the end of this guide, after section 3. They provide technical tips and graphic examples of some common applications.
Factory-Set Default Inputs The PagePac Plus Control Unit has five factory-set default inputs that are active on a priority basis. These five, in order of priority, are Attendant Access, Input #1, Telephone Access, Input #2, and Night Bell. Attendant Access Attendant Access is the highest priority paging mode of the PagePac Plus system. The attendant simply dials his exclusive paging extension to make an announcement.
Eight Primary Paging Zones NOTE: The Zone Option switches, both on the PagePac Plus Controller and on any attached Zone Expansion Units, MUST be set before the PagePac Plus system is powered up, and therefore before programming commences. The PagePac Plus Control Unit has eight onboard zones.
Three Output Types The PagePac Plus Control Unit has three audio outputs, with the level controlled by an automatic gain control (AGC) to ensure excellent voice clarity. The first is the audio output signal to the PagePac Plus Amplicenter, in a Constant-Voltage Distribution System (see "Hardware Configuration," below.) The second audio output is intended to drive (for example) an additional PagePac Plus Control Unit. Only one external device may be connected to this output if talk-back is required.
Whether the PagePac Plus system is configured as a constant-voltage distribution system, a controller system, or as a hybrid system, has no bearing on programming and using the system. For full information about connecting hardware, see the Installation Guide. Constant-Voltage Distribution System This is the "traditional" paging system configuration.
Amplicenter: AC Power in; 110VAC at 60 Hz or 220VAC at 50 Hz OdBm out, control and audio for remote amplifier DC Power and 70V audio out to controller Bass (low frequency) control adjustment 70V out; paging in (redundant to item #9); music in Level adjustments: Music level, Music "ducking" (mute level), VOX audio level LEDs: green - page accessed, red – unbalanced output, red – overload, green – power on Telephone system mode switch: Dry loop 600 ohms, Dry Loop Hi Z, ground start, and loop start From contr
Figure 1-2.
Connectors on Rear You have access to controls and connections on the back panel, which is covered with a removable lid (see figure 1-2). For instructions on installing the PagePac Plus system and making correct interconnects, see the Installation Guide.
Interface Considerations The hardware installation configuration may have these impacts on programming and use of the PagePac Plus system: Setting correct addresses for Zone Expansion Unit(s) See the important explanation about setting the internal dip switches to address each Zone Expansion Unit, in the Installation Guide.
Zone Map The Zone Map is to be filled out by your system administrator or the person responsible for programming your PagePac Plus system. It assists in identifying the zones, both inputs and outputs, of your particular system. Make photocopies of the blank Zone Map to use in laying out your system. Refer to the example Zone Map for an idea how to proceed. Description of Zone Write a brief description of each zone in your facility.
Table 1-1.
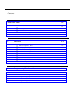
Table 1-2. Zone Map Description of Zone Physical Zone Number Physical Zone Code Zone 2 02 Zone 3 03 Zone 4 04 Zone 5 05 Zone 6 06 Zone 7 07 ALIAS* Zone Number Zone 8 For Zones 9 thru 56, see Zone Map Continuation Pages.
Table 1-2. Zone Map (Continuation Page 1) Description of Zone Physical Zone Number Physical Zone Number ALIAS* Zone Number Input (1 or 2) or Output Zones 9 thru 24 are located on the first Zone Expansion Unit.
Table 1-2. Zone Map (Continuation Page 2) Description of Zone Physical zone number Physical Zone Code ALIAS* Zone Number Zones 25 thru 40 are located on the second Zone Expansion Unit.
Table 1-2. Zone Map Description of Zone (Continuation Page 3) Physical Zone Number Physical Zone Code ALIAS* Zone Number Input (1 or 2) or Output Zones 41 thru 56 are located on the third Zone Expansion Unit.
Zone Configuration Tables The Zone Configuration Table consists of two parts, one for input zones and another for output zones. The table is to be filled out by your system administrator, or the person responsible for programming your PagePac Plus system. The top two lines of each table have been filled as an example. The items in the examples are taken from the Example Zone Map. Table 1-3. Zone Configuration Table Output Zones Description of Output Zone Phys.
Table 1-4.
Programming The Controller 2 Contents Introduction 2-3 ■ Programming by Touchtone Telephone 2-3 ■ Programming by PC 2-3 Software Configuration—Overview 2-4 ■ Zone Group versus Individual Zones 2-4 ■ At Power Up 2-4 Programming Options and Instructions 2-5 ■ Enter Programming Mode 2-5 ■ System Configuration Options Overview 2-5 ■ Reset to Factory Defaults 2-6 ■ Define Length of ALIAS Numbers 2-7 ■ Connect Password 2-8 ■ Programming Password 2-10 ■ Forgot the Password? 2
■ Computer Monitor 2-15 ■ Input Computer Monitor 2-16 ■ General Zone / Group Configurations Overview 2-16 ■ COPY Command 2-17 ■ Zone Map Option—Assigning ALlAS Numbers 2-18 ■ Type of Zone: Input or Output 2-19 ■ lnput Priority Arrangement 2-20 ■ Zone Monitor 2-21 ■ Zone Grouping 2-22 ■ Output Zone/Group Configurations Overview 2-23 ■ Type of Output 2-23 ■ Page Enable 2-25 ■ Music Enable 2-26 ■ Talk-Back Enable 2-27 ■ Night Bell Enable 2-28 ■ Pass DTMF to the Out
Introduction The operation of the PagePac Plus Controller can be customized to meet the requirements of your business. It can be programmed in either of two ways, using a telephone keypad or a PC, and nearly all features 1 can be programmed by either method. The zone option switches on the controller and on any attached Zone Expansion Unit(s) MUST be set before the PagePac system is powered up.
Software Configuration—Overview The PagePac Plus Controller is pre-programmed with certain default values when shipped, However, not all paging systems will have the same requirements, and therefore you (or the installation technician) may want or need to change the options on the system.
Programming Options and Instructions CAUTION: The Zone Option switches must be set before the PagePac Plus system is powered up, and therefore before programming commences. The 8 Zone Option switches on the rear of the PagePac Plus unit MUST be set to match the zone option selected via programming. The slide switch for each zone must be manually set to Contact Closure (to switch on/off a device, such as a door security lock, remote amplifier, etc.
Reset to Factory Defaults This system option allows you to "undo" all system changes you have made, in order to "start over." This Reset option takes all programmed options and restores them to their factory default settings. First access the PagePac Plus system and enter the programming mode by pressing [ * ] [ * ] and entering your Programming password (if optioned). You may exit the programming mode by dialing [ # ]. 1. Dial [ 1 ] [ 0 ] to select this option. Hear a DOUBLE beep. 2 .
Define Length of ALIAS Numbers This system option allows you to set the length (2, 3, or 4 digits) of the ALlAS number field. The default is 2 digits. If you wish to assign ALlAS numbers to the paging zones, you must set the length parameter. The ALIAS number is the dialing extension for the zone. If no ALlAS numbers are used, the Physical Zone Code is the dialing extension for a zone. This MUST be done before "Zone Map Option – Assigning ALlAS Numbers", later in this section.
Connect Password This feature will not become active until the first time you enter a password, via the programming mode. The factory default is NO password. The Connect password operates as a security block into the paging system, restricting paging access to authorized users. You may want to use a short Connect password (2 or 3 digits only) for ease of use. When a user accesses the PagePac Plus unit via Telephone Access, a dial tone will be returned to the user.
Programming Steps First access the PagePac Plus system and enter the programming mode by pressing [ * ] [ * ] and entering your Programming password (if optioned). You may exit the programming mode by dialing [ 1. Dial [ 3 # ]. ] [ 0 ] select this option. Hear a DOUBLE beep. 2. Enter the Password you wish to use (up to 6 digits). If the password has fewer than 6 digits, enter the [ # ] to terminate the string. For example, [ 1 ] [ 2 ] [ 3 ] [ 4 ] [ 5 ] [ 6 ] is a valid password entry.
Programming Password Establishing a Programming password will restrict access to the programming mode of the PagePac Plus paging system. It is recommended that access to programming be restricted to the System Administrator, Telecommunications Manager, or other selected users. This feature will become active once any programming password has been entered via the programming mode. You are not required to establish such a password. The factory-set default programming password is [ * ] [ * ].
Forgot the Password? In the event that either or both the connect password and programming password are forgotten, it will be necessary to call the Harris-Dracon Technical Help line (1-800-437-2266) for instructions how to erase the two passwords and be able to enter new ones. Confirmation Tone ON/OFF Your choice for this selection is ON or OFF, with the default setting as ON. When the option is ON, a tone will be sent to the telephone interface after a zone has been selected and before a page can be made.
Pre-Announcement Tone ON/OFF The choice for this parameter is ON/OFF, with the default setting ON. This tone is very similar to the initial talk-back warning tone, in the sense that it is sent to a zone when the zone is accessed. This tone will be sent out to both the zone selected and to the telephone interface. After this tone is sent, you may begin your page message.
Talk-Back Warning Tone This tone is intended to alert a person that their conversation is being monitored through the paging system loudspeaker. If Talk-back is optioned for YES, then the choices will be INITIAL, 30 SECOND REPETITION, or OFF. The default setting for this parameter is INITIAL and 30 SECOND REPETITION. Programming Steps First access the PagePac Plus system and enter the programming mode by pressing [ * ] [ * ] and entering your Programming password (if optioned).
VOX Disconnect Timing This is a loop supervision parameter for the station mode of the Telephone Interface. The PagePac Plus unit will return to an ON HOOK condition after no audio is detected in the page mode for the programmed amount of time. The default time is 30 seconds, but can be varied from 10 seconds to 60 seconds, in 10 second increments, or can be disabled completely.
Computer Monitor This option selects a device to be connected to the RS-232 port, a computer monitor for logging of all paging activity. The default setting is Computer Monitor. Computer Monitor Mode NOTE: Since the default option is the ONLY option, there is no need to program this. Programming Steps By selecting Computer Monitor (the default option), the PagePac Plus is enabled to monitor activity on Attendant Access, Telephone Interface, and Night Bell inputs.
Input Computer Monitor This option turns ON or OFF the inputs of Attendant Access, Telephone Access, and Night Bell to be recorded and displayed by the Computer Monitor if you have activated it in the preceding programming option. The factory default is OFF for all three. Programming Steps First access the PagePac Plus system and enter the programming mode by pressing [ * ] [ * ] and entering your Programming password (if optioned). You may exit the programming mode by dialing [ # ].
COPY Command The COPY command can be used to copy the configuration of a zone that has already been optioned, to one or more additional zones. This saves recentering the same parameters over again, to duplicate the parameters of an existing zone. The digits [ 1 ] [ 2 ] are used as the COPY command. First access the PagePac Plus system and enter the programming mode by pressing [ * ] [ * ] and entering your Programming password (if optioned). You may exit the programming mode by dialing [ # ]. 1.
Zone Map Option—Assigning ALIAS Numbers NOTE: Before doing this option, you MUST do "Define Length of ALIAS Numbers" above. (see table 2-2) Zone Map permits you to assign the dialing code, called the ALIAS zone code, that you will dial to access a particular zone by telephone. The factory default is NONE: no ALIAS numbers are pre-programmed. The zones are identified by their 2-digit Physical Zone Codes – 01 thru 88- as the default condition.
Type of Zone: Input or Output NOTE: The INPUT #l option must only be assigned to physical zones 1 through 8. The choices here are INPUT #1, INPUT #2, and OUTPUT. Be sure the manually selectable Zone Option switch on the rear of the PagePac Plus Controller is set to match the type of zone selected (input or output). Input #1 would be used for an emergency alert, say a connection to your alarm system. Input #2 would be a lower priority, say a doorbell input. The factory default is OUTPUT (i.e.
Input Priority Arrangement The input priorities are pre-set at the factory. You may only assign a priority level to inputs such as doorbell or security alarm, by assigning them to Input #1 or Input #2, which differ in priority. NOTE: These priorities cannot be rearranged. Also, if you select more than one zone to be inputs of the same level (Input 1, for example), such inputs will be handled on a first in, first served basis.
Zone Monitor This option selects a device to be connected to the RS-232 port, a computer monitor for logging of all zone or group zone paging activity. The default setting is off. Computer Monitor Mode By selecting Zone Monitor, the PagePac Plus is enabled to monitor activity on specific zone or group zone. This feature requires that a PC computer be connected to the RS-232 port of the PagePac Plus Controller.
Zone Grouping This option allows you to select a group of zones to be paged at the same time, The number of zone groups that can be formulated is eight; the maximum number of zones per group is 56 zones. The factory default is NONE (there are no default zone groups). Programming Steps First access the PagePac Plus system and enter the programming mode by pressing [ * ] [ * ] and entering your Programming password (if optioned). You may exit the programming mode by dialing [ # ].
Output Zone/Group Confimations Overview These options apply to zones or groups already configured as outputs (see "Type of Zone," above). All these parameters can be individually optioned per zone. For a summary of these options, see the Programming Quick Reference Chart at the end of this section. Type of Output This option selects the type of output for an individual output zone. The choices here are AUDIO/NORMALLY OPEN, NORMALLY CLOSED, SYSTEM HANDSHAKE, MOMENTARY OPEN, and TOGGLE.
Programming Steps First access the PagePac Plus system and enter the programming mode by pressing [ * ] [ * ] and entering your Programming password (if optioned). You may exit the programming mode by dialing [ # ]. You will need to repeat this procedure for each output zone. 1 . Dial [ 7 ] [ 0 ] to select this option. Hear a DOUBLE beep. 2. Enter the zone number, of the zone you wish to configure. Refer to your Zone Map (table 1-2). Use ALlAS numbers, if optioned.
Page Enable This output zone parameter enables paging for a selected output zone or zone group. The choice for this selection is YES/NO, with the default being YES. If you make an all-call page and this option is selected NO in either a Zone Group or Individual Zones, then an all-call page will be made to all other zones except the ones specified. If the decision is NO for the All-Call zone and an all-call page is made, then an error tone will be returned to you.
Music Enable This is an individual zone output parameter, that enables background music to be broadcast to a selected output zone (in the absence of a higher priority paging output). The choice is YES/NO, with the default being NO. Programming Steps First access the PagePac Plus system and enter the programming mode by pressing [ * ] [ * ] and entering your Programming password (if optioned). You may exit the programming mode by dialing [ # ].
Talk-Back Enable This is a zone output parameter that enables talk-back capability for a selected output zone or group. The choice is YES/NO, with the default being set to NO. All speakers in a zone or group will be active 2-way speakers if talk-back has been enabled for a zone. See discussion of talk-back in the Application Notes, at the end of this guide.
Night Bell Enable This is an individual zone output parameter. The choice is YES/NO with the default being NO. With this parameter set to YES, night bell will be sent to selected outputs whenever ring voltage is present on the night bell input (from the PBX to the controller). If a closure is required to trigger the night bell, then a zone will need to be configured as an input to send night bell to designated zones when a closure is present. This is discussed in Tone Selection and Tone Routing, below.
Pass DTMF to the Output This zone output option enables the Touchtone telephone keypad tones (DTMF) to be passed through the PagePac Pius Controller and output to a second controller or other ancillary device. NO Option The choice is YES/NO, with the default being NO. Operating the unit in the default mode, you may switch from zone to zone (within the same PagePac Plus Controller) without hanging up, simply by dialing the zone number of the zone you wish to switch to.
Programming Steps First access the PagePac Plus system and enter the programming mode by pressing [ * ] [ * ] and entering your Programming password (if optioned). You may exit the programming mode by dialing [ # ]. You will need to repeat this procedure for each output zone or zone group that you wish to receive the DTMF tones. 1 . Dial [ 9 ] [ 0 ] to select this option. Hear a DOUBLE beep. 2 . Enter the zone number, of the zone or group you wish to configure to receive the DTMF.
Input Zone / Group Options Overview These options apply to zones or groups already configured as inputs (see "Type of Zone," above). These options are summarized in the Programming Quick Reference Chart, at the end of this section. Tone Selection This is called "Activate Tone via an Input Closure," on the Quick Reference Chart. If a zone is configured to be an input and is activated, then a tone may be selected to be directed to whatever zone(s) are selected in "Tone Routing," below.
To verify the tone option for a given input zone, dial [ steps 2 and 3 above. 9 ] [ 3 ] and repeat These actions are summarized in table 2-22. The different tones are described below. Table 2-22. Tone Selecting Feature Mode Option/ Verify Activate Tone via an Input Closure To Select To Verify Description of Tones Dial Listen Zone/Group Selection For 92 93 Double Enter the input Double zone number.
Tone Routing Whatever zones are selected here will receive the tone selected in the previous option, "Tone Selection." For example, you have optioned an input zone to receive a doorbell pushbutton input. And you have selected a tone (in the previous step) to be output when the doorbell input is received. Now you must select the output zone or zone group which will receive the tone.
Audio Source Enable The primary use for this feature is to allow the PagePac Plus to be used for door service. If optioned, whenever a selected zone is active (i.e., the doorbell pushbutton), an audio source (either Telephone Access or Attendant Access) will be routed automatically to a zone (the door speaker-phone) selected in "Audio Routing," below. The default for this option is NONE.
Audio Routing If optioned, whenever a selected input zone with "Audio Source Enabled" is active, the audio source (either Telephone Access or Attendant Access) will be routed to the selected zone or group. The default for this parameter is NO ZONES. Door Service The primary use for this feature is to allow the PagePac Plus to be used for door service.
Error Tones The Error Tone is heard over the phone receiver when an incorrect zone number has been dialed or contradictory programming input has been attempted. Hear error tone when dialing a zone ALIAS number When a zone is selected by Touchtone telephone keypad input (DTMF), the PagePac Plus searches for the zone in numerical order of the physical zones; the value dialed (the ALIAS number) is then compared to the digits stored in memory for each physical zone.
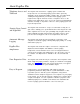
Programming Quick Reference Chart To Enter the Programming Mode (1) dial the PagePac Plus system access extension (2) enter the connect password (if any) (3) press [ * ] [ * ] and enter your programming password (if optioned) Chart 1. System Configuration Options Feature Mode Option/ Verify Dial L i s t e n For Choose Option Listen For Default Reset to Factory Defaults To Select 10 Double Beep Enter 25327 to reset. Enter any invalid number string to escape.
Chart 2. General Zone / Group Configurations Feature Mode Option/ Dial Listen Zone/Group Listen Choose Option Verify For Selection For L i s t e n Default For Zone Map To Select To Verify 60 Double Enter physical 61 Beep zone/group number. Double Enter alias Beep zone/group number. Triple Beeps None Type of Zone To Select To Verify 62 Double Enter 63 zone/group Beep number.
Chart 3. Output Zone / Group Configurations Feature Mode Option/ Dial Verify Listen Zone/Group L i s t e n Choose Option For Selection For Listen Default For Type of Output To Select To Verify 70 71 Double Beep (Z) Double Beep 0 – Audio/N.O. 1 – Mom. Open 2 – N/C 3 – Sys HS 4 – Toggle Triple Beeps Audio/ N.
Chart 4. Input Zone / Group Configurations Listen For Default Double 0 – None Beep 1 – Chime 2 – Siren 3 – Warble Siren 4 – Night Bell 5 – Fast Ring 6 – Steady Tone 7 – Door Bell Triple Beeps None Double Output Beep zone/group number Triple Beeps None 96 Double Enter the 97 Beep input zone number.
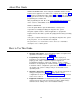
Operation 3 Contents Power Up System Administrator End User 3-2 3-2 3-2 ■ Using Telephone to Make a Voice Page 3-2 ■ Using Telephone to Respond to Doorbell Tone 3-3 User Quick Reference Card 3-4 Operation 3-1
Power UP When the PagePal Plus Controller is first powered up, it polls the zones to determine how many (if any) zone expansion modules are present. (The Controller has the ability to serially access Up to 48 external zones.
Using Telephone to Respond to Doorbell Tone Within 10 Seconds If you pick up your telephone and access the paging system within 10 seconds of the sounding of the doorbell tone, the paging system will automatically route your voice to the door speaker at the door. You need not dial a zone code. However, if a Connect password has been installed in your system, you will need to access the PagePac Plus and enter the password before being routed to the door speaker.
User Quick Reference Card Remove the blank User Quick Reference Card (opposite page) and fill it out o reflect your paging system. Make copies and distribute to all users. This page provides an example of a filled-out card. PAGING SYSTEM QUICK REFERENCE CARD (Example) Paging System Access by Telephone (1) Dial the PagePac Plus system access extension. (2) Enter the Connect password (if any). (3) Dial the code for the zone or zone group to be paged (see table below).
PAGING SYSTEM QUICK REFERENCE CARD Paging System Access by Telephone (1) Dial the PagePac Plus system access extension. (2) Enter the Connect password (if any). (3) Dial the code for the zone or zone group to be paged (see table below). (4) To leave one zone and go directly to another, just dial the code for the other zone (don’t hang up).
A Application Notes Night Bell There are two different Night Bell connections possible with the PagePac Pius Controller. These are illustrated in figure A-1. From an EKTS Telephone System A programmer needs to know what type of Night Bell connection exists between the telephone system and the PagePac Plus.
Figure A-l.
Background Music Is a music source connected to your PagePac Plus Ampiicenter? Which zones do you wish background music to be heard in? You can adjust the music volume level, ducking level, bass level, and voice volume level (for voice paging) on the PagePac Plus Amplicenter. Figure A-2 illustrates typical music interfaces to the PagePac Plus system. For programming information to enable music, see table 2-17 in section 2.
Figure A-2.
Door Control Visitor Presses Doorbell Figure A-3 illustrates door control interfaces. When a visitor presses the doorbell of a security door, a contact-closure input to the controller signals an output tone (i.e., a door chime) to selected paging zone(s). Programming information is provided in section 2, table 2-13 to interface the doorbell as an input zone, 2-21 to select a tone to be sounded when the doorbell input is activated, 2-22 to route the tone to in-facility paging zones.
Figure A-3.
Alarm System Input Figure A-4 illustrates a typical alarm system interface. Program the alarm system input as a contact-closure input, resulting in a warning tone output to all zones (or selected zones only). Refer to section 2 for programming steps, in table 2-13 to set the alarm system interface as an input zone, table 2-21 to select a tone to be triggered, and table 2-22 to route the warning tone to paging zones.
Figure A-4.
Talkback All speakers in a zone will be two-way speakers, if talkback has been enabled for a zone. Therefore all speakers in the talkback zone will pick up ambient noise, as well as the voices of persons addressing the paging speakers. It is not recommended to have more than two speakers in a zone that is designated for talkback. However, there are situations where it is desirable to have more talkback speakers in a zone.
Figure A-5.
Computer Monitor Paging Log Is a PC computer connected to the RS-232 port of the PagePac Plus Controller for the purpose of logging paging activities? If so, you will want to program the controller to send signals to it, and turn ON/OFF the Attendant Access, Telephone Access, and Night Bell signals that would trigger the monitor to log the event. Figure A-6 shows a typical computer monitor interface for logging purposes.
Figure A-6.
Connecting Additional PagePac Plus Controllers or Remote Amplifiers When additional PagePac Plus Controller(s) or other ancillary devices are daisy-chained with the first PagePac Plus Controller, you will want to ensure that the programming option DTMF Enabled to the Output has been selected for a YES condition for output zones. This permits you, when engaged in paging by telephone in one zone, to dial another zone number (residing on the remote PagePac Plus unit) and automatically reach that zone.
Figure A-7.
Index A i-vii About this guide Activate tone via an input closure 2-40 Additional controller Diagram A-14 A-7 Alarm system input Alarm system interface Diagram A-8 1-16 ALlAS zone numbers ALlAS number 2-7 1-3, 1-12, 1-14 Amplicenter 1-9 Amplicenter interface Answering the doorbell A-5 Application notes 1-7, A-1 Attendant access 1-8 Audio routing 2-34, 2-40 2-34 Audio source Audio source enabled 2-40 1-11 1-11 1-11 1-12 2-17 D Default inputs Door control Door control interfaces Diagram Door service Door s
O H Hardware Configuration Installation How to use this guide 1-10 1-6 vii Operation Ordering information Output types Output zone Overview and features vii, 1-7, 3-1 - 3-5 1-11 1-10 2-23 vii I P Indicators Input #1 Input #2 Input computer monitor Input priority Installation Interface considerations Interfaces 1-11 1-8 1-8 2-16, 2-37 2-20 vii 1-15 1-15 L LED indicators 1-11 M Make a voice page Managing the system Monitor Computer Mode Music Background Music enable Music input Music interfaces Diagr
Quick reference chart Talkback Tone muting Touchtone telephone Zone grouping Programming memory Programming password 2-37 2-27 2-33 2-3 2-22 1-10 3-2 Q Quick reference chart 2-3, 2-37 viii A-14 A-1 3 2-37 1-14, 2-3 1-3 1-4 2-4 1-6 ii 3-2 2-5 2-23 1-6 T Talkback Talkback enable Talkback warning tones Telephone access Telephone mode Telephone numbers support Tone generator Tone routing Tone selection Unlock the door User quick reference card Using telephone to make a voice page 3-3 3-4 3-2 V VOX time
©1993 AT&T All rights reserved Printed in U.S.