® Syn248 Installation and Configuration Guide © 2012–2013 Advanced American Telephones. All Rights Reserved. AT&T and the AT&T logo are trademarks of AT&T Intellectual Property licensed to Advanced American Telephones, San Antonio, TX 78219. Syn248® is a registered trademark of Advanced American Telephones. Issue 5.
Syn248 Installation and Configuration Guide CONTENTS Preface .............................................................................................................. 4 Additional Documentation ................................................................................................................................. 4 Topic Navigation .....................................................................................................................................................
Syn248 Installation and Configuration Guide System Configuration...................................................................................35 Accessing the Administrator WebUI .......................................................................................................... 36 Error Handling...................................................................................................................................... 38 System Settings..................................................
Syn248 Installation and Configuration Guide Initial Installation ...............................................................................................................................................104 Display Messages...............................................................................................................................................104 Gateway Setup...........................................................................................................................
Syn248 Installation and Configuration Guide Back to Contents PREFACE This Installation and Configuration Guide provides instructions for installing and setting up your Syn248 system with software version 1.3.1 or later. See page 8 for instructions on checking the software version on the Gateway and the Deskset. To upgrade your Syn248 devices to the latest software version, see “Updating Devices” on page 74.
Syn248 Installation and Configuration Guide Back to Contents Topic Navigation This Syn248 Installation and Configuration Guide features easy navigation between topics and the ability to return to your original topic. Text in blue indicates a link to another page in the document. indicates a hyperlink to an external web site. Bold text in blue You can also click the arrows at the bottom of the page to move around this document. Go back to the last page viewed. Go to the previous page.
Syn248 Installation and Configuration Guide Back to Contents C HAPTER 1 INSTALLATION This section describes the physical installation of the Syn248 devices. Each system must include at least one Gateway and one Deskset. Each Gateway supports up to four analog telephone lines.
Syn248 Installation and Configuration Guide Back to Contents System Overview AT&T SB35010 Analog Gateway — Each Gateway provides access to up to four analog outside telephone lines. A system can have up to two Gateways, supporting up to eight telephone lines. AT&T SB35020/SB35025 Deskset — These Deskset models feature a standard screen and programmable feature keys. A system can have up to 24 Desksets. The SB35025 has a DECT 6.
Syn248 Installation and Configuration Guide Back to Contents Software Version Compatibility Systems with software versions 1.3.1 and later support the features described in this guide. All Gateways and Desksets must have compatible software versions installed. To determine the software version of a SB35010 Gateway, on the Gateway front panel, press SELECT, SELECT, and then DOWN. The software version appears. Device Info SW Ver: FW Ver: S-Series: . '0 3 . .
Syn248 Installation and Configuration Guide Back to Contents System Installation Overview Figure 1 illustrates how the Syn248 system differs from conventional telephone systems in that calls are not coordinated by a central controller. Instead, the system uses a distributed control system over a new or existing local area network (LAN). blue lines = telephone red lines = Ethernet orange lines = audio dotted lines = DECT wireless Figure 1.
Syn248 Installation and Configuration Guide Back to Contents Recommended Installation Sequence Installation 1. Prepare your site for installation. See “Site Preparation” on page 11. 2. Install the Gateway(s). See “Connecting the Gateway” on page 17. 3. Install the first Deskset. See “Deskset Installation” on page 19. This Deskset is assigned extension number 200. 4. Install the other Desksets. See “Deskset Installation” on page 19. 5.
Syn248 Installation and Configuration Guide Back to Contents Site Preparation This section describes how to prepare your site for a successful Syn248 system installation. Network Requirements A switched network topology is recommended for your LAN (using standard 10/100 Ethernet switches that carry traffic at a nominal rate of 100 Mbit/s). The office LAN infrastructure should use Cat.-5 (or better) cable. The LAN connections to Syn248 devices should all be wired.
Syn248 Installation and Configuration Guide Back to Contents Placement Considerations Avoid placing any Syn248 component too close to the following: Communication devices, such as television sets, DVD players, or other cordless telephones Excessive heat sources Noise sources, such as a window with traffic outside, motors, microwave ovens, refrigerators, or fluorescent lighting Excessive dust sources, such as a workshop or garage Excessive moisture Extremely low temperature Mecha
Syn248 Installation and Configuration Guide Back to Contents Assigning Telephone Lines and Extensions This section discusses various telephone line configuration issues to consider. Providing Limited Telephone Service During AC Power Outages The fourth line on each Gateway is a Bypass port that works during AC power failures. If you have a telephone line plugged into LINE 4, connect a line-powered analog telephone to the RJ-11 jack labeled BYPASS for telephone service during power failures.
Syn248 Installation and Configuration Guide Back to Contents Extension Assignments The system assigns the first Deskset to join the network as extension 200. The system automatically assigns each additional Deskset an extension number in ascending order as it is connected to the LAN. Once the Desksets are connected to the same network, they find each other through Peer-to-Peer (P2P) discovery protocols and automatically self-configure.
Syn248 Installation and Configuration Guide Back to Contents Gateway Placement You can install the Gateway in a standard 19-inch rack, on a desktop, or mount it on a wall. The Gateway must be installed within three feet of the building ground point. Install each device using the following instructions. Rack Mounting To mount the Gateway into a standard 19-inch rack: 1. Remove the two mounting brackets and six screws from the packing tissue. 2.
Syn248 Installation and Configuration Guide Back to Contents Wall Mounting You can mount the Gateway to a wall using the two mounting slots on the bottom of the device. Ensure that the device is oriented as shown in Figure 3 to allow air to flow vertically through the ventilation holes on each side of the device. Figure 3. Wall Mount Orientation To mount the Gateway to a wall: Installation 1. Install two pan-head screws (with ¼-inch diameter head) 7 ⅞ inches (20 cm) apart.
Syn248 Installation and Configuration Guide Back to Contents Connecting the Gateway The Gateway grounding terminal shown in Figure 4 must be connected to reliable earth ground using a separate ground wire before connecting the telecommunication lines. The connection to earth ground must be verified by qualified personnel. Grounding Terminal Figure 4.
Syn248 Installation and Configuration Guide Back to Contents Connect the Gateway to the network: 1. Connect the supplied Cat.-5 LAN cable (or a comparable substitute) from your office LAN to the Gateway LAN port. Line LEDs LAN DC Power Figure 7. Gateway Power and LAN Connections 2. Plug the AC plug into an electrical outlet not controlled by a wall switch and the DC plug into the DC Power jack on the Gateway, as shown in Figure 7. Wait up to one minute until the screen lights up.
Syn248 Installation and Configuration Guide Back to Contents Deskset Installation Figure 9 identifies the features on the bottom and side of the Deskset. You can install the Deskset on a desktop or mount it on a wall. 8 1 2 4 3 5 7 6 RESET Figure 9. Deskset Connections (SB35025 Model Shown) 1. Network Port There are two LEDs next to each network port. The green LED is on when the Deskset is connected to the network and has AC power. The yellow LED flashes when there is network activity. 2.
Syn248 Installation and Configuration Guide Back to Contents To attach the Desktop stand for desktop installation: 1. Select a Deskset position. The desktop setup requires the Deskset stand and provides two positions, option 1 at 45° and option 2 at 60°, as shown in Figure 10. If you use option 2, rotate the handset tab as explained in “To rotate the handset tab for wall and Deskset Option 2 installation:” on page 21. Option 2 Option 1 Figure 10. Deskset Stand Options 2.
Syn248 Installation and Configuration Guide 5. Back to Contents Rotate the stand away from you until it rests against the base and you hear a click as the flexible tabs lock into place. To rotate the handset tab for wall and Deskset Option 2 installation: 1. Press the switch hook and slide the handset tab toward the top of the base, as shown. Switch Hook Handset Tab 2. Rotate the handset tab 180° so that the “hook” is at the top. 3. Slide the handset tab back into the base.
Syn248 Installation and Configuration Guide Back to Contents To install the Deskset on a wall: 1. Plug the Ethernet cable into the port on the back of the Deskset. (See “To connect the Deskset to the network:” on page 24.) 2. Plug the power adapter into the jack on the back of the Deskset. Skip this step if using PoE. (See “To connect power:” on page 25.) 3. Place the Deskset base over the mounting plate as shown in . The Deskset will fit onto wall-mount screws with centers 3 ¼ inches (8.
Syn248 Installation and Configuration Guide Back to Contents Connect the corded handset: 1. Plug the coiled end of the handset cord into the handset jack on the left side of the Deskset. Handset Jack on Deskset Handset Jack on Handset 2. Plug the end of the handset cord with the longer straight portion into the handset, then hang up. Connect an optional corded headset: Plug an optional corded headset or cordless headset base into the RJ-9 connector on the bottom of the Deskset, as shown.
Syn248 Installation and Configuration Guide Back to Contents To connect the Deskset to the network: 1. Plug a Cat.-5 Ethernet cable into the Network port on the back of the Deskset. 2. Plug the other end into an Ethernet wall jack that connects to your LAN switch. If there is a networked computer and no extra Ethernet wall jacks near the Deskset, then the Deskset and PC can share the same network connection. 1. Unplug the Cat.-5 Ethernet cable from your computer. 2. Plug that Cat.
Syn248 Installation and Configuration Guide Back to Contents To connect power: If you are using PoE, connecting the Deskset to the network also connects the power. If you are using the supplied power adapter: 1. Plug the power adapter (blue tag) into the DC Power jack on the back of the Deskset. Power Jack 2. Plug the power adapter into an outlet not controlled by a wall switch. The display screen illuminates within a minute.
Syn248 Installation and Configuration Guide Back to Contents Connecting an Overhead Paging System (OHP) You can connect a single-zone overhead paging system to an SB35025 Deskset using the supplied audio in/out cable. Syn248 supports one single-zone paging system per Syn248 system. If necessary, you can connect both an overhead paging system and a Music on Hold source to a single SB35025 Deskset using the supplied audio in/out cable.
Syn248 Installation and Configuration Guide Back to Contents To install an overhead paging system: 1. Plug an audio cable from the OHP device into the “Paging Output” jack of the audio in/out cable supplied with the SB35025 Deskset, as shown in Figure 13. Overhead Paging System Paging Output RESET SB35025 Deskset Figure 13.
Syn248 Installation and Configuration Guide Back to Contents Connecting a Music on Hold Source Your music on hold (MoH) source can be a streaming audio source, such as a radio or MP3 music player. The audio source must have a volume control. The volume adjustment on the audio device should be set to obtain the preferred level of music on hold within the system. On-hold music functionality should only be used in conjunction with music specifically licensed for on-hold use.
Syn248 Installation and Configuration Guide Back to Contents To install a music on hold source: 1. Connect an audio cable with 1/8-inch (3.5 mm) jacks from your music on hold source to the “Music on Hold Input” jack of the audio in/out cable supplied with the SB35025 Deskset. See Figure 15. Music on Hold Source Music on Hold Input RESET SB35025 Deskset Figure 15. Music on Hold Source Installation 2. Connect the supplied audio in/out cable to the SB35025 Deskset AUX I/O port. 3.
Syn248 Installation and Configuration Guide Back to Contents Cordless Headset Installation and Registration The SB35020 Deskset does not support AT&T DECT Cordless Headsets. Install the cordless headset charger, then install and charge the battery according to the headset user’s manual. You can register one AT&T DECT Cordless Headset to a Deskset. When a Deskset has a cordless accessory, the Deskset and headset are all part of the same extension, and only one device can be used at a time.
Syn248 Installation and Configuration Guide Back to Contents SB35031 Deskset Registration To register the cordless headset: 1. Press (MENU), then 2, and then 5. The Cordless Headset Registration menu appears. The headset must be in the charger, otherwise registration cannot proceed. Cordless Headset Registration Cordless Headset is currently Not Registered Place Cordless Headset in charger. Press Register to begin process. Register Quick Dial Exit 2.
Syn248 Installation and Configuration Guide Back to Contents Deregistering a Cordless Headset You must deregister cordless accessories before you can register them to different Desksets. If you remove a Deskset from the system, first deregister any cordless accessories. SB35025 To deregister a cordless headset: 1. Press (MENU), then 2, and then 6. The Cordless Headset menu appears. 2. Press DeReg . The confirmation message appears. 3. Press Yes to confirm deregistration.
Syn248 Installation and Configuration Guide Back to Contents Cordless Headset Registration Cordless Headset is currently Not Registered Place Cordless Headset in charger. Press Register to begin process. Register Quick Dial Exit The cordless headset ON/OFF light slowly flashes. 4. Press Exit . The User Settings menu appears. Cordless Accessory Registration and Deregistration Time-Out If the cordless device is registered to another Deskset, it must be deregistered first.
Syn248 Installation and Configuration Guide Back to Contents Product Registration In order to keep your system up to date with the latest upgrades and ensure timely warranty support, it is extremely important to register your system. To register a device, you need its MAC address. To find a Deskset MAC address: Press (MENU), and then press 4. Scroll down if necessary and note the MAC Address line. Deskset Information Model No: SB35031 Status: IP Address: MAC Address: Serial No: Synchronized* 192.
Syn248 Installation and Configuration Guide Back to Contents CHAPTER 2 SYSTEM CONFIGURATION The WebUI allows you to configure Syn248 devices and the Syn248 system. The WebUI is embedded in every SB35010 Gateway and Deskset. When you access the WebUI, you are accessing it on the device, not on the Internet. This chapter shows you how to access the WebUI, then guides you through the settings you may have to configure to commission or to customize a Syn248 system.
Syn248 Installation and Configuration Guide Back to Contents Accessing the Administrator WebUI Only one person at a time should log on as the system administrator to prevent unintentional overwriting of changes. WebUI information for Deskset users is contained in the “Web Interface” chapter of the SB35020/SB35025 Deskset User's Guide and the SB35031 Deskset User’s Guide at smbtelephones.att.com. To access the WebUI and log on: 1.
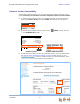
Syn248 Installation and Configuration Guide 6. Back to Contents Enter admin in the Login Name field and 12345 in the Password field, then click . You can change the Admin ID and password once you have logged on. The System Information page appears. The System Information page displays the count of Desksets and Gateways.
Syn248 Installation and Configuration Guide Back to Contents Error Handling If you type an invalid value into one of the WebUI fields and click , the page is not saved. The WebUI displays an error message at the top of the page. The field with the incorrect value is highlighted in yellow, as shown in Figure 16. You can view a more detailed error description by resting your mouse pointer on the highlighted field. . Error Message Invalid Entry Figure 16.
Syn248 Installation and Configuration Guide Back to Contents System Settings After you log on to the WebUI as the administrator with a Gateway or Deskset IP address, you can make changes to the system or to individual Desksets. When making changes to the System Settings through the WebUI, ensure that no one is using the system. To ensure the system is idle, you might need to make the changes outside of normal office hours.
Syn248 Installation and Configuration Guide Back to Contents 4. Set the Timer for Forwarded and Transferred Outside Calls. This sets the Maximum Call Duration for incoming calls when they are forwarded to non-system phone numbers, such as to cell phones. When you forward these calls, two phone lines are in use for the duration of the forwarded call — one for the incoming call and one for the call to the forwarded line — with no Syn248 user able to end the call.
Syn248 Installation and Configuration Guide Back to Contents b. Click Custom Time Server if you have your own preferred time server, then enter the server’s URL. c. Select your Time Zone. d. Click Yes or No for Daylight Savings Time. OR To set the time and date manually, click Manual. 7. a. Enter the current time and date. b. Select your Time Zone. c. Click Yes or No for Daylight Savings Time. Click System Configuration to save these settings or click 41 .
Syn248 Installation and Configuration Guide Back to Contents Configuring the Auto Attendant The Auto Attendant automatically answers unanswered external calls when it is set as a Call Foward–No Answer destination on the Phone Line CFNA page. See “Configuring Phone Line CFNA” on page 53. When calls are forwarded to the Auto Attendant, callers hear the Auto Attendant menu, which tells them how to use a touch-tone telephone to reach the appropriate person, operator, or extension mailbox.
Syn248 Installation and Configuration Guide Back to Contents To customize a menu: 1. Click System Settings, then Auto Attendant. The Day Menu appears. 2. Click to record a menu voice prompt. The Auto Attendant Voice Prompts screen appears. See “Auto Attendant Voice Prompts” on page 45. 3. Set Enable Direct Dial. Enabling Direct Dial allows callers to directly dial extensions by entering an extension number after reaching the Auto Attendant.
Syn248 Installation and Configuration Guide Back to Contents The available choices are: None — No action. Replay — Replays the current message. Auto Attendant Directory — Accesses the Auto Attendant Directory, which allows callers to spell a name, followed by the pound (#) sign. See “Name Recording for the Auto Attendant Directory” on page 47 and “Extension Basic Settings” on page 59. — Sends calls directly to a specific extension.
Syn248 Installation and Configuration Guide Back to Contents Auto Attendant Voice Prompts To record Auto Attendant voice prompts: 1. Click System Settings, then Auto Attendant. 2. On an Auto Attendant Day Menu or Night Menu page, click Auto Attendant Voice Prompts page appears. 3. Follow the instructions on the web page to record the voice prompt. . The Here is an example of a script for a Day menu: “This is the Widget Company. We are open from 9 AM to 5 PM, Monday to Friday.
Syn248 Installation and Configuration Guide Back to Contents Figure 17. Day Menu Example Setting the Current Auto-Attendant To set the current Auto-Attendant: (MENU), then 5 to display the Auto-Attendant 1. On the Operator Deskset, press menu. 2. SB35031 Deskset — Highlight the desired menu, then press SB35020/SB35025 Deskset — Press Menu, Day Menu, or Night Menu. Set? . or to select the current menu: Default Auto Attendant Settings 1. Default Menu [Set] 2. Day Menu 3.
Syn248 Installation and Configuration Guide Back to Contents Name Recording for the Auto Attendant Directory The administrator and individual users can create name recordings at the Desksets. When callers access the Directory through the Auto Attendant, the name recording plays to confirm the selection. In order to create a fully functional Auto Attendant Directory, ensure that you also enter a name for every extension. See “Extension Basic Settings” on page 59.
Syn248 Installation and Configuration Guide SB35031 Back to Contents 4. When you are finished recording, press and Record . Play 5. Press 6. To return to the User Settings screen, press Play Stop . The screen changes to display to review the name recording. Exit . To delete a name: 1. Press MENU, 2, and 4. The Name Recording screen appears. 2. Press 2. A confirmation screen appears. 3. Press Yes to confirm.
Syn248 Installation and Configuration Guide Back to Contents Configuring Hold Settings On the Hold Settings page, you can enable Music on Hold and create a hold announcement for callers to hear when they are on hold. When the hold announcement and Music on Hold are disabled, callers on hold hear two short beeps every 10 seconds. The hold announcement does not play when placing a conference on hold, or if one of the parties drops out of the conference.
Syn248 Installation and Configuration Guide 9. Back to Contents After hanging up and clicking , you return to the Hold Settings page. If you press before you hang up, the recording is not saved. OR Click to return to the Hold Settings page without saving the changes. 10. On the Hold Settings page, click to save these settings or click return to the previous page without saving the changes.
Syn248 Installation and Configuration Guide Back to Contents Overhead Paging The Overhead Paging Configuration page does not appear if there are no SB35025 Desksets connected to the system. To set up external overhead paging: 1. In the navigation menu at left, click Overhead Paging. The Overhead Paging Configuration page appears. 2. Enable or Disable the overhead Paging.
Syn248 Installation and Configuration Guide Back to Contents Creating a Paging Zone with Overhead Paging An overhead paging (OHP) system issues a one-way broadcast to all overhead speakers. These speakers cannot be grouped into separate zones. A single OHP system can be connected to the AUX I/O port of an SB35025 Deskset. This OHP system is automatically included when you page “All Extensions”. To create a single overhead paging zone: 1.
Syn248 Installation and Configuration Guide Back to Contents Configuring Phone Line CFNA On the Phone Line CFNA (Call Forward–No Answer) page, you can specify how to forward calls that do not get answered. You can set a CFNA destination for each telephone line connected to the Gateway.
Syn248 Installation and Configuration Guide Back to Contents Extension. The unanswered call is directed to the selected extension. Note that if the call is not answered at the extension, then the call is forwarded again according the extension’s Intercom CFNA setting. Outside Phone Number. After selecting this, enter a telephone number. Auto Attendant. The unanswered call is directed to the currently selected Auto Attendant menu. 4. Select the Seconds before Forwarding, from 0 to 45 seconds.
Syn248 Installation and Configuration Guide Back to Contents Creating, Editing and Deleting Paging Zones Use paging zones to set up extensions that can be paged as a group. For example, all extensions in the sales department could be defined as a paging zone. Any Deskset user can initiate a page to all extensions or only to the members of a paging zone. You can configure up to eight paging zones, each with one or more members. You can place every extension in a paging zone. To create a paging zone: 1.
Syn248 Installation and Configuration Guide 4. Back to Contents Select one or more extensions that you want in this paging zone from the Available Members list and click . OR Select one or more extensions to remove from this paging zone from the Paging Zone Members list and click . Overhead paging speakers can be included in a paging zone. Select Overhead Page from the Available Members list and click . 5. Click to save these settings or click without saving the changes.
Syn248 Installation and Configuration Guide Back to Contents System Directory Create a list of up to 100 phone numbers (referred to as the System list on the Deskset) that Deskset users might frequently call. These numbers are available to all of the extensions. To set up the System Directory: 1. In the navigation menu at left, click System Directory. The System Directory List page appears. 2. Click 3. Complete the Add System Directory List Entry page with the information indicated. 4.
Syn248 Installation and Configuration Guide Back to Contents Line Naming You can name the lines connected to the Gateway for easier identification. To name a line: 1. In the navigation menu at left, click Line Naming. The Line Naming page appears. 2. In the Select Line to Change list, select a line. All Gateway lines are listed. 3. Enter the New Line Name using up to 16 characters. 4. Click table. System Configuration to save the entry.
Syn248 Installation and Configuration Guide Back to Contents Extension Settings Use the WebUI to configure the following Extension Settings: “Extension Basic Settings” on page 59 “Personal Directory” on page 62 “Deskset Programmable Feature Keys (PFKs)” on page 64. Ensure that the extension you are configuring is not in use, or the configuration changes may fail. Extension Basic Settings You can modify the settings for individual extensions from the Extension Basic Settings page.
Syn248 Installation and Configuration Guide Back to Contents Extension Name displays the name for the current extension. This name is used on the Idle screen of the Deskset and in the Auto Attendant Directory. Callers spell the Extension Name, followed by the pound (#) sign, using their touch-tone phones when they search for extensions in the Auto Attendant Directory. 5. You can enter a new extension number in the range 100–999 into the Change Extension Number to box.
Syn248 Installation and Configuration Guide b. Back to Contents Voicemail. Extension. Outside Phone Number. Select the number of Seconds before Forwarding. The Intercom Call Forward–No Answer settings apply to intercom calls and external calls forwarded from a Phone Line Call Forward–No Answer setting (including calls routed to the extension by the Auto Attendant). 8. Set the Automatic Off-hook Line Selection.
Syn248 Installation and Configuration Guide Back to Contents Personal Directory The Personal Directory is only available at the extension for which it was created. Personal Directory entries can be created and managed by the administrator or by a Deskset user. To manage the Personal Directory: 1. In the navigation menu at left, click Extension Settings, then Personal Directory. The Directory List for Extension: page appears. 2. Select the desired extension number from the list.
Syn248 Installation and Configuration Guide To edit an entry, click [Edit] to the right of the entry. The Edit Personal Directory List Entry page appears with the fields populated with the entry to be edited. Click added. System Configuration Back to Contents to save the entry. The Directory List page appears with the entry To sort entries by last name, click button changes to . The list updates and the . To delete Directory List entries: a.
Syn248 Installation and Configuration Guide Back to Contents Deskset Programmable Feature Keys (PFKs) Use the Programmable Feature Keys page to set the PFKs on the Desksets in your Syn248 system. PFKs give users access to lines (Gateway lines and intercom lines) and provide one-touch access to certain Deskset features. To edit Programmable Feature Key assignments: 1. In the navigation menu at left, click Extension Settings, then Feature Keys. 2.
Syn248 Installation and Configuration Guide Back to Contents SB35020/SB35025 Deskset Programmable Feature Keys Keys 1 to 4 are assigned to Gateway lines 1 to 4 by default. Key 10 is fixed as an Intercom key to enable internal, extension-to-extension calls.
Syn248 Installation and Configuration Guide Back to Contents 2. In the navigation menu at left, click Extension Settings, then Feature Keys. 3. If necessary, select the desired Deskset extension number from the Select an Extension list. When logging on as a user, you cannot select a different extension. 4. On the Programmable Feature Keys page, enter a name and number for every quick-dial entry you want to create. Any hyphens in phone numbers are ignored. Enter P for a pause in the number. 5.
Syn248 Installation and Configuration Guide Back to Contents SB35031 Deskset Quick-Dial Keys You or a SB35031 Deskset user can enter quick-dial entries. To create or edit SB35031 quick-dial entries: 1. Log on, either as administrator or a user (enter an extension number and the user’s password, if needed). 2. If logging on as administrator a. Click Extension Settings, then Feature Keys in the navigation menu at left. The Programmable Feature Keys page appears. b.
Syn248 Installation and Configuration Guide Back to Contents Device Management Use the Device Management page to delete devices from the system and to change Deskset extension numbers. If you unplug a Deskset from the system, the extension remains in the system database until you use the Device Management page to delete the device. All local settings and personal information (Call Logs and voice messages, for example) remain stored in the Deskset.
Syn248 Installation and Configuration Guide Back to Contents Deleting an Extension (Deskset) If you unplug a Deskset from the system, it remains in the system database until you use the Device Management page to delete the device. If the Auto Attendant menu programming has set a far-end key press to ring that extension or leave a message in its personal voice mailbox, that key assignment reverts to None.
Syn248 Installation and Configuration Guide Back to Contents Back Up and Restore Settings Back up individual Deskset settings and system settings so that they can be restored if the network or a Deskset loses its settings. You can also back up a Deskset to copy the settings to other Desksets. Backup files are automatically saved on your computer using the following naming convention: backup_[device]_[extension number]_[year]-[month]-[day]_[time].cfg.
Syn248 Installation and Configuration Guide Back to Contents To back up the Extension Settings: 1. In the navigation menu at left, click Device Management, then Back up/Restore. The Back up/Restore Extension Settings page appears. 2. Select the desired extension from the Select Extension to Back up list. 3. Click . If the desired extension does not appear in the list, then you may need to disconnect and reconnect that extension. See “Reconnecting a Deskset to the System” on page 101. 4.
Syn248 Installation and Configuration Guide Back to Contents 2. Select whether you want to overwrite voicemail and call logs. 3. Enter the file name or click and select a file. Make sure you select the correct file to restore. The restore file name includes your extension number and the date and time. 4. Click . Deskset settings are restored and the Deskset restarts. You are then logged off from the WebUI.
Syn248 Installation and Configuration Guide Back to Contents To back up the System Settings: 1. In the navigation menu at left, click Device Management, then Back up/Restore, then System Settings. The Back up/Restore System Settings page appears. 2. Click . Your web browser opens a window asking you if you would like to save the backup file. Click . Save the file to a location on your computer so that you can restore your settings later. To restore the System Settings: 1.
Syn248 Installation and Configuration Guide Back to Contents Updating Devices New software versions improve system functionality. All Gateways and all Desksets should be running the same software version number. You can update all devices with one command, or you can update the Syn248 devices individually. We recommend automatic device software upgrades for installations with Internet access. This allows your system to obtain the latest upgrade from our server.
Syn248 Installation and Configuration Guide Back to Contents How to Upgrade Software After Adding a New Device Upgrading Syn248 software is simple. You need a reliable Internet connection for your network. After you connect your new Deskset, the screen prompts you to upgrade the software. If you have more than one Deskset to install, connect them all and wait for the upgrade prompt to appear on all Desksets. If you press Upgrade : All Syn248 devices in the system will be upgraded.
Syn248 Installation and Configuration Guide Back to Contents Running a Software Update To update all devices to the latest software version: 1. In the navigation menu at left, click Device Management, then Update Device. The Update Device page appears. 2. Click . The system looks on the Internet for the latest software and systematically updates and then restarts each device. All calls are dropped. A caution appears to remind you that all devices will be restarted as each is updated.
Syn248 Installation and Configuration Guide Back to Contents Using requires a minimum Internet download bandwidth of 1 Mbps and an Internet router that can handle the same number of total simultaneous connections as the number of Syn248 devices. Refer to your router specification. Performing an update without meeting the minimum requirement may cause some or all devices not to update correctly. See “System Upgrade” on page 112. The total time to update all the devices varies.
Syn248 Installation and Configuration Guide Back to Contents Device Log If you have trouble with your system and you contact the installer or customer service, they may need the device log for troubleshooting purposes. You can generate a device log on the Device Log page. You can also configure a device log prior to generating the log. Your installer or product support specialist may want to see specific information in the device log.
Syn248 Installation and Configuration Guide Back to Contents To configure the Device Log: 1. In the navigation menu at left, click Device Management, then Device Log. 2. In the Device Log list, select the desired device. 3. Under Configure Device Log, click Browse... and select the Device Log Configuration file. 4. Click . After configuration is complete, you can proceed with generating the Device Log, as described on page 78.
Syn248 Installation and Configuration Guide Back to Contents Advanced PSTN Settings The Advanced PSTN Settings enable you to configure and troubleshoot the PSTN lines connected to the Gateway. The Advanced PSTN Settings include the following items: Line Calibration Data (see “Resolving Audio Echoes” on page 99) Line Configuration (described below) Advanced Configuration (see “Resolving Audio Echoes” on page 99).
Syn248 Installation and Configuration Guide Back to Contents Help To display the Help menu: 1. In the navigation menu at left, click Help. A PDF Help file opens. 2. To view a topic, click the link for that topic. The page for that topic appears.
Syn248 Installation and Configuration Guide Back to Contents C HAPTER 3 DEVICE CONFIGURATION This chapter shows you how to configure the Syn248 system using the device configuration menus. Most of these functions are duplicated in the WebUI, but if you need to assign static IP addresses, they must be set at each device. You can only directly reset a device from the device, although some functions in the WebUI include device resets.
Syn248 Installation and Configuration Guide Back to Contents SB35010 Gateway Features Figure 20 illustrates the Gateway features and connections. LINE 1 LINE 1 1 LINE 3 LINE 3 LINE 4 BYPASS DC 5.1V LAN RESET LINE 4 POWER UP LINE 2 LINE 2 DOWN SELECT CANCEL - 2 3 4 5 + 6 Figure 20. Gateway Features and Connections 1. Display Provides system and network status, device information, and configuration data. See “Gateway Front Panel Interface” on page 85. 2.
Syn248 Installation and Configuration Guide Back to Contents Figure 21 and Table 2 provide an illustration and description of the Gateway front panel. Status LEDs Power LED Menu Navigation Keys Figure 21. Gateway Front Panel Table 2. Key Gateway Front Panel Keys and LEDs Used To: LED Navigate through the menus, and to increase/decrease editable fields. Highlight the previous or next item in the list.
Syn248 Installation and Configuration Guide Back to Contents Gateway Front Panel Interface You can access basic information and perform some configuration tasks using the Gateway’s front panel. Most of these tasks are easier to do using the WebUI. See “Accessing the Administrator WebUI” on page 36. The Gateway displays the Idle screen after completing the power-up sequence. Use the Gateway main menu to perform some system operations.
Syn248 Installation and Configuration Guide Back to Contents Gateway Configuration Press UP or DOWN in the Gateway main menu until Configuration is highlighted, as shown in Figure 24, and press SELECT to display the Configuration menu. The current setting is indicated with [*]. Figure 24. Gateway Configuration Configuration — Current Gateway settings. Auto IP — Is set automatically. Static IP — You can change the static IP only from the Gateway.
Syn248 Installation and Configuration Guide Back to Contents Press CANCEL to move back a space. Pressing CANCEL repeatedly will take you to the previous screen. Pressing and holding CANCEL for 2 seconds will take you to the Configuration menu. 5. Enter the Subnet Mask. 6. Enter the Gateway. 7. Enter the DNS Server address. 8. After entering the last digit, press SELECT. The Configuration menu appears again. The [*] indicates that the Gateway is now using Static IP.
Syn248 Installation and Configuration Guide Back to Contents Once the downloading starts, the display indicates the progress as shown by the percentage indicator. 4. If the upgrade process is interrupted by removing the server connection, no restart occurs. The Gateway remains on the xx% complete screen, until an action is taken at that Gateway. The process does not resume even after the server connection is reestablished.
Syn248 Installation and Configuration Guide Back to Contents Deskset Admin Settings You can use the Deskset Admin Settings to set up the system features described in Table 3. The WebUI also provides an interface for setting up your system. See “Accessing the Administrator WebUI” on page 36. To display the Admin Settings menu: 1. On the Deskset, press (MENU) then 3. 2. Enter the Admin password, and press (SELECT). The Admin Settings screen appears as shown in Figure 25.
Syn248 Installation and Configuration Guide Back to Contents Setting Intercom Call Forward–No Answer Intercom Call Forward–No Answer is an administrator setting to handle unanswered intercom calls for each Deskset. Intercom calls include calls from other Desksets and outside calls that have been routed to a Deskset by a Phone Line Call Forward–No Answer setting. See “Configuring Phone Line CFNA” on page 53. By default, intercom calls are forwarded to voicemail after they ring for 15 seconds.
Syn248 Installation and Configuration Guide Back to Contents Fwd/Trans to Outside Line You can enable or disable the ability of each Deskset to forward or transfer a call to an outside line. These features use two of your telephone lines. This function is enabled by default. Disabling this function prohibits the user from sending a call to an outside line via the Gateway. To enable or disable Forward/Transfer to an outside line: 1.
Syn248 Installation and Configuration Guide Back to Contents IP Settings On the IP Settings menu, you can manually configure the Deskset IP address. See “Appendix B: IP Addresses and Connectivity” on page 119 for a discussion of the Syn248 network configuration and IP settings. To display the IP Settings menu: 1. On the Admin Settings menu, press 3 to display the IP Settings menu. IP Settings 1. IP Configuration Auto 2. Set/Edit Static IP 3. Press or to move highlight.
Syn248 Installation and Configuration Guide Back to Contents Set/Edit Static IP If your business requires a static IP address, you can enter static IP info at each Deskset. To set and edit static IP Address: 1. On the IP Settings menu, press 2 to display the Set/Edit Static IP screen. IP Settings IP Address: Subnet Mask: Gateway: DNS Server: Use dial pad to enter digits and press # to enter a dot. Save Quick Dial Backspc SB35031 Deskset 2.
Syn248 Installation and Configuration Guide Back to Contents Reset User Password Having a user password is not required, but users may want to set one in order to prevent others from accessing their messages or User Settings. If users forget their passwords, or you want to eliminate the need for a password, or to enter a new user password, you need to reset the user password. To reset the user password: 1. On the Admin Settings menu, press 4 to begin the password reset process.
Syn248 Installation and Configuration Guide Back to Contents If an upgrade is available, the Found New Upgrade screen appears. Press Upgrade to install the upgrade or press Cancel to return to the Admin Settings menu. If no upgrade is available, the No New Version screen appears. Press to return to the Admin Settings menu. Exit If the device is sluggish or unresponsive during the upgrade process, see “A Syn248 device becomes sluggish or unresponsive during or immediately after software upgrade.
Syn248 Installation and Configuration Guide Back to Contents CHAPTER 4 TROUBLESHOOTING If you have difficulty operating your system, try the following suggestions in this section: “Common Troubleshooting Procedures” on page 97 “Initial Installation” on page 104 “Display Messages” on page 104 “Gateway Setup” on page 107 “WebUI” on page 108 “PC/Deskset Interaction” on page 114 “Other Deskset Features” on page 115 “Music on Hold (MoH) (SB35025 Deskset only)” on page 116.
Syn248 Installation and Configuration Guide Back to Contents Common Troubleshooting Procedures Follow these procedures to resolve common issues. Resetting Devices You may need to manually restart a device or return a device to factory defaults (see “Appendix D: Default Settings” on page 121). To reset a device, press the RESET button shown in Figure 26 and Figure 27 on page 98 by inserting a pen or paper clip into the hole and applying pressure to the button.
Syn248 Installation and Configuration Guide Back to Contents RESET Button Figure 27. Deskset Reset Button Resolving General Functional Issues To resolve a blank screen or device that does not work at all: Ensure the AC plug is plugged into an electrical outlet not controlled by a wall switch. Verify that the AC power outlet has power. Try plugging in some other AC device. If nothing works, contact an electrician or use another power outlet.
Syn248 Installation and Configuration Guide Back to Contents Resolving Audio Echoes If excessive echo occurs on outside calls consistently, there are two approaches you can take to troubleshoot the condition: 1. Check line calibration and parallel devices. The SB35010 Gateway uses automatic telephone line calibration to ensure optimal audio performance on outside calls. You can observe the Gateway line calibration data to understand any telephone line issues and recalibrate the lines, if necessary.
Syn248 Installation and Configuration Guide Back to Contents To adjust Echo Suppression and Line Loop Length settings: 1. If line recalibration and checking parallel devices do not resolve audio echoes, go to the Advanced Configuration section on the Advanced PSTN Settings page. 2. Under Echo Suppression for the affected line(s), select Aggressive. 3. Click 4. Test your line(s) by establishing a call under the same conditions in which the echo condition was previously heard. 5.
Syn248 Installation and Configuration Guide Back to Contents Resolving General Audio Issues Check the following if you hear static, sudden silences, gaps in speech, echoes, distorted speech, or garbled speech. To resolve general audio issues: You may be experiencing network problems. Your LAN administrator should ensure the following minimum guidelines are met: A switched network topology, which requires attaching network components to switches rather than hubs, is recommended.
Syn248 Installation and Configuration Guide b. Back to Contents Select the extension from the Select Extension to Back up drop-down list, and click to save the file to a specified location on your computer. You will need to locate and retrieve this file later, so make sure you remember where you saved it. The default file name will be in the format: backup_ds_[extension number]_[year]-[month]-[day]_[time].cfg.
Syn248 Installation and Configuration Guide Back to Contents Power Failure Recovery Procedure The Syn248 system automatically recovers after a power failure. The following describes the recovery process. Allow about a minute for the Gateway to boot up when power returns after a power failure. The power-up sequence for the Gateway follows: 1. About 20 seconds after turning on power to the device, the POWER LED turns on. 2.
Syn248 Installation and Configuration Guide Back to Contents Initial Installation The device screen displays Synchronizing. Probable Cause Corrective Action The device has previous data and settings that are now inconsistent with current system settings. Erase all Deskset data and settings by unplugging the LAN cable and pressing the reset button on the bottom of the Deskset for more than five seconds.
Syn248 Installation and Configuration Guide Back to Contents The device screen displays Synch Failed. Probable Cause Corrective Action The device synch failed when trying to connect to the system. Reset the device. Disconnect power or insert a pen or paper clip to press the RESET button for less than five seconds. The device was disconnected, then reconnected after configuration changes were made to the system. See “Reconnecting a Deskset to the System” on page 101.
Syn248 Installation and Configuration Guide Back to Contents Probable Cause Corrective Action The device may have been configured on another network. Power cycle the Deskset by unplugging the power cord and plugging it back in. If power cycling does not work, back up your Deskset and reset to factory defaults. a. Back up the Deskset. See “Back Up and Restore Settings” on page 70. b. Unplug the LAN cable. c. Press the RESET button for at least five seconds. d.
Syn248 Installation and Configuration Guide Back to Contents A Syn248 device displays an error message other than Host Not Found or File Not Found after a user attempts a software upgrade. Probable Cause Corrective Action The device encountered an unexpected problem. 1. Disconnect the power to the device, wait a few minutes, then reconnect the power and try the upgrade process again. 2. If the error message persists, visit our web site at smbtelephones.att.com or call 1 (888) 386-2006.
Syn248 Installation and Configuration Guide Back to Contents WebUI Administrator WebUI The WebUI is unresponsive. Probable Cause Corrective Action The web browser encountered an unexpected problem. 1. Close the unresponsive web browser, reopen the browser, and log on again as administrator. 2. If this does not work, try again using the IP address of a Deskset that is connected to the PC you are using. 3. If this does not work, try closing the browser and waiting 10 minutes before logging on again.
Syn248 Installation and Configuration Guide Back to Contents A Syn248 device upgrade failed, the WebUI displays “Login to target device failed”, and the WebUI and device screens display the old software version. Probable Cause Corrective Action The software version of the device you are currently logged on to is no longer compatible with the software version of other devices within the network. 1.
Syn248 Installation and Configuration Guide Back to Contents Some devices did not update after using . Probable Cause Corrective Action Did not allow enough time for software to update due to a slow Internet connection. Wait 30 minutes, then check whether additional devices have been updated. If devices are still being updated, then the Internet connection is slow and you must wait for all the devices to complete the update process. If the update has failed (you see a failure message), retry .
Syn248 Installation and Configuration Guide Back to Contents Changes made to System Configuration from the WebUI are not saved. Probable Cause Corrective Action The device whose IP address you used to log on to the WebUI failed to synchronize with the system. The WebUI displays “Unable to save data at this time. Please re-enter and try again.” Check the device status in the footer of the WebUI page. If the status reads "Synch Failed," see “Reconnecting a Deskset to the System” on page 101.
Syn248 Installation and Configuration Guide Back to Contents System Upgrade A Syn248 device becomes sluggish or unresponsive during or immediately after software upgrade. Probable Cause Corrective Action Cannot connect to AT&T server or the device encountered an unexpected problem. Disconnect the power to the device, wait a few minutes, then reconnect the power and try the upgrade process again.
Syn248 Installation and Configuration Guide Back to Contents User WebUI Unable to access the WebUI Log-in page from my computer. Probable Cause Corrective Action The computer is not connected to the same subnet (network) as the Deskset, and the subnets are not set up to communicate. Verify the IP address. You must correctly enter the IP address of your Deskset into your Internet browser’s address bar.
Syn248 Installation and Configuration Guide Back to Contents PC/Deskset Interaction Internet connection or access to the local network on my computer does not work after installing the Deskset. Probable Cause Corrective Action The LAN cables are not installed correctly. Check that the network cable from the computer is plugged into the Deskset port labeled .A second LAN cable should be plugged into the port on the Deskset marked with the other end plugged into your LAN.
Syn248 Installation and Configuration Guide Back to Contents Other Deskset Features For more information about the corrective actions recommended in this troubleshooting section, see the SB35020/SB35025 Deskset User’s Guide or SB35031 Deskset User’s Guide at smbtelephones.att.com. Other Desksets do not appear in the extension list. Probable Cause Corrective Action The Deskset is not connected to the same subnet as the other Desksets.
Syn248 Installation and Configuration Guide Back to Contents Music on Hold (MoH) (SB35025 Deskset only) Music on Hold (MoH) is not playing. Probable Cause Corrective Action MoH is disabled. Log on to the WebUI as administrator. On the Hold Settings page, enable Music on Hold. Set Select Port for the Deskset to which the Music on Hold source is connected, then click . MoH source is not properly connected. Verify that an audio source is connected to a SB35025 Deskset’s AUX I/O port.
Syn248 Installation and Configuration Guide Back to Contents MoH audio is too quiet, fluctuating, or dropping out. Probable Cause Corrective Action The volume on the audio source is too low or too high. If the volume is too high, overdriven audio components may be causing short periods of sound to drop out (not be heard).
Syn248 Installation and Configuration Guide Back to Contents APPENDIXES Appendix A: Expanding Your System You can add another SB35010 Gateway to expand your system to support up to 8 incoming lines, as shown in Figure 28.
Syn248 Installation and Configuration Guide Back to Contents Appendix B: IP Addresses and Connectivity An IP address is an individual numeric identification assigned to devices on a computer network. At least one Syn248 device needs a network-assigned IP address on the subnet shared with any computers that will allow access to the WebUI. Valid IP addresses on the same subnet allow devices on the network to identify each other and enable communication.
Syn248 Installation and Configuration Guide Back to Contents Appendix C: Technical Specifications Table 4 lists the technical specifications for the SB35010 Analog Gateway and SB35020/025 Deskset. Table 4. Technical Specifications Feature Specification Frequency control Crystal controlled PLL synthesizer Size SB35020/025 Deskset: 6.9” × 7.9” × 8.1” (H × W × D @ 57° angle), 7.9” × 7.9” × 7.1” (H × W × D @41° angle) SB35031 Deskset: 7.9” × 8.9” × 6.5” (H × W × D @57° angle), 6.9” × 8.9” × 7.
Syn248 Installation and Configuration Guide Back to Contents Appendix D: Default Settings Table 5 and Table 6 list the default settings for the Syn248 system. Table 5.
Syn248 Installation and Configuration Guide Table 6.
Syn248 Installation and Configuration Guide Back to Contents Appendix E: Parts Lists Figure 29 illustrates the SB35010 Gateway parts. SB35010 Gateway Power Adapter Four Phone Cords Cat.-5 Ethernet LAN Cable (Gray) ǎǐǔ Business Telephone System from AT&T System Installation Quick Start Guide For complete installation information, see the Installation and Configuration Guide, available at ƓƓƓƤ. Mounting Brackets and Screws Installation Quick Start Guide Figure 29.
Syn248 Installation and Configuration Guide Back to Contents Figure 30 illustrates the SB35020 and SB35025 Deskset parts. Deskset Base Power Adapter (Blue Tag) Deskset Stand Handset Cord Quick Start Guide Cat.-5 Ethernet LAN Cable (Gray) Handset Audio In/Out Cable (SB35025 Only) Important Product Information Figure 30.
Syn248 Installation and Configuration Guide Back to Contents Figure 31 illustrates the SB35031 Deskset parts. Deskset Base Power Adapter (Blue Tag) Deskset Stand Cat.-5 Ethernet LAN Cable (Gray) Quick Start Guide Handset Handset Cord Important Product Information Figure 31.
Syn248 Installation and Configuration Guide Back to Contents Appendix F: Maintenance Your system contains sophisticated electronic parts, so it must be treated with care. Avoid Rough Treatment Handle the unit gently. Save the original packing materials to protect your equipment if you ever need to ship it. Avoid Water Your unit can be damaged if it gets wet. Do not use the equipment outdoors in the rain or handle it with wet hands. Do not install the equipment near a sink, bathtub, or shower.
Syn248 Installation and Configuration Guide Back to Contents Appendix G: Important Safety Instructions This symbol alerts you to important operating or servicing instructions in this document. Always follow basic safety precautions when using this product to reduce the risk of injury, fire, or electric shock.
Syn248 Installation and Configuration Guide Back to Contents GLOSSARY This glossary provides definitions that apply to the Syn248 telephone system. 10/100 Ethernet Port: An Ethernet port that supports two different speeds of Ethernet on the same port. The two speeds supported are 10Base-T and 100Base-TX. 10Base-T/100Base-TX: An Ethernet network operating at up to 100 megabits per second. active call: An established telephone call that is not on hold. analog: A continuously variable signal.
Syn248 Installation and Configuration Guide Back to Contents DND ON: An indicator in the top right corner of the Deskset display that illuminates when you turn on the Do Not Disturb feature. DNS (Domain Name System) server: A server that stores the Domain Name System records, such as address, name server, and mail exchanger records for a domain name and responds with answers to queries against its database. DSL (Digital Subscriber Line): High-speed Internet service through your telephone line.
Syn248 Installation and Configuration Guide Back to Contents IP address (Internet Protocol address): An individual numeric identification assigned to devices on your LAN. key beep: When enabled, pressing a Deskset key plays a tone. LAN (Local Area Network): A communications network that allows data devices to communicate with each other. LCD (Liquid Crystal Display): The screen that provides instructions and feedback. LED (Light Emitting Diode): A small light on a device that indicates status.
Syn248 Installation and Configuration Guide Back to Contents reboot: Restart a device. Redial: Accesses the log of outgoing calls. router: An electronic device that connects two or more other electronic devices to each other, allowing them to communicate. soft key: The Syn248 Desksets feature keys below the LCD screen. The bottom of the LCD displays the appropriate label for each key as the function of the key changes.