User’s Guide AT&T SB67020 Deskset © 2011 Advanced American rican Telephones. All Rights Reserved. AT&T and the AT&T logo are trademarks of AT&T Intellectual Property licensed to Advanced American Telephones, San Antonio, TX 78219. Synapse® is a registered trademark of Advanced American Telephones. Issue .
Synapse SB67020 Deskset User’s Guide CONTENTS Preface .............................................................................................................. 6 Additional Documentation ................................................................................................................................. 6 Topic Navigation ..................................................................................................................................................... 7 Text Conventions .
Synapse SB67020 Deskset User’s Guide Making an Intercom Call.................................................................................................................................. 32 Calling a Restricted Number.......................................................................................................................... 33 Calling Restricted Numbers on Your Extension ..................................................................
Synapse SB67020 Deskset User’s Guide Storing Directory Entries from the Call Log or Redial List............................................................. 69 Deleting a Personal List Entry ...................................................................................................................... 70 Sorting Directory Entries.................................................................................................................................. 71 Voicemail ............................
Synapse SB67020 Deskset User’s Guide Deskset Information.........................................................................................................................................119 Auto-Attendant Settings ................................................................................................................................120 Using Do Not Disturb (DND) ........................................................................................................................
Synapse SB67020 Deskset User’s Guide Back to Contents PREFACE This User’s Guide provides instructions for using your Synapse SB67020 Deskset telephone with software version 2.0 or newer. See page 119 for instructions on checking the software version on the Deskset. Although the Quick Start Guide also includes information on using the Deskset, this guide has information on setting up the SB67020 Deskset and more complete information on feature usage.
Synapse SB67020 Deskset User’s Guide Back to Contents Topic Navigation This Synapse SB67020 Deskset User’s Guide features easy navigation between topics and the ability to return to your original topic. Text in blue indicates a link to another page in the document. indicates a hyperlink to an external web site. Bold text in blue You can also click the arrows at the bottom of the page to move around this document. Go back to the last page viewed. Go to the previous page. Go to the next page.
Synapse SB67020 Deskset User’s Guide Back to Contents CHAPTER 1 OVERVIEW The Synapse® Business Phone System from AT&T is for businesses that need up to 100 extensions. This system is scalable from 1 to 39 outside lines, so as your business grows, your phone system can too. The Synapse Business Phone System provides simplicity without sacrifice—it's simple to install, manage, and use, without sacrificing any of the features you need and expect from a business telephone system.
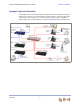
Synapse SB67020 Deskset User’s Guide Back to Contents Synapse System Overview Your Deskset is part of the Synapse System. Synapse differs from conventional telephone systems in that calls are not coordinated by a central controller. Instead, Synapse uses a distributed control system over a Local Area Network (LAN). Figure 1 illustrates a sample system with outside telephone connections in blue and Ethernet cables in red. Figure 1.
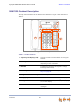
Synapse SB67020 Deskset User’s Guide Back to Contents SB67020 Deskset Description The key external features of the Deskset are identified in Figure 2 and described in Table 2. 8 1 2 3 4 7 6 5 Figure 2. Deskset Layout Table 2 Overview Deskset Features 1. Liquid Crystal Display (LCD) Provides controls and information for using the Deskset. 2. Soft Keys Three keys that produce different actions, depending on the LCD labels. 3.
Synapse SB67020 Deskset User’s Guide Back to Contents Deskset Hard Keys The hard keys include the standard telephone dial-pad keys and a set of function keys. The Deskset hard keys are identified in Figure 3 and described in Table 3. 1 2 4 3 5 Figure 3. Deskset Function Keys Table 3 Overview Deskset Function Keys 1. VOL+/VOL– Increases/decreases the ringer and voice volume. 2. HEADSET Routes audio to corded headset. Can be used to go off hook. 3. HOLD Puts the current active call on hold.
Synapse SB67020 Deskset User’s Guide Back to Contents Modes of Operation The system administrator can configure the Synapse system to operate in one of two different modes: Call Appearance mode and Line Appearance mode. Desksets operate differently in each mode. The appearance mode affects how you make, answer, and manage calls. Each mode provides a unique set of configurable features. This User’s Guide includes information about, and procedures for, both Call Appearance mode and Line Appearance mode.
Synapse SB67020 Deskset User’s Guide Back to Contents The Line Appearance keys are used for receiving and making calls to external numbers. To call another extension in your office, you must use an Intercom key. By default, the Intercom key is the bottom Programmable Feature Key, but your system administrator can configure additional Intercom keys. Setting Your Password You can protect your Deskset by setting a password that prevents other users from accessing your User Settings and Voicemail.
Synapse SB67020 Deskset User’s Guide Back to Contents Soft Keys Soft keys are a set of three context-sensitive keys that provide functions based on what you are doing on the Deskset. The top example as illustrated in Figure 5 shows the soft key labels on the active call screen in Call Appearance mode. The soft key labels change according to the current task. For example, if you are holding a call, the key labels displayed are different from those displayed if you are making a call.
Synapse SB67020 Deskset User’s Guide Back to Contents Deskset Status Indicators Status indicators appear in the upper right-hand corner of the Deskset display, as shown in Figure 6 and as described in Table 4. Status Indicator Area Figure 6. Sample Status Indicator Table 4 Icon 1, 2, 3... Status Indicators Status Indicates the number of the associated Call Appearance or Line Appearance key. Audible Ring Delay is 10 seconds. The number indicates the delay you have set.
Synapse SB67020 Deskset User’s Guide Back to Contents Call Indicators When the Deskset has an incoming, ongoing, or Held call, information about the call appears on the display. The Deskset screen displays one call at a time. You can access each call by pressing a Call Appearance or Line Appearance key. The LEDs in these keys reflect the call status. See “Call Status LEDs” on page 19. During a call, icons show call status and soft keys show the optional actions to take as shown in Figure 7.
Synapse SB67020 Deskset User’s Guide Back to Contents Call Indicators in Call Appearance mode When there are multiple calls in Call Appearance mode, presence of other calls. and icons indicate the Review calls by pressing or . Reviewing calls does not access the calls. Press a Call Appearance key to answer a call or take a call off hold. While you are on an active call and another call comes in, the incoming call screen takes over the display.
Synapse SB67020 Deskset User’s Guide Back to Contents Call Indicators in Line Appearance mode In Line Appearance mode, Line Appearance key LEDs indicate the presence of other calls. While you are on an active call and another call comes in, the incoming call screen takes over the display. You can: answer the call by pressing the flashing green Line Appearance key or by pressing Answer . The previous active call is put on hold. return to the active call screen by pressing Ignore .
Synapse SB67020 Deskset User’s Guide Back to Contents Call Status Icons Table 5 shows and describes the call status icons. The number beside an icon indicates the number of the associated Call Appearance or Line Appearance key. See “Programmable Feature Keys” on page 20 for a complete description. Table 5 Icon Call Status Icons Status Icon Status Off Hook Ringing Call and Ignored Call Indicates that you have lifted the handset, pressed SPEAKER or HEADSET, or you are on a phone call.
Synapse SB67020 Deskset User’s Guide Back to Contents Programmable Feature Keys The Deskset has ten Programmable Feature keys as shown in Figure 2 on page 10. In Call Appearance mode, key 1 (top) is a Call Appearance, and is not programmable. Your system administrator can program the other nine keys to be used as Call Appearances, function keys, or Quick-Dial keys. See “Quick Dial” on page 129 to add Quick Dial entries. In Line Appearance mode, key 10 (bottom) is an Intercom key, and is not programmable.
Synapse SB67020 Deskset User’s Guide Back to Contents Programmable Feature Key LEDs The Programmable Feature Key have two-color LEDs to signal the status of some functions. The LED flash patterns indicate call and feature status as described in Table 9. Table 9 Programmable Feature Keys LED Activity Key LED Activity Description Call 1, Call 2, Call 3,...
Synapse SB67020 Deskset User’s Guide Table 9 Back to Contents Programmable Feature Keys LED Activity (Continued) Key LED Activity Description Intercom (Line Appearance mode only) Steady GREEN Active call Quickly flashing GREEN Incoming call Slowly flashing GREEN Held call Off Not applicable Help Overview 22
Synapse SB67020 Deskset User’s Guide Back to Contents Dial-Pad Entry Use the dial-pad keys to enter letters and numbers into a text field. Keys 2, 3, 4, 5, 6, and 8 have three assigned letters, while keys 7 and 9 have four assigned letters, as shown in Figure 8. GHI 1 ABC 2 DEF 3 4 JKL 5 MNO 6 7 TUV 8 WXYZ 9 PQRS * OPER 0 # Figure 8. Dial Pad Pressing 1 once enters a space; pressing it twice enters a 1. Pressing a key numbered 2 to 9 enters characters in the following order: 1.
Synapse SB67020 Deskset User’s Guide Back to Contents Using the Speakerphone When the speakerphone is active, the SPEAKER key is lit. To use the speakerphone: 1. To initiate a call, press SPEAKER. The key becomes backlit and you hear a dial tone. Begin dialing. 2. To end a call, press SPEAKER. The key backlight goes out. During an active call, if you are using the handset or a corded headset, pressing SPEAKER switches audio to the speakerphone.
Synapse SB67020 Deskset User’s Guide Back to Contents About the Auto Attendant This section applies to Call Appearance mode only. When set to Call Appearance mode, the Synapse system features an Auto Attendant that answers incoming calls and automatically transfers them to a Synapse extension or extensions. The targets for these transfers may depend on the time of day. The Auto Attendant’s interactive voice menu guides callers to the desired extension.
Synapse SB67020 Deskset User’s Guide Back to Contents CHAPTER 2 OUTGOING CALLS The SB67020 Deskset provides several methods for making a call. If you are in Idle mode or have calls on hold, you can predial a phone number and then go off hook to call the number. You can make a call at any time by choosing an off-hook method, then dialing a number. This is referred to as Live Dialing.
Synapse SB67020 Deskset User’s Guide Back to Contents Active Call Screen The Active Call screen, as shown in Figure 9, appears while you are on a call. Call Timer Called Phone Number 0:05 9-232-555-0176 Transfer Conf 1 Call-Status Icon Park Figure 9. Active Call Screen (Call Appearance Mode Shown) Table 10. Outgoing Calls Active Call Screen Description Key Description Transfer Call Appearance mode only—Begins transfer of a call. Conf Begins a conference call.
Synapse SB67020 Deskset User’s Guide Back to Contents Predialing Predial is only available when the Deskset is idle or when all calls are on hold. In Predial mode, there is no dial tone. You can only predial one phone number at a time. To begin Predial, press a dial-pad key. To make a Predial call: 1. Using the dial pad, enter the phone number (for example: 9-232-555-0176). The predial screen appears.
Synapse SB67020 Deskset User’s Guide Back to Contents Live Dialing You can make a call by going off hook, then dialing a phone number. To dial a live number: 1. 2. Do one of the following to go off hook (to hear the dial tone) from Idle mode: Lift the handset. Press SPEAKER or HEADSET. Press an available Call Appearance or Line Appearance key. Enter the number you want to dial. Call Appearance mode only—For outside calls, enter 9 or whatever digit, if any, that must be dialed first.
Synapse SB67020 Deskset User’s Guide Back to Contents Making a Call from a List To make a call from a list: 1. Access the desired list entry. For example, in Call Appearance mode, press MENU, then 1, and then 7. The Directory screen appears. See “Accessing Items in Lists” on page 55. New LastNme Call or until the desired entry appears. 2. Press 3. Press Call or SELECT to dial the displayed number.
Synapse SB67020 Deskset User’s Guide Back to Contents Calling a Busy Extension If you call an extension that is on a call or busy, your Deskset displays the Extension Status screen, shown in Figure 10. The Extension Status screen notifies you that the other party may not be available to answer your call. When the Extension Status screen appears, you can choose to call the other Deskset anyway, or go directly to the Deskset’s voicemail.
Synapse SB67020 Deskset User’s Guide Back to Contents Making an Intercom Call Intercom Calls apply to Line Appearance mode only. In Line Appearance mode, your Deskset uses an outside line any time you go off hook by lifting the handset, pressing SPEAKER, or by some other method. To make an internal (extension-to-extension) call, you must press the Intercom key.
Synapse SB67020 Deskset User’s Guide Back to Contents Calling a Restricted Number Call Restriction Settings apply to Call Appearance mode only. Your system administrator can configure Call Restriction settings that may prohibit you from making calls to certain types of numbers — international long-distance numbers, for example. Call Restriction settings are specific to each extension in the system.
Synapse SB67020 Deskset User’s Guide Back to Contents CHAPTER 3 INCOMING CALLS When a call comes in, the Deskset rings and the incoming call information appears as shown in Figure 13 on page 35. The screen displays the caller’s name and number (if available). If there is more than one incoming call, the new calls are assigned to Call Appearance/Line Appearance keys while the oldest call remains on the screen. You can answer or ignore each call.
Synapse SB67020 Deskset User’s Guide Back to Contents Incoming Call Screen The Incoming Call and Active Call screens are shown in Figure 13. Press Answer Active Call Incoming Call Figure 13. Incoming Call and Active Call . Table 11. Key Incoming Calls Incoming Call Screen Soft Keys Description Answer Answers incoming call. Ignore Silences ringer during incoming call. FwdVM Call Appearance mode only—Forwards incoming call to Voicemail.
Synapse SB67020 Deskset User’s Guide Back to Contents Incoming Call Indication When there is an incoming call, the Deskset rings. See “Sounds” on page 111. Do Not Disturb and Ring Delay both affect the onset of ringing. See “Using Do Not Disturb (DND)” on page 121 and “Sounds” on page 111. Call Appearance Mode When there are no active or held calls, an Incoming Call screen appears, as shown in Figure 14.
Synapse SB67020 Deskset User’s Guide Back to Contents Answering a Call To answer a call: To answer an incoming call, do one of the following: Lift the handset. Press Answer to answer using the Preferred Audio method. See “Preferred Audio Mode” on page 113. Press SPEAKER to use the speakerphone. Press HEADSET to use a headset connected to the Headset jack. See “Call Management Using a Headset” on page 54.
Synapse SB67020 Deskset User’s Guide Back to Contents Ignoring a Call You can ignore an incoming call by pressing Ignore to silence the ringer. The silenced ringer icon appears. If you are on an active or held call, after the incoming call has been ignored, the screen returns to the call you were on before the incoming call. Once a call is ignored: The Ignore key is no longer available on the incoming call screen. The Call Appearance or Line Appearance LED continues to flash.
Synapse SB67020 Deskset User’s Guide Back to Contents Forwarding All Calls This feature applies to Call Appearance mode only. You can forward all incoming calls to the destination that you specified in the User Settings. See “Call Forward All and Call Forward–No Answer” on page 106. To forward all calls: Press MENU, then 1, and then 6. The Call Forward icon (FWD) appears.
Synapse SB67020 Deskset User’s Guide Back to Contents Call Screening This feature applies to Call Appearance mode only. When an incoming call goes to Voicemail, the Message icon ( ) indicates that recording is in progress. You can listen to the recording in progress and interrupt it at any time by answering the call. If another incoming call occurs while screening a call, the Deskset screen displays the new call. To screen a call: Press Listen to listen to a message that is being recorded.
Synapse SB67020 Deskset User’s Guide Back to Contents Auto Answering This feature applies to Call Appearance mode only. You can set your Deskset to answer calls automatically, without your having to touch the phone to answer. When you enable Auto Answer, ANS appears at the top of the Deskset screen as shown in Figure 16 unless DND and FWD are active, since Auto Answer is disabled when they are on. ANS Wed Sep 08 11:09AM John Smith EXT 219 3 New Missed Calls 2 New Messages Figure 16.
Synapse SB67020 Deskset User’s Guide Back to Contents Answering Calls in the Call Queue This feature applies to Call Appearance mode only. Your system administrator may have set up your Deskset as a Call Queue Agent. Incoming calls are directed to your Deskset and all other assigned Call Queue Agents. Answering Calls from Idle Mode When your Deskset is idle, incoming Call Queue calls ring at your extension and at all other idle Call Queue extensions. To answer a call in the Call Queue: 1.
Synapse SB67020 Deskset User’s Guide Back to Contents CHAPTER 4 CALL MANAGEMENT This chapter describes the call management features of the SB67020 Deskset. The Deskset enables you to put calls on hold, transfer calls, park calls, and create conference calls. Call management features and procedures differ depending on whether your system is in Call Appearance or Line Appearance mode. This chapter describes the differences between the two modes.
Synapse SB67020 Deskset User’s Guide Back to Contents Call Management Call Management begins with the Active Call screen shown in Figure 17. The Call Status icons are described in “Call Status Icons” on page 19. Figure 17. Active Call Screen (Call Appearance Mode Shown) Table 12 Active Call Screen Description Key Description Transfer Call Appearance mode only—Begins transfer of a call. Call Management Conf Begins a conference call. Park Call Appearance mode only—Parks a call.
Synapse SB67020 Deskset User’s Guide Back to Contents Putting a Call on Hold (Call Appearance Mode) To hold calls and manage held calls: 1. When you are on an active call, press HOLD. The Held Call Appearance icon appears. 0:27 Graham Bell 232-555-0176 Transfer Conf Park If a call has been on hold for longer than three minutes, the Deskset reminds you with a brief ring every 30 seconds.
Synapse SB67020 Deskset User’s Guide Back to Contents Putting a Call on Hold (Line Appearance Mode) In Line Appearance mode, all Desksets that share assigned lines can view held calls and take calls off hold. To hold calls and manage held calls: 1. 2. Call Management When you are on an active call, press HOLD. The Held Call icon appears and the Line Appearance LED flashes green. On other Desksets that are assigned that line, the Line Appearance LED flashes orange.
Synapse SB67020 Deskset User’s Guide Back to Contents Transferring a Call This section applies to Call Appearance mode only. To make calls available to other Desksets when your system is in Line Appearance mode, put a call on hold. Someone at another Deskset can retrieve the call if that line has been assigned to their Deskset as described in “Putting a Call on Hold (Line Appearance Mode)” on page 46. To view and access held calls on all lines, see “Accessing the Held Calls List” on page 63.
Synapse SB67020 Deskset User’s Guide Back to Contents 0:08 202 2 Transfer 4. To complete the transfer, press Transfer . A Call Transferred screen appears for two seconds. When the transfer is complete, the screen returns to Idle mode. Call Transferred. Transferring a call to a busy extension If you try to transfer a call to an extension in your office that is on an active call or is paging, the Extension Status screen reads on a call, as shown in Figure 18.
Synapse SB67020 Deskset User’s Guide Back to Contents Making a Conference Call You can set up a conference call with yourself and two telephone numbers (either internal, outside, or with both). The pictures below show Call Appearance mode, but the procedure is the same in Line Appearance mode. To make a conference call: 1. Press Conf from an Active Call screen. The call is automatically put on hold and the Conference Setup screen appears. Press 2. 0:05 Waiting to Join...
Synapse SB67020 Deskset User’s Guide Back to Contents Putting a Conference on Hold The pictures below show Call Appearance mode, but the procedure is the same in Line Appearance mode. To put a conference on hold: 1. Press HOLD. The other callers can continue communicating with each other. The held conference icon indicates a held conference. 0:15 9-1-732-555-7318 Conf 2 is unavailable during an active call if you have another conference on hold.
Synapse SB67020 Deskset User’s Guide Back to Contents Parking a Call This feature applies to Call Appearance mode only. Parking a call is similar to putting a call on Hold, but any extension on the system can retrieve a parked call. You can park outside calls only. To park a call: 1. Press 2. Press or to display the active or held outside call you want to park. Park .
Synapse SB67020 Deskset User’s Guide Back to Contents Retrieving a Parked Call You can retrieve parked calls from any extension in the system. To retrieve a parked call: If you know the extension number of the parked call, dial it. You will retrieve the parked call. OR 1. Press MENU, then 1, and then 2 to display the Park List screen. , - . Retrieve or to display the desired entry. 2. Press 3. Press Retrieve to retrieve the parked call. The Active Call screen appears.
Synapse SB67020 Deskset User’s Guide Back to Contents Call Management with one Call Appearance This section applies to Call Appearance mode only. If your system administrator has configured your Deskset with one Call Appearance key, some features are restricted. These restrictions also apply when the Deskset has more than one Call Appearance key, and all Call Appearances are occupied. If you are on an active call, held call, or incoming call, additional incoming calls cannot be received.
Synapse SB67020 Deskset User’s Guide Back to Contents Call Management Using a Headset You can use a corded or cordless headset with the SB67020 Deskset if it is plugged into the jack on the back of the Deskset. The cordless headset must provide its own wireless radio. To use a Headset: From Idle mode or during a call, press HEADSET. If you have a headset connected and turned on, then the headset becomes active. To return audio to the Deskset (speakerphone or handset), press HEADSET.
Synapse SB67020 Deskset User’s Guide Back to Contents CHAPTER 5 ACCESSING ITEMS IN LISTS The Deskset has lists of phone numbers that are used for making calls and for call management. Some of the lists, like Voicemail, have other features associated with them that are explained elsewhere in this guide. In this chapter, you learn how to access an individual item in a list. All instructions start from the Idle screen.
Synapse SB67020 Deskset User’s Guide Back to Contents Accessing the Queued Calls List This feature applies to Call Appearance mode only. The system administrator can configure the system to forward Incoming Calls to the Call Queue. The Queued Calls list contains unanswered calls. If the system administrator has assigned your extension to the Call Queue, queued calls ring at your extension when your extension becomes idle. You can also view and answer queued calls from the Queued Calls list.
Synapse SB67020 Deskset User’s Guide Back to Contents Accessing the Park List This feature applies to Call Appearance mode only. Use the Park List screen to access parked calls from any extension. See “Parking a Call” on page 51. Your Deskset may have a Programmable Feature Key set up as a Park List key. You can press the key to access the Park List. To access an entry in the Park List: 1. Press MENU, then 1, and then 2. The Park List appears. , - .
Synapse SB67020 Deskset User’s Guide Back to Contents Accessing the Extension List You can access the Extension List as part of the Directory when the phone is idle. See “Using the Directory” on page 65. When you go off-hook, you can access the Extension List using the ExtList soft key that appears. To access the Extension List: 1. Call Appearance mode: Lift the receiver or press SPEAKER to go off hook. Line Appearance mode: Lift the receiver or press SPEAKER, then press the Intercom key.
Synapse SB67020 Deskset User’s Guide Back to Contents Accessing Quick-Dial Numbers Your system administrator can set some of the Deskset Programmable Feature Keys as Quick-Dial keys for numbers that you frequently call. The Programmable Feature Keys are shown in Figure 2 on page 10 (Call Appearance mode shown). Quick Dial numbers are available in Call Appearance mode and Line Appearance mode.
Synapse SB67020 Deskset User’s Guide Back to Contents Accessing the Redial List The last 20 phone numbers that you dialed are recorded in the Redial list, as shown in Figure 19 and described in Table 13. Number, time and date $ 9-232-555-0176 11:15a Oct 20 Store Delete Callback Figure 19. Redial List Table 13. Key Redial List Function Description Store Delete Stores the caller’s number in the Personal list. You can also enter the caller’s name. Deletes the entry.
Synapse SB67020 Deskset User’s Guide Back to Contents If necessary, enter the caller’s first and last names. Press cursor to the Last Name and Phone # entries. Press Save to move the to save the entry. The system does not check for duplicate entries. 4. Press CANCEL to exit the Redial list. Deleting Redial Entries You can delete a single Redial entry from the Redial list or all Redial entries. Ensure the entry you wish to delete is displayed.
Synapse SB67020 Deskset User’s Guide Back to Contents Searching the Extension or Directory Lists Using the Dial Pad Use the dial pad to get to the first entry that starts with any letter. To search for a list entry: 1. Select a list to search, such as the Directory. New LastNme 2. Call Press the dial-pad keys to cause the Deskset to search for an exact match or the closest match.
Synapse SB67020 Deskset User’s Guide Back to Contents Accessing the Held Calls List This feature applies to Line Appearance mode only. When you or anyone else in your office puts an external call on hold, the call is displayed in the Held Calls List. From the Held Calls List, you can view and retrieve any held call in the system. Your Deskset Line Appearance LEDs also show which lines have held calls on them, but only for the lines assigned to your Deskset.
Synapse SB67020 Deskset User’s Guide Back to Contents CHAPTER 6 DIRECTORY The Synapse system provides three Directory lists. By default, the system displays entries from all three lists. See “To view and call Directory entries:” on page 66 to learn how you can limit this display to one of the three lists. Directory Personal — You can add, edit, and delete up to 50 entries in this Personal directory from the Deskset or the WebUI (referred to as “Extension Directory” on the WebUI).
Synapse SB67020 Deskset User’s Guide Back to Contents Using the Directory Access the Directory by pressing MENU, then 1, and then 7 (Call Appearance mode) or MENU, then 1, and then 5 (Line Appearance mode) to display the screen shown in Figure 20 and described in Table 14. Full name and number displayed. New LastNme Call Entry type (Personal, System, or Extension). Figure 20. Directory Table 14.
Synapse SB67020 Deskset User’s Guide Back to Contents Viewing and Calling Directory Entries By default, the Directory screen displays entries from all three Directory lists—Personal, System, and Extension. You can change the Directory settings to view any combination of the lists. Within a list, you can press a dial-pad key to see the first name that starts with the first letter on that key. If there is no match, the Deskset displays the next entry in the alphabetical list.
Synapse SB67020 Deskset User’s Guide Back to Contents Creating a New Personal List Entry You can add up to 50 personal entries to the Directory. These personal entries are only visible at your extension. To create a new Personal list entry: 1. Call Appearance mode—Press MENU, then 1, and then 7. Line Appearance mode—Press MENU, then 1, and then 5. The Directory appears. 2. Press New to display the Personal Entry screen with the cursor positioned in the First Name field.
Synapse SB67020 Deskset User’s Guide Back to Contents Editing a Personal List Entry You can edit any Personal list entry while viewing the Directory. To edit a Personal list entry: 1. Call Appearance mode—Press MENU, then 1, and then 7. Line Appearance mode—Press MENU, then 1, and then 5. The Directory appears. 2. Press 3. Press or to display a Personal entry. Edit . The Personal Entry edit screen appears.
Synapse SB67020 Deskset User’s Guide Back to Contents Storing Directory Entries from the Call Log or Redial List To store a Call Log or Redial entry into your Personal list: 1. In the Call Log or Redial list, press 2. If necessary, press 3. Press Store appears. or to display the desired entry. or to see the Store soft key. to store the entry in your Personal list. The Personal Entry screen The Deskset automatically fills in the name and number, if available. 4.
Synapse SB67020 Deskset User’s Guide Back to Contents Deleting a Personal List Entry You can delete any one of your personal list entries while viewing the Directory. To delete a Personal list entry: 1. Call Appearance mode—Press MENU, then 1, and then 7. Line Appearance mode—Press MENU, then 1, and then 5. The Directory appears. 2. Press or to display the entry to be deleted. 3. Press so that Delete appears. Directory 1/104 Graham Bell 9-232-555-0176 Edit Settings Delete 4.
Synapse SB67020 Deskset User’s Guide Back to Contents Sorting Directory Entries The Directory entries are sorted by first or last names. When you use the dial pad to search, the system searches for the names in the sort order. To sort Directory entries: 1. Call Appearance mode—Press MENU, then 1, and then 7. Line Appearance mode—Press MENU, then 1, and then 5. The Directory appears. 2. To sort the entries by first name, press FirstNme .
Synapse SB67020 Deskset User’s Guide Back to Contents CHAPTER 7 VOICEMAIL Your Synapse system records and saves incoming voicemail messages. You can play, delete, or forward those messages to one or many other extensions. The MESSAGE WAITING LED, shown in Figure 21 on page 73, lights up when there is at least one new message. Each message can be up to 2 minutes long. The Personal Mailbox at your Deskset has 30 minutes of recording time.
Synapse SB67020 Deskset User’s Guide Back to Contents Voicemail Overview When there is at least one new message, the MESSAGE WAITING LED lights up, as shown in Figure 21. MESSAGE WAITING LED Figure 21. Message Waiting LED To access your messages, see “Accessing Your Messages” on page 76. Each message appears on a screen similar to the screen shown in Figure 22. To see other messages, press or . Pressing or displays the soft keys described in Table 15.
Synapse SB67020 Deskset User’s Guide Back to Contents Group Mailbox Overview Group Mailboxes provide general delivery of Voicemail messages to a group within an organization. Group Mailboxes are different from your Personal Mailbox in that messages in Group Mailboxes are not stored in your Deskset. Even if your Personal Mailbox is full, there may be space available in some of your Group Mailboxes.
Synapse SB67020 Deskset User’s Guide Voicemail Back to Contents After someone listens to a message, the ! indicator for that message is removed from the screens of all participants of that group. If someone else is listening to a message when you delete it, the message is not deleted until the listener exits the Voicemail session. Message playback is not interrupted if you receive a call while listening to Group Mailbox Voicemail.
Synapse SB67020 Deskset User’s Guide Back to Contents Accessing Your Messages Access to your messages is different depending on whether or not you have access to any Group Mailboxes, and whether you have enabled Voicemail distribution. To access an entry from Voicemail: 1. Call Appearance mode: Press MENU, then 1, and then 4. Line Appearance mode: Press MENU, then 1, and then 3. If necessary, use the dial pad to enter your user password and press SELECT.
Synapse SB67020 Deskset User’s Guide Back to Contents Message Playback You can play either a single message or all of the Voicemail messages in a Mailbox. To play a single message: 1. On the Messages screen, press or until the desired entry is on the screen. Messages 1/10 ! Graham Bell Jul 19 232-555-0176 1:18p Play DelMsg Callback 2. Press time. Play .
Synapse SB67020 Deskset User’s Guide Back to Contents Calling the Messenger You can call back the person who left the Voicemail message. To call back the person who left the message: or until the desired entry is on the screen. 1. In the Messages list, press 2. Press Callback . The Call Back screen appears. Call Back Graham Bell 232-555-0176 Call Voicemail Store or to view the dialing options. Press Press Call Press Store Press CANCEL to return to the Messages list.
Synapse SB67020 Deskset User’s Guide Back to Contents Forwarding a Message You can forward a message to an extension or extensions, a Voicemail Distribution List (if enabled), or a Group Mailbox (if enabled). You can also record a message and forward it to a Distribution List. “Forwarding a Voicemail Message” on page 79 “Recording an Introduction to Send with a Forwarded Message” on page 80.
Synapse SB67020 Deskset User’s Guide 6. Press Send Back to Contents to forward the message. The Message Forwarded screen appears. Forward message to: Amy Lee - 203 Message Forw arded. Intro Send The forwarded message appears in the recipient’s Messages list. Recording an Introduction to Send with a Forwarded Message You can record an audio introduction to send with a forwarded message. To begin recording the introduction, press Intro while forwarding a message.
Synapse SB67020 Deskset User’s Guide Back to Contents Sending a New Message to a Distribution List If you have enabled Voicemail Distribution and created at least one Distribution List, you can record a new message and send it to a Distribution List. To create a Distribution List, see “Voicemail Distribution” on page 130. To record and send a new message: 1. Call Appearance mode—Press MENU, then 1, then 4. Line Appearance mode—Press MENU, then 1, then 3.
Synapse SB67020 Deskset User’s Guide Back to Contents Deleting Messages You can delete a single message or all messages from the Messages screen. You can also delete a single message during message playback, as described in “Message Playback” on page 77. To delete a single message or all messages: or until the desired entry is on the screen. 1. On the Messages screen, press 2. Press DelMsg to delete the message. The system deletes the message and displays call information for the next message.
Synapse SB67020 Deskset User’s Guide Back to Contents New Message Status Indications You can add a new message indication ( ) or delete the new message indication from a message. The new message indication disappears after you play a message, but you can mark a message as “new” or “old” at any time. To clear and restore new Message indications: 1. On the Messages screen, press 2. Press or to display the or until the desired entry is on the screen. ClrNew soft key.
Synapse SB67020 Deskset User’s Guide Back to Contents Accessing Your Voicemail Remotely Remote access allows you to listen to Personal Messages or change the recorded greeting when you are away from your Deskset. Follow the voice prompts and press the appropriate dial-pad keys to navigate through the system. The voice prompts in a menu list are repeated three times with a 5-second pause between. After three times with no action, the voice says “Goodbye” and the remote call is disconnected.
Synapse SB67020 Deskset User’s Guide Back to Contents To access Voicemail remotely – listen to messages: Once you have accessed the system, the Main Menu plays. From this menu you can listen to old or new messages as shown in Figure 27. You have the following options: To listen to new messages, press 1. To listen to old messages, press 2. To change Voicemail options, press 8.
Synapse SB67020 Deskset User’s Guide Back to Contents To access Voicemail remotely – Voicemail greeting setup: 1. To set up the Voicemail greeting, access the system and press 8. As illustrated in the flow diagram in Figure 28, you have the following options: To record a primary greeting, press 1. To record an alternate greeting, press 2. To choose the Primary or Alternate greeting, press 7. 2. Begin recording after the tone. 3. To end the recording, press 5. 4.
Synapse SB67020 Deskset User’s Guide Back to Contents CHAPTER 8 CALL LOG The Deskset Call Log provides available name and number information for the last 50 calls received. The newest entries replace the oldest. “Using the Call Log” on page 88 “Managing Missed Calls” on page 90 “Deleting Call Log Entries” on page 93 “Deleting Call Log Entries” on page 93.
Synapse SB67020 Deskset User’s Guide Back to Contents Using the Call Log The Call Log soft keys, as shown in Figure 29 and described in Table 16, are available whenever the Call Log has at least one entry. 4 3 1 2 Figure 29. Call Log Functions 1. Name and number The Ring Group name can also appear here. 2. NEW Indicates call was not answered and has not been reviewed. 3. Voicemail message available for Exclamation mark (!) indicates message is new. playback.
Synapse SB67020 Deskset User’s Guide Back to Contents To access the Call Log list: 1. Call Appearance mode: Press MENU, then 1, and then 8. Line Appearance mode: Press MENU, then 1, and then 6. The most recent Call Log entry appears. 11:15a Oct 20 1/35 ! Graham Bell 232-555-0176 [NEW] PlayMsg Delete Callback Call Log or until the desired entry is on the screen. 2. Press 3. Press CANCEL to exit the Call Log.
Synapse SB67020 Deskset User’s Guide Back to Contents Managing Missed Calls All incoming calls are recorded in the Call Log unless Call Forward All is on and calls are forwarded to another extension or outside phone number (Call Appearance mode only). Unanswered calls that have not been reviewed are indicated by [NEW]. To review and make calls from the Call Log: 1. On the Call Log screen, press or to see the desired entry.
Synapse SB67020 Deskset User’s Guide Back to Contents Listening to Voicemail From the Call Log If the caller left a Voicemail message, you can play the message from the Call Log. To play a Voicemail message from the Call Log: or until the desired entry is on the screen. 1. On the Call Log screen, press 2. Press PlayMsg . The message playback screen appears. Graham Bell Jul 19 1:18p ! 05:10 Pause Delete PlayMsg only appears if the call has an associated Voicemail.
Synapse SB67020 Deskset User’s Guide Back to Contents Storing Call Log Entries To store a Call Log entry into your Personal list: or to display the 1. From the desired Call Log entry, press 2. Press Store to store the entry in your Personal list. The store personal entry screen appears. Store soft key. First Nam e: Angela Ma... Last Nam e: Phone #: 732-555-7318 Save Pause Backspc The caller information fills in the First Name and Number fields. 3. Fill in the Last Name field, if desired.
Synapse SB67020 Deskset User’s Guide Back to Contents Deleting Call Log Entries You can delete a single Call Log entry, or all Call Log entries. To delete Call Log entries: 1. From a Call Log entry, press Delete . The displayed entry is removed from the list and the next entry appears. OR To delete all Call Log entries, press or to display the ! / G @D "B Store ClrNew DelAll a. Press DelAll . The confirmation screen appears.
Synapse SB67020 Deskset User’s Guide Back to Contents CHAPTER 9 PAGING Paging allows you to broadcast what you say to more than one extension. If your system administrator has set up Paging Zones, you can page all extensions or a zone. If your Synapse system includes an optional overhead paging (OHP) system, you may be able to page through loudspeakers. If the OHP is a single-zone paging system, it is included when you page All Extensions.
Synapse SB67020 Deskset User’s Guide Back to Contents Sending a Page You can start sending a page from the Paging Zones screen. If your system administrator has set up Paging Zones, you can page all extensions or a zone. To send a page: 1. Call Appearance mode—Press MENU, then 1, and then 3. Line Appearance mode—Press MENU, then 1, and then 2. The Paging Zones screen appears. The screen shows the page options available to your Deskset. > ;> H ; . C ( : ;. ;. C ( F; . C ) ; > ; 2.
Synapse SB67020 Deskset User’s Guide Back to Contents CHAPTER 10 DESKSET SETTINGS You or your system administrator can customize your Deskset at the Deskset using the following menus and features: Deskset Settings “Deskset Menu” on page 97 “Features” on page 98 “User Settings” on page 100 “Admin Settings” on page 118 “Deskset Information” on page 119 “Auto-Attendant Settings” on page 120 “Using Do Not Disturb (DND)” on page 121.
Synapse SB67020 Deskset User’s Guide Back to Contents Deskset Menu You can use the Deskset menus to set up many Deskset features. Access the Menu by pressing MENU, and then select options by highlighting an item and pressing SELECT, or by pressing the dial-pad key with that option number. To access the Deskset setup menus: 1. Deskset Settings Press MENU. The Deskset Menu appears. Press 1 on the dial pad to display the Features menu. These features are discussed throughout this User’s Guide.
Synapse SB67020 Deskset User’s Guide Back to Contents Features Use the Features menu to access the Deskset Features. Table 17 lists the Features available in Call Appearance mode. For Features available in Line Appearance mode, see Table 18 on page 99. Features Menu 1/4 Features Menu 2/4 Features Menu 3/4 Features Menu 4/4 Figure 30. Deskset Features Menu (Call Appearance Mode) Table 17. Deskset Menu – Call Appearance Mode Features Feature See page... Description 1.
Synapse SB67020 Deskset User’s Guide Back to Contents Features Menu 1/3 Features Menu 2/3 Features Menu 3/3 Figure 31. Deskset Features Menu (Line Appearance Mode) Table 18. Deskset Menu – Line Appearance Mode Features Feature See page... Description 1. Held Calls List 63 View and retrieve calls from any line in the system. 2. Page 95 Make an announcement to your organization. 3. Messages 76 Play, delete, or forward messages. 4. Do Not Disturb 121 Turn Do Not Disturb on and off. 5.
Synapse SB67020 Deskset User’s Guide Back to Contents User Settings Use the User Settings menu to set up options as shown in Figure 32 and described in Table 19. Figure 32 shows the menu in Call Appearance mode. The menu in Line Appearance mode is slightly different, as described in Table 19. User Settings Menu 1/2 User Settings Menu 2/2 Figure 32. User Settings Menu (Call Appearance Mode Shown) Table 19. Deskset Menu – User Settings Call Appearance mode See page... Line Appearance mode See page..
Synapse SB67020 Deskset User’s Guide Back to Contents Greetings Use the Greetings menu, as shown in Figure 33 and listed in Table 20, to record greetings. The figure below shows the menu in Call Appearance mode. The menu in Line Appearance mode is slightly different, as described in Table 20. Figure 33. Greetings Menu (Call Appearance Mode Shown) Table 20. SB67020 Deskset Menu – User Settings Function See page... Deskset Settings Description 1. Voicemail Greeting 102 Set your Voicemail greetings.
Synapse SB67020 Deskset User’s Guide Back to Contents Voicemail Greetings You can have three different greetings for your Voicemail. You can then activate the one that is currently appropriate. You can record a Primary Greeting to use most of the time and an Alternate Greeting for when you are out of the office. The Pre-Set greeting, “Please leave a message after the tone,” is used when no other greeting is recorded. To activate a greeting: 1.
Synapse SB67020 Deskset User’s Guide Back to Contents 4. If you wish to record the greeting on the handset, lift the handset. You can also record the greeting on the speakerphone. 5. To record your greeting, press Record . The message recording screen appears and the Record key changes to Stop . 6. Press Stop when you are finished. The greeting is saved and the message review screen appears. Recording stops automatically if you exceed the 60-second time limit. 7. Press 8.
Synapse SB67020 Deskset User’s Guide Back to Contents Name Recording Name Recording is available in Call Appearance mode only. If callers access the Company Directory when the Auto Attendant is on, they hear this recording upon entering your name. To create a useful recording for incoming callers, you should say your name slowly, clearly, and at a reasonable volume. Your system administrator may also recommend that you state both your name and extension number.
Synapse SB67020 Deskset User’s Guide Back to Contents Call Management Call Management features apply to Call Appearance mode only. When the Synapse system is in Call Appearance mode, you can use the Call Management menu to set up options for handling calls, as shown in Figure 34 and listed in Table 21. Figure 34. Call Management Menu Table 21. Deskset Settings Deskset Call Management Menu Function See page... Description 1. Call Forward 106 Redirect incoming calls. 2.
Synapse SB67020 Deskset User’s Guide Back to Contents Call Forward All and Call Forward–No Answer Call Forward All and Call Forward–No Answer redirect incoming calls. Once a call is forwarded, it cannot be answered by the original extension. You can set Call Forward All to redirect calls to a phone number, extension, or Voicemail. Your Deskset does not ring, but a message screen appears to confirm that the call was forwarded. Your Deskset does not record the call in its Call Log.
Synapse SB67020 Deskset User’s Guide 3. Deskset Settings To confirm the change, press error message appears if: Back to Contents Save . The Call Management menu appears. An you entered an invalid extension number your system administrator has disabled call forwarding/transferring to an outside line you enter a restricted number.
Synapse SB67020 Deskset User’s Guide Back to Contents Automatic Answering You can set the Deskset to automatically answer calls after a delay that you specify. Without touching the Deskset, you can speak to and be heard by people who call you. For example, employees in warehouses or shops may use this feature for quick conversations without having to interrupt what they are doing. Do Not Disturb and Call Forward All take priority over Auto Answer.
Synapse SB67020 Deskset User’s Guide Back to Contents Deskset Settings Use the Deskset Settings menu to set up the display appearance and sounds of your Deskset as listed in Table 22. Deskset Settings Menu 1/2 Deskset Settings Menu 2/2 Figure 35. Deskset Settings Menu Table 22. Deskset Settings Menu Function 1. Display See page... 110 Options 1. Contrast (1–9) 2. Backlight (Lo/Hi/Off) 2. Sounds 111 1. Ring Volume (0–9) 2. (0–40 seconds) 3. Ringtones (1–9) 4. Key beeps (On/Off) 3.
Synapse SB67020 Deskset User’s Guide Back to Contents Display Use the Display menu to adjust your Deskset LCD screen contrast and backlight. To use the Display menu: 1. Call Appearance mode—Press MENU, then 2, then 3, and then 1. Line Appearance mode—Press MENU, then 2, then 2, and then 1. The Display menu appears. 2. Press or to adjust the Contrast level from 1 to 9. The default is 5. 3. Press to set the Backlight level. Press or to select Hi, Lo, or Off. The default is Hi. 4.
Synapse SB67020 Deskset User’s Guide Back to Contents Sounds Use the Sounds menu to set the ring volume, delay the beginning of audible ringing, pick one of nine ringtones, or turn key beeps on and off. To use the Sounds menu: 1. Call Appearance mode—Press MENU, then 2, then 3, and then 2. Line Appearance mode—Press MENU, then 2, then 2, and then 2. The Sounds menu appears. 2. Press or to adjust the Ring Volume from 0 to 9. The default is 3. A ringer sample plays.
Synapse SB67020 Deskset User’s Guide Back to Contents Volume Settings Set the Speaker, Receiver, Headset, and Paging volumes using the Volume Settings menu. You can also adjust each of these volumes while you are on a call by pressing VOL+ and VOL–. To use the Volume Settings menu: 1. Call Appearance mode—Press MENU, then 2, then 3, and then 3. Line Appearance mode—Press MENU, then 2, then 2, and then 3. The Volume Settings menu appears. or to set the Speaker Volume from 1 to 9. The default is 4.
Synapse SB67020 Deskset User’s Guide Back to Contents Preferred Audio Mode When you press a Call Appearance key or , the call is answered in the preferred audio mode. Lifting the handset takes first priority in all instances. You can set the audio preferences to Headset or Speaker by using the Preferred Audio menu. To use the Preferred Audio Mode menu: 1. Call Appearance mode—Press MENU, then 2, then 3, and then 4. Line Appearance mode—Press MENU, then 2, then 2, and then 4.
Synapse SB67020 Deskset User’s Guide Back to Contents Directory Settings Use the Directory Settings menu to show or hide any of the three directories (Personal, System, and Ext List) and to set the sort order of the Directory. The default setting is all shown and sorted by first name. To use the Directory Settings menu: 1. Call Appearance mode—Press MENU, then 2, and then 4. Line Appearance mode—Press MENU, then 2, and then 3. The Directory Settings menu appears. 2.
Synapse SB67020 Deskset User’s Guide Back to Contents Setting and Changing Your Password Use the User Password menu to set, change, or reset your password. This setting can also be controlled on the WebUI. Once the password has been reset, password entry is no longer necessary for User Settings, Voicemail, and the WebUI. To use the Password menu: 1. Call Appearance mode—Press MENU, then 2, and then 5. Line Appearance mode—Press MENU, then 2, and then 4. The User Password menu appears. 2.
Synapse SB67020 Deskset User’s Guide Back to Contents Changing Your Password To change your password: 1. Call Appearance mode—Press MENU, then 2, then 5, and then 1. Line Appearance mode—Press MENU, then 2, then 4, and then 1. The Set/Change Password menu appears. 2. Use the dial pad to enter a password. Passwords can be up to six digits. To correct errors, press Backspc . To start over, press Delete . and enter the new password again. 3. Press 4.
Synapse SB67020 Deskset User’s Guide Back to Contents Setting the Voicemail to Email Mode The Voicemail to Email feature converts new voicemail messages to .WAV files and sends them to your email account as an attachment. You can also choose to receive an email notification of a new message without the .WAV attachment. 1. Call Appearance mode—Press MENU, then 2, and then 6. Line Appearance mode—Press MENU, then 2, and then 5. The Voicemail to Email menu appears.
Synapse SB67020 Deskset User’s Guide Back to Contents Admin Settings The Admin Settings are determined by your system administrator. Only someone with access to the system administrator’s password can change the Admin Settings. To display the Admin Settings menu: 1. Press MENU, then 3. You then must enter the Admin password before you can view the Admin Settings menu. For more information about these settings, see the Synapse Administrator’s Guide, available for download at www.telephones.att.
Synapse SB67020 Deskset User’s Guide Back to Contents Deskset Information Use the Deskset Information screen, shown in Figure 36, to find the Deskset's IP Address, which you will need to access the WebUI. The other Deskset information may be used by your system administrator or the installer. Deskset Information 1/4 Deskset Information 2/4 Deskset Information 3/4 Deskset Information 4/4 Figure 36. Deskset Information To display the Deskset Information: 1. Press MENU and then 4.
Synapse SB67020 Deskset User’s Guide Back to Contents Auto-Attendant Settings Auto Attendant settings apply to Call Appearance mode only. If your system administrator has set your extension as an Auto Attendant Manager, you can use the Deskset to manage one or more Auto Attendants. To manage the Auto-Attendant Settings: 1. Press MENU to display the menu with a fifth item, Auto Attendant. 2. Press 5 to display the Auto-Attendant Settings. The screen displays a list of Auto Attendants you can manage.
Synapse SB67020 Deskset User’s Guide Back to Contents Using Do Not Disturb (DND) Do Not Disturb (DND) silences incoming ringing and paging. You can still answer incoming calls when DND is on. The incoming call screen appears and the Call Appearance or Line Appearance LED flashes. To enable or disable Do Not Disturb: 1. Call Appearance mode—Press MENU, then 1, and then 5. Line Appearance mode—Press MENU, then 1, and then 4. The DND indicator appears on the Idle screen when Do Not Disturb is on.
Synapse SB67020 Deskset User’s Guide Back to Contents CHAPTER 11 WEB INTERFACE Use an Internet browser to access the Web User Interface (WebUI) that resides on your Deskset. See “Accessing the Web User Interface (WebUI)” on page 123. After you log in to the WebUI, you can configure the following features: “Basic Settings” on page 125 “Extension Directory” on page 127 “Quick Dial” on page 129 “Voicemail Distribution” on page 130. You can also view the Deskset Help from the WebUI.
Synapse SB67020 Deskset User’s Guide Back to Contents Accessing the Web User Interface (WebUI) To access the WebUI: 1. Ensure that your computer is connected to the same network as the Synapse system. In most cases, your computer will already be connected to the network through the PC port on the back of a Deskset. 2. On the Deskset, press MENU then 4 to display Deskset Information. 3. On the Deskset Information screen, find the IP Address. .,. I;J ; ) $ D ! % % F.
Synapse SB67020 Deskset User’s Guide Back to Contents Error Handling If you type an invalid value into one of the WebUI fields and click , the page is not saved. The WebUI displays an error message at the top of the page. The field with the incorrect value is highlighted in yellow, as shown in Figure 37. You can view a more detailed error description by resting your mouse pointer on the highlighted field. . Error Message Invalid Entry Figure 37.
Synapse SB67020 Deskset User’s Guide Back to Contents Basic Settings The remaining procedures in this chapter assume that you are already logged in to the WebUI. See “Accessing the Web User Interface (WebUI)” on page 123. After logging in, the Basic Settings page appears as shown in Figure 38. Your Extension Name, which the system administrator enters, is displayed on internal calls. In Call Appearance mode, callers using the Auto Attendant can search for your Extension Name to reach your extension.
Synapse SB67020 Deskset User’s Guide Web Interface Back to Contents Extension: Select an extension number or the Operator extension. Outside Phone Number: Enter an outside telephone number. Enter a 9 or whatever digit, if any, that you would normally dial first to indicate that it is an outside call. For example, enter your cell phone number as the Outside Phone Number to have all calls forwarded to your cell phone.
Synapse SB67020 Deskset User’s Guide Back to Contents Extension Directory To allow easy dialing, you can create a personal Extension Directory (referred to as the Personal list on the Deskset) that is only available from your extension. Your administrator can also create a System Directory of names and phone numbers (referred to as System list on the Deskset) that is available to all extensions. To add an entry to the Extension Directory: Web Interface 1.
Synapse SB67020 Deskset User’s Guide Back to Contents To edit Extension Directory entries: 1. In the navigation menu at left, click Extension Directory. The Directory List page appears. 2. Click [Edit] next to the entry to be edited. The Edit Extension Directory List Entry page appears. 3. Complete the form with the desired information. 4. Click to accept your changes or to reject the changes. To sort and delete Extension Directory entries: Web Interface 1.
Synapse SB67020 Deskset User’s Guide Back to Contents Quick Dial To add or edit Quick Dial Entries: 1. In the navigation menu at left, click Feature Keys. The Programmable Feature Keys page appears (Call Appearance mode shown). You can edit any Programmable Feature Keys that the system administrator has set up as Quick Dial keys. All other Programmable Feature Keys are unavailable. 2. Enter names and telephone numbers or extensions in the Name and Number columns.
Synapse SB67020 Deskset User’s Guide Back to Contents Voicemail Distribution If you enable Voicemail Distribution, you can leave new messages or forward existing messages to lists that you create in the WebUI. This feature is disabled by default. If you enable this feature, there will be an additional step every time you access your messages. See “Accessing Your Messages” on page 76. To enable and disable Voicemail Distribution Lists: 1.
Synapse SB67020 Deskset User’s Guide Back to Contents To create a Voicemail Distribution List: 1. In the navigation menu at left, click Voicemail Distribution to display the Voicemail Distribution Lists page. 2. Click 3. Enter a Name for the Voicemail Distribution List. 4. Assign Distribution List Members. . The Create Distribution List page appears.
Synapse SB67020 Deskset User’s Guide Back to Contents 3. Optional: Click to delete this Distribution List, then go to Step 6. 4. Edit the Distribution List Name as needed. 5. Assign Distribution List Members. Select one or more extensions from the Available Extensions list and click OR Select one or more extensions from the Distribution List Members list and click . 6. Web Interface Click to save these settings or click without saving the changes. 132 to return to the previous page .
Synapse SB67020 Deskset User’s Guide Back to Contents Help To access WebUI Help: 1. In the navigation menu at left, click Help. A PDF Help file opens. 2. Web Interface To view a topic, click the link for that topic. The page for that topic appears.
Synapse SB67020 Deskset User’s Guide Back to Contents CHAPTER 12 TROUBLESHOOTING If you have difficulty operating your Deskset, try the following suggestions in this section: “Common Troubleshooting Procedures” on page 135 “Display Messages” on page 136 “Calls Generally” on page 138 “Incoming Calls” on page 142 “Outgoing Calls” on page 144 “Voicemail” on page 146 “Other Deskset Features” on page 149 “WebUI” on page 151 “PC/Deskset Interaction” on page 152. .
Synapse SB67020 Deskset User’s Guide Back to Contents Common Troubleshooting Procedures Follow these procedures to resolve common issues. Resolving General Functional Issues To resolve a blank screen or device that does not work at all: Ensure the AC plug is plugged into an electrical outlet not powered by a wall switch. Verify that the AC power outlet has power. Try plugging in some other AC device. If nothing works, contact an electrician or use another power outlet.
Synapse SB67020 Deskset User’s Guide Back to Contents Display Messages The screen is blank or the Deskset menu does not work. Probable Cause Corrective Action There may be no power or the Deskset may need to be reset. See “To resolve a blank screen or device that does not work at all:” on page 135. Reset the Deskset to factory defaults. Insert a pen or paper clip into the reset hole and press for more than five seconds. The screen displays Joining Site... for more than one minute.
Synapse SB67020 Deskset User’s Guide Back to Contents Probable Cause Corrective Action The same Deskset extension number already exists. Reset the Deskset to factory defaults without the network cable connected. Use a paper clip to press and hold the reset switch for more than five seconds. The device software version is different than the rest of the system. Ask your system administrator to update all devices to the current software version. The device screen displays Synchronizing....
Synapse SB67020 Deskset User’s Guide Back to Contents Calls Generally Calls are dropped. Probable Cause Corrective Action Restoring Deskset settings or updating software while that extension is in use will cause all calls to be dropped. Your system administrator should avoid updating software or restoring Deskset settings when you are likely to be using the phone. The network is down.
Synapse SB67020 Deskset User’s Guide Back to Contents You cannot retrieve parked calls. Probable Cause Corrective Action The first digit of an extension number matches the first digit of parked calls. Your system administrator may have to correct your Dial Plan settings. Do not have extension numbers whose first digits match the park extension prefix. You hear static, sudden silences, gaps in speech, or garbled speech. Probable Cause Corrective Action You may be experiencing network problems.
Synapse SB67020 Deskset User’s Guide Back to Contents You are unable to transfer a call to an extension. Probable Cause Corrective Action The extension is unavailable. Check if the destination extension is disconnected from the network. Ensure that the extension exists. All the destination extension’s lines may be busy. If the party you have on hold hangs up, call back and start the transfer process again. Your Deskset does not automatically forward a call to another extension.
Synapse SB67020 Deskset User’s Guide Back to Contents Deskset does not automatically forward a call to an outside phone number. Probable Cause Corrective Action Forwarding to an outside phone number has been disabled or Call Forward All or the Call Forward–No Answer settings are incorrect. Call Appearance mode only—Check that Call Forward All is on. FWD should appear in the top right corner of the screen while in Idle mode. Press MENU, then 1, then 6 to turn this feature on.
Synapse SB67020 Deskset User’s Guide Back to Contents Incoming Calls Your Deskset does not receive incoming calls. Probable Cause Corrective Action Incoming call notifications have been suppressed or delayed, or incoming calls are redirected by the Deskset, or incoming calls are not directed to the Deskset. Verify that Do Not Disturb is off. Make sure that DND is not in the top right corner of the Deskset display.
Synapse SB67020 Deskset User’s Guide Back to Contents Probable Cause Corrective Action The outside caller may not be waiting long enough for the search. Tell callers that after spelling the name, they can press the pound (#) sign to start the search. Call Appearance mode only—Call does not Auto Answer. Probable Cause Corrective Action The Deskset is set to Call Forward All. Deactivate Call Forward All. Press MENU –> 1 –> 6. The Deskset is in DND mode. Deactivate DND.
Synapse SB67020 Deskset User’s Guide Back to Contents Outgoing Calls No dial tone. Probable Cause Corrective Action Handset cord is plugged into the wrong jack. Ensure the handset cord is plugged into the handset jack on the side of the Deskset. Do not connect the handset cord to the corded headset jack on the back of the Deskset. When you dial an outside number, you reach an extension instead.
Synapse SB67020 Deskset User’s Guide Back to Contents You cannot make international long distance calls. Probable Cause Corrective Action Call Appearance mode only—If no trunk prefix (digit entered before dialing outside calls) is set, phone numbers, including international or country codes, that start with 0 (zero) will go to the Synapse system operator. Consult your system administrator. You cannot access phone company services like 411.
Synapse SB67020 Deskset User’s Guide Back to Contents Voicemail Voicemail is not received at the extension you called. Probable Cause Corrective Action Target extension Voicemail is full. Delete messages. Extension is unplugged. Plug in the extension. Distribution List error. Verify the Distribution List. Log in to the WebUI, then click Voicemail Distribution. Your Deskset does not receive Voicemail.
Synapse SB67020 Deskset User’s Guide Back to Contents Incomplete Voicemail messages. Probable Cause Corrective Action Recording interrupted by time-out or full memory. If a caller leaves a very long message, part of it may be lost when the Deskset disconnects the call after two minutes. If the caller pauses for longer than six seconds, the Deskset stops recording and disconnects the call.
Synapse SB67020 Deskset User’s Guide Back to Contents The system does not respond to remote Voicemail commands. Probable Cause Corrective Action The system cannot detect Dual-Tone Multi-Frequency (DTMF) tones, which are the signals sent when the caller presses dial-pad keys. Confirm you have entered star, star (**) before entering your remote access code (user password). If you have no password, press star, star (**), then pound (#). Confirm you are calling from a touch-tone phone.
Synapse SB67020 Deskset User’s Guide Back to Contents Other Deskset Features Other Desksets do not appear in the extension list. Probable Cause Corrective Action The Deskset is not connected to the same subnet as the other Desksets. Verify that the first two sections of the IP address (the portion before the second “dot”) match the IP addresses of the other Desksets or that the subnets are set up to communicate with each other. Press MENU –> 4 at a Deskset to find the IP address.
Synapse SB67020 Deskset User’s Guide Back to Contents You are unable to add an entry to Quick-Dial list. Probable Cause Corrective Action If you have an SB67030/031 Deskset, the Quick-Dial list is full — there are six entries available. Edit Quick-Dial entries on the Deskset to write over an existing entry: a. Press the button to the right of . b. Press Edit List to add or edit a Quick-Dial entry. Edit Quick-Dial entries on the WebUI to write over an existing entry: a.
Synapse SB67020 Deskset User’s Guide Back to Contents WebUI Unable to access the WebUI Log-in page from my computer. Probable Cause Corrective Action The computer is not connected to the same subnet (network) as the Deskset, and the subnets are not set up to communicate. Verify the IP address. You must correctly enter the IP address of your Deskset into your Internet browser’s address bar. At the Deskset, press MENU –> 4 to see the IP address displayed in the third line of the information.
Synapse SB67020 Deskset User’s Guide Back to Contents PC/Deskset Interaction Internet connection or access to the local network on your computer does not work after installing the Deskset. Probable Cause Corrective Action The Ethernet cords are not installed correctly. Check that the Ethernet cord from the computer is plugged into the Deskset port labeled .A second Ethernet cord should be plugged into the Ethernet port on the Deskset marked with the other end plugged into your LAN.
Synapse SB67020 Deskset User’s Guide Back to Contents APPENDIXES Appendix A: Soft Keys The Synapse SB67020 Deskset features keys below the LCD screen. The bottom of the screen displays the appropriate label for each key as the function of the key changes. Table 23 provides an alphabetical list of the labels that appear above the Deskset soft keys. Table 23. Function SB67020 Deskset Soft Key Functions Description Function Enters a dot in IP address. Deletes a Voicemail message.
Synapse SB67020 Deskset User’s Guide Table 23. Function Back to Contents SB67020 Deskset Soft Key Functions (Continued) Description Function Opens the Park List. Initiates Message Forward function. Inserts a two-second pause in a digit string. Forwards incoming call to Voicemail. Plays a message or recording. Silences ringer during incoming call. Plays all Voicemail messages. Plays a message from the Call Log. Record an introductory message. Plays a recording.
Synapse SB67020 Deskset User’s Guide Back to Contents Appendix B: Technical Specifications Table 24 lists the technical specifications for the SB67020 Deskset. Table 24. Technical Specifications Feature Specification Size 6.9” × 7.9” × 8.1” (H × W × D @57° angle), 7.9” × 7.9” × 7.1” (H × W × D @41° angle) Weight 35.59 oz. (1009 g) (including adapter) Power Requirements 5.1 V DC @ 1700 mA, 48 V DC Typ.
Synapse SB67020 Deskset User’s Guide Back to Contents Appendix C: Maintenance Your system contains sophisticated electronic parts, so it must be treated with care. Avoid Rough Treatment Handle the unit gently. Save the original packing materials to protect your equipment if you ever need to ship it. Avoid Water Your unit can be damaged if it gets wet. Do not use the equipment outdoors in the rain or handle it with wet hands. Do not install the equipment near a sink, bathtub, or shower.
Synapse SB67020 Deskset User’s Guide Back to Contents Appendix D: Important Safety Instructions This symbol alerts you to important operating or servicing instructions in this document. Always follow basic safety precautions when using this product to reduce the risk of injury, fire, or electric shock.
Synapse SB67020 Deskset User’s Guide Back to Contents GLOSSARY This glossary provides definitions that pertain to the Synapse telephone system.
Synapse SB67020 Deskset User’s Guide Back to Contents default: The original product settings deregister: To remove the association between an SB67030/031 Deskset and a Cordless Handset or Cordless Headset dial pad: The 0 through 9, *, and # keys on the Deskset and the SB67040 Cordless Handset direct dial: Allows callers to directly dial users' extension numbers after the Auto Attendant answers Directory: A list of names and phone numbers Display Names: The names that the system administrator enters to ide
Synapse SB67020 Deskset User’s Guide Back to Contents greeting, preset: The voice message that plays to callers if the user has not recorded an outgoing message grounding: An electrical ground connection that minimizes interference, reduces the risk of equipment damage due to lightning, eliminates electrostatic buildup, and helps protect people who service the equipment Group Mailbox: Provide general delivery of Voicemail messages to a group within an organization.
Synapse SB67020 Deskset User’s Guide Back to Contents NTP (Network Time Protocol): An Internet standard protocol that assures time synchronization in a computer network off hook: Indicates that you are on a phone call, have lifted the corded handset, or have pressed SPEAKER or HEADSET to answer a call or to prepare to make a call. You are off hook from the moment that you hear a dial tone to when you hang up a call.
Synapse SB67020 Deskset User’s Guide Back to Contents single-zone paging: Paging to a single set of overhead loudspeakers. All speakers transmit the same announcement simultaneously. SIP: Session Initiation Protocol, a signaling protocol used for voice and video communications over the Internet soft key: The Synapse Desksets and Cordless Handsets feature keys below the LCD screen. The bottom of the screen displays the appropriate label for each key as the function of the key changes.