
Installation guide


Synapse Installation Guide Back to Contents
Installation 32
Grounding
The Gateways and ATAs must be connected to reliable earth ground. The connection to
earth ground must be verified by qualified personnel.
The SB67010 PSTN Gateway must be connected to reliable earth ground using the
supplied ground wire connected to a terminal on the back of the Gateway chassis.
The SB67060 T1 Gateway and SB67070 SIP Gateway must be connected to reliable earth
ground through a separate ground wire connected to a terminal on the back of the
Gateway chassis before connecting the T1 cable or LAN cable.
The SB67050 Analog Terminal Adapter is connected to earth ground through a properly
grounded wall outlet. Additional grounding may be necessary for the ATA if you need to
improve immunity to Electrostatic Discharge (ESD) and to minimize the possibility of
electrical interference when using third-party audio equipment.
To provide additional grounding, the ATA can be connected to reliable earth ground
through a separate ground wire connected to a terminal on the back of the ATA chassis.
To ground the Gateway or ATA:
1. Acquire a grounding cable of 18 AWG or greater gauge. For the PSTN Gateway, use
the supplied grounding cable.
2. Locate the device near the building ground point, usually located at the electrical
breaker box. The PSTN Gateway must be within three feet (91.4 centimeters) of the
building ground point.
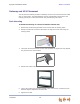
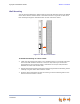
3. Loosen the grounding terminal screw on the back of the device, as identified in
Figure 12 and Figure 13.
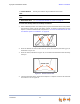
Figure 12. PSTN Gateway Grounding
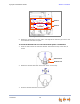
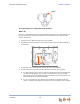
Figure 13. T1 Gateway, SIP Gateway, and ATA Grounding
4. Insert the end of the grounding cable under the grounding terminal.
5. Tighten the screw.
6. Connect the other end of the grounding cable to the building ground point, usually
located at the electrical breaker box.
If you are unsure about the location of the building ground point or how
to ground the device, contact the facilities manager.
Grounding Terminal
Grounding Terminal