
Installation guide


Synapse Installation Guide Back to Contents
Installation 33
Gateway Installation
To install the Gateway:
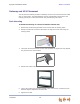
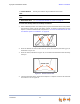
1. Install a Gateway first. Plug the AC plug into an electrical outlet not controlled by a
wall switch and the DC plug into the DC jack, as shown in Figure 14. Wait up to one
minute until the screen lights up.
2. Plug a gray Cat.-5 LAN cable for the PSTN Gateway or SIP Gateway or yellow Cat.-6
LAN cable for the T1 Gateway into the Ethernet port marked LAN. Use the supplied
cables or a comparable substitute. Plug the other end of the cable into your
office LAN. The T1 Gateway is Gigabit Ethernet (GigE) capable, so it has a Cat.-6 LAN
cable. The Desksets and other devices require only Cat.-5 cables.
Figure 14. Gateway Power and LAN Connections
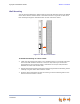
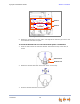
The Gateway takes about a minute to power up.
After another Synapse device is installed, and after the Gateway has found the
network and the other Synapse device, Synchronized appears on the third line of
the display as shown in Figure 15 (PSTN Gateway shown). This is the Idle screen.
Figure 15. Gateway Idle Screen, Synchronized
The time and date may not be correct. You can set the time and date on the System
Basic Settings page in the WebUI or using the Deskset Admin Settings menu.
For more information, see the Synapse Administrator’s Guide at
www.telephones.att.com/synapseguides.
PSTN Gateway
T1 Gateway
LAN
DC Power
SIP Gateway