
Installation guide


Synapse Installation Guide Back to Contents
Installation 43
SB67050 ATA Installation
To install an ATA:
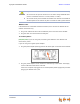
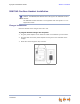
1. After installing at least one Deskset, plug the AC plug into an electrical outlet not
controlled by a wall switch and the DC plug into the DC jack, as shown in Figure 23.
Wait up to one minute until the screen lights up.
2. Plug a Cat.-5 Ethernet cable into the port marked LAN. Plug the other end of the
Ethernet cable into your office LAN.
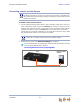
Figure 23. ATA Power, LAN, and Station Port Connections
The ATA takes about a minute to power up.
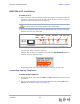
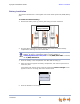
After the ATA has found the network and the Gateway, Synchronized appears on
the third line of the ATA Idle screen.
3. Remove the plastic covers from the FXS station ports that you are using.
Connecting Analog Telephones
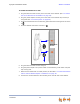
To install analog telephones:
1. Remove the plastic covers from the FXS 1 and FXS 2 (telephone) ports to be used
on the ATA.
2. Plug up to two telephone lines from analog telephones into the ATA FXS 1 and
FXS 2 ports, as shown in Figure 24 on page 44.
To prevent the loss of ATA-supported services during power outages, plug the
AC power plug into an Uninterruptible Power Supply (UPS).
Station Ports
FXS 1
FXS 2
AUX IN
AUX OUT
LAN
DC Power