
Installation guide


Synapse Installation Guide Back to Contents
Installation 46
To install an overhead paging system:
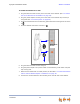
1. Remove the plastic cover from the FXS 1 or FXS 2 port to be used on the ATA.
2. Plug the telephone line from the OHP device into the FXS 1 or FXS 2 port, or plug
an audio cable from the OHP device into the ATA AUX OUT port, as shown in
Figure 23 on page 43, depending on the requirements of the paging system.
If you need to hard-wire a connection between your OHP device and the ATA AUX
OUT jack, you can use the supplied auxiliary audio cable as follows:
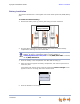
a. Remove the 3.5 mm plug from one end of the cable.
b. Strip enough shielding from the cable to expose the three wires inside.
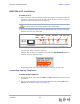
c. Identify the Tip (Left channel) and Ground wires. Depending on the cable, the Tip
wire may be white, the Ground wire may be bare/unshielded, and the Ring (Right
channel) wire may be red, as shown in Figure 26. You can use a voltmeter to
properly identify the wires.
Figure 26. Hard-Wiring a Stereo Cable to the OHP
d. Trim the Ring (Right channel) wire to ensure it does not contact other wires or
terminals.
e. Connect the Ground wire to the negative terminal and the Tip wire to the positive
terminal on the OHP device.
f. Plug the 3.5 mm plug on the other end of the cable into the AUX OUT port on
the ATA.
3. Enable the OHP device in the WebUI.
For information on setting up OHP, see the Synapse Administrator’s Guide at
www.telephones.att.com/synapseguides.
3.5 mm stereo plug
to ATA AUX OUT
Ground
Tip (Left Ch.)
Ring (Right Ch.)
(Do not wire to OHP)