SB67080 Expansion Module Installation and Configuration Guide © 2012 Advanced American Telephones. All Rights Reserved. AT&T and the AT&T logo are trademarks of AT&T Intellectual Property licensed to Advanced American Telephones, San Antonio, TX 78219. Synapse® is a registered trademark of Advanced American Telephones. Issue 2.
SB67080 Expansion Module Installation and Configuration Guide CONTENTS Preface .............................................................................................................. 3 Additional Documentation ................................................................................................................................. 3 Topic Navigation .................................................................................................................................................
SB67080 Expansion Module Installation and Configuration Guide Initial Installation ................................................................................................................................................. 40 Display Messages................................................................................................................................................. 41 WebUI.............................................................................................................
SB67080 Expansion Module Installation and Configuration Guide Back to Contents PREFACE This Installation Guide provides instructions for installing and setting up your Synapse SB67080 Expansion Module with software version 3.0.0 or later. See page 8 for instructions on checking the software version on the device. Before using this AT&T product, please read “Appendix F: Important Safety Instructions” on page 54.
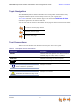
SB67080 Expansion Module Installation and Configuration Guide Back to Contents Topic Navigation This SB67080 Expansion Module Installation and Configuration Guide features easy navigation between topics and the ability to return to your original topic. Text in blue indicates a link to another page in the document. indicates a hyperlink to an external web site. Bold text in blue You can also click the arrows at the bottom of the page to move around this document. Go back to the last page viewed.
SB67080 Expansion Module Installation and Configuration Guide Back to Contents C HAPTER 1 INSTALLATION This section describes the physical installation of the SB67080 Expansion Module. The SB67080 is an expansion unit for Synapse SB6703x or SB6702x series Desksets. The Expansion Module provides: Up to 24 Feature Key assignments (12 per set) Extension monitoring Quick dialing other extensions Additional Quick Dial keys for dialing external numbers.
SB67080 Expansion Module Installation and Configuration Guide Back to Contents System Overview Figure 1 illustrates how the Expansion Module connects to the Synapse system in a basic configuration. For more information about connection options, see “Expansion Module Installation” on page 12. The Expansion Module must connect to same network as the other Synapse devices. The Synapse system can support up to 10 Expansion Modules. Each Expansion Module is intended to be paired with only one Deskset.
SB67080 Expansion Module Installation and Configuration Guide Back to Contents Recommended Installation Sequence Installation 1. Prepare your site for installation. See “Installation Preparations” on page 11. 2. Connect network cable(s) and power to the Expansion Module(s). See “Expansion Module Installation” on page 12. 3. Configure the Expansion Module(s) using the WebUI. See “Configuring the Expansion Module” on page 27. 4. Check for software upgrades and register your Synapse devices.
SB67080 Expansion Module Installation and Configuration Guide Back to Contents Software Version Compatibility Systems with software versions 3.0.0 and later support the features described in this guide. Prior to connecting the Expansion Module, please ensure that all Gateways, ATAs and Desksets have compatible software versions installed. If any devices need an upgrade to software version 3.0.0, see “Updating Devices” on page 31. To determine the software version of all installed devices: 1.
SB67080 Expansion Module Installation and Configuration Guide Back to Contents About Appearance Modes You can configure the Synapse system to operate in one of two appearance modes: Call Appearance mode and Line Appearance mode. The appearance mode affects how Deskset users make, answer, and manage calls, as well as Expansion Module functionality. Each mode provides a unique set of configurable features. For more information, see the Synapse Administrator’s Guide at www.telephones.att.com/synapseguides.
SB67080 Expansion Module Installation and Configuration Guide EM-1 (200) 1/2 EM-1 (200) ABC Accountants Milford Taxi Charlie Johnson Mary Williams Robert Brown Linda Miller Ext. 200 Davis Caterer Richard Serling David Carter Angela Martin Graham Bell Back to Contents 1/2 ABC Accountants Milford Taxi 3 4 5 6 7 8 9 10 11 12 Call Appearance Mode - Line Appearance Mode Figure 2.
SB67080 Expansion Module Installation and Configuration Guide Back to Contents Installation Preparations Placement Considerations. The Expansion Module is designed to be placed next to the Synapse Deskset with which is paired, as shown in Figure 3. Figure 3.
SB67080 Expansion Module Installation and Configuration Guide Back to Contents Expansion Module Installation Figure 4 identifies the features on the back of the Expansion Module. 5 1 2 4 3 Figure 4. Expansion Module Connections 1. Network Port Connects to the paired Desksets or the LAN switch used by the Synapse system. The two LEDs next to the network port indicate network status and AC power status. Green—on when the unit is connected to the network and has power.
SB67080 Expansion Module Installation and Configuration Guide Back to Contents To attach the stand: 1. Select a Expansion Module position. The stand provides two positions to match the angle of the paired Deskset. Option 1 is 45° and Option 2 is 60°. Option 2 Option 1 2. Place the Expansion Module on a flat surface with the power and network ports facing you. 3. Place the stand on the base with the flexible tab side away from you. Flexible Tabs 4.
SB67080 Expansion Module Installation and Configuration Guide Back to Contents To connect the Expansion Module with a shared network connection with a Deskset: You can connect the Expansion Module to a Deskset so that the Expansion Module and Deskset share a network connection. 1. Plug a Cat.-5 Ethernet cable into the Network port on the back of the Expansion Module. 2. Plug the other end of the cable into the PC port on the back of the Deskset.
SB67080 Expansion Module Installation and Configuration Guide Back to Contents To connect the Expansion Module and share a network connection with an end-user PC: If there is a networked computer and no extra Ethernet wall jacks near the Expansion Module, then plug the PC Ethernet cable into the Expansion Module. The PC can share the network connection through the Expansion Module PC port. Network Port PC Port Figure 5. Expansion Module Network and PC Ports 1. Unplug the Cat.
SB67080 Expansion Module Installation and Configuration Guide Back to Contents If a PC is connected to your LAN through a Expansion Module, any Expansion Module resets and power or network interruptions will disrupt the PC’s connection to the network. The PC port on the Expansion Module is intended for connection to an end-user PC only. Do not use the PC port to connect to a PC with a heavy bandwidth load (such as a network server PC or a hub, switch, or router).
SB67080 Expansion Module Installation and Configuration Guide Back to Contents CHAPTER 2 CONFIGURATION You can configure the Expansion Module using the Web User Interface (WebUI). The WebUI consists of web pages with editable settings for the system and each Synapse device. The WebUI is embedded in every Expansion Module, Gateway, Deskset, and optional Analog Terminal Adapter (ATA). When you access the WebUI, you are accessing it on the device, not on the Internet.
SB67080 Expansion Module Installation and Configuration Guide Back to Contents Expansion Module Front Panel You can access basic information and perform some configuration tasks using the Expansion Module’s front panel. From the front panel, you can configure: Display Settings—Contrast and Backlight. These settings are intended for the Expansion Module end user, and are described in the SB67080 Expansion Module User’s Guide included with the product.
SB67080 Expansion Module Installation and Configuration Guide Back to Contents To access the Expansion Module Main menu: 1. From the Idle screen, press and hold the SHIFT key for five seconds. The MENU appears. MENU Display Settings IP Settings Device Information Cancel Figure 8. Expansion Module Menu From the Main menu, press keys next to the screen labels to access the: Configuration Display Settings menu IP Settings menu Device Information screen.
SB67080 Expansion Module Installation and Configuration Guide Back to Contents Expansion Module IP Settings Synapse devices are connected to a LAN so they can communicate with each other. See “System Overview” on page 6 and “Appendix A: IP Addresses and Connectivity” on page 49 for a discussion of the Synapse network configuration and IP settings. To display the IP Settings screen: 1. Press and hold the SHIFT key for five seconds. The MENU appears. 2.
SB67080 Expansion Module Installation and Configuration Guide Back to Contents Setting the IP Configuration (Auto or Static) The Expansion Module is configured for automatic IP assignment by default, so changing this setting is only necessary if you require a static IP address for the device. To set the IP Configuration: 1. From the IP Settings menu, press the key adjacent to IP Configuration. The IP Configuration screen appears.
SB67080 Expansion Module Installation and Configuration Guide 2. 3. Back to Contents Enter the required IP settings as follows: For each digit, press the + or – keys to increase or decrease the value. Press Press Press or to move the cursor between digits. Next Save to move down to the next setting. to accept the changes and return to the IP Settings menu. IP Status This screen is for informational purposes only. To view the IP status: 1.
SB67080 Expansion Module Installation and Configuration Guide Back to Contents WebUI Overview If two Synapse devices are connected to the LAN, and as long as one Synapse device is currently on the same subnet as a PC, you can use the WebUI to administer the system. Only one person should log in as system administrator at a time to prevent accidentally overwriting and losing intended changes.
SB67080 Expansion Module Installation and Configuration Guide Back to Contents Logging in as Administrator To access the browser interface and log in: 1. Ensure your computer is connected to the same IP subnet as the Synapse system. You can connect your computer to the PC port on the back of the Expansion Module or a Deskset. 2. On the Expansion Module, press and hold the SHIFT key ( MENU appears. 3. On the MENU, press the key adjacent to Device Information. MENU ) for five seconds.
SB67080 Expansion Module Installation and Configuration Guide 7. Back to Contents Enter your administrator ID and password. If logging in for the first time, enter admin in the Login Name field and 12345 in the Password field, then click Login. You can change the Admin ID and password once you are logged in. The System Information page appears. Click topics from the navigation menu on the left side of the WebUI to see them.
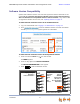
SB67080 Expansion Module Installation and Configuration Guide Back to Contents Error Handling If you type an invalid value into one of the WebUI fields and click Apply, the page is not saved. The WebUI displays an error message at the top of the page. The field with the incorrect value is highlighted in yellow, as shown in Figure 9. You can view a more detailed error description by resting your mouse pointer on the highlighted field. . Error Message Invalid Entry Figure 9.
SB67080 Expansion Module Installation and Configuration Guide Back to Contents Configuring the Expansion Module When making changes to the System Settings through the WebUI, ensure that no one is using the system. You might need to make the changes after normal office hours. Configuring the Expansion Module consists of: Configuration Pairing the Expansion Module with a Deskset. When you pair an Expansion Module with a Deskset, the two devices operate together.
SB67080 Expansion Module Installation and Configuration Guide Back to Contents To pair the Expansion Module with a Deskset: 1. In the navigation menu at left, click Expansion Module. The Expansion Module page appears. 2. Click the Select a Module list, and select the Expansion Module you want to configure. The Expansion Module page expands to show all the available settings. 3. Under EM Registration, select the Deskset Extension with which you want to pair the Expansion Module.
SB67080 Expansion Module Installation and Configuration Guide Back to Contents To configure the Expansion Module keys: 1. If you are not viewing the Expansion Module page already, in the navigation menu at left, click Expansion Module. The Expansion Module page appears. 2. If necessary, click the Select a Module list, and select the Expansion Module you want to configure. 3. Under Feature Key Assignments, select the key set that you want to edit.
SB67080 Expansion Module Installation and Configuration Guide Back to Contents For more information about Synapse Dial Plan settings, see the Synapse Administrator’s Guide at www.telephones.att.com/synapseguides. b. 5. Configuration If you select an Extension to monitor, an Enable Monitor checkbox appears. Extension monitoring is enabled by default. However, you can disable Extension monitoring by clearing the checkbox.
SB67080 Expansion Module Installation and Configuration Guide Back to Contents Updating Devices New software versions improve system functionality. All Synapse devices should be running the same software version number. (The optional Cordless Handsets and Cordless Headsets have different software version number sequences.) You can update all devices with one command, or you can update the Synapse devices individually.
SB67080 Expansion Module Installation and Configuration Guide Back to Contents To update all devices to the latest software version: 1. In the navigation menu at left, click Device Management, then Update Device. The Update Device page appears. 2. Under Automatic Update, select the desired Language Support. When only English is selected, the system will update all devices to the latest English-only release.
SB67080 Expansion Module Installation and Configuration Guide Back to Contents Using requires a minimum Internet download bandwidth of 1 Mbps and an Internet router that can handle the same number of total simultaneous connections as the number of Synapse devices. Refer to your router specification. Performing an update without meeting the minimum requirement may cause some or all devices not to update correctly. See “System Upgrade” on page 46. The total time to update all the devices varies.
SB67080 Expansion Module Installation and Configuration Guide MENU Back to Contents DEVICE INFORMATION P1 / 2 Display Settings IP Settings Device Information Device: EM-1 Paired with: Ext. 220 Model #: SB67080 Status: Synchronized IP: 192.168.0.
SB67080 Expansion Module Installation and Configuration Guide Back to Contents Product Registration In order to keep your system up to date with the latest upgrades and ensure timely warranty support, it is extremely important to register your system. To register a device, you need its MAC address. To find an Expansion Module MAC address: 1. Press and hold the SHIFT key for five seconds. The MENU appears. 2. On the MENU, press the key adjacent to Device Information. 3.
SB67080 Expansion Module Installation and Configuration Guide Back to Contents CHAPTER 3 TROUBLESHOOTING If you have difficulty operating your system, try the following suggestions in this section: “Common Troubleshooting Procedures” on page 37 “Initial Installation” on page 40 “Display Messages” on page 41 “WebUI” on page 44 “PC/Expansion Module Interaction” on page 48. For customer service or product information, contact the person who installed your system.
SB67080 Expansion Module Installation and Configuration Guide Back to Contents Common Troubleshooting Procedures Follow these procedures to resolve common issues. Resetting the Expansion Module You may need to manually restart the Expansion Module or return it to factory defaults (see “Appendix C: Default Settings” on page 51). You can restart the device if the device does not respond or fails to synchronize with the system.
SB67080 Expansion Module Installation and Configuration Guide Back to Contents Backing Up and Restoring Expansion Module Settings If need to reset the Expansion Module to factory defaults, you may want to save the device settings. You can then restore the settings after the Expansion Module is reconnected to the system. To back up the Expansion Module settings: 1. Log on to the WebUI as administrator. Click Device Management, then Back up/Restore, and then EM Settings in the navigation menu at left. 2.
SB67080 Expansion Module Installation and Configuration Guide Back to Contents Resolving General Functional Issues To resolve a blank screen or device that does not work at all: Ensure the AC plug is plugged into an electrical outlet not controlled by a wall switch. Verify that the AC power outlet has power. Try plugging in some other AC device. If nothing works, contact an electrician or use another power outlet. Verify that the DC plug is plugged into the power jack on the device.
SB67080 Expansion Module Installation and Configuration Guide Back to Contents Initial Installation The device screen displays Synchronizing. Troubleshooting Probable Cause Corrective Action The device has previous data and settings that are now inconsistent with current system settings. Erase all Expansion Module data and settings by unplugging the LAN cable and pressing the reset button on the bottom of the Expansion Module for more than five seconds.
SB67080 Expansion Module Installation and Configuration Guide Back to Contents Display Messages The screen is blank. Probable Cause Corrective Action Many. See “To resolve a blank screen or device that does not work at all:” on page 39. The screen displays Joining Site... for more than one minute. Probable Cause Corrective Action The device is failing to synchronize with other devices configured for a different system configuration.
SB67080 Expansion Module Installation and Configuration Guide Back to Contents The device screen displays Synch Failed. Probable Cause Corrective Action The device synch failed when trying to connect to the system. Reset the device. Use a pen or paper clip to press the RESET button for more than five seconds. The device was configured on another network or has returned to the system after being deleted from the system.
SB67080 Expansion Module Installation and Configuration Guide Back to Contents A Synapse device displays Host Not Found after a user attempts a software upgrade. Probable Cause Corrective Action The user attempted a software upgrade with no outside Internet connection. Ensure you have Internet connectivity and that your connection to your Internet Service Provider is operating normally. Ensure your firewall is not blocking http requests.
SB67080 Expansion Module Installation and Configuration Guide Back to Contents WebUI Administrator WebUI Unable to configure keys for extension monitoring. Probable Cause Corrective Action The system is in Line Appearance mode. None. Extension monitoring is not supported in Line Appearance mode. If Call Appearance mode is compatible with the site requirements, change the system to Call Appearance mode from the System Basic Settings page on the WebUI. The WebUI is unresponsive.
SB67080 Expansion Module Installation and Configuration Guide Back to Contents A Synapse device upgrade failed, the WebUI displays “Login to target device failed”, and the WebUI and device screens display the old software version. Probable Cause Corrective Action The software version of the device you are currently logged into is no longer compatible with the software version of other devices within the network. 1.
SB67080 Expansion Module Installation and Configuration Guide Back to Contents WebUI reverts to Log-in page after clicking a navigation link. Probable Cause Corrective Action The browser is not checking for newer versions of pages. Ensure that your Internet browser is working normally. It may not be automatically caching pages. For example, in Internet Explorer 7, click Tools –> Internet Options. Then under Browsing history, click Settings.
SB67080 Expansion Module Installation and Configuration Guide Back to Contents During device upgrade one of the following messages appears: “UNKNOWN ERROR Current image version” or “UNKNOWN ERROR”. Troubleshooting Probable Cause Corrective Action A communication error between the devices and the server. If this failure occurred after clicking Update All Devices, power cycle each device that did not get upgraded. Unplug the power cord and plug it back in.
SB67080 Expansion Module Installation and Configuration Guide Back to Contents PC/Expansion Module Interaction Internet connection or access to the local network on my computer does not work after installing the Expansion Module. Probable Cause Corrective Action The Ethernet cords are not installed correctly. Check that the Ethernet cord from the computer is plugged into the Expansion Module port labeled .
SB67080 Expansion Module Installation and Configuration Guide Back to Contents APPENDIXES Appendix A: IP Addresses and Connectivity An IP address is an individual numeric identification assigned to devices on a computer network. At least one Synapse device needs a network-assigned IP address on the subnet shared with any computers that will allow access to the WebUI. Valid IP addresses on the same subnet allow devices on the network to identify each other and enable communication.
SB67080 Expansion Module Installation and Configuration Guide Back to Contents Appendix B: Technical Specifications Table 2 lists the technical specifications for the SB67080 Expansion Module. Table 2. Technical Specifications Feature Specification Size 5.8” × 5.6” × 5.4” (H × W × D @ 60° angle), 5.1” × 5.6” × 6.3” (H × W × D @45° angle) Weight 17 oz. (480 g) (including stand) Power Requirements 5.
SB67080 Expansion Module Installation and Configuration Guide Back to Contents Appendix C: Default Settings Table 3 lists the default settings for the Expansion Module. Table 3.
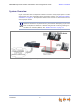
SB67080 Expansion Module Installation and Configuration Guide Back to Contents Appendix D: Parts List Figure 11 illustrates the Expansion Module parts. SB67080 Expansion Module Stand Power Adapter Cat.-5 Ethernet LAN Cable User Guide Important Product Information Figure 11.
SB67080 Expansion Module Installation and Configuration Guide Back to Contents Appendix E: Maintenance Your system contains sophisticated electronic parts, so it must be treated with care. Avoid Rough Treatment Handle the unit gently. Save the original packing materials to protect your equipment if you ever need to ship it. Avoid Water Your unit can be damaged if it gets wet. Do not use the equipment outdoors in the rain or handle it with wet hands.
SB67080 Expansion Module Installation and Configuration Guide Back to Contents Appendix F: Important Safety Instructions This symbol alerts you to important operating or servicing instructions in this document. Always follow basic safety precautions when using this product to reduce the risk of injury, fire, or electric shock.