AT&T Synapse® SB67070 SIP Gateway Configuration Guide Software Version 3.1.2 & later 3.x.
TABLE OF CONTENTS 1 2 Introduction ..................................................................................................... 3 Special Notes.................................................................................................... 3 2.1 Emergency 911/E911 Services Limitations and Restrictions............................... 3 2.2 Special Notes/Unsupported SIP Features ........................................................ 3 3 Overview .................................................
1 Introduction This configuration guide provides instructions for configuring the Synapse Business Phone System for AT&T IP Flexible Reach SIP Trunking Service. Specifically, this guide describes how to configure the Synapse SB67070 SIP Gateway for IP Flexible Reach Service. The SB67070 SIP Gateway was qualified for AT&T IP Flexible Reach Service using Synapse software version 3.1.2, and covers all later 3.x.x versions.
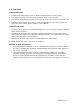
For the Network-Based Locate Me feature (aka Sequential Ringing), the Answer Confirmation option must be set to OFF. Sequential Ringing does not work if Answer Confirmation is turned ON. Note: This is specific to Sequential ringing. Answer Confirmation can be turned ON for the Simultaneous ringing feature. 3 Overview This configuration guide assumes that your Synapse system is installed and that users are able to make internal (Deskset to Deskset) calls.
3.1 SB67070 SIP Gateway Features A LAN 10/100 BaseT Ethernet port connects to the existing Synapse network. A four-line LCD display with four hard keys provides status information, such as the device IP address, and allows basic network configuration and firmware upgrades. Device configuration and system configuration, such as SIP Account information, available through the Web User Interface (WebUI). Supports up to 16 simultaneous voice calls.
3.3 Call Flow Inbound Call Flow: 1. A PSTN phone originates a call to an AT&T IP Flexible Reach service number. 2. The PSTN routes the call to the AT&T IP Flexible Reach service network. 3. The AT&T IP Flexible Reach service routes the call to Synapse System at Customer Site. 4. Synapse System applies any necessary digit manipulations based upon the DID and routes the call to a hunt group, phone or a fax endpoint. Outbound Call Flow: 1.
4 Configuration Guide This section describes how to configure the SIP Gateway Account Settings to support AT&T’s IP Flexible Reach Service. 4.1 Software Version Compatibility Systems with software versions 3.1.2 and later 3.x.x versions support the features described in this guide. All Gateways and Desksets must have the same software versions installed. To determine the software version of the SB67070 SIP Gateway from the device front panel, press SELECT, SELECT, and then DOWN.
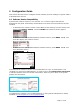
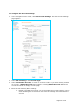
4.2 Configuring Synapse for IP Flexible Reach Service The Synapse WebUI allows you to configure the SIP Gateway for IP Flexible Reach Service. 4.2.1 Logging In to Synapse as Administrator To access the Synapse WebUI and log in: 1. Connect your computer to the same IP subnet as the Synapse system, or ensure that devices on different subnets are able to communicate. For example, you can connect your computer to the PC port on the back of a Deskset. 2. On the Deskset, press MENU then 4.
4.3 Configuring the SIP Gateway To configure the SIP Gateway General Settings: 1. In the navigation menu at left, click SIP Settings and then click SIP General Settings. The SIP General Settings page appears. 2. Enter the Starting RTP Port number. AT&T IP Flexible Reach supports an RTP port range between 16384 and 32767. Ensure that the RTP port setting is within that range. 3. Click Apply to save your changes.
To configure SIP Account Settings: 1. In the navigation menu at left, click SIP Account Settings. The SIP Account Settings page appears. 2. Select SIP Trunking as the Account Type. 3. Select Create New Account, or select an account to edit. If you have already created an account, a Delete Account button appears. Clicking Delete Account deletes the account and loads an empty account page. 4. Enter the SIP Gateway Basic Settings. a. Enable or Disable the account.
b. Enter the Account Name. The SIP account name appears on the Dial Plan Settings page and the Trunk Reservation page. c. For Max Calls, enter the number of simultaneous call sessions you purchased. The maximum value is 16. Setting the Max Calls to a value that is less than the current number of Trunk Reservations for the SIP Account will generate an error. d. Enter the Display Name. The Display Name is the text portion of the Caller ID that is displayed for outgoing calls. e.
b. Arrange the enabled audio codecs. Select a codec, then click or to change the order. AT&T IP Flexible Reach requires G.729 to be the primary codec, with G.711u as the secondary codec. 8. Click Apply to save your changes. The SIP Gateway Registration LED should turn green when the SIP Gateway has successfully registered to AT&T IP Flexible Reach Service. 4.
move a trunk up or down the priority list by selecting it, then clicking or . 3. Set the Call Log/Messages Prefix according to your Dialing Rules. You can enter a maximum of eight digits using only the characters 0–9, #, *, or P. Leave the field blank if the Dialing Rules do not use a number for external line access. 4. Enter or modify Dialing Rule patterns. For more information, see “About Dialing Rules” in the Synapse System Administrator’s Guide. 5.
5 Troubleshooting Note: For customer service, repair, replacement, or warranty service, and all questions about this product, visit our web site at www.telephones.att.com/smb or call 1 (888) 916-2007. In Canada dial 1 (888) 883-2474. 5.1 Device Log If you have trouble with your system and you require customer service, they may need the device log for troubleshooting purposes. You can generate a device log on the Device Log page. You can also configure a device log prior to generating the log.
5.2 General Troubleshooting Topics SIP Gateway REG LED is RED or SIP Registration status on the WebUI is Unknown. Cause Action Incorrect SIP account settings. Make sure your SIP Account settings are set as per your SIP service provider’s requirements. Network connection problems. Make sure you have a reliable Internet connection for the SIP Gateway. Make sure the SIP service is not down. SIP Gateway is not working. Cause Action No power to the Gateway.
Calls on the SIP Gateway terminate unexpectedly. Cause Action Issues with SIP account settings. Make sure that your SIP account is registered. The REGISTRATION LED on the SIP Gateway front panel should be solid GREEN and the Registration Status on the WebUI SIP Account Settings should show Registered. On the WebUI SIP Account Settings page, ensure Static Registration is not selected. Incorrect SIP account settings.