
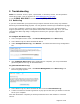
Installation guide
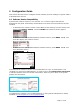


b. Enter the Account Name. The SIP account name appears on the Dial Plan
Settings page and the Trunk Reservation page.
c. For Max Calls, enter the number of simultaneous call sessions you
purchased. The maximum value is 16. Setting the Max Calls to a value that is
less than the current number of Trunk Reservations for the SIP Account will
generate an error.
d. Enter the Display Name. The Display Name is the text portion of the Caller
ID that is displayed for outgoing calls.
e. Enter the User Name as provided by AT&T. The User Name, also known as
the Account ID, is usually the company's main number. Synapse will only
accept digits for a User Name.
f. Leave the Auth User Name and Auth User Password fields blank.
g. Enter the Primary Number. Usually this is the same as the main phone
number as entered under User Name.
h. Set the IP-PBX Signaling Address to Enabled.
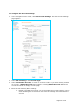
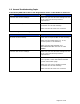
5. Enter the SIP Gateway Account Registration Settings.
a. Select Static Registration.
b. Enter the number of seconds for Registration Expires. This setting applies to
dynamic registration. It is a re-registration timeout value sent to the SIP
Provider. This is usually overriden by a re-registration interval determined by
the service provider’s response. The default setting is 3600 seconds and
should only be changed on the advice of your service provider.
6. Enter the SIP Gateway Account Server Settings.
a. Enter the SIP Server Address or URL.
b. If necessary, enter the SIP Server Port. Port 5060, the default setting, is
typically used for SIP transmission.
c. Enter the Registrar Server Address or URL if it is different than the SIP
Server Address or URL.
d. Enter the Registrar Server Port if it is different than the SIP Server Port. If a
Registrar Server address or URL is entered in the field above, it may not be
necessary to enter a Registrar Server Port.
e. Enter the
Outbound Proxy Server Address o
r URL if it is different than the
SIP Server Address or URL.
f. Enter the Outbound Proxy Server Port if it is different than the SIP Server
Port. If an Outbound Proxy Server address or URL is entered in the field
above, it may not be necessary to enter an Outbound Proxy Server Port.
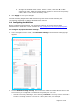
7. Configure the Codec Configuration.
a. Enable or disable audio codecs. You can click Add > to add the selected codec
to the Enabled Codecs list, or click < Remove to add it to the Disabled
Codecs list.
Page 11 of 16