Installation and Operation Guide for AT&T Softphone Call Manager for use with TL7910/TL7912 headset
Installation and Operation Guide for AT&T Softphone Call Manager for use with TL7910/TL7912 headset Table of contents Getting started Introduction..................................... 1 Installation....................................... 2 Compatibility............................... 2 Installation................................... 2 Important settings....................... 3 Audio settings............................ 3 Skype access authorization..... 4 Quick reference guide - . Call Connectivity . panel.
Import phonebook entries from Microsoft Outlook........ 31 Review and search the phonebook.................................. 32 Review and search phonebook entries................. 32 Dial, edit or delete . phonebook entries................. 33 Dial a phonebook entry....... 33 Edit a phonebook entry....... 33 Delete a phonebook entry.... 34 Caller ID Call log............................................. 35 View the call log...................... 35 Dial a call log entry................
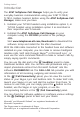
Getting started Introduction The AT&T Softphone Call Manager helps you to unify your everyday business communication using your AT&T TL7910/ TL7912 cordless headset. Before using the AT&T Softphone Call Manager, make sure you have: 1. Installed your TL7910 headset using installation option 3, or TL7912 headset using installation option 2 as described in their respective user’s manuals. 2. Installed the AT&T Softphone Call Manager on your computer using the CD-ROM provided in the package.. -ORVisit www.
Getting started Installation Compatibility The AT&T Softphone Call Manager works with Microsoft® Windows® 2000, Windows XP®, Windows Vista® or Windows 7 systems with the following programs: Skype® 5.0 or above Microsoft Lync® 2010 Windows Media Player® 10 or above iTunes® 10 or above Microsoft Outlook® 2003 or above Installation To install the AT&T Softphone Call Manager: 1. Put the CD-ROM that comes with the package into the PC. Open My computer, then double click to open the disk drive.
Getting started Important settings Audio settings After you have installed the AT&T Softphone Call Manager, check to make sure the audio setting is properly configured in your Windows system. If you have installed Skype and/or Microsoft Lync and want to use them with your headset, make sure the audio settings are configured correctly in the programs as well. a) Audio settings in Windows system: i. Launch the AT&T Softphone Call Manager program. ii. Click the (Settings) panel, then the General tab. iii.
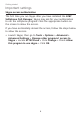
Getting started Important settings Skype access authorization The first time you run Skype after you have installed the AT&T Softphone Call Manager, Skype may ask for your authorization to run the softphone program. Click the appropriate button on the screen to allow the access. If you have accidentally denied the access, follow the steps below to allow the access: • Launch Skype, then go to Tools > Options > Advanced > Advanced Settings > Manage other programs’ access to Skype > Locate ATTSCM.
Getting started Quick reference guide - Call Connectivity panel 1 2 3 4 1/2 5 6 1. Minimize button -- Click the button to minimize the software. 2. Close button -- Click the button to close the software. 3. Call status -- Displays the status of Skype/Lync/landline calls. 4. Switch between Skype/Lync calls -- Click or between calls when there are multiple calls. to switch 5. Battery status -- Displays the battery status of the active headset when it is placed in the headset base (see page 6). 6.
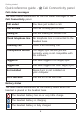
Getting started Quick reference guide - Call Connectivity panel Call status messages The table below summarizes all the call status messages in the Call Connectivity panel. Call ended You have just ended a call. Call on hold The call is being put on hold. Calling to You are making an outside call. Check telephone line No telephone line is connected to the headset base. Incoming call There is an incoming call.
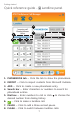
Getting started Quick reference guide - Landline panel 1 2 5 6 4 3 7 8 1. PHONEBOOK tab -- Click the tab to show the phonebook. 2. IMPORT -- Click to import contacts from Microsoft Outlook. 3. ADD -- Click to create a new phonebook entry. 4. Search bar -- Enter characters or numbers to search for phonebook entries. 5. Dial box -- Enter numbers to call or click desired number from dialing history. 6. to choose the -- Click to make a landline call. 7. PAUSE -- Click to add a three-second pause. 8.
Getting started Quick reference guide - Landline panel 1 2 3 5 4 6 7 1. CALL LOG tab -- Click the tab to show the call log. 2. CLEAR HISTORY -- Click to delete all records in the call log. 3. Search bar -- Enter characters or numbers to search . for call log entries. 4. ALL -- Click to show all landline call records. 5. IN -- Click to show the records of incoming landline calls. 6. OUT -- Click to show the records of outgoing landline calls. 7.
Getting started Quick reference guide - Settings panel 1 2 3 4 1. General, Landline, Softphone, and About tabs -Click the tab of the setting you want to edit (see Settings on pages 10-22). 2. Introduction panel -- Provides an introduction for each item in the SETTINGS panel. 3. RESTORE DEFAULT -- Click to restore all settings . to their default settings. 4. APPLY -- Click to confirm any setting changes.
Getting started Settings About Settings You may customize various settings in the (Settings) panel before you start using the software. Below is an introduction of what you can set in each tab. Use the General tab to set the headset base default mode, headset low battery alert tone, ringer tone, second inbound . call alert, headset microphone muted alert, action on player when calls begin, voice answer call or on screen display.
Getting started Settings - General Default mode Before using the headset, you may change the default mode of your headset. When you press on your headset in idle mode, it automatically switches to the default mode you selected. You can choose between Phone mode and . PC mode. PC Phone To choose PHONE mode: 1. 2. 3. 4. 5. Click the (Settings) panel. Click the General tab. Click q in the Default mode drop down menu. Click Phone. Click the APPLY button to confirm.
Getting started Settings - General Low battery alert tone The headset beeps twice every 20 seconds when the headset battery is low. You can enable or AT&T Softphone Call Manager disable this alert tone. To enable or disable the low battery alert tone: 1. 2. 3. 4. 5. Enable Disable Click the (Settings) panel. Click the General tab. Click Current q inmode thePCLow battery alert drop down menu. SOFTPHONE LANDLINE SET Headset In Use Click Enable or Disable. Click APPLY to confirm.
Getting started Settings - General Second inbound call alert This software allows you to have three kinds of calls, namely the Landline, Skype or Lync call. While you are on a call of any kind and there is another kind of incoming call, you will hear an alert tone. You can set the alert tone to sound continuously or play once only, or disable the alert tone. Continuous Play once Ignore To set or disable the second inbound call alert: 1. Click the (Settings) panel. 2. Click the General tab. 3.
Getting started Settings - General Action on player when calls begin If there is an incoming call when you are using Windows Media Player or iTunes, the media player can either pause or take no action (continue playing). The default setting . is Pause. Pause No action To change the setting: 1. Click the (Settings) panel. 2. Click the General tab. 3. Click q in the Action on player when calls begin . drop down menu. 4. Click Pause or No action. 5. Click APPLY to confirm.
Getting started Settings - General On screen display If this feature is enabled, there is a pop-up window displayed on your PC screen when you are using the voice command feature (pages 38-40). To enable or disable the on screen display: 1. 2. 3. 4. 5. Click the (Settings) panel. Click the General tab. Click q in the On screen display drop down menu. Click Enable or Disable. Click the APPLY button to confirm.
Getting started Settings - Landline Caller ID Announce The Caller ID Announce . feature lets you know who is calling through landline without having to look at the display. You can enable or disable the Caller ID Announce feature for landline calls. To enable or disable the caller ID announce: 1. 2. 3. 4. 5. Enable Disable Click the (Settings) panel. Click the Landline tab. Click q in the Caller ID Announce drop down menu. Click Enable or Disable. Click the APPLY button to confirm.
Getting started Settings - Landline No line alert display If there is no line connected . to the headset base, the Landline status bar in the . (Call Connectivity) panel displays Check telephone line. You can enable or disable the . alert message. 1. 2. 3. 4. 5. Click Click Click Click Click Enable Disable the (Settings) panel. the Landline tab. q in the No line alert display drop down menu. Enable or Disable. APPLY to confirm.
Getting started Settings - Landline PC speaker If you have chosen the ringer to be played through both the headset and PC speaker, you have to choose the appropriate speaker setting. 1. Click the (Settings) panel. 2. Click the Landline tab. 3. Click q in the PC Speaker drop down menu. 4. Click the desired PC speaker. 5. Click APPLY to confirm.
Getting started Settings - Softphone Caller ID Announce The Caller ID Announce feature lets you know who is calling through softphone without having to look at the display. You can enable or disable the Caller ID Announce feature for softphone calls. Enable Disable 1. Click the (Settings) panel. 2. Click the Softphone tab. 3. Click q in the Caller ID announce drop down menu under Skype/Lync section. 4. Click Enable or Disable. 5. Click APPLY to confirm.
Getting started Settings - Softphone Incompatible version alert display If the current Skype or . Lync installed on your . computer is not compatible with this software, the . Skype/Lync status bar in the (Call Connectivity) panel shows Incompatible version. You can enable or disable this alert message. Enable Disable 1. Click the (Settings) panel. 2. Click the Softphone tab. 3. Click q in the Incompatible version alert display drop down menu under Skype/Lync section. 4. Click Enable or Disable. 5.
Getting started Settings - About User guide You can download the Installation and Operation Guide from our webpage. Support 1. Click the (Settings) panel. 2. Click the About tab. 3. Click User Guide in the Support section. Contact You can obtain customer support information from our Product Support webpage. 1. Click the (Settings) panel. 2. Click the About tab. 3. Click Contact in the Support section.
Getting started Settings - About Headset operating range You can choose the headset . to operate in high, middle or low range. The lower the operating range you set, the higher the intensity of signal it will become. 1. Click the (Settings) panel. 2. Click the About tab. 3. Click q in the Headset operating range drop . down menu. 4. Click the desired operating range. • High - up to 500 feet. • Middle - up to 200 feet. • Low - up to 50 feet. 5. Click the APPLY button to confirm.
Operation Making, answering and ending calls Log in Skype/Lync To make or receive VoIP calls via Skype/Lync, make sure you log in to the respective program before use. in 1. Launch the Skype/Lync program. 2. Enter you user ID and password to log in to the Skype/Lync program. The Skype/Lync status bar under the (Call Connectivity) panel displays Logged in.
Operation Making, answering and ending calls Make a call To make a landline call: 1. Click the (Landline) panel. 2. Click on the number input box above the dial pad. You can either use the dial pad or your keyboard to enter the telephone number. 3. Click or on the headset. -OR1. Press on the headset. Make sure the number input box is blank before you press the button. 2. Click the (Landline) panel 3. Click on the number input box.
Operation Making, answering and ending calls Answer a call When there is an incoming landline call: You can choose one of the following ways to answer the call: on the pop-up window. • Click • Click in the Landline status bar under the . (Call Connectivity) panel. in the (Landline) panel. • Click • Press the button on the headset. When there is an incoming Skype/Lync call: You can choose one of the following ways to answer the call: • Click on the Skype/Lync pop-up window.
Operation Making, answering and ending calls End a call To end a landline call: You can choose one of the following ways to end the call: in the (Landline) panel. • Click • Click in the Landline status bar under the. (Call Connectivity) panel. • Press the button on the headset. • Place the headset in the headset base. To end a Skype/Lync call: You can choose one of the following ways to end the call: • Click in the Skype/Lync status bar under the. (Call Connectivity) panel. • End the call on Skype/Lync.
Operation Options while on calls Hold You can hold a Skype, Lync or landline call and resume it at any time you want to on the (Call Connectivity) panel. To hold a landline call: • Click HOLD to hold the current call. Phone 00:00:01 HOLD To resume a landline call: • Click RESUME to resume the call. To hold a Skype/Lync call: • While on a Skype/Lync call, click HOLD to hold the current call. • You can make another Skype/Lync call if necessary.
Operation Options while on calls Mute The mute function allows you to turn off the microphone or the volume of the headset earpiece. To mute a call: • Click at the bottom of the AT&T Softphone Call Manager to turn off the headset microphone. turns grey. The voice prompt "Mute on" plays. The MUTE light on the headset base flashes. If you have enabled the microphone mute alert setting, a short beep plays every 30 seconds.
Operation Options while on calls Landline call waiting If you subscribe to call waiting service offered by your telephone service provider, there is a call waiting alert tone if you receive a second incoming call while you are already on a call. Using the (Landline) panel: • Click FLASH in the (Landline) panel. • Click FLASH again at any time to switch back and forth between calls. Using the (Call Connectivity) panel: • Click FLASH in the landline . status bar under the . (Call Connectivity) panel.
Phonebook Create phonebook entries Create a new phonebook entry 1. 2. 3. 4. Click the (Landline) panel. Click the PHONEBOOK tab. Click ADD. Enter the name and telephone number (Mobile, Office, Home or Other) in the corresponding field. 5. Click SAVE to save the entry. Click CANCEL to cancel without saving the entry.
Phonebook Import phonebook entries Import phonebook entries from Microsoft Outlook 1. 2. 3. 4. Click the (Landline) panel. Click the PHONEBOOK tab. Click IMPORT. When Import contacts from Microsoft Outlook? displays, click the YES button to confirm. 5. When XX contacts from Microsoft Outlook has been imported to the phonebook displays, click OK to finish. Import contacts from Microsoft Outlook? NOTES: • If Microsoft Outlook is not installed, Microsoft Outlook is not found displays.
Phonebook Review and search the phonebook Review and search phonebook entries 1. Click the (Landline) panel. 2. Click the PHONEBOOK tab. 3. Use the scroll bar on the right to scroll through the list of phonebook entries if necessary. You can also use the search bar to search for entries by entering names or numbers. Matching entries show below the search bar.
Phonebook Dial, edit or delete phonebook entries Dial a phonebook entry 1. Click the (Landline) panel, then click the PHONEBOOK tab. 2. Find the entry you wish to dial. See Review and search phonebook entries on the previous page. 3. Double click the phone number you wish to dial. 4. Click . Edit a phonebook entry 1. Click the (Landline) panel, then click the PHONEBOOK tab. 2. Click the entry you wish to edit, then click EDIT (If you cannot see any entries, make sure the search bar is blank). 3.
Phonebook Dial, edit or delete phonebook entries Delete a phonebook entry 1. Click the (Landline) . panel, then click the PHONEBOOK tab. 2. Click the entry you wish to delete, then click EDIT (If you Delete Contact? cannot see any entries, make Charlie Johnson sure the search bar is blank). 3. Click DELETE. The screen displays Delete Contact? and the contact name. 4. If you do not want to delete the entry, click NO. To confirm deleting, click YES. 5. The screen shows Deleted. Click OK.
Caller ID Call log View the call log If there are any missed calls, the total number of missed calls that has not been checked is shown on the CALL LOG tab. To view the call log, click the� (Landline) ������������������ panel, then click the CALL LOG tab. Scroll through the call log with the scroll bar on the right if necessary. You can also use . the search bar to search for . a specific name or number. if needed. 800-880-2445 800-880-2445 Dial a call log entry 1.
Caller ID Call log Delete a call log entry 1. Click the (Landline) panel, then click the CALL LOG tab. 2. Click the entry you wish to delete, then click EDIT (If you cannot see any entries, make sure the search bar is blank). 3. Click Delete Call Log Entry from the options shown. The screen displays Are you sure you want to delete this log entry? 4. Click YES to confirm or click NO to cancel. 800-883-2445 Create New Contact Delete all call log entries 1.
Caller ID Call log Save a call log entry to the phonebook 1. Click the (Landline) panel, then click the CALL LOG tab. 2. Click the entry you wish to save to the phonebook, then click EDIT (If you cannot see any entries, make sure the search bar is blank). 3. Click Create New Contact from the options shown. 4. Click the field you wish to add or edit for Name, Mobile, Office, Home or Other telephone numbers, and then use the keyboard to edit the entries. 5. Click SAVE to confirm and save.
Voce command Voice command About voice command By saying certain commands to the headset, you can make or answer calls. Using voice command Press MUTE/VOICE on the side of the headset. After you hear "Who would you like to call?" followed by a beep, say the desired command. To use voice command when there is an incoming call, make sure you have first enabled the Voice answer call feature (page 14). Say the desired command after hearing a beep. Refer to pages 39-40 for a list of commands.
Voce command Voice command General commands Command Action “What can I say?” To hear a list of voice commands. “Cancel.” To return to idle mode. Commands to make a call Command Action "Redial last number." To redial the last dialed number. First name + last name . To call a specific contact number from (from directory) the directory.
Voce command Voice command Commands when there is an incoming call If you have enabled the Voice answer call feature (page 14), you can use the following commands. When there is an incoming call, say one of the following commands after hearing a beep. Command Action "Answer call" To answer an incoming call. "Mute ringer" To mute the incoming call ringer. "Decline call" To decline the incoming call.
Appendix Troubleshooting If you have difficulty in using this software with your headset, please try the suggestions below. For customer service, visit our website at www.telephones.att.com or call 1 (800) 222–3111. In Canada, dial 1 (866) 288-4268. I cannot install the software. • Check the operating system of your PC to make sure it is compatible with this software. See Compatibility on page 2. • Make sure your hard drive has enough space to install the AT&T Softphone Call Manager.
Appendix Troubleshooting AT&T DECT Headset does not appear in the audio devices control panel on my PC. • Make sure you have turned on the headset. • Make sure you have correctly installed the headset and headset base. Refer to your TL7910/TL7912 user’s manual for more information. I cannot see the headset mode, and the and icons are always in grey on the bottom of AT&T Softphone Call Manager. • Make sure you have correctly installed the headset and headset base.
Appendix Troubleshooting I can’t make calls using the software. • Make sure you are in PC mode and the headset is charged. Press the PHONE or PC button on the headset base to switch between modes. • Make sure the headset is registered to the headset base. . See the Adding and registering headsets section in the TL7910/TL7912 user’s manual for details. • Make sure the CORDED HANDSET CONNECTED switch on the headset base is set to NO.
Appendix Troubleshooting My voice is not recognized. • Make sure you have set the audio settings correctly (page 3). • Make sure you are wearing the headset correctly with the speaker pointing to your mouth. • When you say the command, say it clearly, in a consistent speed and louder than the background noise. • When voice command fails, you will hear "I didn't catch that. Please try again." Press MUTE/VOICE and repeat your command. • If you are in a very noisy place, you can simply press the .
Index Index A Action on player when calls begin 14 Answer a call 25 Audio 3 I Import phonebook entries 31 Incompatible version alert display 20 Installation 2 C Caller ID Announce 16, 19 Call log 35–37 Compatibility 2 Contact 21 Create a phonebook entry 30 L Landline call waiting 29 Log in 23 Low battery alert tone 12 M Make a call 24 Microphone mute alert .
Index Index R Resume calls 27 Review and search phonebook entries 32 Ringer played at location 17 Ringer tone 12 S Save a call log entry to the phonebook 37 Second inbound call alert 13 Settings about 21–22 audio 3 general 11–15 landline 16–18 softphone 19–20 Skype access 4 T Troubleshooting 41–44 U Updates 22 User guide 21 V View the call log 35 Voice command 38–40 46
www.telephones.att.com © 2013 Advanced American Telephones. All Rights Reserved. AT&T and the AT&T logo are trademarks of AT&T Intellectual Property licensed to Advanced American Telephones, San Antonio, TX 78219. Issue 3 AT&T 06/13. Microsoft®, Windows®, Windows XP®, Windows Vista®, Windows Media Player® and Microsoft Outlook® are registered trademarks of Microsoft Corporation. The Skype name is a trademark of Skype. Microsoft Lync is a registered trademark of Microsoft Corporation.