
User's Manual


Programming the Mail System
3.
4.
5.
6.
7.
8.
9.
10.
11.
12.
13.
14.
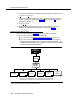
Press [ 1 ] for day; if you do not need to record a Day Menu, skip to Step 16.
Press [
6
] to modify the menu.
Enter a Selector Code.
If prompted, press [
9 ] to approve, or [ 6 ] to cancel and return to Step 5.
Enter the corresponding Action as follows:
Selector Code Transfer:
[
1
] + extension number + [
#
].
Play Submenu:
[
2
] + Submenu number + [
#
].
Play Announcement:
[
3
] + Announcement number + [
#
].
Prompted Transfer:
[
4
].
Direct Extension Transfer:
[
5
].
or
[
★
] [
D
] ([
★
] [
3
]) to delete. When prompted, press [
9
] to approve or [
6
] to
cancel the deletion.
Repeat Steps 5 through 7 until finished programming Selector Codes.
Press [
★
] [
#
].
Choose the Dial 0/Timeout Action:
Transfer to Call Answer Service Operator
[
0
]. Go to Step 12.
Record Message In General Mailbox
[
1
]. Go to Step 12.
Disconnect
[
2
]. Go to Step 12.
Transfer to Extension
[
3
]. Go to Step 11.
Quit (keep current setting)
[
★
] [
#
]. Go to Step 12.
Enter the extension number + [
#
].
Choose one of the following:
■
Press [
#
] to use the existing prompt.
■
Record a new prompt, then press [ 1 ]. For better sound quality, be
sure to use the handset rather than the speakerphone to record the
prompt.
Press one of the following:
■
■
■
■
[
★
] [
#
] to approve. Then go to Step 14.
[
2
] [
3
] to play back. Then repeat Step 13.
[
2
] [
1
] to re-record. Then repeat from Step 12.
[
★
] [
D
] ([
★
] [
3
]) to delete the new prompt.
Bilingual only: Repeat Steps 12 and 13 for the secondary language.
Mail System Initial Programming
3-29