Manual Coffee machine CM4511AC CM4592AC
EN Manual EN 3 - EN 41
CONTENTS Introduction Pictograms used 4 Description 5 Control panel 6 Safety instructions What you should pay attention to 7 Use Preparation 10 Operation 11 Settings Using menu options 20 Maintenance Cleaning 28 Messages Faults table 33 Troubleshooting 35 Installation instructions What you should pay attention to Building in 38 39 Disposal of appliance and packaging Technical data 41 41 Appendices EN 3
INTRODUCTION This coffee machine will make delicious cups of coffee, espresso and cappuccino. You can customise the settings of the machine to suit your personal preferences and tastes. Coffee has been used in the factory to test the appliance and it is therefore completely normal that there are traces of coffee in the mill. This appliance is however guaranteed to be new.
DESCRIPTION A. Main switch / Aa. On/Stand-by button B. Handles C. Nozzle Place for the measuring spoon Filling chute for preground coffee Coffee guide Place for accessories (left and right) IEC Connector Q B Aa C B I O L 2 CA IN O FFE LA TTE V CC T. U. V. W. X. x PPU O. P. Q. R. S.
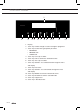
CONTROL PANEL 1 1 2 3 4 5 6 7 8 9 10 11 12 1. Display 2. Touch key ‘Coffee strength’ to select strength or preground 3. Touch key to select the type/quantity of coffee: •• ESPRESSO •• MEDIUM CUP •• LARGE CUP 4. Touch key ‘One cup of coffee’ 5. Touch key ‘OK’ to confirm the selected function 6. Touch key ‘Two cups of coffee’ 7. Touch key ‘SCROLL’ to scroll backwards through the menu and display 8. Touch key ‘Hot water’ 9. Touch key ‘SCROLL’ to scroll forwards through the menu and display 10.
SAFETY INSTRUCTIONS What you should pay attention to • W ARNING: The appliance and its accessible parts become hot during use. Care should be taken to avoid touching heating elements. • The appliance is not intended for use by persons (including children) with reduced physical, sensory or mental capabilities, or lack of experience and knowledge, unless they have been given supervision or instruction concerning use of the appliance by a person responsible for their safety.
SAFETY INSTRUCTIONS • Appliances can be used by persons with reduced physical, sensory or mental capabilities or lack of experience and knowledge if they have been given supervision or instruction concerning use of the appliance in a safe way and understand the hazards involved. • Children shall not play with the appliance. • When not in use and before cleaning, always unplug the appliance. • Surfaces marked with this symbol become hot during use (the symbol is present in certain models only).
SAFETY INSTRUCTIONS • O nly ask for original spare parts to be used. Failure to respect the above could reduce the safety of the appliance. • Do not put objects containing liquids, inflammable or corrosive materials on the machine. • Use the accessories holder to contain coffee accessories (for example coffee beans). • Never touch the appliance with damp hands. • Unplug directly from the plug only. • Never pull the power cable as you could damage it.
USE Preparation Connect the appliance to the mains supply (see chapter ‘Installation’) and switch on the appliance with the main switch (see ‘A’ page 5). The first time you switch on the appliance with the main switch and every time that it is plugged in, the appliance executes a “SELF-DIAGNOSIS” action. Then the appliance switches off. To turn it on, press the On/stand by button (Aa) on the left site underneath the control panel.
USE 8. Open the lid and fill the container with coffee beans, then close the lid and push the appliance in. The coffee maker is now ready for normal use. Only fill the water tank with cold water. Never use other liquids such as mineral water or milk. To prevent malfunctions, never fill with ground coffee, frozen or caramelised coffee beans or anything else that could damage the appliance.
USE ▷▷ Once the set amount of coffee has been delivered, the machine stops delivery automatically and expels the exhausted waste coffee into the waste coffee container. After a few seconds, the appliance is ready for use again. 2 3 4 6 Tips • To turn the appliance off, press the ‘On-off’ button (Aa / see page 5). Before going off, the appliance performs an automatic rinse cycle. Take care to avoid scalds.
USE Empty the waste coffee container • T he appliance counts the number of coffees made. Every 14 single coffees (or 7 doubles) the appliance displays “EMPTY WASTE COFFEE CONTAINER”. This means that the waste coffee container is full and must be emptied and cleaned. • As long as the waste coffee container is not cleaned, this message remains in place and the coffee machine cannot make any coffee.
USE To change these quantities, proceed as follows: 2 3 4 6 1. Place a cup under the spouts. 2. Press the ‘type of coffee’ touch key (3) to select the type of coffee. 3. Keep the ‘one cup of coffee deliver’ touch key (4) pressed until the message “PROGRAM QUANTITY” is displayed and coffee delivery begins. 4. As soon as the coffee in the cup reaches the required level, press the same icon again. The quantity set has now been programmed.
USE Preparing espresso coffee using ground coffee 1. Press the ‘Coffee strength’ touch key (2) several times to select “PRE-GROUND”. 2. Extract the machine by pulling it outwards using the handles. 3. Lift the central lid, place one measure of preground coffee in the funnel, push the appliance back and proceed as described in the section “Making coffee using coffee beans”. You can make just one coffee at a time by pressing the ‘One cup deliver’ touch key (4). 4.
USE 3. Press the ‘Hot water’ touch key (8). Hot water is dispensed; the display shows “HOT WATER”. Once the programmed amount of hot water is dispensed, dispensing stops automatically. For a few seconds the display shows “PREPARATION RUNNING PLEASE WAIT”. After that the appliance is ready to make coffee again and the last selected coffee setting appears on the display. 8 Changing the quantity of hot water The machine is set by default to automatically delivery 150 ml of hot water.
USE 5. Remove the hot water spout and attach the milk container to the nozzle. 6. Position the milk spout (N4) and then place a sufficiently large cup under the coffee and milk spouts. 7. Press the ‘Cappuccino deliver’ touch key (12). “CAPPUCCINO” is displayed and after a few seconds, frothed milk flows out of the milk spout into the cup below (delivery stops automatically). 8. Next the appliance delivers coffee. 9. The cappuccino is now ready.
USE Notes 12 N3 13 • While making cappuccino or latte macchiato, the flow of frothed milk or coffee can be interrupted by pressing the ‘Cappuccino deliver’ touch key (12) or the ‘Latte Macchiato’touch key (13). • If the milk in the container finishes while delivering frothed milk, remove the container and add milk. Then re-attach it and press the ‘Cappuccino deliver’ touch key (12) or the ‘Latte Macchiato’touch key (13) to request cappuccino again.
USE After a few seconds, the appliance starts delivering coffee into the cup and the message “COFFEE FOR CAPPUCC. PROGRAM QUANTITY” or “COFFEE FOR MACCHIATO PROGRAM QUANTITY” is displayed. 5. Once the required quantity of coffee has been delivered into the cup, press the ‘Cappuccino deliver’ touch key (12) or ‘Latte Macchiato’ (13) touch key again. Coffee delivery stops. The machine is now reprogrammed with the new milk and coffee quantities.
SETTINGS Using menu options You can change the following menu options and functions: • Rinsing • Set language • Energy saving (enable or disable energie saving) • Set time (daytime) • Auto start (auto switch on) • Auto off (auto turn off) • Set temperature (of the water to make coffee) • Water hardness • Contrast (display) • Buzzer • Statistics (from the appliance) • Default values (reset) • Descaling To go back to the coffee mode, press the ‘Return’ touch key (11).
SETTINGS Setting the language 5 7 9 10 You can choose between several languages. A different language can be selected as follows: 1. Press the touch key ‘MENU’ (10) and press the scroll touch keys (7 and 9) until the menu option “SET LANGUAGE” appears. Confirm the menu option with the touch key ‘OK’ (5). 2. The language set appears on the display. Press the scroll touch keys (7 and 9) until the desired language appears. When the desired language is displayed, confirm with the touch key ‘OK’ (5).
SETTINGS 2. Press the touch key ‘OK’ (5). “ENABLE?” is displayed. 5 7 9 10 3. Press the touch key ‘OK’ (5). The hours flash on the display. 4. Use the scroll touch keys (7 and 9) to set the hour. 5. Press the touch key ‘OK’ (5) to confirm. The minutes flash on the display. 6. Use the scroll touch keys (7 and 9) to set the minutes. 7. Press the touch key ‘OK’ (5) to confirm. “ENABLED” appears under “AUTO START”. 8. Press the touch key ‘RETURN’ (11) to exit the menu. Disable auto start 1.
SETTINGS The factory setting can be changed as follows: 5 7 9 10 11 1. P ress the touch key ‘MENU’ (10) and press the scroll touch keys (7 and 9) until the menu option “ SET TEMPERATURE” appears. 2. Confirm the menu option with the touch key ‘OK’ (5). The display shows the current setting. 3. Select another temperature with the scroll touch keys (7 and 9). When the desired temperature is displayed, confirm it with the touch key ‘OK’ (5). 4. Press the touch key ‘RETURN’ (11) to exit the menu.
SETTINGS 5. Press the scroll touch keys (7 and 9) until the established hardness level is displayed. Confirm the selection with the touch key ‘OK’ (5). The appliance is now programmed to provide the descaling warning when necessary, based on the actual hardness of the water. Information on the hardness of the water in your area can be obtained from the local water board. The table below shows the water hardness setting your machine requires.
SETTINGS Statistics You can look up the following information values: • how many coffees have been made; • how many milk drinks have been made (cappuccino’s/latte macchiato/frothed milk); • how many times the machine has been descaled; • the total number of litres of water delivered. Two cups of coffee dispensed at the same time are counted as two cups. 5 7 9 10 11 Proceed as follows to look up the values: 1.
SETTINGS Descaling Over time, leads the continuous heating of the water that is used to make coffee to lime deposits in the inner circuits of the machine. Descale the machine when the message “DESCALE” flashes on the display. Use the descaler recommended by the manufacturer only. Under no circumstances should you use sulphamic or acetic based descalers. Their use invalidates the guarantee. Descale the appliance as described. 1. I nsert the hot water spout. 2.
SETTINGS ▷▷ After about 30 minutes, the message “RINSING FILL TANK” is displayed. The appliance is now ready for a rinsing process with clean water. 7. Empty the container used to collect the descaler solution. 8. Take out the water tank, empty the watertank and fill it with clean water. 9. Put the water tank back in place and put the container back under the coffe spouts and the hot water spout. The display shows: “RINSING PRESS OK”. 10. Press the touch key ‘OK’ (5).
MAINTENANCE Cleaning Before performing any cleaning operations, the machine must be turned off by pressing the main switch (A) and unplugged from the mains power supply. Never immerse the coffee maker in water. Aa Cleaning the coffee machine Do not use solvents or abrasive detergents to clean the coffee maker. A soft damp cloth will suffice. Never wash any of the components of the coffee maker in the dishwasher. The following parts of the machine must be cleaned regularly: • Waste coffee container (Q).
MAINTENANCE To remove the drip tray (F): 1. Open the service door. 2. Remove the drip tray and the waste coffee container. 3. Clean the drip tray and waste coffee container. 4. Replace the drip tray and waste coffee container. 5. Close the service door. Cleaning the water tank (D) 1. Clean the water tank regularly (about once a month) with a damp cloth and a little mild washing up liquid. 2. Remove all traces of washing up liquid. N Cleaning the spouts 1. Clean the spouts periodically using a sponge. 2.
MAINTENANCE Cleaning the inside of the coffee maker • Check regularly (about once a week) that the inside of the appliance is not dirty. If necessary, remove coffee deposits with a sponge. • Remove the residues with a vacuum cleaner. Cleaning the brewing unit The brewing unit must be cleaned regularly to avoid the build-up of coffee encrustations which could cause malfunction. The brewing unit can only be taken out when the appliance is switched off by pressing the on/stand by button (Aa).
MAINTENANCE 7. Once inserted, make sure the two colored buttons have snapped A B back out, otherwise the service door cannot be closed. ▷▷ The two colored buttons are correctly snapped out (A). ▷▷ The two colored buttons are not snapped out (B). 8. Replace the drip tray and waste coffee container. 9. Close the service door. Notes • If the brewing unit is not put in place correctly, the service door cannot be closed.
MAINTENANCE 3. Remove the frothed milk regulator (F) by pulling it outwards. G F H H N3 4. Wash all the components thoroughly with hot water and mild washing-up liquid. Make sure there are no milk residues left inside the holes (H) and the groove (G) on the fine end of the frothed milk regulator (F). 5. Check that the intake tube and spout are not clogged with milk residues. 6. Replace the frothed milk regulator, milk spout and intake tube. 7. Replace the milk container lid.
MESSAGES MESSAGE MEANING WHAT TO DO FILL TANK The water tank is empty or not properly in place. Fill the water tank and insert it according to the instructions. The water tank is dirty or limescale deposits have built up inside it. Rinse out or descale the water tank. Coffee comes out too slowly. Turn the knob for the grind level setting clockwise by one position (see “Setting the grind level”). GROUND TOO FINE ADJUST MILL + PRESS ‘OK’ + FILL TANK The coffee machine cannot make any coffee.
MESSAGES EN 34 MESSAGE MEANING WHAT TO DO DESCALE Shows that the coffee machine is encrusted with limescale. The descaling program must be carried out as soon as possible (see “Carrying out the descaling program”. CLOSE DOOR The service door is open. Close the service door. If the service door cannot be closed, make sure that the brewing unit is correctly inserted (see “Cleaning the brewing unit”.
TROUBLESHOOTING Faults table If the appliance does not work properly, this does not always mean that it is defective. If the coffee machine does not work and a message is displayed, refer to the problem solving information (see chapter ‘Messages’). If no message is displayed, try to find a solution first by checking the points mentioned in the table below, or contact the service department (see the guarantee certificate for details). FAULT CAUSE SOLUTION Coffee is not hot. The cups were not preheated.
TROUBLESHOOTING FAULT CAUSE SOLUTION The machine does not switch The main switch on the right Check that the main switch is on when the on/stand by button is pressed side of the appliance is not switched on or the mains plug is not plugged in. in the ‘ON’ position and that the power lead is plugged in the socket properly. The brewing unit cannot be taken out for cleaning. The coffee machine is switched on. The brewing unit can only be removed when the machine is switched off.
TROUBLESHOOTING FAULT CAUSE SOLUTION Coffee does not come out The holes on the coffee Remove the dried on coffee of the spouts on the coffee dispenser but out of the service door at the side. dispenser are blocked with dried on coffee. with a needle (see “Cleaning the coffee machine”). The swing drawer on the inside of the service hatch is blocked and will not move. Carefully clean the swing drawer, particulary in the area around the hinges so that these continue to move.
INSTALLATION INSTRUCTIONS What you should pay attention to • After removing the packaging, make sure the product is complete and undamaged. If in doubt, do not use the appliance and contact a qualified professional. • Installation must be carried out by a qualified techncian and in compliance with current regulations. • Packing elements (plastic bags, polystyrene etc.) must not be left within reach of children as they may represent a hazard.
INSTALLATION INSTRUCTIONS Building in lease check the minimum measures necessary to the proper P installation of the appliance. The coffee maker must be installed in a column unit, which must in turn be fixed to the wall. 450 mm m 45 m . min 560+ mm 545 . min m 45 m . min 850 mm min. 8 mm HOW TO20PROCEED TO ADJUST THE HEIGHT OF THE COFFEE M 0cm (MX4111A/MX4192A/COMBI STEAMER).
INSTALLATION INSTRUCTIONS x4 16 2 1mm 4 x8 x 16 5 3 x2 4 16 1 x4 1mm x8 4 5 + -1 560 mm 7 x4 6 1mm 4 x8 6 approx. • Position the appliance on the rail, making sure the pins are correctly inserted in the housing, then fix it with the screws supplied. • If the height of the appliance requires adjusting, use the spacer 1 disks provided. 5 x4 560 + 4 m 350 m 7 1 mm 4 x1 x4 approx.
APPENDICES Disposal of appliance and packaging The packaging of this appliance is recyclable and may have been made of: • cardboard • paper • polythene foil (PE) • CFC-free polystyrene (PS hard foam) • polypropylene tape (PP). Dispose of these materials in a responsible manner and in accordance with government regulations. The appliance carries the symbol of a crossed-out dustbin to state that segregated processing is compulsory to avoid any negative effects on the environment and public health.
The appliance identification card is located on the side of the appliance. When contacting the service department, have the complete type number to hand. 569486 569486 569486 / VER 1 / 20-04-2016 You will find the addresses and phone numbers of the service organisation on the guarantee card.