FG1011L/N FG1093L/N FG1093K FG1011K FG1093NABE/A01 FG1011NABE/A01
Index / Index/ Inhaltsverzeichnis / Inhoud HERDE MIT ELEKTRISCHER ZÜNDUNG .......................... 18 BENUTZUNG DER KOCHSTELLEN DER GASKOCHMULDE ............................................................... 18 BENUTZUNG DES GRILLS ................................................. 19 BENUTZUNG DES MULTIFUNKTIONSELEKTROBACKOFENS ........................................................ 19 HINWEISE FÜR DAS BACKEN ........................................... 19 BENUTZUNG DES DREHSPIESSES .....................
FR Installation INSTALLATION L’installation de l’appareil doit être effectuée par un professionnel qualifié conformément aux textes réglementaires et règles de l’art en vigueur. Avant l'installation s'assurer que les conditions de distribution locale (nature et pression du gaz) et le réglage de l'appareil sont compatibles. Les conditions de réglage de cet appareil sont inscrites sur la plaquette signalétique en couverture.
FR Installation - Les essais d'étanchéité du circuit à gaz ne doivent pas être faits en utilisant des flammes. Si l'on n'a pas de dispositif de contrôle spécifique, on peut utiliser de la mousse ou de l'eau très savonneuse. - En refermant la table de cuisson il faut faire attention que les fils électriques des bougies (s'il y en a) ne soient pas près des injecteurs pour éviter qu'ils passent sur les injecteurs.
FR Pour l'utilisateur (sur la voûte du four), la température du four est réglée au moyen de la manette du thermostat. Le tournebroche est en marche. Dans toutes les positions (excepté le 0) le voyant rouge et la lampe du four s'allument. REMARQUE: Le voyant jaune s’allume lorsque le thermostat intervient. Avant d'introduire les mets à cuire, préchauffer le four pendant 10 minutes au moins. - La grille du four sert pour supporter les plats ou directement la viande à cuire.
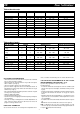
FR Pour l'utilisateur Tableau des desserts Type de dessert Niveau Fonct. statique Fonct. ventilé Génoise Tarte aux fruits Petits gâteaux Pâte pour tarte Tarte aux pommes Tarte à la ricotta Tarte “biskuit” Tartes à pâte levée Biscuits à pâte levée Pizza Choux Macarons 2 2 2 2 2 2 2 2 2 2 2 2 2 2 2 2 2 2 2 2 2 2 2 2 Température °C Fonct. statique Fonct.
FR Pour l'utilisateur l’aide de la touche "+" ou "-". - Durant le fonctionnement du minuteur le symbole CLOCHE s’allume. - Au terme du temps programmé la sonnerie se déclenche et le symbole CLOCHE s’éteint. SONNERIE - Le signal sonore se déclenche au terme d’une programmation et dure 7 minutes. - Pour l’arrêter avant, presser une touche quelconque. - En pressant la touche "-" sans avoir préalablement sélectionné une fonction, il est possible de changer la fréquence du signal sonore.
Pour l'utilisateur FR four déclenchera le dispositif de sécurité qui interrompra l’alimentation électrique. Dès que la température baisse et arrive dans les limites acceptables, le courant est rétabli spontanément. Toutefois il faut rappeler qu’une intervention cyclique du dispositif est provoqué par une condition anomale de fonctionnement (ex. rupture du thermostat qui règle la température intérieure du four). Demander l’intervention d’un technicien.
GB Installation INSTALLATION The appliance must be installed by qualified staff working in accordance with the regulations in force. Before installing, ensure that the appliance is correctly preset for the local distribution conditions (gas type and pressure). The presettings of this appliance are indicated on the nameplate shown on the cover. This appliance is not connected to a flue gas extractor device. It must be installed and connected in accordance with the regulations in force.
GB Installation HOW TO USE THE COOKER - gently close the oven door; - after a few minutes, turn the food to expose the other side to the infrared radiation (the cooking time depends on the type of food and personal taste). The grill must only be used at its full rated heat. IMPORTANT: accessible parts may be hot when the grill is in use! Keep children well away. The grill element in the top of the oven is switched on by turning the thermostat knob clockwise to the grill symbol on the control panel.
GB For the user - Remember that cooking times may vary if food is cooked on two shelves at the same time. DESSERT BAKING TIPS The kitchen is fitted with an enamelled DESSERT TRAY, of the same shape as the drip tray, but with a shallower central cavity, which is essential for ensuring best results when baking desserts. Desserts should be baked at a moderate heat (150 to 200 °C), with the oven preheated for around ten minutes. Do not open the door before at least _ of the baking time has passed.
GB For the user HOW TO USE THE ROTISSERIE - impale the meat to be cooked on the spit and fix it in the centre using the two forks provided; - insert the tip of the spit into the rotation hub on the frame (see fig. 6); - unscrew the handle from the spit; - place the spit support frame in the central runner of the oven, at the same time inserting the rotation shaft into the motor hub (see fig.
GB For the user hose must be replaced at the latest at the indicated date and must be secured at both ends using a standard hose clamp. - If taps become stiff to operate over time, contact the AfterSales service. - Wash enamelled or chrome-plated parts with soapy lukewarm water or non-abrasive detergents. A metal brush may be used to remove deposits from hob burners and flame caps. Dry thoroughly. - Never use abrasives to clean enamelled or chrome-plated parts.
Installation DE INSTALLATION Das Gerät darf nur von einem zugelassenen Fachmann unter Beachtung der geltenden Installationsvorschriften angeschlossen werden (DVGW - TRGI - Arbeitsblatt G 600, Technische Regeln für Flüssiggas TRF, DVGW - TR - GAS). Vor der Installation sicherstellen, daß die örtlichen Versorgungsbedingungen (Gasart und Druck) mit der Einstellung des Geräts übereinstimmen. Die Einstellwerte sind auf der Typenschild-abbildung auf dem Deckblatt angegeben.
Installation DE Backofen und Grill. GEBRAUCH DES HERDS HINWEISE: - Vor jedem technischen Eingriff im Innern des Herds den Netzstecker abziehen und den Gashahn schließen. - Auf keinen Fall Flammen zur Dicht-heitsprüfung verwenden. Wenn keine spezifische Prüfvorrichtung zur Verfügung steht, kann man Schaum oder Wasser mit reichlich Seife verwenden.
Für den Benutzer DE - für Normalbrenner: ein Durchmesser von mindestens 14 cm; - für Starkbrenner und doppelten Flammenkranz = Kochgefäß mit mindestens 22 cm Durchmesser - sicherstellen, dass der Brennerkranz korrekt auf dem Brenner positioniert ist, die beiden Pfeile müssen übereinstimmen. ANMERKUNG: den Bedienknebel niemals in einer Zwischenstellung zwischen der Großstellung und der AUS-Stellung ( ) belassen.
Für den Benutzer DE Tabelle Backen: Gebäckart Einschubhöhe Heißluft Ober-/Unterhitze Sandkuchen Obstkuchen Kleingebäck Tortenboden Apfelkuchen, gedeckt Quarktorte Biskuittorte Obstkuchen Hefekleingebäck Pizza Windbeutel Makronen 2 2 2 2 2 2 2 2 2 2 2 2 2 2 2 2 2 2 2 2 2 2 2 2 Temperatur °C Ober-/Unterhitze Heißluft 160 - 180 160 - 180 170 - 190 170 - 190 170 - 190 180 - 200 170 - 190 170 - 190 170 - 190 200 - 210 190 - 210 * 120 - 140 * 150 - 170 150 - 170 150 - 170 160 - 170 150 - 170 150 - 170 160
Für den Benutzer DE Funktionswahlschalter in die AUS-Stellung drehen. KURZZEITWECKER - Die Taste KURZZEITWECKER drücken und die gewünschte Zeit mit Hilfe der Tasten "+" und "-" einstellen. - Während des Betriebs des Kurzzeitweckers leuchtet das Symbol GLOCKE. - Nach Ablauf der eingestellten Zeit ertönt das akustische Signal und das Symbol GLOCKE erlischt. AKUSTISCHES SIGNAL - Das akustische Signal ertönt am Ende eines Back-/ Bratprogramms für die Dauer von 7 Minuten.
Für den Benutzer DE - Die Zündkerzen für die elektrische Zündung (falls vorhanden) müssen stets sauber gehalten werden und sollten nach dem Kochen getrocknet werden, insbesondere dann, wenn etwas übergelaufen ist. - Stöße gegen die emaillierten Teile und die Zündkerzen (falls vorhanden) vermeiden. - Wenn der Herd nicht gebraucht wird, sollte normalerweise der Haupt- bzw. Wandgashahn geschlossen werden. - Den Herd auf keinen Fall am Backofentürgriff hochheben.
Installatie NL INSTALLATIE De installatie moet worden uitgevoerd door een deskundige, die zich aan de geldende normen dient te houden. Vóór de installatie controleren of de karakteristieken van het lokale gas-distributienet (aard en druk van het gas) overeenstemmen met de afstelling van het apparaat. De afstellingsvoorwaarden van het apparaat staan op het etiket op de omslag beschreven. Dit apparaat is niet aangesloten op een afvoerinrichting voor verbrandingsprodukten.
Voor de gebruiker NL de thermostaatknop. : ontsteking van de grill , de thermostaatknop - symbool moet in de stand van de maximumtemperatuur staan. : ontsteking van de grill , de thermostaatknop - symbool moet in de stand van de maximumtemperatuur staan. Het draaispit is ingeschakeld. onder de bodem van de pan uit te komen. Wij raden aan: - voor een hulpbrander = pot of pan van minstens 8 cm. en met gebruikmaking van het bijgesloten reduktierooster.
Voor de gebruiker NL Gebaktabel Soort gebak Cake Vruchtentaart Biscuit Taartbodem Appeltaart Ricotta-taart Biscuit taart Gerezen taarten Gerezen biscuits Pizza Beignets Bitterkoekjes Niveau Temperatuur °C Statische werking Geventileerde werk.
Voor de gebruiker NL GEBRUIK VAN DE ELEKTRONISCHE PROGRAMMERING (fig. 9) Maakt het mogelijk de begintijd en de duur van de kooktijd in de oven te programmeren. Als het te koken gerecht voorts niet continu hoeft te worden gecontroleerd, kan dit ook in afwezigheid van de gebruiker gebeuren. Tijdens de installatie of na een stroomonderbreking, zal de display knipperen; dit betekent dat de juiste tijd moet worden ingesteld, omdat anders de programmering niet juist zal zijn.
Voor de gebruiker NL openingen van de branderhouders komt, daar dit gevaar op zou kunnen opleveren. - De ontstekingsstiften voor de elektrische ontsteking moeten na elk gebruik schoon worden gemaakt en afgedroogd; vooral als er is gemorst of overgekookt. - Niet tegen de geëmailleerde delen en ontstekingsstiften (indien aanwezig) stoten. - Als het fornuis niet wordt gebruikt, wordt het aanbevolen de hoofdkraan (of de kraan aan de muur) van het gas te sluiten.
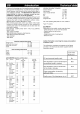
Figures / Figures/ Abbildungen/Afbeeldingen SCHEMA DES BRANCHEMENTS CONNECTION DIAGRAM ANSCHLUSSPLAN AANSLUITSCHEMA SR A C 230 V BIPHASE / TWO-PHASE / ZWEIFASIG/ TWEEFASIG / R 1 R L 2 A = Auxiliaire/Auxiliary/Hilfsbrenner/ Sudderbrander SR = Semi-rapide/Semi-rapid/Normaal br.
Figures / Figures/ Abbildungen/Afbeeldingen 13 .
335105 - ED.