HG61..M HG61..N HG71..M HG76..M HG96..M HG96..S HG77..M HG97..
NL handleiding . . . . . . . . . . . . . . . . . . . . . . . . . . . . . . . . . . . . . . . . . . 3 – 29 FR notice d’utilisation . . . . . . . . . . . . . . . . . . . . . . . . . . . . . . . . . . . . 31 – 57 DE Anleitung . . . . . . . . . . . . . . . . . . . . . . . . . . . . . . . . . . . . . . . . . . . 59 – 85 GB manual . . . . . . . . . . . . . . . . . . . . . . . . . . . . . . . . . . . . . . . . . . . .
UW GASKOOKPLAAT inhoud uw gaskookplaat beschrijving. . . . . . . . . . . . . . . . . . . . . . . . . . . . . . . . . . . . . . . . . . . . . . 4 inleiding . . . . . . . . . . . . . . . . . . . . . . . . . . . . . . . . . . . . . . . . . . . . . . . . 5 veiligheid waar u op moet letten . . . . . . . . . . . . . . . . . . . . . . . . . . . . . . . . . . . . . . 6 bediening ontsteken en instellen . . . . . . . . . . . . . . . . . . . . . . . . . . . . . . . . . . . . . .
beschrijving UW GASKOOKPLAAT HG61..MB HG61..NB 3 2 3 2 4 5 2 5 1 2 6 6 HG71..MB HG76..MB 2 3 3 4 5 4 2 5 1 6 6 2 HG96..MB 2 HG96..SB 2 2 4 4 1 5 2 5 2 6 6 1 3 HG77..MB 3 HG97..MB 3 4 2 4 4 2 1. 2. sterkbrander normaalbrander 5 1 5 2 7 7 1 2 3. sudderbrander 4. wokbrander 5. pandrager 6. glasplaat 3 7.
UW GASKOOKPLAAT inleiding Deze gaskookplaat is ontworpen voor de echte kookliefhebber. De verschillen in brandercapaciteit zorgen ervoor dat u ieder gerecht kunt bereiden. Dankzij de in de knoppen geïntegreerde vonkontsteking ontsteekt èn bedient u de branders met één hand. Dit toestel voldoet aan alle eisen die gelden voor het Kookkeurmerk. Dit betekent dat de gaskookplaat hoog rendement koppelt aan een minimum aan onvolledige verbrandingsgassen.
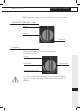
VEILIGHEID waar u op moet letten Zorg voor voldoende ventilatie tijdens het gebruik – Houd natuurlijke ventilatieopeningen open. – Bij langdurig gebruik van de kookplaat is extra ventilatie noodzakelijk. Zet bijvoorbeeld een raam open of installeer een mechanische ventilator. Gebruik de kookplaat alleen voor het bereiden van gerechten – Het toestel is niet geschikt om ruimtes te verwarmen. Flambeer nooit onder een afzuigkap – Door de hoge vlammen kan brand ontstaan, ook bij een uitgeschakelde ventilator.
BEDIENING ontsteken en instellen Elke brander kan traploos worden geregeld tussen vol- en kleinstand. Wok HG96..MB, HG97..MB 0-stand branderaanduiding volstand kleinstand bediening Druk de bedieningsknop in en draai hem linksom. De brander ontsteekt. 0-stand branderaanduiding volstand wok kleinstand wok kleinstand buitenring wok Voor de toestellen met vlambeveiliging moet u de bedieningsknop ongeveer 5 seconden ingedrukt houden om de vlambeveiliging in te schakelen.
COMFORTABEL KOKEN de kookplaat optimaal gebruiken – Zorg er altijd voor dat de vlammen onder de pan blijven. Als vlammen om de pan heen spelen gaat veel energie verloren. Bovendien kunnen de handgrepen dan te heet worden. Gebruik geen pannen met een kleinere bodemdiameter dan 12 cm. Kleinere pannen staan niet stabiel. FOUT GOED – (Roer)bakken, doorkoken van grote hoeveelheden en frituren kunt u (indien van toepassing) het beste doen op de sterk- of wokbrander.
COMFORTABEL KOKEN de kookplaat optimaal gebruiken wokbrander Met de wokbrander kunt u gerechten op een zeer hoge temperatuur bereiden. Het is hierbij van belang dat u: – van te voren de ingrediënten in reepjes, plakjes of stukjes snijdt; – bij het roerbakken olie van goede kwaliteit gebruikt, zoals olijf-, maïs-, zonnebloem- of arachide olie. Een klein beetje is al genoeg.
algemeen ONDERHOUD Uw toestel is vervaardigd uit hoogwaardige materialen, die u eenvoudig reinigt. – Branderdelen mogen niet in de vaatwasser gereinigd worden. De onderdelen kunnen door het vaatwasmiddel aangetast worden! Gebruik niet te veel vocht, aangezien dit de brander of ventilatieopeningen kan binnendringen. – Reinig de ontstekingsbougies bij voorkeur met een doekje. Betracht hierbij wel enige voorzichtigheid.
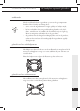
algemeen ONDERHOUD Wok HG61/71/76/ 77..MB en HG96..SB Branderdeksel buiten Branderkop Branderkop binnen Gaskelk Branderkelk Bougie Thermokoppel Branderdeksel Wok HG96/97..
ONDERHOUD algemeen algemeen – Regelmatig onderhoud direct na gebruik voorkomt dat overgekookt voedsel lange tijd kan inwerken en hardnekkige, moeilijk te verwijderen vlekken veroorzaakt. Gebruik hiervoor een mild reinigingsmiddel. – Reinig eerst de bedieningsknoppen, branders en pandragers en dan pas de glasplaat. Hiermee voorkomt u dat de glasplaat tijdens het reinigen opnieuw vuil wordt.
ONDERHOUD algemeen reinigen verwijderbare branderdelen De verwijderbare branderdelen (inclusief wok) kunt u het beste reinigen met een mild schoonmaakmiddel en een zachte doek. Bij hardnekkige vlekken kunt u de delen laten weken in een sopje. Gebruik nooit schuurpoeders, pads, scherpe voorwerpen of agressieve reinigingsmiddelen. messing wokbranderdelen Enkele delen van de wokbrander zijn vervaardigd uit messing.
STORINGEN tabel Wanneer u twijfelt over de goede werking van uw kookplaat betekent dit niet automatisch dat er een defect is. Controleer in elk geval de volgende punten: storing oorzaak oplossing Het ruikt naar gas in de omgeving van het toestel. – Er is een brander ingeschakeld, maar niet ontstoken. – De koppeling van een flessengastoestel is losgeschoten. – Sluit de kraan en wacht enkele minuten met opnieuw ontsteken. – Zet de koppeling vast. Een brander ontsteekt niet.
MILIEUASPECTEN verpakking en toestel afvoeren Bij de vervaardiging van dit toestel is gebruik gemaakt van duurzame materialen. De verpakking van het toestel is recyclebaar. Gebruikt kunnen zijn: • karton; • papier; • polyethyleenfolie (PE); • CFK-vrij polystyreen (PS-hardschuim); • polypropyleenband (PP). Deze materialen op verantwoorde wijze en conform de overheidsbepalingen afvoeren.
INSTALLATIEVOORSCHRIFT algemeen Dit toestel mag alleen door een erkend installateur worden aangesloten. let op De gassoort en het land waarvoor het toestel is ingericht staan vermeld op het gegevensplaatje. Dit is een klasse 3 toestel. gasaansluiting De gasaansluiting moet voldoen aan de nationale en lokale voorschriften. Wij adviseren de kookplaat aan te sluiten met een vaste leiding.
INSTALLATIEVOORSCHRIFT algemeen elektrische aansluiting 230 V - 50 Hz - 0,6 VA De elektrische aansluiting moet voldoen aan de nationale en lokale voorschriften. Wandcontactdoos en stekker moeten te allen tijde bereikbaar blijven. Als u een vaste aansluiting wilt maken, moet u er voor zorgen dat er een omnipolaire schakelaar met een contactafstand van minimaal 3 mm in de toevoerleiding wordt aangebracht. let op Dit toestel moet altijd geaard zijn.
inbouwen INSTALLATIEVOORSCHRIFT uitsparing in werkblad zagen Zaag de uitsparing in het werkblad. Doe dit zeer nauwkeurig (zie inbouwmaten). Als het werkblad van hout is, behandel dan de kopse kanten van het werkblad met afdichtvernis, om uitzetten van het werkblad door vocht te voorkomen.
INSTALLATIEVOORSCHRIFT inbouwen Verwijder de beschermfolie van het afdichtband (A) en plak het band in de groef van de aluminium profielen of op de rand van de glasplaat. Plak het afdichtband niet door de hoek, maar knip 4 stukken die goed aansluiten in de hoek. inbouwvolgorde RVS-toestel HG77..M en HG97..M . 0-3 mm Verwijder de beschermfolie van het afdichtband en plak het band rondom de uitsparing in het werkblad. Begin aan de achterzijde van het toestel en plak het afdichtband door de hoeken.
inbouwen INSTALLATIEVOORSCHRIFT inbouwmaten HG61..M 1*) bevestigingspunt montagebeugel 522 640 45 voorzijde min.
INSTALLATIEVOORSCHRIFT inbouwen inbouwmaten HG61..N 618 644 31 45 voorzijde min.
INSTALLATIEVOORSCHRIFT inbouwen inbouwmaten HG71..M 522 794 31 45 voorzijde min.
INSTALLATIEVOORSCHRIFT inbouwen inbouwmaten HG76..M 522 794 45 31 voorzijde min.
inbouwen INSTALLATIEVOORSCHRIFT inbouwmaten HG96..M/S 522 904 45 voorzijde min.
inbouwen INSTALLATIEVOORSCHRIFT inbouwmaten HG77..M 522 794 45 31 voorzijde min.
INSTALLATIEVOORSCHRIFT inbouwen inbouwmaten HG97..M 522 904 45 voorzijde min.
INSTALLATIEVOORSCHRIFT inbouwen inbouwsituaties HG71/76/77/96/97 in 60 cm kast Inbouwmaten HG7111M in 60 cm corpus X < 31 mm : X >= 31 mm : Y = 31 mm - X Y = 0 mm X Y 600 Inbouwmaten HG76/77/96/97..MB en HG96..
inbouwen INSTALLATIEVOORSCHRIFT benodigde vrije ruimte rondom Een gaskookplaat ontwikkelt warmte. Laat voldoende ruimte vrij tot niet hittebestendige materialen. Let ook op bij materialen die kunnen verkleuren (zoals roestvaststaal). min 600 (HG61) min 750 HG71/76/77 min 900 HG96/97 min. 650 mm min. 450 mm min. 100 mm min. 100 mm De kookplaat mag naast slechts één verticale wand ingebouwd worden. let op De onderzijde van de kookplaat wordt heet.
INSTALLATIEVOORSCHRIFT gastechnische gegevens G25/25 mbar G20/20 mbar G25/20 mbar G30/29 mbar G31/29 mbar G31/37 mbar G30/50 mbar brandertype (kW) (kW) (kW) (kW / g/h) (kW / g/h) (kW / g/h) sudder 1.00 1.00 0.90 0.90 / 65 0.79 / 57 0.90 / 65 1.00 / 72 0.88 / 63 normaal 2.00 2.00 1.80 1.60 / 115 1.41 / 101 1.60 / 115 2.00 / 144 1.76 / 127 sterk 3.00 3.00 2.70 2.30 / 166 2.02 / 146 2.30 / 166 2.70 / 194 2.38 / 171 wok 4.50 4.50 4.50 3.50 / 252 3.08 / 222 3.
VOTRE PLAQUE DE CUISSON AU GAZ table des matières votre plaque de cuisson au gaz description . . . . . . . . . . . . . . . . . . . . . . . . . . . . . . . . . . . . . . . . . . . . . 32 introduction . . . . . . . . . . . . . . . . . . . . . . . . . . . . . . . . . . . . . . . . . . . . 33 sécurité les points qui méritent votre attention . . . . . . . . . . . . . . . . . . . . . . . . 34 commande allumer et régler . . . . . . . . . . . . . . . . . . . . . . . . . . . . . . . . . . . . . . . . .
VOTRE PLAQUE DE CUISSON AU GAZ HG61..MB description HG61..NB 3 2 3 2 4 5 2 5 1 2 6 6 HG71..MB HG76..MB 2 3 3 4 5 4 2 5 1 6 6 HG96..MB HG96..SB 2 2 2 2 4 4 5 2 5 2 6 6 1 HG77..MB 3 HG97..MB 1 3 3 4 2 4 5 2 5 1 7 7 2 32 2 1. brûleur puissant 2. brûleur normal 3. brûleur à ralenti 1 3 4. brûleur wok 7. Plaque en acier inoxydable 5. grille de cuisson 6.
VOTRE PLAQUE DE CUISSON AU GAZ introduction La présente plaque de cuisson a été conçue pour le véritable amateur de cuisine. Les brûleurs sont de puissances diverses, ce qui vous permet de préparer des mets divers. Grâce à l’allumage commandé et intégré dans les boutons, vous allumez et commandez d’une seule main les brûleurs. La plaque de cuisson au gaz allie un rendement élevé à un minimum de combustion imparfaite.
SÉCURITÉ les points qui méritent votre attention Veillez à une bonne aération pendant l’utilisation – Maintenez les points d’aération naturels ouverts. – En cas d’une utilisation prolongée de la plaque de cuisson, une aération supplémentaire est indispensable. Ouvrez, par exemple, une fenêtre ou installez une aération mécanique. N’utilisez la plaque de cuisson que pour préparer des mets – L’appareil n’est pas approprié pour chauffer des espaces.
COMMANDE allumer et régler Chaque brûleur peut être réglé progressivement entre la position Haute et Basse. Wok HG96..MB, HG97..MB position 0 signalisation du brûleur position élevée position basse commande Appuyez sur la touche de commande et tournez-la vers la gauche. Le brûleur va s’allumer.
CUISINER CONFORTABLEMENT utilisation optimale – Veillez toujours à ce que les flammes se trouvent sous la casserole. Un grand gaspillage d’énergie se produit en laissant tournoyer les flammes autour de la casserole. De plus, les poignées risquent de devenir trop chaudes. N’utilisez pas de casseroles détenant des diamètres de fond inférieurs à 12 cm. Des casseroles plus petites ne sont pas stables.
CUISINER CONFORTABLEMENT utilisation optimale brûleur Wok Un brûleur Wok vous permet de préparer des mets à une température très élevée. Dans ce contexte, il est important : – couper à l’avance tous les ingrédients en morceaux ; – d’utiliser une huile de bonne qualité (huile d’olive, de maïs, de tournesol ou d’arachide par exemple) en faisant revenir les ingrédients. Il n’en faut pas beaucoup.
ENTRETIEN généralités Votre appareil comprend des matériaux de haute qualité qui se nettoient facilement. – Les éléments du brûleur ne peuvent pas être lavées dans le lavevaisselle. Les pièces risquent d’être attaquées par le produit vaisselle. N’utilisez pas trop d’eau pour lui éviter de s’introduire dans le brûleur ou dans les points d’aération. – Nettoyez de préférence les bougies d’allumage avec un chiffon. Soyez prudent en effectuant cette opération.
ENTRETIEN Wok G61/71/76/ 77..MB et HG96..SB généralités capuchon de brûleur cercle extérieur tête de brûleur tête de brûleur enceinte gaz du brûleur coupe du brûleur bougie thermocouple Wok HG96/97..
ENTRETIEN généralités généralités – Un entretien régulier et direct après utilisation évite aux aliments collés d’agir à long terme et de provoquer des tâches tenaces, difficiles à supprimer. Utilisez de préférence un produit d’entretien doux. – Nettoyez d’abord les touches de commande, les brûleurs et les grilles de cuisson avant le plaque en verre. Vous évitez ainsi pendant le nettoyage, de salir encore la plaque en verre.
ENTRETIEN généralités nettoyage éléments des brûleurs amovibles Nettoyez les éléments des brûleurs amovibles (wok y compris) avec un produit d’entretien doux et une éponge douce. En cas de tâches tenaces, laissez tremper les éléments dans une eau savonneuse chaude. N’utilisez jamais de poudre à récurer, ni d’éponges métalliques, ni d’objets pointus, ni de produits d’entretien agressifs. éléments du brûleur Wok en cuivre Quelques éléments du brûleur Wok sont en cuivre.
PANNES tableau Si l’appareil ne fonctionne pas bien, ceci ne veut pas dire forcément qu’il est en panne. Essayez de résoudre d’abord le problème vous même comme suit : panne cause solution Odeurs de gaz dans les alentours de l’appareil. – Un brûleur a été enclenché, mais n’a pas été allumé. – Fermez le robinet et attendez quelques minutes avant de réenclencher. – Attachez la connexion. – La connexion d’un appareil à gaz en bouteille s’est brusquement détachée. Un brûleur ne s’allume pas.
ENVIRONNEMENT que faire de l’emballage et de l’appareil usé Des matériaux solides ont été utilisés pour fabriquer cet appareil. L’emballage de l’appareil est recyclable. Peuvent être utilisés : • le carton ; • le papier ; • le film en polyéthylène (PE) ; • le polystyrène sans CFC (mousse dure PS) ; • la bande en polypropylène (PP). Evacuez ces matériaux correctement et conformément aux dispositions administratives. Sur la plaque signalétique porte le symbole d’un caisson à ordures barré.
INSTRUCTIONS D’INSTALLATION généralités Cet appareil ne peut être installé que par un technicien gazier agréé. attention Le type de gaz et le pays auxquels l’appareil est destiné sont mentionnés sur la plaque d’identification. C’est un appareil appartenant à la classe 3. raccordement du gaz Le branchement au gaz doit satisfaire aux prescriptions nationales et locales. Nous recommandons de brancher la plaque de cuisson au moyen d’un câble fixe.
INSTRUCTIONS D’INSTALLATION généralités branchement électrique 230 V - 50 Hz - 0,6 VA Le branchement électrique doit satisfaire aux prescriptions nationales et locales. La fiche et la prise de courant doivent toujours être accessibles. Pour le branchement fixe, veillez à ce que le câble d’alimentation soit muni d’un interrupteur omnipolaire avec une distance de contact d’au moins 3 mm. attention Cet appareil doit être mis à la terre.
INSTRUCTIONS D’INSTALLATION encastrement scier un trou dans le plan de travail Sciez le trou dans le plan de travail. Effectuez cette opération avec précision (voir dimensions hors tout). Si le plan de travail est réalité en bois synthétique, traiter les côtés latéraux avec un vernis d’étanchéité, afin d’eviter que le plaque ne se déforme suite à la absorption d’humidité.
INSTRUCTIONS D’INSTALLATION encastrement Eliminez la feuille de protection de la bande d’étanchéité (A) et collez la bande dans la rainure des profils en aluminium ou de la plaque de verre. Ne passez pas le ruban d’obturation dans les angles, mais coupez 4 morceaux qui se rejoignent bien entre eux dans les angles. ordre d’encastrement l’appareil en acier HG77..M et HG97..M . 0-3 mm Enlevez le film de protection de la bande d’étanchéité et collez la bande autour de la découpe du plan de travail.
encastrement INSTRUCTIONS D’INSTALLATION dimensions hors tout HG61..M 1*) point de fixation pour étrier de montage 522 640 45 avant min.
encastrement INSTRUCTIONS D’INSTALLATION dimensions hors tout HG61..N 618 644 31 45 avant min.
encastrement INSTRUCTIONS D’INSTALLATION dimensions hors tout HG71..M 522 794 31 45 avant min.
encastrement INSTRUCTIONS D’INSTALLATION dimensions hors tout HG76..M 522 794 45 31 avant min.
encastrement INSTRUCTIONS D’INSTALLATION dimensions hors tout HG96..M/S 522 904 45 avant min.
encastrement INSTRUCTIONS D’INSTALLATION dimensions hors tout HG77..M 522 794 45 31 avant min.
encastrement INSTRUCTIONS D’INSTALLATION dimensions hors tout HG97..M 522 904 45 avant min.
encastrement INSTRUCTIONS D’INSTALLATION situations d’encastrement HG71/76/77/96/97 dans placard de 60 cm dimensions d'encastrement HG7111m dans corpus de 60 cm X < 31 mm : X >= 31 mm : Y = 31 mm - X Y = 0 mm X Y 600 dimensions d'encastrement HG76/77/96/97..MB et HG96..
INSTRUCTIONS D’INSTALLATION encastrement espace libre qui est nécessaire autour Une plaque de cuisson dégage de la chaleur. Observez un espace suffisant pour les matériaux craignant la chaleur. Attention aussi aux matériaux qui peuvent se décolorer (comme l’acier inoxydable). min 600 (HG61) min 750 HG71/76/77 min 900 HG96/97 min. 650 mm min. 450 mm min. 100 mm min. 100 mm La plaque de cuisson au gaz ne peut être encastrée qu‘auprès d‘une paroi verticale.
INSTRUCTIONS D’INSTALLATION données pour le gaz G25/25 mbar G20/20 mbar G25/20 mbar G30/29 mbar G31/29 mbar G31/37 mbar G30/50 mbar type de brûleur (kW) (kW) (kW) (kW / g/h) (kW / g/h) (kW / g/h) à ralenti 1.00 1.00 0.90 0.90 / 65 0.79 / 57 0.90 / 65 1.00 / 72 0.88 / 63 normal 2.00 2.00 1.80 1.60 / 115 1.41 / 101 1.60 / 115 2.00 / 144 1.76 / 127 (kW / g/h) G31/50 mbar (kW / g/h) puissant 3.00 3.00 2.70 2.30 / 166 2.02 / 146 2.30 / 166 2.70 / 194 2.
IHRE GASKOCHMULDE Inhalt Ihre Gaskochmulde Beschreibung . . . . . . . . . . . . . . . . . . . . . . . . . . . . . . . . . . . . . . . . . . . 60 Einleitung . . . . . . . . . . . . . . . . . . . . . . . . . . . . . . . . . . . . . . . . . . . . . . 61 Sicherheit Worauf Sie achten müssen . . . . . . . . . . . . . . . . . . . . . . . . . . . . . . . . . 62 Bedienung Zünden und Einstellen . . . . . . . . . . . . . . . . . . . . . . . . . . . . . . . . . . . .
IHRE GASKOCHMULDE Beschreibung HG61..MB HG61..NB 3 2 3 2 4 5 2 5 1 2 6 6 HG71..MB HG76..MB 2 3 3 4 5 4 2 5 1 6 6 HG96..MB HG96..SB 2 2 2 2 4 4 5 2 5 2 6 6 1 HG77..MB 3 1 HG97..MB 3 3 4 2 60 2 4 1. 2. 5 1 5 2 7 7 1 2 Starkbrenner Normalbrenner 3. Garbrenner 4. Wokbrenner 5. Rippenplatte 6. Glasplatte 3 7.
IHRE GASKOCHMULDE Einleitung Diese Gaskochmulde von ATAG wurde für die echten Hobbyköche entworfen. Die unterschiedlichen Brennerleistungen sorgen dafür, dass Sie jedes Gericht zubereiten können. Durch die in den Bedienungsknöpfen integrierte Funkenzündung zünden und bedienen Sie die Knöpfe mit einer Hand. Dieses Gerät entspricht allen Anforderungen, die für das Kochgütezeichen gelten. Bei der Kochmulde ist hohe Leistungsfähigkeit mit einem Minimum an unvollständiger Verbrennung gekoppelt.
SICHERHEIT Worauf Sie achten müssen Sorgen Sie für ausreichende Lüftung bei Benutzung des Gerätes – Sorgen Sie dafür, dass natürliche Lüftungsöffnungen offen sind. – Bei längerer Benutzung der Kochmulde ist zusätzliche Lüftung erforderlich. Öffnen Sie zum Beispiel ein Fenster oder installieren Sie ein mechanisches Gebläse. Benutzen Sie die Kochmulde nur zur Bereitung von Gerichten – Das Gerät ist nicht zur Heizung von Räumen geeignet.
BEDIENUNG Zünden und Einstellen Jeder Brenner ist stufenlos zwischen Groß- und Kleinstellung einstellbar. Wok HG96..MB, HG97..MB 0-Stellung Brennerbezeichnung Großstellung Kleinstellung Bedienung Drücken Sie den entsprechenden Knebel ein und drehen Sie ihn nach links. 0-Stellung Brennerbezeichnung Großstellung Wok Kleinstellung Wok Kleinstellung äußere Ring Wok Der Brenner zündet.
BEQUEM KOCHEN Die optimale Benutzung der Kochmulde – Sorgen Sie immer dafür, dass die Flammen unter dem Topf bleiben. Wenn die Flammen um den Topf züngeln, geht viel Energie verloren. Zudem können die Griffe zu heiß werden. Benutzen Sie keine Töpfe mit kleinerem Bodendurchmesser als 12 cm. Kleinere Töpfe stehen nicht stabil. FALSCH GUT – Zum Sautieren, Braten, Durchkochen von großen Mengen und Frittieren (soweit zutreffend) empfiehlt es sich, den Stark-, Superstark- oder Wokbrenner zu verwenden.
BEQUEM KOCHEN Die optimale Benutzung der Kochmulde Wokbrenner Mit dem Wokbrenner können Gerichte bei sehr hoher Temperatur bereitet werden. Es ist dabei wichtig, dass Sie: – die Zutaten zuvor in Streifen, Scheiben oder Stückchen schneiden; – beim Sautieren ein Qualitätsöl verwenden, wie Oliven-, Mais-, Sonnenblumen- oder Speiseöl verwenden. Ein bisschen genügt schon.
PFLEGE Allgemeines Ihr Gerät ist aus hochwertigen Materialien hergestellt und lässt sich einfach reinigen. – Brennerteile dürfen nicht im Geschirrspüler gereinigt werden. Die Teile können durch das Geschirrspülmittel angegriffen werden! Verwenden Sie nicht zu viel Feuchtigkeit, da sie in den Brenner oder die Lüftungsöffnungen eindringen kann. – Reinigen Sie die Zündkerzen vorzugsweise mit einem Tuch. Seien Sie vorsichtig dabei.
PFLEGE Wok HG61/71/76/ 77..MB und HG96..SB Allgemeines Brennerdeckel äußere Ring Brennerkopf Brennerkopf innen Gaskörpern Brennkörpern Zündkerze Thermo-element Wok HG96/97..
PFLEGE Allgemeines Allgemeines – Regelmäßige Reinigung und Pflege sofort nach Benutzung des Gerätes verhindert, dass übergekochte Essensreste lange einwirken können und hartnäckige, schwer zu entfernende Flecken verursachen. Sie können am besten ein mildes Reinigungsmittel verwenden. – Reinigen Sie erst die Knebel, Brenner und Topfroste und dann die Glasplatte. Damit wird vermieden, dass die glasplatte beim Reinigen wieder schmutzig wird.
Allgemeines PFLEGE Reinigung Entfernbaren Brennerteilen Die entfernbaren Brennerteile (einschließlich Wok) können am besten mit einem milden Spülmittel und einem weichen Tuch gereinigt werden. Bei hartnäckigen Flecken können Sie die Teile in Wasser mit Spülmittel weichen lassen. Keine Scheuermittel, Scheuerschwämme, scharfe Gegenstände oder aggressiven Reinigungsmittel verwenden. Messing-Wokbrennerteile Einige Teile des Wokbrenners sind aus Messing.
STÖRUNGEN Tabelle Wenn das Gerät nicht ordnungsgemäß funktioniert, bedeutet das nicht unbedingt, dass es defekt ist. Versuchen Sie eventuell, das Problem selbst zu lösen. Verständigen Sie den Kundendienst, wenn die nachstehenden Ratschläge keine Abhilfe verschaffen. Störung Ursache Abhilfe Es riecht nach Gas im Geräteumfeld. – Ein Brenner ist eingeschaltet, aber nicht gezündet. – Schließen Sie den Hahn und warten Sie ein paar Minuten vor erneuter Zündung. – Befestigen Sie die Kopplung.
UMWELTASPEKTE Verpackung und Gerät entsorgen Bei der Herstellung dieses Gerätes wurden dauerhafte Werkstoffe verwendet. Die Verpackung des Gerätes ist wiederverwendbar. Verwendet können sein: • Pappe; • Papier; • Polyethylenfolie (PE); • CFK-freies Polystyrol (PS-Hartschaum); • Polypropylenband (PP). Diese Werkstoffe sind ordnungsgemäß und gemäß den behördlichen Vorschriften zu entsorgen. Das Typenschild ist gekennzeichnet mit einer Mülltonne, die durchgestrichen ist.
INSTALLATIONSANWEISUNG Allgemein Dieses Gerät darf nur von einem qualifizierten Gasinstallateur angeschlossen werden. Achtung Gasart und Land, wofür sich das Gerät eignet, sind auf dem Typenschild angegeben. Dies ist ein Klasse-3-Gerät. Gasanschluß Der Gasanschluß muß den nationalen und kommunalen Vorschriften entsprechen. Wir empfehlen, das Kochgerät mit einer festen Leitung anzuschließen. Erlaubt ist jedoch auch der Anschluß mit einem speziell hierfür bestimmten Sicherheits-schlauch.
INSTALLATIONSANWEISUNG Allgemein Stromversorgung 230 V - 50 Hz - 0,6 VA Der elektrische Anschluß muß den nationalen und kommunalen Vorschriften entsprechen. Steckdose und Stecker müssen immer gut zugänglich sein. Wenn Sie einen festen Anschluß anbringen möchten, sorgen Sie bitte dafür, daß in der Zuführungsleitung ein omnipolarer Schalter mit einem Kontaktabstand von mindestens 3 mm angebracht wird. Achtung Dieses Gerät muß jederzeit geerdet sein.
Einbauen INSTALLATIONSANWEISUNG Ausschnitt in die Arbeitsplatte sägen Sägen Sie den Ausschnitt in die Arbeitsplatte. Verfahren Sie dabei sorgfältig (siehe Einbaumaße). Sägen Sie eventuell vorhandene Trennwände auch aus. Der Abstand vom Ausschnittmaß bis zur Rückwand und / oder Seitenwand ist aus der Tabelle ersichtlich.
INSTALLATIONSANWEISUNG Einbauen Entfernen Sie die Schutzfolie des Dichtungsstreifens (A) und kleben Sie den Dichtungsstreifen in die Rille der Aluminiumprofile oder an die untere Seite der Glasplatte. Das Dichtungsband nicht durch die Ecken kleben, sondern 4 Stücken schneiden, die in den Ecken für eine gute Verbindung sorgen. Einbaureihenfolge Edelstahl-Gerät HG77..M und HG97..M .
Einbauen INSTALLATIONSANWEISUNG Einbaumaße HG61..M 1*) Befestigungspunkt Montagebügel 522 640 45 Vorderseite min.
Einbauen INSTALLATIONSANWEISUNG Einbaumaße HG61..N 618 644 31 45 Vorderseite min.
Einbauen INSTALLATIONSANWEISUNG Einbaumaße HG71..M 522 794 31 45 Vorderseite min.
Einbauen INSTALLATIONSANWEISUNG Einbaumaße HG76..M 522 794 45 31 Vorderseite min.
Einbauen INSTALLATIONSANWEISUNG Einbaumaße HG96..M/S 522 904 45 Vorderseite min.
Einbauen INSTALLATIONSANWEISUNG Einbaumaße HG77..M 522 794 45 31 Vorderseite min.
Einbauen INSTALLATIONSANWEISUNG Einbaumaße HG97..M 522 904 45 Vorderseite min.
Einbauen INSTALLATIONSANWEISUNG Einbausituationen HG71/76/77/96/97 in 60-cm-Schrank Einbaumaße HG7111m in 60-cm-Korpus X < 31 mm : X >= 31 mm : Y = 31 mm - X Y = 0 mm X Y 600 Einbaumaße HG76/77/96/97..MB und HG96..
Einbauen INSTALLATIONSANWEISUNG Benötigter Freiraum Eine Gaskochmulde entwickelt Wärme. Sorgen Sie für ausreichenden Freiraum zu nicht-hitzebeständigen Materialien. Achten Sie auch auf Werkstoffe, die sich verfärben können (wie Edelstahl). min 600 (HG61) min 750 HG71/76/77 min 900 HG96/97 min. 650 mm min. 450 mm min. 100 mm min. 100 mm Die Gaskochmulde darf neben nur einer senkrechten Wand eingebaut werden. Achtung Die Unterseite der Kochplatte wird heiß.
Gastechnische Daten INSTALLATIONSANWEISUNG G25/25 mbar G20/20 mbar G25/20 mbar G30/29 mbar G31/29 mbar G31/37 mbar G30/50 mbar Brennertyp (kW) (kW) (kW) (kW / g/h) (kW / g/h) (kW / g/h) Gar 1.00 1.00 0.90 0.90 / 65 0.79 / 57 0.90 / 65 1.00 / 72 0.88 / 63 Normal 2.00 2.00 1.80 1.60 / 115 1.41 / 101 1.60 / 115 2.00 / 144 1.76 / 127 Stark 3.00 3.00 2.70 2.30 / 166 2.02 / 146 2.30 / 166 2.70 / 194 2.38 / 171 Wok 4.50 4.50 4.50 3.50 / 252 3.08 / 222 3.50 / 252 4.
YOUR GAS HOB contents your gas hob description . . . . . . . . . . . . . . . . . . . . . . . . . . . . . . . . . . . . . . . . . . . . . 88 introduction . . . . . . . . . . . . . . . . . . . . . . . . . . . . . . . . . . . . . . . . . . . . 89 safety what you should pay attention to . . . . . . . . . . . . . . . . . . . . . . . . . . . . 90 controls igniting and adjusting . . . . . . . . . . . . . . . . . . . . . . . . . . . . . . . . . . . . . 91 comfortable cooking optimal use of the hob . . . . . .
YOUR GAS HOB description HG61..MB HG61..NB 3 2 3 2 4 5 2 5 1 2 6 6 HG71..MB HG76..MB 2 3 3 4 5 4 2 5 1 6 6 HG96..MB HG96..SB 2 2 2 4 2 4 5 2 5 2 6 6 1 HG77..MB 3 HG97..MB 1 3 3 4 2 88 2 4 5 1 5 2 7 7 1 2 1. rapid burner 2. semi-rapid burner 3. simmer burner 4. wok burner 5. pan supports 6. glass plate 3 7.
YOUR GAS HOB introduction This ATAG gas hob has been designed for the real lover of cooking. The differences in burner capacity mean that you can cook any type of dish. Thanks to the integration of the spark ignition in the knobs, you can ignite and control the burners with one hand. The gas hob combines high efficiency with a minimum of incompletely burned combustion gases. This gives you an appliance with short heating times, while also providing excellent simmering. The HG61..MB, HG61..NB, HG71..
SAFETY what you should pay attention to Ensure that there is adequate ventilation during use – Keep natural ventilation openings open. – When using the hob for long periods, extra ventilation is necessary. Open a window for instance or install a mechanical fan. Use the hob only for preparing dishes – The appliance is not suitable for space heating. Never flambé under an extractor hood – The high flames can cause a fire, even if the fan is switched off.
CONTROLS igniting and adjusting Each burner can be adjusted continuously between the full and low positions. Wok HG96..MB, HG97..MB 0-setting burner indication high setting low setting controls 0-setting burner indication high setting wok low setting wok low setting outer ring wok Press the control knob in and turn it anti-clockwise. The burner ignites.
COMFORTABLE COOKING optimal use of the hob – Always ensure that the flames remain below the pan. If flames play around the pan, a lot of energy is lost. In addition, the handles can get too hot. Do not use pans with a base diameter less than 12 cm. Smaller pans will not be stable. WRONG RIGHT – When frying, stir-frying, heating through large quantities and deepfrying it is better to use the strong, super-strong or wok burner.
COMFORTABLE COOKING optimal use of the hob wok burner With the wok burner you can prepare dishes at a very high temperature. For this purpose it is important: – to cut the ingredients into strips, slices or pieces before cooking; – to use good-quality oil, such as olive, maize, sunflower or peanut oil when stir-frying. A small quantity is enough.
MAINTENANCE general Your appliance has been manufactured from high-grade materials, which are easy for you to clean. – Burner parts should not be cleaned in the dishwasher. The parts may be damaged by the dishwasher detergent! Do not use too much water as this can penetrate into the burner or ventilation openings. – Clean the spark plugs preferably with a cloth. Do this carefully.
MAINTENANCE Wok HG61/71/76/ 77..MB and HG96..SB general burner cap outer ring burner head burner head inside gas base burner base sparkplug thermocouple Wok HG96/97..
MAINTENANCE general general – Regular cleaning immediately after use prevents over-cooked food being able to become ingrained and cause stubborn stains that are difficult to remove. Use a mild cleaning agent. – Clean the control knobs, burners and pan supports first and then the glass plate. This avoids the glass plate getting dirty again during cleaning. stubborn stains on enamel (pan supports, burner caps) Remove with a non-abrasive cream or a soft sponge.
MAINTENANCE general cleaning removable burner components The removable burner components (including wok) are best cleaned with a mild cleaning product and a soft cloth. In the case of obstinate stains you can soak the parts in hot suds. Never use scouring powder, scouring pads, sharp objects or aggressive cleansing agents. brass wok burner parts A few parts of the work burner are made from brass.
FAULTS table If the appliance does not work properly, this does not always mean that it is defective. Try to deal with the problem yourself first by checking the points mentioned below: fault cause solution There is a smell of gas in the vicinity of the appliance. – A burner is turned on but not lit. – Close the tap and wait for a few minutes before relighting. – Tighten the coupling. – The coupling on a bottled gas unit has come undone. A burner does not ignite. – Plug not in socket.
ENVIRONMENTAL ASPECTS disposal of packaging and appliance In the manufacturing of this appliance use has been made of durable materials. The appliance packaging is recyclable. The following may have been used: • cardboard; • paper; • polythene film (PE); • CFC-free polystyrene (PS hard foam); • polypropylene tape (PP). Dispose of these materials in a responsible manner and in accordance with government regulations.
INSTALLATION INSTRUCTIONS general The fitting of the appliance should only be carried out by a registered Corgi gas fitter. please note The type of gas and the country for which the appliance has been designed are indicated on the ratings plate. This is a category 3 appliance. gas connection The gas connection must comply with national and local regulations. We recommend that the hob be connected by means of a fixed pipe. Connection using a specially designed safety hose is also permitted.
INSTALLATION INSTRUCTIONS general electrical connection (solely for appliances with a spark switch) 230 V - 50 Hz - 0.6 VA The electrical connection must comply with national and local regulations. Wall socket and plug must be accessible at all times. If you want to make a fixed connection, ensure that a multi-pole switch with a distance between contacts of 3 mm is installed in the supply cable. please note This appliance must be earthed.
building in INSTALLATION INSTRUCTIONS cut opening in worktop Saw the opening in the worktop. This should be done very accurately (building in dimensions). If the woodtop is made of treated wood, then coat the sawn surfaces of the top with sealing varnish, to prevent moisture causing the top to swell.
INSTALLATION INSTRUCTIONS building in Remove the protective foil of the sealing strip (A) and attach the sealing strip in the groove of the aluminium profiles or the edge of the glass plate. Do not attach the sealing strip through the corner. Instead, cut 4 pieces that fit tightly together in the corners. installation sequence for a stainless steel appliance HG77..M and HG97..M . 0-3 mm Remove the protective foil from the sealing tape and apply the tape around the cut-out in the worktop.
building in INSTALLATION INSTRUCTIONS building in dimensions HG61..M 1*) attachment point for mounting bracket 522 640 45 front min.
building in INSTALLATION INSTRUCTIONS building in dimensions HG61..N 618 644 31 45 front min.
building in INSTALLATION INSTRUCTIONS building in dimensions HG71..M 522 794 31 45 front min.
building in INSTALLATION INSTRUCTIONS building in dimensions HG76..M 522 794 45 31 front min.
building in INSTALLATION INSTRUCTIONS building in dimensions HG96..M/S 522 904 45 front min.
building in INSTALLATION INSTRUCTIONS building in dimensions HG77..M 522 794 45 31 front min.
building in INSTALLATION INSTRUCTIONS building in dimensions HG97..M 522 904 45 front min.
building in INSTALLATION INSTRUCTIONS fitted-unit situations for HG71/76/77/96/97 in 60 cm cabinet fitted-unit dimensions for HG7111m in 60 cm corpus X < 31 mm : X >= 31 mm : Y = 31 mm - X Y = 0 mm X Y 600 fitted-unit dimensions for HG76/77/96/97..MB and HG96..
building in INSTALLATION INSTRUCTIONS space to be left free around the appliance A hob generates heat. Leave a sufficient distance between the appliance and non heat-resistant materials. Take care also with materials that may discolour (such as stainless steel). min 600 (HG61) min 750 HG71/76/77 min 900 HG96/97 min. 650 mm min. 450 mm min. 100 mm min. 100 mm The gas hob may only be built in next to one vertical wall. please note The bottom of the hob becomes hot.
gas information INSTALLATION INSTRUCTIONS G25/25 mbar G20/20 mbar G25/20 mbar G30/29 mbar G31/29 mbar G31/37 mbar (kW) (kW) (kW) (kW / g/h) (kW / g/h) (kW / g/h) simmer 1.00 1.00 0.90 0.90 / 65 0.79 / 57 0.90 / 65 1.00 / 72 0.88 / 63 normal 2.00 2.00 1.80 1.60 / 115 1.41 / 101 1.60 / 115 2.00 / 144 1.76 / 127 strong 3.00 3.00 2.70 2.30 / 166 2.02 / 146 2.30 / 166 2.70 / 194 2.38 / 171 wok 4.50 4.50 4.50 3.50 / 252 3.08 / 222 3.50 / 252 4.00 / 288 3.
plak hier het toestel-identificatieplaatje placez ici la plaque d’identification de l’appareil kleben Sie hier das Gerätetypenschild ein stick the appliance identification card here Dit plaatje bevindt zich aan de bovenzijde van het toestel. Cette plaque se trouve sur le dessus de l’appareil. Dieses Schild befindet sich an der Oberseite des Gerätes. This card is located on the top of the appliance.