gebruiksaanwijzing inductiekookplaat instructions for use induction hob Het toestel-identificatieplaatje bevindt zich aan de onderkant van het toestel. The appliance identification card is located on the bottom of the appliance. Plak hier het toestel-identificatieplaatje. Stick the appliance identification card here. Houd, wanneer u contact opneemt met de serviceafdeling, het complete typenummer bij de hand. When contacting the service department, have the complete type number to hand.
NL Handleiding NL 3 - NL 36 EN Manual Gebruikte pictogrammen - Pictograms used Belangrijk om te weten - Important information Tip EN 3 - EN 36
INHOUDSOPGAVE Uw inductiekookplaat Inleiding Bedieningspaneel Beschrijving 4 5 6 Temperatuurbeveiliging Kookduurbegrenzing 8 8 Veiligheid Gebruik Werking van de aanraaktoetsen Inductiekoken Werking inductie Inductiegeluiden Pannen 9 9 10 10 11 Inschakelen en vermogen instellen Restwarmte-indicatie Boost Twee achter elkaar liggende kookzones HI8271MT Boost management Bridgen van de Vario inductiezones Uitschakelen Stand-by modus Eco stand-by modus Kinderslot Pauze Herkennen van een modus Timer / Kookwe
UW INDUCTIEKOOKPLAAT Inleiding Deze inductiekookplaat is ontworpen voor de echte kookliefhebber. Koken op een inductiekookplaat heeft een aantal voordelen. Het is comfortabel, omdat de kookplaat snel reageert en ook op een zeer laag vermogen is in te stellen. Dankzij het hoge vermogen gaat het aan de kook brengen zeer snel. De ruime afstanden tussen de kookzones maken het koken ook comfortabel. Koken op een inductiekookplaat verschilt met koken op een traditioneel toestel.
UW INDUCTIEKOOKPLAAT Bedieningspaneel 24 23 22 21 19 20 18 1 2 3 4 5 6 7 8 1. 2. 3. 4. 5. 6. 7. 8. 9. 10. 11. 12. 13. 14. 15. 16. 17. 18. 19. 20. 21. 22. 23. 24.
UW INDUCTIEKOOKPLAAT Beschrijving HI3271MV HI6271MV / HI6272MV 5 5 5 5 5 5 HI6271M / HI6271MI 1 2 3 2 1. Kookzone Ø145 2,2 kW 2. Kookzone Ø180 3,0 kW 3. Kookzone Ø210 3,7 kW 4. Kookzone Ø260 3,7 kW 5.
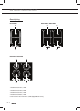
UW INDUCTIEKOOKPLAAT HI7271IM HI8271MT 1 2 3 2 4 HI9271M 2 2 2 2 HI9271MV 4 2 2 5 5 5 2 2 5 5 5 NL 7
VEILIGHEID Lees voor gebruik eerst de separate veiligheidsinstructies! Temperatuurbeveiliging • Elke kookzone is voorzien van een sensor. Deze sensor controleert ononderbroken de temperatuur van de bodem van de kookpan en van de onderdelen van de kookplaat om elk risico op oververhitting, bij bijvoorbeeld een drooggekookte pan, te vermijden. Bij een te hoge temperatuur wordt het vermogen van de kookzone/kookplaat automatisch verlaagd of schakelt de kookzone/kookplaat helemaal uit.
GEBRUIK Werking van de aanraaktoetsen Het bedienen van de kookplaat door middel van de aanraaktoetsen is even wennen als u andere bediening gewend bent. Leg uw vingertoppen plat op de toetsen voor het beste effect. U hoeft niet hard te drukken. De aanraaksensoren zijn zodanig ingesteld dat deze alleen reageren op de druk en het formaat van vingertoppen. De kookplaat is niet te bedienen met andere voorwerpen en zal bijvoorbeeld niet inschakelen als uw huisdier over de kookplaat loopt.
GEBRUIK Werking inductie In het toestel wordt een magnetisch veld opgewekt. Door een pan met een ijzeren bodem op een kookzone te plaatsen ontstaat in de panbodem een inductiestroom. Deze inductiestroom wekt warmte op in de panbodem. De spoel (1) in de kookplaat (2) wekt een magnetisch veld (3) op. Door een pan met een ijzeren bodem (4) op de spoel te plaatsen Comfortabel De elektronische regeling is nauwkeurig en eenvoudig in te stellen.
GEBRUIK Ventilator maakt geluid Om de levensduur van de elektronica te vergroten, is het apparaat voorzien van een ventilator. Als u het apparaat intensief gebruikt, wordt de ventilator ingeschakeld en hoort u een zoemend geluid. Ook nadat u het apparaat heeft uitgeschakeld, kan de ventilator nog geluid maken. Automatische inschakelfunctie Wanneer de automatisch inschakel functie (APD) actief is, is een tikkend geluid waarneembaar ook als de zone niet in gebruik is.
GEBRUIK Let op Wees voorzichtig met dunne plaatstaal geëmailleerde pannen: • op een hoge stand kan het emaille er afspringen wanneer de pan te droog is; • door het hoge vermogen kan de panbodem gemakkelijk kromtrekken. Let op Gebruik nooit pannen met een vervormde bodem. Een holle of bolle bodem kan de werking van de oververhittingsbeveiliging belemmeren. Het toestel kan dan te warm worden waardoor de glasplaat kan barsten en de panbodem kan smelten.
BEDIENING Inschakelen en vermogen instellen Het vermogen is in te stellen in 12 standen. Daarnaast is er nog een ‘boost’ stand. 1. Plaats een pan op het midden van een kookzone. 2. Druk op de sleuteltoets. Er klinkt een enkel geluidssignaal. 3. Druk op de aan-/uittoets van de gewenste kookzone. In de display verschijnt een knipperende ‘-’ en er klinkt een enkel geluidssignaal. Wanneer u geen verdere actie onderneemt, schakelt de kookzone na 10 seconden vanzelf uit. 4.
BEDIENING Boost De ‘boost’ functie kunt u gebruiken om gedurende een korte tijd (maximaal 10 minuten) op het hoogste vermogen te koken. Na het verstrijken van de maximale boosttijd wordt het vermogen verlaagd naar stand 12. Boost inschakelen 1. Zet een pan op een kookzone en schakel de kookzone in. 2. Druk direct na inschakeling een keer op de >> toets. In de display verschijnt stand 12 en ‘boost’.
BEDIENING HI8271MT Boost management L1 L2 De zones die samen op een fase zitten beinvloeden elkaar. De verdeling van de zones is hiernaast aangegeven. • Van de kookzones die samen op 1 fase aangesloten zijn kan er maximaal 1 op boost gezet worden. De eerst ingestelde boost zal blijven staan. • Indien alle drie de zones op 1 fase worden ingeschakeld is boost niet mogelijk. Bridgen van de Vario inductiezones De Vario inductiezones kunnen aan elkaar gebridged (gekoppeld)worden.
BEDIENING Uitschakelen Eén kookzone uitschakelen Druk op de aan-/uittoets van de kookzone die u wilt uitschakelen. Er klinkt een enkel geluidssignaal en de display dooft. • Indien alle kookzones op deze manier uitgeschakeld zijn staat de kookplaat automatisch in stand-by modus (zie ook ‘stand-by modus’). Alle kookzones tegelijk uitschakelen Druk kort op de sleuteltoets om alle kookzones gelijktijdig uit te schakelen. Er klinkt een enkel geluidssignaal.
BEDIENING De kookplaat naar eco stand-by modus schakelen • Druk kort op de sleuteltoets. Er klinkt een enkel geluidssignaal. De eco stand-by modus is actief, het rode lampje naast de sleuteltoets blijft langzaam aan en uit gaan. Vanuit de eco stand-by modus kunt u niet meteen beginnen met koken. Hiervoor moet de kookplaat eerst naar stand-by modus geschakeld worden.
BEDIENING Pauze Met de pauze functie kunt u de gehele kookplaat tijdens het koken gedurende 5 minuten ‘op pauze’ zetten. U kunt de kookplaat zo gedurende een korte tijd, op een veilige manier alleen laten of schoonmaken, zonder instellingen te verliezen. De kookplaat naar pauze modus schakelen • Druk éénmaal op de pauzetoets. Er klinkt een dubbel geluidssignaal, de kookzones gaan uit en het rode lampje naast de pauzetoets knippert. ▷ Eventueel ingestelde timers/kookwekkers staan stil.
BEDIENING Timer / Kookwekker De timer-/kookwekkertoets van elke kookzone heeft twee functies: De timerfunctie De kookwekkerfunctie Deze functie is te herkennen aan het rode pijltje naar boven. Deze functie is te herkennen aan het rode pijltje naar beneden. In de timerfunctie loopt de tijd op. In de kookwekkerfunctie telt de tijd af. De timer is niet te koppelen aan een kookzone. De kookwekker is te koppelen aan een kookzone. Dit houdt in dat de kookzone uitschakelt als de ingestelde tijd afgelopen is.
BEDIENING De kookwekker inschakelen 1. Druk éénmaal op de timer-/kookwekkertoets van de kookzone. 2. Druk op de + of - toets om van de timerfunctie naar de kookwekkerfunctie te schakelen. Daarna kunt met de + toets de gewenste kookduur instellen. Vervolgens kunt u met de - toets de ingestelde tijd aanpassen. Het rode pijltje naar beneden licht op. De tijd telt af. 3. Druk nogmaals op de timer-/kookwekkertoets om deze weer uit te schakelen.
BEDIENING Tip U kunt de + of - toets ingedrukt houden om sneller de gewenste kookduur in te stellen. Geluidssignaal in- en uitschakelen 1. Druk tweemaal op de meest linker aan-/uittoets. 2. Houd daarna tegelijkertijd de << toets en de + toets ingedrukt totdat u een geluidssignaal hoort. Het geluidssignaal is nu uitgeschakeld voor alle toetsbedieningen, behalve bij de pauzetoets en de sleuteltoets. Let wel: het kookwekker alarm en het geluidssignaal bij foutmeldingen zijn niet uit te schakelen. 3.
BEDIENING Automatische kookprogramma’s Uw kookplaat is voorzien van 6 automatische kookprogramma’s. De eventuele eindtijd van een automatisch kookprogramma kunt u zelf instellen met behulp van de kookwekkerfunctie (zie pagina 19). De kookprogramma’s zijn gebaseerd op gangbare hoeveelheden. De tabellen zijn bedoeld als richtlijn, door de ruime marges kunt u het gerecht naar uw eigen wensen aanpassen. Een automatisch kookprogramma instellen De kookzone is ingeschakeld. • Druk op de menutoets.
BEDIENING Deze functie kan alleen ingeschakeld worden als de kookplaat niet in gebruik is, om deze functie in te schakelen dienen eerst alle zones te worden uitgeschakeld. Met de meeste linker menu toets kan de functie worden geselecteerd. door de menu toets loslaten wanneer chef- indicatie (24) oplicht. Uitschakelen chef functie (HI9271MV) 1. Door middel van de eco-slot toets (3) schakelt de gehele kookplaat uit. 2.
BEDIENING (Aan)kookfunctie*/** Brengt de inhoud van de pan aan de kook (100 °C) en houdt deze aan de kook. Er klinkt een geluidssignaal als de inhoud aan de kook is of als het gerecht moet worden toegevoegd. Deze functie werkt alleen met deksel op de pan.
BEDIENING Sudderfunctie* De temperatuur van het gerecht wordt constant tegen het kookpunt (90 °C - 95 °C) aangehouden. De sudderstand werkt het beste met een deksel op de pan. Dikkere gerechten moeten elke 15 minuten omgeroerd worden. De maximale suddertijd is 8 uur, tenzij er met behulp van een timer een kortere tijd ingesteld is.
BEDIENING Wokfunctie*/** De wokstand zorgt voor een optimale woktemperatuur, zowel voor de olie als voor het wokken. Na het geluidssignaal is de pan op temperatuur, de olie kan in de pan en daarna het gerecht.
BEDIENING Grillfunctie*/** De grillstand zorgt voor een optimale grilltemperatuur. Er klinkt een geluidssignaal als de pan op temperatuur is.
BEDIENING Kookstanden Het onderstaande overzicht is uitsluitend bedoeld als leidraad, omdat de instelwaarde afhankelijk is van de hoeveelheid en samenstelling van het gerecht en de pan. Gebruik ‘boost’ en stand 11 en 12 voor: • snel aan de kook brengen; • slinken van bladgroenten • verhitten van olie en vet; • onder druk brengen van een snelkookpan; • wokken. Gebruik stand 9 en 10 voor: • aanbraden van vlees; • bakken van vis; • bakken van omeletten; • bakken van gekookte aardappelen; • frituren.
BEDIENING Gebruik stand 1 t/m 3 voor: • trekken van bouillon; • pocheren; • warmhouden; • bereiden van stoofvlees; • smoren van groenten; • smelten van chocolade; • smelten van kaas.
ONDERHOUD Reinigen Tip Schakel, voordat u met schoonmaken begint, eerst het kinderslot in. Dagelijkse reiniging • Hoewel overgekookt voedsel niet kan inbranden verdient het aanbeveling de kookplaat direct na gebruik schoon te maken. • Voor de dagelijkse reiniging kunt u het beste een mild reinigingsmiddel en een vochtige doek gebruiken. • Nadrogen met keukenpapier of een droge doek. Hardnekkige vlekken • Ook hardnekkige vlekken zijn met een mild reinigingsmiddel, bijvoorbeeld afwasmiddel, te verwijderen.
STORINGEN Algemeen Indien u een barstje of scheurtje (hoe klein ook) op de glasplaat ziet, schakel dan de kookplaat onmiddellijk uit, neem direct de stekker van de kookplaat uit het stopcontact, verbreek de (automatische) zekering(en) in de meterkast of zet de schakelaar in de meterkast op nul bij een vaste aansluiting. Neem vervolgens contact op met de servicedienst. Storingstabel Wanneer u twijfelt over de goede werking van uw inductiekookplaat betekent dit niet automatisch dat er een defect is.
STORINGEN NL 32 Symptoom Mogelijke oorzaak Oplossing Een kookzone stopt plotseling met de werking en er klinkt een signaal. De ingestelde timertijd is voorbij. Schakel het signaal uit door op de - of + toets van de timer te drukken. De kookplaat werkt niet en er verschijnt niets in de display. Geen stroomtoevoer door defecte voeding of foutieve aansluiting. Controleer de zekering of de elektrische schakelaar (bij een toestel zonder stekker).
TECHNISCHE GEGEVENS Technische gegevens Deze toestellen voldoen aan alle relevante CE richtlijnen. Kookplaattype Inductie Aansluiting Aantal fasen Max.
TECHNISCHE GEGEVENS Kookplaattype Inductie Aansluiting Aantal fasen Max.
TECHNISCHE GEGEVENS Kookplaattype Inductie HI9271M x HI9271MV x HI3271MV x Aansluiting 230V - 50Hz 230V - 50Hz 230V - 50Hz Aantal fasen Max.
MILIEUASPECTEN Afvoeren toestel en verpakking Bij de vervaardiging van dit toestel is gebruik gemaakt van duurzame materialen. Dit toestel moet aan het eind van zijn levenscyclus op verantwoorde wijze worden afgevoerd. De overheid kan u hierover informatie verschaffen. De verpakking van het toestel is recyclebaar. Gebruikt kunnen zijn: • karton; • polyethyleenfolie (PE); • CFK- vrij polystyreen (PS- hardschuim). Deze materialen dient u op verantwoorde wijze en conform de overheidsbepalingen af te voeren.
CONTENTS Your induction hob Introduction Control panel Description 4 5 6 Temperature safety Cooking-time limiter 8 8 Safety instructions Use Using the touch controls Induction cooking How does induction work Induction noises Pans 9 9 10 10 11 Switching on the hob and setting the power Residual warmth indicator Boost Two cooking zones behind each other HI8271MT Boost management How to bridge the Vario induction zones Switching off Stand-by modus Eco stand-by modus Child lock Pause Recognizing a mode Ti
YOUR INDUCTION HOB Introduction This hob has been designed for the real lover of cooking. Cooking on an induction hob has a number of advantages. It is easy, because the hob reacts quickly and can also be set to a very low power level. Because, moreover, it can also be set to a high power level, it can bring dishes to the boil very quickly. The ample space between the cooking zones makes cooking comfortable. Cooking on an induction hob is different from cooking on a traditional appliance.
YOUR INDUCTION HOB Control panel 24 23 22 21 20 19 18 1 2 3 4 5 6 7 1. 2. 3. 4. 5. 6. 7. 8. 9. 10. 11. 12. 13. 14. 15. 16. 17. 18. 19. 20. 21. 22. 23. 24.
YOUR INDUCTION HOB Description HI3271MV HI6271MV / HI6272MV 5 5 5 5 5 5 HI6271M / HI6271MI 1 2 3 2 1. Cooking zone Ø145 2,2 kW 2. Cooking zone Ø180 3,0 kW 3. Cooking zone Ø210 3,7 kW 4. Cooking zone Ø260 3,7 kW 5.
YOUR INDUCTION HOB HI7271IM HI8271MT 1 2 3 2 2 4 2 2 HI9271MV 5 5 5 5 5 2 HI9271M 4 2 2 2 2 5 EN 7
SAFETY Before use, read the separate safety instructions first! Temperature safety • A sensor continuously measures the temperature of certain parts of the hob. Every cooking zone is equipped with a sensor that measures the temperature of the bottom of the pan to avoid any risk of overheating when a pan boils dry. In case of temperatures rising too high, the power is reduced automatically or the hob switches off automatically.
USE Using the touch controls The touch controls may take some getting used to if you are used to other (rotary) controls. Place the tip of your finger flat on the control to achieve the best results. You do not have to apply any pressure. The touch sensors only react to the light pressure of a fingertip. Do not operate the controls with any other objects. The hob will not switch on when your pet walks over it.
USE How does induction work A magnetic field is generated in the appliance. By placing a pan with an iron base on a cooking zone, a current is induced in the pan base. This induced current generates heat in the base of the pan. The coil (1) in the hob (2) generates a magnetic field (3). By placing a pan with Easy The electronic controls are accurate and easy to set.
USE The fan is making noise To enlarge the lifespan of the electronics, the appliance is equiped with a fan. If you use the appliance intense, the fan is activated to cool down the appliance and you will hear a buzzing sound. The fan runs on for several minutes after the hob has been switched off. Automatic power-on function When the automatic power-on function (APD) is active, you will hear a ticking noise, even if the zone is not being used.
USE Attention Be careful with enamelled sheet-steel pans: • the enamel may chip (the enamel comes loose from the steel), if you switch the hob on at a high setting when the pan is (too) dry; • the base of the pan may warp - due, for example, to overheating or to the use of too high a power level. Attention Never use pans with a misshapen base. A hollow or rounded base can interfere with the operation of the overheating protection, so that the appliance becomes too hot.
OPERATION Switching on the hob and setting the power The cooking zones have 12 levels. Beside it there is a level ‘boost’. 1. Place a pan in the middle of a cooking zone. 2. Press the child lock button. You will hear a single beep. 3. Press the on/off button of the cooking zone concerned. A flashing ‘-’ appears in the display and you will hear a single beep. If no further action is taken, the cooking zone will automatically switch off after a few seconds. 4.
OPERATION Boost You can use the ‘boost’ function to cook at the highest power level during a short period of time (max.10 minutes). After the maximum boost time the power will be reduced to setting 12. Switching on ‘boost’ 1. Put a pan on a cooking zone. 2. Press the >> button immediately after you have switched on the zone. Level 12 and ‘boost’ appear in the display.
OPERATION HI8271MT Boost management The zones on the same phase affect each other. The division of the zones is given alongside. • A maximum of 1 of the cooking zones connected together to 1 phase can be set to boost. The first boost set will remain. • If all three zones on 1 phase are switched on, boost is not possible. L1 L2 How to bridge the Vario induction zones The Vario induction zones can be bridged (linked) to each other.
OPERATION Switching off Switching off one cooking zone Press the on/off button of the cooking zone you want to switch off. You will hear a beep and the level in the display disappears. • If all cooking zones have been switched off in this way, the hob will automatically be in the stand-by mode (also refer to ‘stand-by mode’). Switching off all cooking zones Press the child lock button to switch off all the cooking zones at the same time. You will hear a beep.
OPERATION Switching the hob to the eco stand-by mode • Press the child lock button. A will hear a single beep. The eco stand-by mode is active, the red light next to the child lock button keeps slowly going on and off. From the eco stand-by mode you can’t immediately start cooking. To be able to, the hob first needs to be switched to the stand-by mode.
OPERATION Pause With this pause function, you can set the entire hob to ‘pause’ for 5 minutes during cooking. In this way you can leave or clean the hob in a safe way during a short period of time, without losing settings. Switching the hob to the pause mode • Press the pause button once. You will hear a double beep, the settings change into a lower setting and the red light next to the pause button flashes. ▷ Any set timers/kitchen timers stop.
OPERATION Timer / Kitchen timer The timer/alarmclock button of each cooking zone has two functions: The timer function The kitchen timer function This function can be recognized by the red small arrow pointing up. This function can be recognized by the red small arrow pointing down. The time increases in the timer function. The time decreases in the kitchen timer function. The timer cannot be linked to a cooking zone. The kitchen timer can be linked to a cooking zone.
OPERATION Switching on the kitchen timer 1. Press the timer/alarmclock button of the cooking zone once. 2. Press the + or - button to switch from the timer function to the kitchen timer function. After that you can set the desired cooking time with the + button. Then you can change the set time with the - button. The red small arrow pointing down lights up. Time is counting down. 3. Press the timer/alarmclock button of the cooking zone again, to switch it off.
OPERATION Tip You can press and hold the + or - button to set the desired cooking time quicker. Switching on and off the beep 1. Press the on/off button on the far left twice. 2. Press and hold the << button and the + button simultaneously until you hear a beep. The beep is now switched off for all button operations, except for the pause button and the child lock button. Note: the kitchen timer alarm and the beep for error messages cannot be switched off. 3.
OPERATION Automatic cooking programs Your hob is fitted with 6 automatic cooking programs. You can set any end time of an automatic cooking program with the aid of the kitchen timer function (refer to page 22). The cooking programs are based on regular quantities. The tables are meant as a guideline, because of the large margins you can alter the dish according to your wishes. To set an automatic program The cooking zone is switched on. • Press the menu button.
OPERATION This function can only be switched on if the hob is not being used. To switch on this function, all zones first need to be switched off. With the far left-hand menu button, the function can be selected by releasing the menu button when the chef indicator (24) lights up. Switching off the chef function (HI9271MV) 1. By means of the eco-lock button (3), the whole hob can be switched off. 2. Using the on/off buttons (6): This switches off the chef function; all zones are deactivated.
OPERATION Boiling function*/** This function brings the content of the pan to a boil (100 °C) and keeps it boiling. A beep can be heard when the content is cooking or if the food has to be added. This function works only with the lid on the pan. Dish Cooked potatoes Cooked (hard) vegetables Number of people Quantity Pan Zone 1-3 200 - 500 g Saucepan (Ø 200) Ø 145 / HI8271MT Ø 180 3-5 500 - 800 g Low pan (Ø 200) Ø 180 1,5 l incl.
OPERATION Simmering fucntion* The temperature of the dish is constantly kept near the boiling point (90 °C - 95 °C). The simmer setting works best with a lid on the pan. Thicker dishes have to be stirred every 15 minutes. The maximum simmering time is 8 hours, unless a shorter time has been set with the aid of a timer.
OPERATION Wok function*/** The wok setting provides an optimal wok temperature, for both the oil and the wok. After the beep the pan has reached its temperature, the oil can be put in the pan and then the dish.
OPERATION Grill function*/** The grill setting provides the optimal grilling temperature. A beep can be heard when the pan has reached its temperature.
OPERATION Cooking settings Because the settings depend on the quantity and composition of the contents of the pan, the table below is intended as a guideline only. Use setting ‘boost’ and setting 11 and 12 to: • bring the food or liquid to the boil quickly; • ‘shrink’ greens; • heat oil and fat; • bring a pressure cooker up to pressure; • wok Use setting 9 and 10 to: • sear meats; • cook fish; • cook omelettes; • fry boiled potatoes; • deep fry foods.
OPERATION Use settings 1-3 to: • simmer bouillon; • stew meats; • simmer vegetables; • melt chocolate; • poach; • keep warm; • melt cheese.
MAINTENANCE Cleaning Tip Set the child lock before you start cleaning the hob. Daily cleaning • Although food spills cannot burn into the glass, we nevertheless recommend you to clean the hob immediately after use. • Best for daily cleaning is a damp cloth with a mild cleaning agent. • Dry with kitchen paper or a dry teacloth. Stubborn stains • Stubborn stains can also be removed with a mild cleaning agent such as washing-up liquid. • Remove water marks and lime scale with vinegar.
TROUBLESHOOTING General If you notice a crack in the glass top (however small), switch the hob off immediately, unplug the hob, turn off the (automatic) fuse switch(es) in the meter cupboard or, in the event of a permanent connection, set the switch in the power supply lead to zero.) Contact the service department. Troubleshooting table If the appliance does not work properly, this does not always mean that it is defective.
TROUBLESHOOTING EN 32 Symptom Possible cause Solution A cooking zone suddenly stops working and you hear a signal. The preset time has ended. Switch the bleep off by pressing the + or - button of the timer. The hob is not working and nothing appears in the display. There is no power supply due to a defective cable or a faulty connection. Check the fuses or the electric switch (if there is no plug). A fuse blows as soon as the hob is switched on. The hob has been wrongly connected.
TECHNICAL DETAILS Technical details This appliance complies with all relevant CE directives.
TECHNICAL DETAILS Hob type Induction Connection Phases Maximum capacity cooking zones Middle left Front left Rear left Rear right Front right Connected load L1 L2 L3 Total connected load (Building in) dimensions Appliance width x depth Build-in height from top of worktop Cut-out width x depth Minimal distance cut-out to back wall Minimal distance cut-out to side wall EN 34 HI7271M x 230V - 50Hz 2 HI8271MT x 230V - 50Hz 2 3,7 kW (Ø210) 2,2 kW (Ø145) 3 kW (Ø180) 3 kW (Ø180) 3,7 kW (Ø260) 3 kW (Ø180) 3 k
TECHNICAL DETAILS Hob type Induction Connection Phases Maximum capacity cooking zones Front left Rear left Front middle Rear middle Front right Rear right Connected load L1 L2 L3 Total connected load (Building in) dimensions Appliance width x depth Build-in height from top of worktop Cut-out width x depth Minimal distance cut-out to back wall Minimal distance cut-out to side wall HI9271M x 230V - 50Hz 3 HI9271MV x 230V - 50Hz 3 HI3271MV x 230V - 50Hz 1 3,7 kW (Ø260) 3 kW (Ø180) 3 kW (Ø180) 3 kW (Ø180)
ENVIRONMENTAL ASPECTS Disposal of packaging and appliance In the manufacturing of this appliance durable materials were used. Make sure to dispose of this equipment responsibly at the end of its lifecycle. Ask the authorities for more information regarding this. The appliance packaging is recyclable. The following may have been used: • cardboard; • polythene film (PE); • CFC-free polystyrene (PS hard foam). Dispose of these materials in a responsible manner and in accordance with government regulations.