
Operation Manual

setting up _21
0
1
S
ETTIN
G
U
P
I
N
S
T
A
LL
IN
G
T
HE
WAT
E
R
D
IS
PE
N
S
E
R
L
IN
E
)
RU
([W
H
UL
RU
P
RGHO
P
a
rt
s
f
o
r w
a
t
e
r lin
e
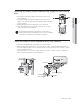
I
n
s
t
a
ll
a
ti
o
n
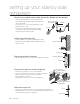
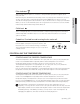
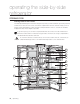
C
onnectin
g
to the water supply lin
e
C
onnect the water pipe with coupler and tap.
1
.
C
lose the main water ta
p
.
2.
C
onnect cou
p
ler “A” to the ta
p.
&$87,21
The water line must be connected to the cold
water pipe. If it is connected to the hot water
pipe, it may cause the purifier to malfunction.
:DWHU
O
LQ
H
Ƃ
[HU DQG
VFUHZ
V
3L
S
H
FRQQHFWR
U
:
DWH
U
OLQH
3XULƂH
U
3X
U
LƂH
U
O
RF
N
F
OLS
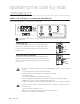
:$55$17<,1)250$7,21
This water line installation is not covered by the
refrigerator or ice maker manufacturer’s warranty.
Follow these instructions carefully to minimise the risk of
expensive water damage.
1RWH
If the coupler does not fit on the current tap, go
the nearest authorised service dealer and purchase the
right couplers fittings.
TAP
CO
UPLER
S
IDE
OF
PURIFIER
WATER INLET
S
IDE
O
F PURIFIER
L
INE
OU
TLE
T
GH
J
UH
H
PURIFIER
WATER
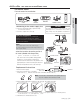
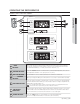
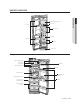
select the location where the
p
urifier is
to install.
(
Model with the
p
urifier
)
-
If
you w
i
s
h
to reassem
bl
e t
h
e water
i
n
l
et
and outlet sides of the purifier durin
g
purifier
i
nstallation
,
see the reference illustration.
-
C
ut the water line attached to the
p
urifier to the
appropr
i
ate p
l
ace a
f
ter measur
i
n
g
t
h
e
di
stance
b
etween t
h
e pur
ifi
er an
d
t
h
e co
ld
water tap.
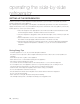
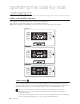
R
ep
l
acement
I
ns
tr
uc
t
io
n
s
1
.
S
hut off water supply.
2. Note the Flow direction on the filter
.
3
. Insert water su
pp
l
y
tube into the inlet side of the filter until the tube sto
p.
4. After insertin
g
tube, put to
g
ether the clip stron
g
ly. The Clip fix the tube
.
5
.
T
urn on t
h
e water an
d
c
h
ec
k
f
or
l
ea
k
s.
If
l
ea
k
s occur, repeat step 1,2,3,4.
If
l
ea
k
s pers
i
st,
di
scont
i
nue use an
d
ca
ll
your support
i
n
g
d
ea
l
er.
6. Flush filter for 5 minutes before use
.
WATER
S
UPPL
Y
INLET
S
IDE
PERMEAT
F
L
O
W DIRE
C
TI
ON
1RWHYou must also ensure that the cut is square and not at
any sort of angle as this could cause a leak
CAUTION
Locking Clip
Insert Locking Clip After
tube seated