gebruiksaanwijzing stoomoven SQ4211T SQ4292T SQ4311T SQ4392T
Inhoud Bedieningspaneel . . . . . . . . . . . . . . . . . . . . . . . . . . . . . . . . . . . . . . . . . . . . . . . . . . . . . . . . . . 4 Toestelbeschrijving . . . . . . . . . . . . . . . . . . . . . . . . . . . . . . . . . . . . . . . . . . . . . . . . . . . . . . . . . 5 Accessoires . . . . . . . . . . . . . . . . . . . . . . . . . . . . . . . . . . . . . . . . . . . . . . . . . . . . . . . . . . . . . . . 6 In gebruikname . . . . . . . . . . . . . . . . . . . . . . . . . . . . . . . . . . . . . . . .
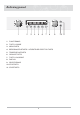
Bedieningspaneel 1 2 3 4 5 6 7 8 1. FUNCTIEKNOP 2. TOETS ‘VORIGE’ 3. MENUTOETS 4. BEREIDINGSTIJDTOETS / UITGESTELDE STARTTIJD TOETS 5. TEMPERATUURTOETS 6. GEWICHTTOETS 7. TOETS ‘VOLGENDE’ 8. DISPLAY 9. SELECTIEKNOP 10. STOPTOETS 11.
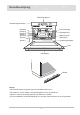
Toestelbeschrijving Bedieningspaneel Verwarmingselementen Ventilator Niveau 6 Niveau 5 Niveau 4 Niveau 3 Niveau 2 Ovenverlichting Stoomopening Waterreservoir (Watertank) Condensopvangbak Niveau 1 Deur Handgreep Lekbak Let op ● De inschuifniveaus zijn genummerd van beneden naar boven. ● De niveaus 4, 5 en 6 worden voornamelijk gebruikt voor de grillfunctie. ● Niveau 1 wordt voornamelijk gebruikt voor bakken en braden.
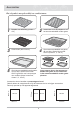
Accessoires Het volgende is meegeleverd bij uw combi-steamer: 1 Bakplaat met teflonlaag (niveau 1 of 6) 2 Inzetrooster voor de bakplaat of voor het stoomovenbakblik zonder gaten 3 Ovenrooster (alle niveau’s) 4 Groot stoomovenbakblik met gaten, 40 mm diep, Gastro-Norm-maat GN 2/3 (niveau 2, 3, 4 en 5) 5 Groot stoomovenbakblik zonder gaten, 40 mm diep, Gastro-Norm-maat GN 2/3 (geschikt voor het opvangen van condens tijdens het stomen, niveau 2, 3, 4 en 5) Om te stomen kunt u het stoomovenbakblik me
In gebruikname Bedankt voor de aanschaf van deze ATAG combi-steamer. Deze handleiding bevat belangrijke veiligheidsvoorschriften en essentiële informatie over het gebruik en het onderhoud van uw nieuwe combi-steamer. Lees deze handleiding zorgvuldig voordat u het apparaat gebruikt en bewaar haar als naslagwerk voor toekomstig gebruik. Voor de installatie Milieuvriendelijk afvoeren Pak het apparaat uit en voer de verpakking op een milieuvriendelijke manier af.
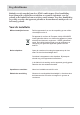
In gebruikname (vervolg) Veiligheidsvoorschriften Dit apparaat is alleen voor huishoudelijk gebruik bestemd. Gebruik het uitsluitend voor het bereiden van gerechten. Hete oven • Dit apparaat is niet bedoeld om te worden gebruikt door personen (waaronder kinderen) met een verminderd fysiek, zintuiglijk of mentaal vermogen, of gebrek aan ervaring en kennis, tenzij zij onder toezicht staan of instructies krijgen over het gebruik van het apparaat door een persoon die verantwoordelijk is voor hun veiligheid.
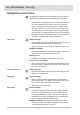
In gebruikname (vervolg) Belangrijke aanwijzingen voor het gebruik Geopende ovendeur Gebruik de geopende ovendeur nooit als vlak om iets op te zetten. Bewaar geen gerechten in het apparaat. Toebehoren Maak alleen gebruik van het meegeleverde toebehoren. Dit is speciaal op uw apparaat afgestemd. Bakvormen moeten hitte- en stoombestendig zijn. Siliconen bakvormen zijn niet geschikt voor gecombineerd gebruik van hetelucht en stoom. Gebruik geen vormen die roestplekken vertonen.
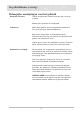
In gebruikname (vervolg) Oorzaken van schade Sterk vervuilde afdichting Als de afdichting aan de buitenkant van de oven sterk is vervuild, sluit de ovendeur niet goed. De aangrenzende voorzijden van meubels kunnen worden beschadigd. Houd de afdichting schoon. Ovendeur als zitting Ga nooit op de ovendeur zitten of staan. Transport Draag en houd het apparaat niet vast aan de deurgreep. De deurgreep houdt op den duur het gewicht van het apparaat niet en kan afbreken.
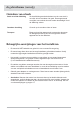
Waterreservoir vullen Wanneer u de deur van de combi-steamer opent, ziet u rechts het waterreservoir. Vul het reservoir alleen met vers leidingwater. Bevat het water teveel kalk, dan kunt u ook gebruik maken van onthard water (zie ook “Waterhardheid”). Let op! Giet geen gedestilleerd water of andere vloeistoffen in het waterreservoir. Voor gebruik het waterreservoir altijd vullen! Til het waterreservoir over de vergrendeling en trek het vervolgens uit het apparaat.
Betekenis van knoppen en toetsen Nadat u op de Menutoets hebt gedrukt, kunt u verschillende instellingen kiezen door aan de Selectieknop te draaien. Kies een instelling, druk op de Toets ‘Volgende’ om de keuze te bevestigen en u kunt vervolgens weer verschillende instellingen kiezen door aan de Selectieknop te draaien. In de tabel hieronder ziet u welke instellingen u kunt kiezen. Menu Tijd Uren/Minuten (zie pag.
Betekenis van knoppen en toetsen (vervolg) Uitgestelde starttijd / Druk in, houdt drie seconden vast De uitgestelde starttijd gaat knipperen Bevestig, de uitgestelde starttijd stopt met knipperen Stel de uitgestelde starttijd in Als de toets ‘Bereidingstijd’of ‘Temperatuur’ wordt ingedrukt, kunt u deze instellingen (indien beschikbaar) aanpassen (ze gaan knipperen) Temperatuur / De temperatuur knippert Bevestig, de temperatuur stopt met knipperen Stel de temperatuur in Als de toets ‘Bereidingstij
Betekenis van knoppen en toetsen (vervolg) Als u een functie heeft gekozen met de Functieknop, kunt u wederom verschillende instellingen aanpassen of instellen door aan de Selectieknop te draaien. Automenu Automenu Selecteer een categorie en druk op ‘Verder’ ter bevestiging Selecteer een gerecht-item en druk op ‘Verder’ ter bevestiging Zie pag.
Betekenis van knoppen en toetsen (vervolg) Hetelucht Hetelucht Druk om de bereidingstijd/uitgestelde starttijd/ temperatuur aan te passen Stel de bereidingstijd/uitgestelde starttijd/ temperatuur in Bevestig Start Grill Druk om de bereidingstijd/uitgestelde starttijd aan te passen Stel de bereidingstijd/ uitgestelde starttijd in Bevestig Start Ontdooien Druk om de bereidingstijd/uitgestelde starttijd/ temperatuur aan te passen Stel de bereidingstijd/uitgestelde starttijd/ temperatuur in Bevest
Betekenis van knoppen en toetsen (vervolg) Als u ‘Automenu’ kiest door aan de Functieknop te draaien of als u op de Menutoets drukt, ziet u tekst in de display. Tevens verschijnen er bepaalde symbolen in de display, waarvan u de uitleg hieronder in de tabel vindt.
Voordat u begint De taal en de tijd instellen Wanneer het toestel voor de eerste keer op het elektriciteitsnet wordt aangesloten, moet u eerst de taal en de tijd instellen. aan de Selectieknop om de taal kunt u de huidige tijd instellen. Het 1 Draai 2 Nu in te stellen. Druk op de Starttoets ter kloksymbool ‘ ’ en ‘12’ knipperen. bevestiging. de tijd instellen op 1:30. 3 Voorbeeld: Draai aan de Selectieknop om het op de Toets ‘Volgende’ om te 4 Druk bevestigen. Het kloksymbool ‘ ‘ en uur in te stellen.
Voordat u begint (vervolg) Aanwijzingen 1) Tijdens het bereiden van gerechten kunnen de bereidingstijd, uitgestelde starttijd en/of temperatuur altijd aangepast worden. ► Bereidingstijd: druk op de Bereidingstijdtoets , draai aan de Selectieknop en druk nogmaals op de Bereidingstijdtoets ter bevestiging (zie pag. 21). ► Uitgestelde starttijd: druk op de Bereidingstijdtoets en houdt deze 3 sekonden vast, draai aan de Selectieknop en druk nogmaals op de Bereidingstijdtoets ter bevestiging (zie pag. 22).
Functies en instellingen De volgende tabel geeft een overzicht van de verschillende functies en instellingen van uw combi-steamer. Gebruik de kooktabellen als richtlijn bij het koken. Stomen Het gerecht wordt bereid met stoom. De stoomgeneratoren wekken stoom op die met regelmatige tussenpozen in de ovenruimte wordt gespoten. Gebruik deze functie voor het stomen van bijvoorbeeld groenten, vis, eieren, fruit en rijst. Zorg er bij deze functie altijd voor dat het reservoir gevuld is met vers water.
Functies en instellingen (vervolg) Grillen Het gerecht wordt verwarmd door de bovenste verwarmingselementen. Gebruik deze functie voor het grillen van kleinere stukken vlees (bijvoorbeeld biefstuk of worstjes) en voor het roosteren van brood. Ontdooien Het ontdooien van bevroren gerechten gebeurt met behulp van stoom. De stoomgeneratoren wekken stoom op die met regelmatige tussenpozen in de ovenruimte wordt gespoten. Gebruik deze fucntie voor bevroren vlees, gevogelte, vis en fruit.
De bereidingstijd aanpassen Voorbeeld: de bereidingstijd aanpassen in de stoomfunctie de Functieknop naar de positie tijd en het ‘bereidingstijdsymbool’ 1 Draai 2 De ‘Stomen’ (standaard bereidingstijd knipperen. 20 min. temperatuur 100 °C). Druk op de Bereidingstijdtoets. Draai aan de Selectieknop om de 3 gewenste bereidingstijd in te stellen op de Starttoets. De combi4 Druk steamer start. en druk op de Bereidingstijdtoets ter bevestiging.
De uitgestelde starttijd instellen Voorbeeld: de uitgestelde starttijd instellen (2 uur) in de stoomfunctie Draai de Functieknop naar de positie huidige tijd en het ‘uitgestelde 1 ‘Stomen’ 2 De (standaard bereidingstijd starttijdsymbool’ knipperen. 20 min. temperatuur 100 °C).Druk op de Bereidingstijdtoets en houdt deze drie seconden vast. aan de Selectieknop om de ziet u ‘Programma begint 3 Draai 4 Inover’de endisplay de uitgestelde starttijd die uitgestelde starttijd (2 uur) in te stellen aftelt.
Gebruik van de stoomfunctie Stoomoven instellen het waterreservoir tot de marde Functieknop naar de positie 1 Vul 2 Draai kering ‘max’ met vers water en plaats ‘Stomen’ (standaard bereidingstijd het reservoir weer terug. Zet daarna het gerecht in de oven. 20 min. temperatuur 100 °C). u wilt, kunt u de bereidingstijd, uitop de Starttoets. De combi3 Als 4 Druk gestelde starttijd en/of de temperatuur steamer start. instellen (indien beschikbaar). Zie pag. 21 en 22.
Gebruik van de stoomfunctie (vervolg) Stomen Het gerecht wordt bereid met stoom. De stoomgeneratoren wekken stoom op die met regelmatige tussenpozen in de ovenruimte wordt gespoten. Het stoomovenbakblik met gaten wordt meestal, samen met het stoomovenbakblik zonder gaten, op niveau geplaatst. Kooktabel Gebruik de instellingen en bereidingstijden in onderstaande tabel als richtlijn voor het stomen. Vul voor het stomen altijd het waterreservoir met vers water tot de markering ‘max’.
Gebruik van de stoomfunctie (vervolg) Stomen (°C ) Accessoires (niveau) Tijd (min.
Gebruik van de hetelucht + stoomfunctie De Hetelucht + Stoomfunctie het waterreservoir tot de marDraai de Functieknop naar de positie 1 Vul 2 ‘Hetelucht kering ‘max’ met vers water en plaats + Stomen’ (standaard het reservoir weer terug. Zet daarna het gerecht in de oven. temperatuur 180 °C). u wilt, kunt u de bereidingstijd, uitDruk op de Starttoets. De combi3 Als 4 steamer gestelde starttijd en/of de temperatuur start. instellen (indien beschikbaar). Zie pag. 21 en 22.
Gebruik van de hetelucht + stoomfunctie (vervolg) Combi stomen Het gerecht wordt bereid met behulp van de verwarmingselementen, de ventilator en de stoomfunctie. De stoomgeneratoren wekken stoom op die met regelmatige tussenpozen in de ovenruimte wordt gespoten. De bakplaat of het ovenrooster wordt meestal op niveau geplaatst. Kooktabel Gebruik de instellingen en bereidingstijden in onderstaande tabel als richtlijn voor het bakken en braden.
Gebruik van de opwarmfunctie Opwarmen het waterreservoir tot de marde Functieknop naar de positie 1 Vul 2 Draai kering ‘max’ met vers water en plaats ‘Opwarmen’ (standaard bereidingshet reservoir weer terug. Zet daarna het gerecht in de oven. tijd: 20 min.). u wilt, kunt u de bereidingstijd, en/ op de Starttoets. De combi4 Druk 3 Als of uitgestelde starttijd instellen (indien steamer start. beschikbaar). Zie pag. 21 en 22.
Gebruik van de hetelucht functie Hetelucht de Functieknop naar de positie u wilt, kunt u de bereidingstijd, uit1 Draai 2 Als ‘Hetelucht’ (standaard temperatuur gestelde starttijd en/of de temperatuur 180 °C). instellen (indien beschikbaar). Zie pag. 21 en 22. Druk op de Starttoets. De combi3 steamer start. Voorverwarmen overslaan Als u begint te koken in de hetelucht functie, ziet u ‘Voorverwarmen’ in de display staan.
Gebruik van hetelucht (vervolg) Hetelucht Het gerecht wordt bereid met behulp van de verwarmingselementen, terwijl de ventilator aan de zijkant de warmte gelijkmatig verdeelt. Plaats de bakplaat of het ovenrooster op niveau . Kooktabel Gebruik de instellingen en bereidingstijden in onderstaande tabel als richtlijn voor het bakken. Gerecht Hetelucht (°C ) Accessoires (niveau) Tijd (min.
Gebruik van de grillfunctie Grillen de Functieknop naar de positie u wilt, kunt u de bereidingstijd, en/ 1 Draai 2 Als ‘Grillen’ (standaard bereidingstijd of uitgestelde starttijd instellen (indien 5 min.). beschikbaar). Zie pag. 21 en 22. Druk op de Starttoets. De combi3 steamer start. Belangrijk 1) Controleer of de verwarmingselementen in horizontale positie staan. 2) Gebruik altijd ovenwanten of pannenlappen als u gerechten uit de oven haalt.
Gebruik van de grillfunctie (vervolg) Grillen Het gerecht wordt verwarmd door de bovenste verwarmingselementen. Plaats voor het grillen de bakplaat, eventueel met inzetrooster, op niveau . Gebruik het stoomovenbakblik zonder gaten op niveau . Kooktabel Gebruik de instellingen en bereidingstijden in onderstaande tabel als richtlijn voor het grillen. Gerecht Functie Accessoires (niveau) Tijd (min.
Gebruik van het Automenu In het Automenu kunt u kiezen uit verscheidene gerechten die verdeeld zijn in 14 categoriën. In de lijst hieronder ziet u welke categorieën er zijn. De automatische programma’s hebben voorgeprogrammeerde bereidingstijden. U hoeft de tijd en de temperatuur niet in te stellen. U kunt in het Automenu ook kiezen voor ‘Eigen gerechten’ (zie pagina 47) of ‘Meerfase koken’ (zie pagina 45). Categorieën: 1. 2. 3. 4. 5. 6. 7. 8. 9. 10. 11. 12. 13. 14.
Gebruik van het Automenu (vervolg) De automatische programma’s hebben voorgeprogrammeerde bereidingstijden. U hoeft de tijd en de temperatuur niet in te stellen. Draai de Functieknop naar de positie Draai aan de Selectieknop om een 1 ‘Auto’. 2 automenu categorie te kiezen (zie de tabellen op pag. 35-44). Druk op de Toets ‘Volgende’ om de instelling te bevestigen. aan de Selectieknop om een 3 Draai voedsel item te kiezen.
Gebruik van het Automenu (vervolg) In de volgende tabellen ziet u de verschillende gerechten items die bij de 12 categorieën horen. De hoeveelheden zijn aangegeven waarop het programma is gebaseerd en aanbevelingen om het beste resultaat te krijgen. Vul het waterreservoir met vers water tot de markering ‘max’. Gebruik altijd ovenwanten of pannenlappen als u het gerecht uit de combi-steamer haalt. Categorie: Groenten Voedsel Item Bloemkool Sub-item Gewicht (kg) Accessoires (niveau) Roosjes 0.2-0.
Gebruik van het Automenu (vervolg) Categorie: Bijgerechten Voedsel Item Sub-item Gewicht (kg) Heel 0.2-0.8 Accessoires (niveau) Stoomovenbakblik met gaten samen met stoomovenbakblik zonder gaten (3) Leg de hele (geschilde) aardappelen (ongeveer 100 gram per stuk) in het stoomovenbakblik. Aardappelen gestoomd Half 0.2-0.8 Stoomovenbakblik met gaten samen met stoomovenbakblik zonder gaten (3) Leg de halve (geschilde) aardappelen (ongeveer 50 gram per stuk) in het stoomovenbakblik. Kriel 0.2-0.
Gebruik van het Automenu (vervolg) Categorie: Vlees Voedsel Item Sub-item Gewicht (kg) Accessoires (niveau) Rood-rosé 1.1-1.3 Inzetrooster met bakplaat (1) Kruid de rosbief met olie en kruiden (zout moet pas na het braden worden toegevoegd). Plaats de rosbief op de bakplaat met inzetrooster. Draai de rosbief om bij het piepsignaal van de oven. Druk op de Starttoets om het proces voort te zetten. Na het braden moet de rosbief in aluminiumfolie worden verpakt. Laat het vlees 15 minuten rusten.
Gebruik van het Automenu (vervolg) Voedsel Item Sub-item Gewicht (kg) Accessoires (niveau) 0.3-0.6 Inzetrooster met stoomovenbakblik (4) Saucijsjes/Worstjes Plaats de saucijsjes/worstjes naast elkaar in het midden van het inzetrooster. (Gebruik niveau 5 voor een extra bruin resultaat). Draai de saucijsjes/worstjes om bij het piepsignaal van de oven. Druk op de Starttoets om het proces voort te zetten. Hamburgers Plaats rauwe hamburgers naast elkaar op het inzetrooster.
Gebruik van het Automenu (vervolg) Voedsel item Kipsaté Sub-item Gewicht (kg) Accessoires (niveau) 0.3-0.5 Inzetrooster met bakplaat (6) Kruid de kipsaté met olie en kruiden (max. maat van de kipstukjes 3 x 3 cm). Leg de kipsaté in het midden op het inzetrooster. Draai de kipsaté om bij het piepsignaal van de oven. Druk op de Starttoets om het proces voort te zetten. Categorie: Vis Voedsel item Visfilet, 2 cm Sub-item Gewicht (kg) Gestoomd 0.2-1.
Gebruik van het Automenu (vervolg) Categorie: Deegwaren Voedsel item Sub-item Gewicht (kg) Accessoires (niveau) Wit brood 0.7-0.8 Ovenrooster (1) Bereid het deeg voor volgens de instructies op het pak. Doe het deeg in een rechthoekig metalen bakblik (lengte 30 cm). Zet, na het voorverwarmen, het bakblik (evenwijdig aan de deur) op het ovenrooster. Brood Rijzen gistdeeg 0.3-0.6 Ovenrooster (1) Bereid het deeg voor pizza, cake of brood. Plaats dit in een grote, ronde hittebestendige schaal.
Gebruik van het Automenu (vervolg) Category: Schotels Voedsel item Gratin Sub-item Gewicht (kg) Accessoires (niveau) Aardappelgratin 0.7-1.0 Ovenrooster (1) Gebruik een glazen of ovenvaste schaal. Zet de schaal op het ovenrooster. Groentegratin 0.4-0.8 Ovenrooster (1) Gebruik een glazen of ovenvaste schaal. Zet de schaal op het ovenrooster. 0.8-1.1 Ovenrooster (1) Lasagne Gebruik een rechthoekige/viekante ovenvaste schaal. Zet de schaal op het ovenrooster.
Gebruik van het Automenu (vervolg) Voedsel item Chocolade smelten Gedroogd fruit wellen Sub-item Gewicht (kg) Accessoires (niveau) Puur 0.1-0.3 Ovenrooster (1) Vul het waterreservoir met vers water tot de markering ‘max’. Breek pure chocolade of kook chocolade in stukken. Doe de stukken chocola in een klein, glazen ovenschaaltje en bedek dit met plasticfolie. Plaats het schaaltje op het ovenrooster. Bedek het schaaltje het gehele programma. Na de bereidingstijd goed roeren.
Gebruik van het Automenu (vervolg) Voedsel item Diepvries fruit Bevroren maaltijd Sub-item Gewicht (kg) Rood fruit 0.2-0.6 Accessoires (niveau) Stoomovenbakblik met gaten samen met stoomovenbakblik zonder gaten (3) Verdeel het fruit in een stoomovenbakblik. Dit programma is geschikt voor alle soorten gesneden fruit en klein heel fruit zoals rood fruit. 0.8-1.2 Ovenrooster (1) Plaats de maaltijd (zonder verpakking) op het ovenrooster.
Gebruik van het Automenu (vervolg) Categorie: Kant en klaar Voedsel item Sub-item Gewicht (kg) Accessoires (niveau) Pizza 0.3-0.35 0.4-0.45 Bakplaat (1) Plaats de bevroren pizza op de bakplaat. Ovenfriet 0.4-0.45 Bakplaat (1) Verdeel de bevroren frites (geschikt voor het bereiden in de oven) gelijkmatig over de bakplaat. Vissticks 0.3-0.5 Bakplaat (1) Verdeel de vissticks over de bakplaat. Aardappelkroketten 0.4-0.
Gebruik van de functie ‘Meerfase koken’ De functie ‘Meerfase koken’ kiest u als u meerdere functies achter elkaar wilt gebruiken. U kunt twee of drie fasen instellen en het is mogelijk om het hele proces op te slaan als een ‘Eigen gerecht’ (zie pag. 47: ‘Eigen gerechten opslaan’). Meerfase koken de Functieknop naar de positie aan de Selectieknop om ‘Meer1 Draai 2 Draai ‘Auto’. fase koken’ te kiezen. Druk op de Toets ‘Volgende’ ter bevestiging.
Gebruik van de functie ‘Meerfase koken’ (vervolg) op de Toets ‘Volgende’ om 7 deDrukinstelling voor de tweede fase Druk op de Toets ‘Volgende’ om de 8 instelling te bevestigen. te bevestigen. In de display ziet u ‘Derde fase’ en ‘Druk start’. Kies met de Selectieknop ‘Derde fase’ als u een derde fase wilt toevoegen of kies “Druk start’ als u het meerfase koken wilt starten. Ga naar stap 9 als u een derde fase wilt toevoegen. Ga naar stap 12 als u het meerfase koken met twee fasen wilt starten.
Sla uw eigen gerecht op U kunt 10 ‘eigen gerechten’ programmeren en bewaren. Een ‘eigen gerecht’ opslaan op de Menutoets en draai aan 1 Druk de Selectieknop om ‘Gerechten’ te op de Toets ‘Volgende’ ter 2 Druk bevestiging. Draai aan de Selectie- kiezen. knop om ‘Toevoegen’ te kiezen. op de Toets ‘Volgende’ ter 3 Druk bevestiging. In de display ziet u ‘Kies de display ziet u ‘Kies bereiding’ en 4 Indaarna de verschillende ovenfuncties. Draai aan de Selectieknop om de gewenste ovenfunctie te kiezen.
Sla uw eigen gerecht op (vervolg) Druk op de Toets ‘Volgende’ ter 7 bevestiging. Draai aan de Selectie- u wilt, kunt u de bereidingstijd 8 Als en/of de temperatuur instellen (indien knop om de gewenste ovenfunctie te kiezen voor de tweede fase. Druk op de Toets ‘Volgende’ ter bevestiging. beschikbaar). Zie pag. 21 en 22. Druk op de Toets ‘Volgende’ ter 9 bevestiging. Draai aan de Selectie- op de Toets ‘Volgende’ ter 10 Druk bevestiging.
Een ‘eigen gerecht’ kiezen Draai de Functieknop naar de positie Draai aan de Selectieknop om ‘Eigen 1 ‘Auto’. 2 gerechten’ te kiezen. Druk op de Toets ‘Volgende’ ter bevestiging. Draai aan de Selectieknop om uw 3 eigen gerecht te kiezen. Druk op de het waterreservoir tot de marke4 Vul ring ‘max’ met vers water als u het Starttoets om het bereiden van uw eigen gerecht in de combi-steamer te starten. symbool in de display ziet en plaats het reservoir weer terug. Zet daarna het gerecht in de oven.
Een ‘eigen gerecht’ verwijderen op de Menutoets en draai aan 1 Druk de Selectieknop om ‘Gerechten’ te Druk op de Toets ‘Volgende’ ter 2 bevestiging. Draai aan de Selectie- kiezen. knop om ‘Verwijderen’ te kiezen. Druk op de Toets ‘Volgende’ ter 3 bevestiging. Draai aan de Selectie- Druk op de Toets ‘Volgende’ ter 4 bevestiging. Draai aan de Selectie- knop om uw eigen gerecht te kiezen. knop om ‘Verwijderen’ te kiezen. Druk op de Toets ‘Volgende’ ter 5 bevestiging.
Gebruik van de ontdooifunctie Ontdooien het waterreservoir tot de marke1 Vul ring ‘max’ met vers water en plaats de Functieknop naar de positie 2 Draai ‘Ontdooien’ (standaard bereidings- het reservoir weer terug. Zet daarna het gerecht in de oven. tijd 20 min. temperatuur 50 °C). u wilt, kunt u de bereidingstijd, uitop de Starttoets. De combi3 Als 4 Druk gestelde starttijd en/of de temperatuur steamer start. instellen (indien beschikbaar). Zie pag. 21 en 22.
Gebruik van de ontdooifunctie (vervolg) Ontdooien Gebruik de instellingen en bereidingstijden in onderstaande tabel als richtlijn voor het ontdooien. Vul voor het ontdooien altijd het waterreservoir met vers water tot de markering ‘max’. Verwijder al het verpakkingsmateriaal voordat u gaat ontdooien! Laat na ontdooien het gerecht 15 tot 30 minuten op kamertemperatuur staan, zodat de warmte zich gelijkmatig kan verdelen. Gerecht Ontdooien (°C ) Accessoires (niveau) Tijd (min.
Gebruik van de warmhoudfunctie Warmhouden Draai de Functieknop naar de positie u wilt, kunt u de bereidingstijd en/ 1 ‘Warmhouden’ 2 Als (standaard bereiof uitgestelde starttijd instellen (indien dingstijd 5 min.). beschikbaar). Zie pag. 21 en 22. Druk op de Starttoets. De combi3 steamer start.
De waterhardheid instellen Het is nodig om regelmatig de combi-steamer te ontkalken. Op deze manier voorkomt u dat het apparaat wordt aangetast door kalk. Er verschijnt automatisch een symbool in de display van de combi-steamer wanneer u moet ontkalken. Het apparaat is ingesteld op water met de hoogst mogelijke hardheidsgraad (4). Als uw water zachter is, kunt u de ingestelde hardheidsgraad veranderen.
Ontkalken Als u het symbool in de display ziet, moet de combi-steamer ontkalkt worden. het waterreservoir met 100 ml 1 Vul ontkalker die u bij de combi-steamer de deksel en plaats het water2 Sluit reservoir terug. heeft gekregen en vul aan tot de markering ‘max’ met vers water. Meng dit goed door elkaar. Druk op de Menutoets en draai de 3 Selectieknop naar ‘Schoonmaken’. op Toets ‘Volgende’ ter beves4 Druk tiging. Draai de Selectieknop naar ‘Ontkalken’. de Starttoets.
Ontkalken (vervolg) het ontkalken klaar is, klinkt er 7 Als een signaal. Leeg het lekbakje en het waterreservoir en spoel het waterreservoir goed om met water. Open de deur en droog de binnenkant van de ovenruimte met een droge doek. Belangrijk • • • • Wij adviseren om voor het ontkalken NOKALK/DLS te gebruiken. NOKALK/DLS is een ontkalkingsmiddel dat zeer efficiënt is en uitsluitend uit natuurlijke, volledig afbreekbare ingrediënten bestaat, en dat niet corrosief, agressief en milieuvriendelijk is.
Gebruik van de Steam Clean functie De Steam Clean functie maakt het mogelijk om in 10 minuten uw combi-steamer van binnen te reinigen. Het stoomproces duurt 7 minuten. De resterende 3 minuten worden gebruikt om de stoom goed in te laten werken, zodat u naderhand de achtergebleven etensresten makkelijk kunt wegvegen met een zachte doek. het waterreservoir tot de marop de Menutoets en draai de 1 Vul 2 Druk kering ‘max’ met vers water en plaats Selectie Knop naar ‘Schoonmaken’. de tank weer terug.
Reinigen en onderhoud 2 1 Reinigen van de grillelementen ► De grillelementen kunnen makkelijk worden schoongemaakt door ze een kwartslag naar links of rechts te draaien (zie afbeelding). Vergeet niet de grillelementen naar hun oorspronkelijke positie terug te draaien nadat u ze hebt gereinigd. 2 Reinigen van de ovenruimte ► Verwijder de linker- en rechter inschuifroosters door ze eerst aan de voorkant op te tillen (1). Beweeg ze nu naar het midden toe (2) en trek ze vervolgens naar u toe.
Reinigen en onderhoud (vervolg) 3 Reinigen buitenkant, bedieningspaneel en ovenruit ► Reinig de buitenkant met een vochtige doek en een sopje van afwasmiddel. Wrijf het oppervlak na met een schone, droge doek. ► Reinig het bedieningspaneel niet met kracht. U zou het kunnen beschadigen. ► Reinig de ovenruit met een vochtige doek en een sopje van afwasmiddel. Droog de ovenruit met een schone, droge doek.
Reinigen en onderhoud (vervolg) Ovendeur verwijderen Om het reinigen te vergemakkelijken kunt u de ovendeur verwijderen. Grijp niet in de scharnieren. U zou zich kunnen verwonden. 1. Open de ovendeur volledig. 2. Klap de vergrendelingen aan de linker- en rechterzijde naar boven. 3. Sluit de ovendeur half. Houd de bovenkant van de ovendeur aan weerszijden met twee handen vast. Sluit de ovendeur nog iets meer en trek hem rechtstandig omhoog uit de scharnieren.
Ovenlamp vervangen Ovenlamp vervangen en reinigen van de glazen beschermkap 1. Draai de glazen beschermkap, tegen de klok in, los. 2. Verwijder zowel de metalen ring als de blikken ring en reinig de glazen kap. 3. Vervang indien noodzakelijk de lamp door een nieuwe (25 W, 230 V, 300 °C warmte bestendige) ovenlamp. 4. Plaats de beschermkap en de ringen in omgekeerde volgorde terug.
Storingscodes Storingscode Beschrijving TEMP SENSOR OPEN Storingscode verschijnt indien de waarde van de temperatuursensor minder dan 5 °C bedraagt tijdens gebruik/ beëindiging programma. TEMP SENSOR SHORT Storingscode verschijnt indien de waarde van de temperatuursensor meer dan 250 °C bedraagt tijdens gebruik/beëindiging programma. UNFINISHED PREHEAT Storingscode verschijnt indien de combi-steamer niet de ingestelde temperatuur heeft bereikt na een bepaalde tijd.
Technische Specificaties Type SQ4211TUU / SQ4292TUU Elektrische aansluiting 230 V ~ 50 Hz Aansluitwaarde Maximaal vermogen Grill Hetelucht Stoom 3200 W 1530 W 2050 W 1700 W - 2200 W Koeling Koelventilator Afmetingen (W x H x D) Toestel Ovenruimte (netto) 595 x 460 x 473 mm 400 x 215 x 385 mm Inhoud netto Inhoud bruto 30 liter 36 liter Gewicht Netto Incl. verpakking ca. 25 kg ca.
Het toestel-identificatieplaatje bevindt zich aan de binnenkant van het toestel. La plaque d’identification de l’appareil se trouve sur l’intérieur de l’appareil. Das Gerätetypenschild befindet sich an der Innenseite des Gerätes. The appliance identification card is located on the inside of the appliance. Plak hier het toestel-identificatieplaatje. Placez ici la plaque d’identification de l’appareil. Kleben Sie hier das Gerätetypenschild ein. Stick the appliance identification card here.