User Manual Dishwasher Benutzerinformation Geschirrspüler VA63211VT
CONTENTS Safety information Safety instructions Product description Control panel Programmes Settings Options 2 3 5 6 6 8 11 Before first use Daily use Hints and tips Care and cleaning Troubleshooting Technical information 12 13 15 16 18 19 Subject to change without notice. SAFETY INFORMATION Before the installation and use of the appliance, carefully read the supplied instructions. The manufacturer is not responsible if an incorrect installation and use causes injuries and damages.
by clients in hotels, motels, bed & breakfast and other residential type environments. Do not change the specification of this appliance. The operating water pressure (minimum and maximum) must be between 0.5 (0.05) / 8 (0.8) bar (Mpa) Obey the maximum number of 15 place settings. If the supply cord is damaged, it must be replaced by the manufacturer, its Authorised Service Centre or similarly qualified persons in order to avoid a hazard.
• This appliance complies with the E.E.C. Directives. • Only for UK and Ireland. The appliance has a 13 amp mains plug. If it is necessary to change the fuse in the mains plug, use fuse: 13 amp ASTA (BS 1362). Water connection • Make sure not to cause damage to the water hoses. • Before you connect the appliance to new pipes or pipes not used for a long time, let the water flow until it is clean. • The first time you use the appliance, make sure that there is no leakage.
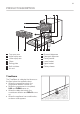
PRODUCT DESCRIPTION 1 2 3 13 12 11 1 2 3 4 5 6 7 10 9 8 Top spray arm Upper spray arm Lower spray arm Filters Rating plate Salt container Air vent TimeBeam The TimeBeam is a display that shows on the floor below the appliance door. • When the programme starts, the programme duration comes on. • When the programme is completed, 0:00 and CLEAN come on. • When the delay start starts, the countdown duration and DELAY come on. • When the appliance has a malfunction, an alarm code appears.
CONTROL PANEL 1 1 2 3 4 5 2 3 On/off button Display Delay button Program button ExtraHygiene button 4 6 7 8 9 5 6 7 8 9 TIME SAVER button Multitab button AutoOpen button Indicators Indicators Indicator Description End indicator. Salt indicator. It is always off while the programme operates. Rinse aid indicator. It is always off while the programme operates.
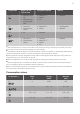
Programme Degree of soil Type of load Programme phases Options P4 • Normal or light soil • Delicate crockery and glassware • Wash 45 °C • Rinses • Dry • Multitab • Fresh soil • Crockery and cutlery • Wash 60 °C • Rinses • ExtraHygiene • Multitab • All • Prewash • Normal soil • Crockery and cutlery • • • • P5 4) P6 5) P7 6) Prewash Wash 50 °C Rinses Dry • Multitab 1) With this programme you have the most efficient use of water and energy consumption for crockery and cutlery with normal
Water (l) Energy (kWh) Duration (min) P5 10 0.9 30 P6 4 0.1 14 P7 9 - 10 1.0 - 1.2 219 - 229 Programme 1) 1) The pressure and the temperature of the water, the variations of the mains supply, the options and the quantity of dishes can change the values. Information for test institutes For all the necessary information for test performance, send an email to: Write down the product number (PNC) that is on the rating plate. info.test@dishwasher-production.
your area. Your local water authority can advise you on the hardness of the water in your area. It is important to set the right level of the water softener to assure good washing results. Water hardness German degrees (°dH) French degrees (°fH) mmol/l Clarke degrees Water softener level 47 - 50 84 - 90 8.4 - 9.0 58 - 63 10 43 - 46 76 - 83 7.6 - 8.3 53 - 57 9 37 - 42 65 - 75 6.5 - 7.5 46 - 52 8 29 - 36 51 - 64 5.1 - 6.4 36 - 45 7 23 - 28 40 - 50 4.0 - 5.
indicators , , , and start to flash and the display is blank. 2. Press . • The indicators , , and go off. • The indicator continues to flash. • The display shows the current setting: e.g. = level 4. – The levels of rinse aid are from 0A to 6A. – Level 0 = no rinse aid is released. 3. Press again and again to change the setting. 4. Press the on/off button to confirm the setting. Use of rinse aid and multitablets The factory setting of the rinse aid dispenser is with the dispenser activated.
How to set the colour of the TimeBeam The appliance must be in programme selection mode. It is possible to change the colour of the TimeBeam to match the colour of the kitchen floor. There are several colours available. The TimeBeam can also be deactivated. 1. To enter the user mode, press and hold until the simultaneously and indicators , , , and start to flash and the display is blank. 2. Press . • The indicators , , and go off. • The indicator continues to flash.
The display shows the updated programme duration. ExtraHygiene With this option you have better hygiene results. During the last rinsing phase, the temperature stays at 70 °C for at least 10 minutes. How to activate ExtraHygiene Press , the related indicator comes on If the option is not applicable to the programme, the related indicator does not come on or it flashes quickly for a few seconds and then goes off. The display shows the updated programme duration.
The salt container CAUTION! Only use salt specifically designed for dishwashers. The salt is used to recharge the resin in the water softener and to assure good washing results in the daily use. How to fill the salt container Water and salt can come out from the salt container when you fill it. Risk of corrosion. To prevent it, after you fill the salt container, start a programme. How to fill the rinse aid dispenser A B 1. Turn the cap of the salt container counterclockwise and remove it. 2.
Using the detergent A B C CAUTION! Only use detergent specifically designed for dishwashers. 1. Press the release button (A) to open the lid (C). 2. Put the detergent, in powder or tablets, in the compartment (B). 3. If the programme has a prewash phase, put a small quantity of detergent on the inner part of the appliance door. 4. Close the lid. Make sure that the lid locks into position.
Cancelling the delay start while the countdown operates Make sure that there is detergent in the detergent dispenser before you start a new programme. When you cancel the delay start you have to set the programme and options again. End of programme Press and hold simultaneously and until the appliance is in programme selection mode. When the programme is completed and you open the door, the appliance is automatically deactivated. Cancelling the programme Close the water tap.
What to do if you want to stop using multi-tablets Before you start to use separately detergent, salt and rinse aid do the following procedure. 1. Set the highest level of the water softener. 2. Make sure that the salt and rinse aid containers are full. 3. Start the shortest programme with a rinsing phase. Do not add detergent and do not load the baskets. 4. When the programme is completed, adjust the water softener according to the water hardness in your area. 5.
C B A 1. Turn the filter (B) counterclockwise and remove it. 2. Remove the filter (C) out of filter (B). 3. Remove the flat filter (A). 4. Wash the filters. 5. Make sure that there are no residues of food or soil in or around the edge of the sump. 6. Put back in place the flat filter (A). Make sure that it is correctly positioned under the 2 guides. 7. Reassemble the filters (B) and (C). 8. Put back the filter (B) in the flat filter (A). Turn it clockwise until it locks.
CAUTION! An incorrect position of the filters can cause bad washing results and damage to the appliance. Cleaning the spray arms Do not remove the spray arms. If the holes in the spray arms are clogged, remove remaining parts of soil with a thin pointed object. External cleaning • Clean the appliance with a moist soft cloth. • Only use neutral detergents. • Do not use abrasive products, abrasive cleaning pads or solvents.
Once you have checked the appliance, deactivate and activate the appliance. If the problem occurs again, contact an Authorised Service Centre. For alarm codes not described in the table, contact an Authorised Service Centre. The washing and drying results are not satisfactory Problem Possible solution There are whitish streaks or bluish layers on glasses and dishes. • The release quantity of rinse aid is too much. Adjust the rinse aid selector to a lower position.
ENVIRONMENT CONCERNS Recycle the materials with the symbol . Put the packaging in applicable containers to recycle it. Help protect the environment and human health and to recycle waste of electrical and electronic appliances. Do not dispose appliances marked with the symbol with the household waste. Return the product to your local recycling facility or contact your municipal office.
INHALTSVERZEICHNIS Sicherheitsinformationen Sicherheitsanweisungen Gerätebeschreibung Bedienfeld Programme Einstellungen Optionen 21 22 24 25 26 28 31 Vor der ersten Inbetriebnahme Täglicher Gebrauch Tipps und Hinweise Reinigung und Pflege Fehlersuche Technische Daten 32 34 35 37 39 40 Änderungen vorbehalten. SICHERHEITSINFORMATIONEN Lesen Sie vor der Montage und dem Gebrauch des Geräts zuerst die Gebrauchsanleitung.
Bauernhöfe, Personalküchenbereiche in Geschäften, Büros und anderen Arbeitsumfeldern. – Für Gäste in Hotels, Motels, Pensionen und anderen wohnungsähnlichen Räumlichkeiten. Nehmen Sie keine technischen Änderungen am Gerät vor. Der Betriebswasserdruck (Mindest- und Höchstdruck) muss zwischen 0.5 (0.05) / 8 (0.8) bar (Mpa) liegen Beachten Sie, dass die Höchstzahl an Maßgedecken 15 beträgt.
Elektrischer Anschluss WARNUNG! Brand- und Stromschlaggefahr. • Das Gerät muss geerdet sein. • Stellen Sie sicher, dass die elektrischen Daten auf dem Typenschild den Daten Ihrer Stromversorgung entsprechen. Wenden Sie sich andernfalls an eine Elektrofachkraft. • Schließen Sie das Gerät nur an eine ordnungsgemäß installierte Schutzkontaktsteckdose an. • Verwenden Sie keine Mehrfachsteckdosen oder Verlängerungskabel. • Achten Sie darauf, Netzstecker und Netzkabel nicht zu beschädigen.
Entsorgung WARNUNG! Verletzungs- und Erstickungsgefahr. • Trennen Sie das Gerät von der Stromversorgung. • Schneiden Sie das Netzkabel ab, und entsorgen Sie es. • Entfernen Sie das Türschloss, um zu verhindern, dass sich Kinder oder Haustiere in dem Gerät einschließen.
BEDIENFELD 1 1 2 3 4 5 2 3 Taste „Ein/Aus“ Display Delay Taste Program Taste ExtraHygiene Taste 4 6 7 8 9 5 6 7 8 9 TIME SAVER Taste Multitab Taste AutoOpen Taste Kontrolllampen Kontrolllampen Kontrolllampe Beschreibung Kontrolllampe Programmende Kontrolllampe Salz Sie erlischt während des Programmbetriebs. Kontrolllampe Klarspülmittel Sie erlischt während des Programmbetriebs.
PROGRAMME Programm Verschmutzungsgrad Beladung Programmphasen Optionen P1 • Normal verschmutzt • Geschirr und Besteck • • • • • • • • • Alle • Geschirr, Besteck, Töpfe und Pfannen • Vorspülen • Hauptspülgang von 45 °C bis 70 °C • Spülgänge • Trocknen • ExtraHygiene • Multitab • Stark verschmutzt • Geschirr, Besteck, Töpfe und Pfannen • • • • • TIME SAVER • Multitab • Normal oder leicht verschmutzt • Empfindliches Geschirr und Gläser • Hauptspülgang 45 °C • Spülgänge • Trocknen • Multitab
Programm Verschmutzungsgrad Beladung Programmphasen Optionen P7 • Normal verschmutzt • Geschirr und Besteck • • • • • Multitab 6) Vorspülen Hauptspülgang 50 °C Spülgänge Trocknen 1) Dieses Programm gewährleistet den wirtschaftlichsten Wasser- und Energieverbrauch für normal verschmutztes Geschirr und Besteck. (Dies ist das Standardprogramm für Prüfinstitute.) 2) Das Gerät erkennt den Verschmutzungsgrad und die Anzahl der Geschirrteile in den Körben.
Informationen für Prüfinstitute info.test@dishwasher-production.com Möchten Sie Informationen zum Leistungstest erhalten, schicken Sie eine EMail an: Notieren Sie die Produktnummer (PNC), die Sie auf dem Typenschild finden. EINSTELLUNGEN Programmwahlmodus und Benutzermodus Wenn Sie das Gerät einschalten, befindet es sich normalerweise im Programmwahlmodus.
Deutsche Wasserhärtegrade (°dH) Französische Wasserhärtegrade (°fH). mmol/l Clarke Wasserhärtegrade Einstellung für den Wasserenthärter 23 - 28 40 - 50 4.0 - 5.0 28 - 35 6 19 - 22 33 - 39 3.3 - 3.9 23 - 27 5 1) 15 - 18 26 - 32 2.6 - 3.2 18 - 22 4 11 - 14 19 - 25 1.9 - 2.5 13 - 17 3 4 - 10 7 - 18 0.7 - 1.8 5 - 12 2 <4 <7 <0.7 <5 1 2) 1) Werkseitige Einstellung 2) Verwenden Sie kein Salz bei diesen Werten.
– Stufe 0 = Es wird kein Klarspülmittel zugegeben. 3. Drücken Sie wiederholt, um die Einstellung zu ändern. 4. Drücken Sie die Taste „Ein/Aus“ zum Bestätigen der Einstellung. Gebrauch des Klarspülmittels mit Multi-Reinigungstabletten Werkseitig ist der Klarspülmittel-Dosierer eingeschaltet. Dies bedeutet, dass der Klarspülmittel-Dosierer immer Klarspülmittel freigibt. Es besteht die Möglichkeit, den Klarspülmittel-Dosierer auszuschalten.
Einstellen der Farbe von TimeBeam Das Gerät muss sich im Programmwahlmodus befinden. Sie können die Farbe von TimeBeam ändern, um sie an die Farbe Ihres Küchenbodens anzupassen. Es sind verschiedene Farben verfügbar. Der TimeBeam lässt sich auch ausschalten. 1. Halten Sie zum Aufrufen des Benutzermodus gleichzeitig und gedrückt, bis die Kontrolllampen , , , und blinken und das Display nichts anzeigt. 2. Drücken Sie . • Die Kontrolllampen , , und erlöschen. • Die Kontrolllampe blinkt weiter.
Einschalten von TIME SAVER Drücken Sie , die entsprechende Kontrolllampe leuchtet auf. Ist die Option nicht mit dem Programm kombinierbar, leuchtet die entsprechende Kontrolllampe nicht oder sie blinkt ein paar Sekunden schnell und erlischt dann. Das Display zeigt die aktualisierte Programmdauer an. ExtraHygiene • Während der Trockenphase wird die Gerätetür von einer besonderen Vorrichtung einen Spaltbreit geöffnet. • Am Programmende werden Vorrichtung und Tür zurückgezogen.
in Ihrem Gebiet entspricht. Wenn nicht, stellen Sie die Wasserenthärterstufe ein. 2. Füllen Sie den Salzbehälter. 3. Füllen Sie den Klarspülmittel-Dosierer. 4. Öffnen Sie den Wasserhahn. 5. Starten Sie ein Programm, um Fertigungsrückstände, die sich möglicherweise noch im Gerät befinden können, zu beseitigen. Verwenden Sie kein Reinigungsmittel und beladen Sie die Körbe nicht. Wenn Sie ein Programm starten, kann es bis zu 5 Minuten dauern das Filterharz des Wasserenthärters zu regenerieren.
Tuch auf, um zu große Schaumbildung zu vermeiden. 4. Schließen Sie den Deckel. Achten Sie darauf, dass der Deckel einrastet. Füllen Sie den KlarspülmittelDosierer auf, wenn die Füllstandsanzeige für den Klarspüler (A) durchsichtig wird. TÄGLICHER GEBRAUCH 1. Öffnen Sie den Wasserhahn. 2. Drücken Sie die Taste Ein/Aus, um das Gerät einzuschalten. Stellen Sie sicher, dass sich das Gerät im Programmwahlmodus befindet. • Füllen Sie den Salzbehälter auf, wenn die Kontrolllampe Salz leuchtet.
Die Programmnummer wird etwa 3 Sekunden lang im Display angezeigt, anschließend erscheint die Programmdauer. 4. Stellen Sie die verfügbaren Optionen ein. 5. Schließen Sie die Gerätetür, um das Programm zu starten. Starten eines Programms mit Zeitvorwahl 1. Wählen Sie ein Programm. 2. Drücken Sie die Taste wiederholt, bis im Display die gewünschte Zeitvorwahl angezeigt wird (zwischen 1 und 24 Stunden). Die Kontrolllampe der Zeitvorwahl leuchtet auf. 3.
Reinigungstabletten (z.B. „3in1“, „4in1“, „All-in-1“) verwenden. Befolgen Sie die Anweisungen auf der Verpackung. • Stellen Sie je nach Beladung und Verschmutzungsgrad das passende Programm ein. Mit dem Programm ECO erhalten Sie den wirtschaftlichsten Energie- und Wasserverbrauch für Geschirr und Besteck mit normaler Verschmutzung. Verwendung von Salz, Klarspülund Reinigungsmittel • Verwenden Sie nur Salz, Klarspüler und Reinigungsmittel für Geschirrspüler. Andere Produkte können das Gerät beschädigen.
Vor dem Starten eines Programms Kontrollieren Sie folgende Punkte: • Die Filter sind sauber und ordnungsgemäß eingesetzt. • Der Deckel des Salzbehälters ist fest geschlossen. • Die Sprüharme sind nicht verstopft. • Geschirrspülsalz und Klarspülmittel sind vorhanden (außer Sie verwenden MultiReinigungstabletten). • Die Geschirrteile sind richtig in den Körben angeordnet. • Das Programm eignet sich für die Beladung und den Verschmutzungsgrad. • Die Reinigungsmittelmenge stimmt. Entladen der Körbe 1.
2. Nehmen Sie den Filter (C) aus dem Filter (B). 3. Entfernen Sie den flachen Filter (A). 7. Bauen Sie die Filter (B) und (C) wieder zusammen. 8. Setzen Sie den Filter (B) in den flachen Filter (A) ein. Drehen Sie ihn nach rechts, bis er einrastet. 4. Reinigen Sie die Filter. ACHTUNG! Eine falsche Anordnung der Filter führt zu schlechten Spülergebnissen und kann das Gerät beschädigen. 5. Achten Sie darauf, dass sich keine Lebensmittelreste oder Verschmutzungen in oder um den Rand der Wanne befinden. 6.
Reinigung des Geräteinnenraums Kalkablagerungen im Gerät führen. Um dieses zu vermeiden, wird empfohlen, mindestens zweimal im Monat Programme mit langer Laufzeit zu verwenden. • Reinigen Sie das Gerät und die Gummidichtung der Tür sorgfältig mit einem weichen, feuchten Tuch. • Wenn Sie regelmäßig Kurzprogramme verwenden, können diese zu Fett- und FEHLERSUCHE Das Gerät startet nicht oder bleibt während des Betriebs stehen.
Wenden Sie sich an einen autorisierten Kundendienst, wenn Alarmcodes angezeigt werden, die nicht in der Tabelle angegeben sind. Die Spül- und Trocknungsergebnisse sind nicht zufriedenstellend Problem Mögliche Abhilfe Weiße Streifen oder blau schimmernder Belag auf Gläsern und Geschirr. • Die zugegebene Klarspülmittelmenge ist zu hoch. Stellen Sie den Dosierwähler für Klarspülmittel niedriger ein. • Die Reinigungsmittelmenge ist zu hoch. Wasserflecken und andere Flecken auf Gläsern und Geschirr.
UMWELTTIPPS Recyceln Sie Materialien mit dem Symbol mit diesem Symbol nicht mit dem Hausmüll. Bringen Sie das Gerät zu Ihrer örtlichen Sammelstelle oder wenden Sie sich an Ihr Gemeindeamt. . Entsorgen Sie die Verpackung in den entsprechenden Recyclingbehältern. Recyceln Sie zum Umwelt- und Gesundheitsschutz elektrische und elektronische Geräte.
When contacting the service department, have the complete type number to hand. Halten Sie die vollständige Typennummer bereit, wenn Sie mit der Kundendienstabteilung Kontakt aufnehmen. You will find the addresses and phone numbers of the service organisation on the guarantee card. Adressen und Telefonnummern der Kundendienstorganisation finden Sie auf der Garantiekarte.