
User's Manual


ATake Digital Technology ShenZhen Co., Ltd.
Wireless Optical Mouse User Manual (Rechargeable)
ATake Co., Ltd. ♦ 7F., No. 123, Li-de Street, Jhonghe City, Taipei Country 235, Taiwan ♦ WWW.ATAKE.COM
886 2 2221 4999 ♦ sales@atake.com
- 3 -
To start using Wireless Mouse
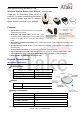
1. Battery Installation
1) Open the battery compartment of the mouse by
one-push button.
2) Insert two AAA 1.2V 600mA NiMH
Re-chargeable batteries into the compartment.
Make sure to comply with the polarity markings.
3) Close the battery compartment back onto the
mouse again until you hear it click into place.
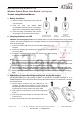
2. Charging the Mouse via USB
AMW-300, the Rechargeable model can be charged while in use; this means the mouse can be used at
all times, even when the batteries are not charged. However, we recommend always charging the mouse
when is not being used.
1) Connect the cable’s USB connector into an available USB port on your
computer.
2) Connect the charge plug to the DC jack on the rear of the mouse (under the
one-touch button).
3) The battery charging LED lights remain “on” while charging. When charging
is complete, the lights turn “off”.
NOTE:
1. To continuously charge the mouse via the USB charge cable, your computer must be on and awake. For
best results, turn off your computer’s power management feature while charging the mouse.
2.
AMW-300 can be powered by rechargeable batteries (AAA/1.2V x 2), USB powered from PCs (5±0.25V), or DC powered
from an optional power adapter (5V/1A, Ø3.5mm
positive center coax plug).
3.
There are two conditions if the LED starts blinking: (1) the mouse is connected with USB charge cable
while no batteries installed in the compartment; (2) the mouse is powered from PC via USB charge cable
and the fully charged batteries are installed at the same time, the LED will start blinking after working a
while.
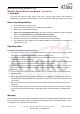
3. Establishing a connection between the mouse and the RF receiver
The following steps have to be carried out within 15 seconds if a successful connection is to be
established between the mouse and the RF receiver. Ensure that the mouse is no further than 1.5m away
from the RF receiver.
1) Connect the RF receiver to any free USB port on your
computer. The Plug & Play function of your system will
automatically detect that a new device has been connected.
The mouse will not yet be ready to use at this stage.
2) First, press the Connect button on the receiver that shown
as step 1.
3) Then, press the Connect button on the bottom side of the
mouse as step 2.
4) After a few seconds your mouse will be ready for use.
DC Jack